Page 49 of 94

Periodic maintenance an d a djustment
6-5
6
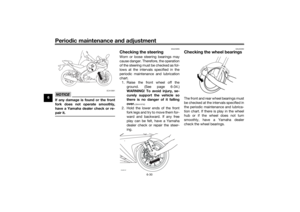
11 *Wheel bearin gs • Check bearing for looseness or
damage. √√√√
12 *Swin
garm pivot
b earin gs • Check operation and for exces-
sive play. √√√√
• Lubricate with lithium-soap- based grease. Every 24000 km (14000 mi)
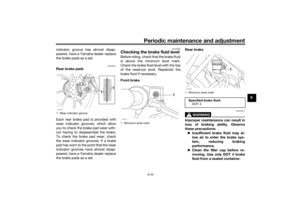
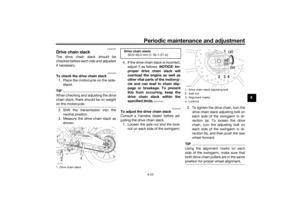
13 Drive chain • Check chain slack, alignment and
condition.
• Adjust and lubricate chain with a special O-ring chain lubricant
thoroughly. Every 1000 km (600 mi) and after washing the motorcycle, riding in the rain or
riding in wet areas
14 *Steerin g b earin gs • Check bearing assemblies for
looseness. √√√√
• Moderately repack with lithium- soap-based grease. √
15 *Chassis fasteners • Make sure that all nuts, bolts and
screws are properly tightened. √√√√√
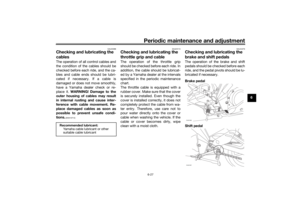
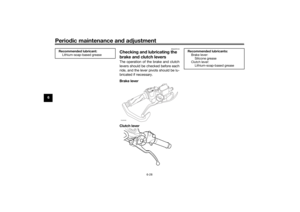
16 Brake lever pivot
shaft
• Lubricate with silicone grease.
√√√√√
17 Brake ped
al pivot
shaft • Lubricate with lithium-soap-
based grease. √√√√√
18 Clutch lever pivot
shaft • Lubricate with lithium-soap-
based grease. √√√√√
19 Shift pe
dal pivot
shaft • Lubricate with lithium-soap-
based grease. √√√√√
NO. ITEM CHECK OR MAINTENANCE JOB
ODOMETER READING
ANNUAL
CHECK
1000 km
(600 mi) 6000 km
(3500 mi) 12000 km
(7000 mi) 18000 km
(10500 mi) 24000 km
(14000 mi)
UB5GE2E0.book Page 5 Thursday, July 30, 2020 3:08 PM
Page 50 of 94

Periodic maintenance an d a djustment
6-6
6
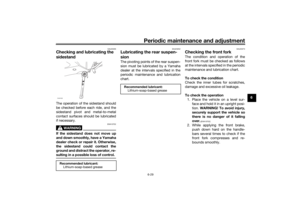
20 Si destan d • Check operation.
• Lubricate with lithium-soap-
based grease. √√√√√
21 *Sidestan d switch • Check operation and replace if
necessary. √√√√√√
22 *Front fork • Check operation and for oil leak-
age.
• Replace if necessary. √√√√
23 *Shock a
bsor ber as-
sem bly • Check operation and for oil leak-
age.
• Replace if necessary. √√√√
24 *Rear suspension re-
lay arm an
d con-
nectin g arm
pivotin g points • Check operation.
√√√√
• Lubricate with lithium-soap- based grease. √√
25 En gine oil • Change (warm engine before
draining).
• Check oil level and vehicle for oil leakage. At the initial interval and
every 3000 km (1800 mi) thereafter. √
26 En
gine oil filter ele-
ment • Replace.
√√√√√
27 *Coolin g system • Check coolant level and vehicle
for coolant leakage. √√√√√
• Change. Every 3 years
28 *Front an
d rear
b rake switches • Check operation.
√√√√√√
29 *Movin
g parts an d
cab les • Lubricate.
√√
√√√
NO. ITEM CHECK OR MAINTENANCE JOB
ODOMETER READING
ANNUAL
CHECK
1000 km
(600 mi) 6000 km
(3500 mi) 12000 km
(7000 mi) 18000 km
(10500 mi) 24000 km
(14000 mi)
UB5GE2E0.book Page 6 Thursday, July 30, 2020 3:08 PM
Page 51 of 94
Periodic maintenance an d a djustment
6-7
6
EAU72750
TIP The air filter needs more frequent service if you are riding in unusually wet or dusty areas.
Hydraulic brake service
• Regularly check and, if necessary, correct the brake fluid level.
• Every two years replace the internal components of the brake master cylinders and calipers, and change the brake fluid.
• Replace the brake hoses every four years and if cracked or damaged.30 *Throttle g
rip hous-
in g an d ca ble • Check operation and free play.
• Adjust the throttle cable free play
if necessary.
• Lubricate the throttle grip housing and cable. √√√√√
31 *Li
ghts, si gnals an d
switches • Check operation.
• Adjust headlight beam.
√√√√√√
NO. ITEM CHECK OR MAINTENANCE JOB
ODOMETER READING
ANNUAL
CHECK
1000 km
(600 mi) 6000 km
(3500 mi) 12000 km
(7000 mi) 18000 km
(10500 mi) 24000 km
(14000 mi)
UB5GE2E0.book Page 7 Thursday, July 30, 2020 3:08 PM
Page 52 of 94

Periodic maintenance an d a djustment
6-8
6
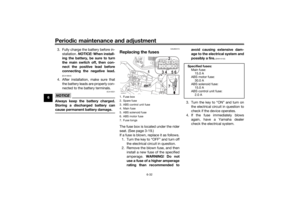
EAU18782
Removin g an d installin g cowl-
in gsThe cowlings shown need to be re-
moved to perform some of the mainte-
nance jobs described in this chapter.
Refer to this section each time a cowl-
ing needs to be removed and installed.
EAUM4041
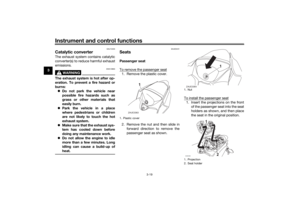
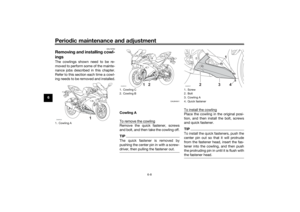
Cowlin g A
To remove the cowlingRemove the quick fastener, screws
and bolt, and then take the cowling off.TIPThe quick fastener is removed by
pushing the center pin in with a screw-
driver, then pulling the fastener out.
To install the cowlingPlace the cowling in the original posi-
tion, and then install the bolt, screws
and quick fastener.TIPTo install the quick fasteners, push the
center pin out so that it will protrude
from the fastener head, insert the fas-
tener into the cowling, and then push
the protruding pin in until it is flush with
the fastener head.
1. Cowling AZAUM1616
1
1. Cowling C
2. Cowling BZAUM1615
1
2
1. Screw
2. Bolt
3. Cowling A
4. Quick fastenerZAUM1617
3
4
1
2
UB5GE2E0.book Page 8 Thursday, July 30, 2020 3:08 PM
Page 53 of 94

Periodic maintenance an d a djustment
6-9
6
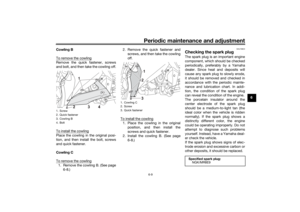
Cowlin
g B
To remove the cowling
Remove the quick fastener, screws
and bolt, and then take the cowling off.
To install the cowlingPlace the cowling in the original posi-
tion, and then install the bolt, screws
and quick fastener.
Cowlin g C
To remove the cowling1. Remove the cowling B. (See page 6-8.) 2. Remove the quick fastener and
screws, and then take the cowling
off.
To install the cowling
1. Place the cowling in the original position, and then install the
screws and quick fastener.
2. Install the cowling B. (See page 6-8.)
EAU19623
Checkin g the spark plu gThe spark plug is an important engine
component, which should be checked
periodically, preferably by a Yamaha
dealer. Since heat and deposits will
cause any spark plug to slowly erode,
it should be removed and checked in
accordance with the periodic mainte-
nance and lubrication chart. In addi-
tion, the condition of the spark plug
can reveal the condition of the engine.
The porcelain insulator around the
center electrode of the spark plug
should be a medium-to-light tan (the
ideal color when the vehicle is ridden
normally). If the spark plug shows a
distinctly different color, the engine
could be operating improperly. Do not
attempt to diagnose such problems
yourself. Instead, have a Yamaha deal-
er check the vehicle.
If the spark plug shows signs of elec-
trode erosion and excessive carbon or
other deposits, it should be replaced.
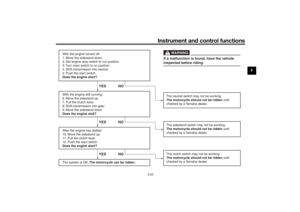
1. Screw
2. Quick fastener
3. Cowling B
4. BoltZAUM1618
1
1. Cowling C
2. Screw
3. Quick fastenerZAUM1619
21
Specified spark plu g:
NGK/MR8E9
UB5GE2E0.book Page 9 Thursday, July 30, 2020 3:08 PM
Page 54 of 94

Periodic maintenance an d a djustment
6-10
6 Before installing a spark plug, the
spark plug gap should be measured
with a wire thickness gauge and, if
necessary, adjusted to specification.
Clean the surface of the spark plug
gasket and its mating surface, and
then wipe off any grime from the spark
plug threads.
TIPIf a torque wrench is not available
when installing a spark plug, a good
estimate of the correct torque is 1/4–
1/2 turn past finger tight. However, the
spark plug should be tightened to the
specified torque as soon as possible.
EAU36112
CanisterThis model is equipped with a canister
to prevent the discharging of fuel vapor
into the atmosphere. Before operating
this vehicle, make sure to check the
following:
Check each hose connection.
Check each hose and canister for
cracks or damage. Replace if
damaged.
Make sure that the canister
breather is not blocked, and if
necessary, clean it.
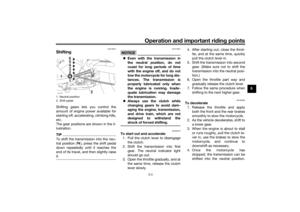
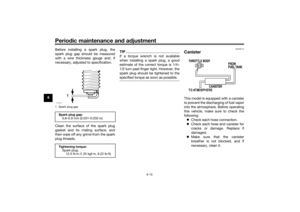
1. Spark plug gapSpark plu g g ap:
0.8–0.9 mm (0.031–0.035 in)
Ti ghtenin g torque:
Spark plug: 12.5 N·m (1.25 kgf·m, 9.22 lb·ft)
1
ZAUM0037
UB5GE2E0.book Page 10 Thursday, July 30, 2020 3:08 PM
Page 55 of 94

Periodic maintenance an d a djustment
6-11
6
EAUM4051
En gine oil an d oil filter ele-
mentThe engine oil level should be checked
before each ride. In addition, the oil
must be changed and the oil filter ele-
ment replaced at the intervals specified
in the periodic maintenance and lubri-
cation chart.
To check the en gine oil level
1. Place the vehicle on a level sur- face and hold it in an upright posi-
tion. A slight tilt to the side can
result in a false reading.
2. Start the engine, warm it up for several minutes, and then turn it
off.
3. Wait a few minutes until the oil set- tles, remove the oil filler cap, wipe
the dipstick clean, insert it back
into the oil filler hole (without
screwing it in), and then remove it
again to check the oil level.
NOTICE: Do not operate the ve-
hicle until you know that the en-
g ine oil level is sufficient.
[ECA10012]
TIPThe engine oil should be between the
minimum and maximum level marks.
4. If the engine oil is below the mini-
mum level mark, add sufficient oil
of the recommended type to raise
it to the correct level.
5. Install the oil filler cap.
To chan ge the en gine oil (with or
without oil filter element replace-
ment) 1. Remove cowling A. (See page 6-8.)
2. Start the engine, warm it up for several minutes, and then turn it
off.
3. Place an oil pan under the engine to collect the used oil.
4. Remove the engine oil filler cap and the drain bolt along with the
O-ring, compression spring, and
engine oil strainer, to drain the oil
from the crankcase. NOTICE:
When removin g the eng ine oil
d rain bolt, the O-ring , compres-
sion sprin g, an d oil strainer will
fall out. Take care not to lose
these parts.
[ECA11002]
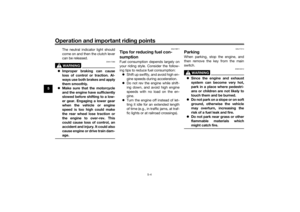
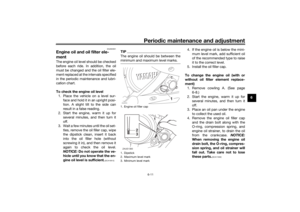
1. Engine oil filler cap
1. Dipstick
2. Maximum level mark
3. Minimum level markZAUM1610
1
2
3
ZAUE1300
UB5GE2E0.book Page 11 Thursday, July 30, 2020 3:08 PM
Page 56 of 94

Periodic maintenance an d a djustment
6-12
6
5. Clean the engine oil strainer withsolvent.
TIPSkip to step 9 when only changing
the oil.
Perform steps 6–8 when replacing
the oil filter element.6. Remove the oil filter element cover
by removing the bolts. 7. Remove and replace the oil filter
element and O-ring. 8. Install the oil filter element cover
by installing the bolts, then tight-
ening them to the specified
torque.
TIPMake sure that the O-ring is properly
seated.9. Install the engine oil strainer, com-pression spring, O-ring and the
engine oil drain bolt, and then
tighten it to the specified torque.
NOTICE: Before installin g the
en gine oil d rain bolt, do not for-
g et to install the O-rin g, com-
pression sprin g, an d oil strainer
in position.
[ECA10422]
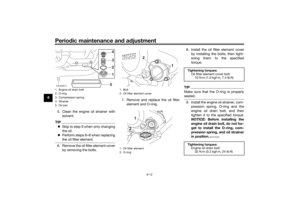
1. Engine oil drain bolt
2. O-ring
3. Compression spring
4. Strainer
5. Oil pan
2 3 4
5 1
ZAUE0672
1. Bolt
2. Oil filter element cover
1. Oil filter element
2. O-ring
Ti
ghtenin g torques:
Oil filter element cover bolt: 10 N·m (1.0 kgf·m, 7.4 lb·ft)
Ti ghtenin g torques:
Engine oil drain bolt: 32 N·m (3.2 kgf·m, 24 lb·ft)
UB5GE2E0.book Page 12 Thursday, July 30, 2020 3:08 PM