Page 89 of 150
9-4
9
5*Exhaust system • Check for leakage and replace gasket(s) if neces-
sary.
• Check for looseness and tighten all screw clamps and joints if necessary. √√√
6Spark arrester • Clean. √√√
7 *Air induction sys-
tem • Check the air cut-off valve, reed valve, and hose
for damage.
• Replace any damaged parts if necessary. √√√√√
NO. ITEM
CHECK OR MAINTENANCE
JOB INITIAL EVERY
Whichev- er comes first month136612
km (mi) 320
(200) 1300
(800) 2500
(1600) 2500
(1600) 5000
(3200)
hours 20 80 160 160 320
UBKD60E0.book Page 4 Wednesday, November 18, 2020 8:39 AM
Page 90 of 150

9-5
9
EBU2186EPeriodic maintenance chart: General maintenance and lubricationTIPFor ATVs not equipped with an odometer or an hour meter, follow the month maintenance intervals in-
stead.
For odometer or hour meter-equipped vehicles, follow the month maintenance interval if the ATV isn’t
ridden for the stated mileage or engine operating hours.
Items marked with an asterisk should be performed by a Yamaha dealer as they require special tools,
data and technical skills. NO. ITEM CHECK OR MAINTENANCE
JOB INITIAL
EVERY
Whichev-
er comes first month136612
km (mi) 320
(200) 1300
(800) 2500
(1600) 2500
(1600) 5000
(3200)
hours 20 80 160 160 320
1 Air filter element • Clean and replace if necessary. Every 20–40 hours (more often in wet or
dusty areas)
2 *Clutch • Check operation and adjust if necessary. √ √√√
3 *Front brake • Check operation and correct if necessary.
• Check fluid level and ATV for fluid leakage, and
correct if necessary. √√√√√
• Replace brake pads. Whenever worn to the limit
4 *Rear brake • Check operation and correct if necessary.
• Check fluid level and ATV for fluid leakage, and
correct if necessary. √√√√√
• Replace brake pads. Whenever worn to the limit
UBKD60E0.book Page 5 Wednesday, November 18, 2020 8:39 AM
Page 91 of 150

9-6
9
5*Brake hoses • Check for cracks or other damage, and replace if
necessary. √√√√
• Replace. Every 4 years
6 *Brake fluid • Change. Every 2 years
7 *Parking brake • Check operation and adjust if necessary. √√√√√
8 *Wheels • Check runout and for damage, and replace if nec-
essary. √ √√√
9 *Tires • Check tread depth and for damage, and replace if
necessary.
• Check air pressure and balance, and correct if necessary. √ √√√
10 *Wheel hub bearings • Check for looseness or damage, and replace if
necessary. √ √√√
11 *Swingarm pivots • Check operation and for excessive play, and re-
place bearings if necessary.
• Lubricate with lithium-soap-based grease. √√√
12 *Upper and lower
arm pivots • Lubricate with lithium-soap-based grease.
√√√
13 Drive chain • Check chain slack and adjust if necessary.
• Check rear wheel alignment and correct if neces-
sary.
• Clean and lubricate. √√√√√
NO. ITEM
CHECK OR MAINTENANCE
JOB INITIAL EVERY
Whichev- er comes first month136612
km (mi) 320
(200) 1300
(800) 2500
(1600) 2500
(1600) 5000
(3200)
hours 20 80 160 160 320
UBKD60E0.book Page 6 Wednesday, November 18, 2020 8:39 AM
Page 92 of 150

9-7
9
14*Drive chain roller • Check for wear and replace if necessary. √√√
15 *Chassis fasteners • Make sure that all nuts, bolts, and screws are
properly tightened. √√√√√
16 *Shock absorber as-
semblies • Check operation and correct if necessary.
• Check for oil leakage and replace if necessary.
√√√
17 *Rear suspension re-
lay arm and con-
necting arm
pivoting points • Check operation and correct if necessary.
√√√√
18 *Steering shaft • Lubricate with lithium-soap-based grease. √√√
19 *Steering system • Check operation and repair or replace if dam-
aged.
• Check toe-in and adjust if necessary. √√√√√
20 Engine oil • Change.
• Check ATV for oil leakage, and correct if neces-
sary. √ √√√
21 Engine oil filter ele-
ment
• Replace.
√√√
22 *Cooling system • Check coolant level and ATV for coolant leakage,
and correct if necessary. √√√√√
• Replace coolant. Every 2 years
NO. ITEM
CHECK OR MAINTENANCE
JOB INITIAL EVERY
Whichev-
er comes first month136612
km (mi) 320
(200) 1300
(800) 2500
(1600) 2500
(1600) 5000
(3200)
hours 20 80 160 160 320UBKD60E0.book Page 7 Wednesday, November 18, 2020 8:39 AM
Page 93 of 150

9-8
9
EBU29431TIPSome maintenance items need more frequent service if you are riding in unusually wet, dusty, sandy or
muddy areas, or at full-throttle.
Replace the fuel hose every five years and if cracked or damaged.
Hydraulic brake service
• Regularly check and, if necessary, correct the brake fluid level.
• Every two years replace the internal components of the brake master cylinders and calipers, and
change the brake fluid.23 *Moving parts and
cables •Lubricate.
√√√√
24 *Throttle lever • Check operation.
• Check throttle lever free play, and adjust if neces-
sary.
• Lubricate cable and lever housing. √√√√√
25 *Front and rear
brake switches • Check operation and correct if necessary.
√√√√√
26 *Lights and switches • Check operation and correct if necessary.
• Adjust headlight beams. √√√√√
NO. ITEM
CHECK OR MAINTENANCE
JOB INITIAL EVERY
Whichev- er comes first month136612
km (mi) 320
(200) 1300
(800) 2500
(1600) 2500
(1600) 5000
(3200)
hours 20 80 160 160 320UBKD60E0.book Page 8 Wednesday, November 18, 2020 8:39 AM
Page 94 of 150
9-9
9• Replace the brake hoses every four years and if cracked or damaged.
UBKD60E0.book Page 9 Wednesday, November 18, 2020 8:39 AM
Page 95 of 150
9-10
9
EBU30131Removing and installing the cowling
and panelsThe cowling and panels shown need to be re-
moved to perform some of the maintenance jobs
described in this chapter. Refer to this section
each time a cowling or panel needs to be removed
and installed.
EBU29596Panel A
To remove the panel1. Remove the seat. (See page 5-10.)
2. Remove the fuel tank cap by turning it coun-terclockwise. (See page 5-8.) NOTICE: Make
sure that no foreign material enters the
fuel tank.
[ECB01052]
3. Loosen the quick fasteners.
1. Panel A
2. Panel B
3. Cowling
1
2
3
1. Panel C
1
UBKD60E0.book Page 10 Wednesday, November 18, 2020 8:39 AM
Page 96 of 150
9-11
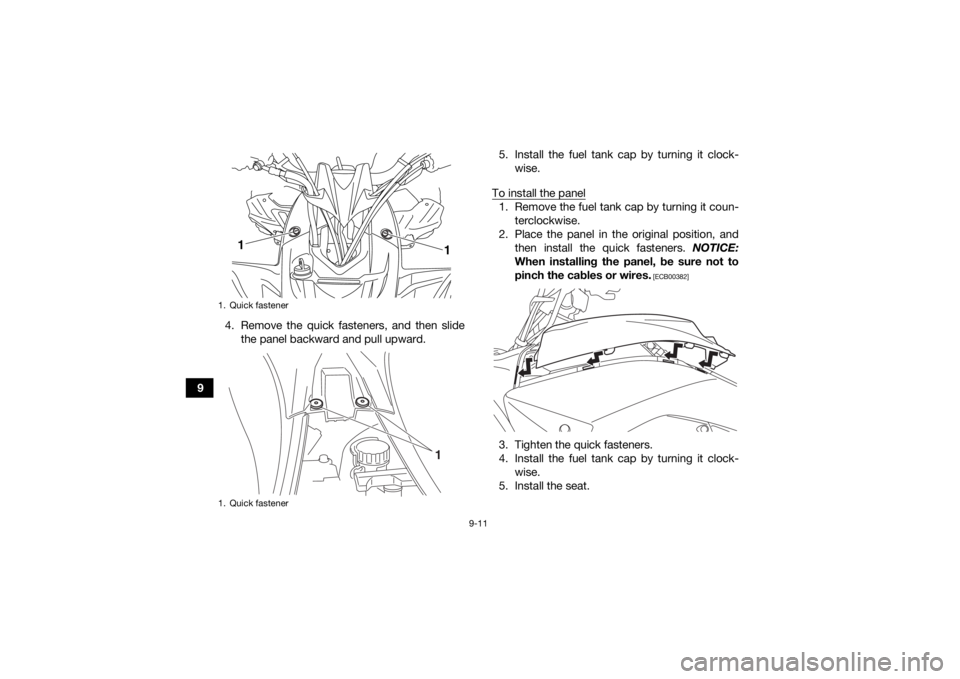
94. Remove the quick fasteners, and then slide
the panel backward and pull upward. 5. Install the fuel tank cap by turning it clock-
wise.
To install the panel
1. Remove the fuel tank cap by turning it coun- terclockwise.
2. Place the panel in the original position, and then install the quick fasteners. NOTICE:
When installing the panel, be sure not to
pinch the cables or wires.
[ECB00382]
3. Tighten the quick fasteners.
4. Install the fuel tank cap by turning it clock- wise.
5. Install the seat.
1. Quick fastener
1. Quick fastener
1 1
1
UBKD60E0.book Page 11 Wednesday, November 18, 2020 8:39 AM