2021 VOLVO V90 CROSS COUNTRY key battery
[x] Cancel search: key batteryPage 8 of 683
6
Parking climate*
234
Preconditioning *
234
Starting and stopping precondi- tioning * 234
Preconditioning timer *
235
Adding and editing timer settingsfor preconditioning * 235
Activating and deactivating pre-conditioning timer * 236
Deleting preconditioning timersettings * 237
Pre-cleaning *
238
Starting and stopping pre-cleaning *
238
Climate comfort retaining function *
239
Starting and switching off the cli-mate retaining function when parking *239
Parking climate symbols and mes-sages * 241
KEY, LOCKS AND ALARM
Locking and unlocking
244
Lock indication 244
Lock confirmation settings 246
Remote key 246
Locking and unlocking using the remote key 249
Settings for remote and insidedoor unlock 250
Unlocking the tailgate using theremote key 251
Remote key range 251
Replacing the remote key's battery 252
Ordering additional remote keys 256
Care Key – restricted remote key 256
Care Key settings 257
Detachable key blade 257
Locking and unlocking withdetachable key blade 258
Electronic immobilizer 260
Start and lock system type desig-nations 260
Keyless and touch-sensitive surfaces *
262
Keyless locking and unlocking *
263
Keyless unlock settings *
264
Keyless tailgate unlock *
264
Antenna locations for the start and lock system 265
Locking and unlocking from insidethe vehicle 266
Unlocking the tailgate from insidethe vehicle 267
Activating and deactivating child locks 267
Automatic locking when driving 268
Closing and locking the tailgate using the buttons * 269
Setting maximum opening heightfor the power tailgate *271
Operating the tailgate with a footmovement * 271
Private Locking 272
Activating and deactivating pri- vate locking 273
Alarm 274
Arming and disarming the alarm 275
Page 250 of 683
||
KEY, LOCKS AND ALARM
* Option/accessory.
248
NOTE
Be aware of the risk of locking the remote key in the vehicle. If the remote key or key tag is left in the vehicle, it will be deactivated whenthe vehicle is locked and the alarm setusing another valid key. The key will bereactivated when the vehicle isunlocked.
If the remote key or Care Key is left inthe vehicle, it will be deactivated evenif the vehicle is locked using Volvo OnCall, and will be reactivated when thevehicle is unlocked using Volvo On Callor another valid key.
Button-less key (Key Tag)
*
The button-less key4
provided with the keyless
locking and unlocking function works in the same way as the regular remote key for key-less start, locking and unlocking. The key iswaterproof up to a depth of approx. 10 meters(30 feet) for up to 60 minutes. It does nothave a detachable key blade and its batterycannot be replaced.
Care Key - restricted remote keyA Care Key enables the vehicle owner to set amaximum speed limit for the vehicle. This limit is intended to promote safe use of the vehicle,e.g. when it is loaned out.
InterferenceElectromagnetic fields or obstructing objectsmay interfere with the remote key's functionsfor keyless start and keyless locking and unlocking
*.
NOTE
Avoid storing the remote key near metal objects or electronic devices, e.g. cellphones, tablets, laptops or chargers – pref-erably no closer than 10-15 cm (4-6 in.).
If you experience interference, use the remote key's detachable blade to unlock the vehicleand then place the remote key in the backupreader in the tunnel console cup holder to dis-arm the alarm and start the vehicle.
NOTE
When the remote control key is placed in the cup holder, make sure that no othervehicle keys, metal objects or electronicdevices (e.g. cell phones, tablets, laptopsor chargers) are found in the cup holder.Multiple vehicle keys close to each other inthe cup holder can disrupt their functional-ity.
WARNING
California Proposition 65 Operating, servicing and maintaining a pas- senger vehicle can expose you to chemi-cals including engine exhaust, carbon mon-oxide, phthalates, and lead, which areknown to the State of California to causecancer and birth defects or other reproduc-tive harm. To minimize exposure, avoidbreathing exhaust, do not idle the engineexcept as necessary, service your vehicle ina well ventilated area and wear gloves orwash your hands frequently when servicingyour vehicle. For more information go towww.P65Warnings.ca.gov/passenger-vehicle.
4
Also called sport key.
Page 251 of 683
KEY, LOCKS AND ALARM
}}
* Option/accessory.249
Related information
Starting the vehicle (p. 398)
Locking and unlocking using the remote key (p. 249)
Remote key range (p. 251)
Replacing the remote key's battery(p. 252)
Detachable key blade (p. 257)
Care Key – restricted remote key (p. 256)
Electronic immobilizer (p. 260)
Linking a remote key to a driver profile(p. 142)
Locking and unlocking using the remote key
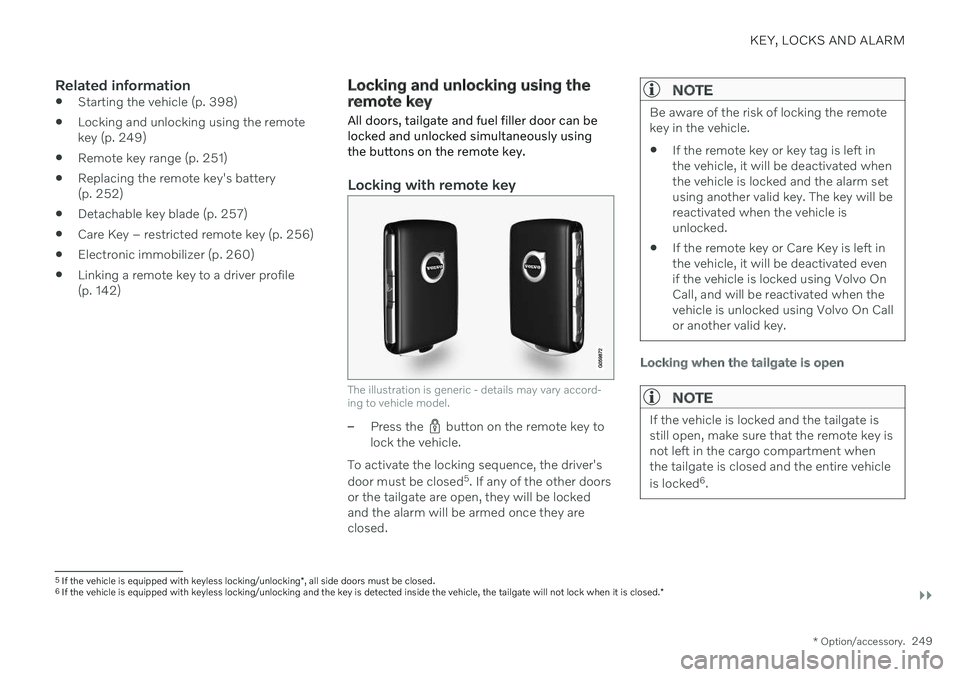
All doors, tailgate and fuel filler door can be locked and unlocked simultaneously usingthe buttons on the remote key.
Locking with remote key
The illustration is generic - details may vary accord- ing to vehicle model.
–Press the button on the remote key to
lock the vehicle.
To activate the locking sequence, the driver's door must be closed 5
. If any of the other doors
or the tailgate are open, they will be locked and the alarm will be armed once they areclosed.
NOTE
Be aware of the risk of locking the remote key in the vehicle. If the remote key or key tag is left in the vehicle, it will be deactivated whenthe vehicle is locked and the alarm setusing another valid key. The key will bereactivated when the vehicle isunlocked.
If the remote key or Care Key is left inthe vehicle, it will be deactivated evenif the vehicle is locked using Volvo OnCall, and will be reactivated when thevehicle is unlocked using Volvo On Callor another valid key.
Locking when the tailgate is open
NOTE
If the vehicle is locked and the tailgate is still open, make sure that the remote key isnot left in the cargo compartment whenthe tailgate is closed and the entire vehicle is locked 6
.
5 If the vehicle is equipped with keyless locking/unlocking *, all side doors must be closed.
6 If the vehicle is equipped with keyless locking/unlocking and the key is detected inside the vehicle, the tailgate will not lock when it is closed. *
Page 252 of 683
||
KEY, LOCKS AND ALARM
250
Unlocking with remote key
–Press the button on the remote key to
unlock the vehicle.
Automatic relockingIf none of the doors or tailgate are opened within two minutes after being unlocked, theywill automatically relock. This function reducesthe risk of inadvertently leaving the vehicleunlocked.
Remote key not working
NOTE
Move closer to the vehicle and try to unlock it again.
If the remote key is not working to lock or unlock the vehicle, its battery may be dis-charged. Use the detachable key blade tolock/unlock the driver's door instead.
Related information
Settings for remote and inside door unlock(p. 250)
Unlocking the tailgate using the remotekey (p. 251)
Remote key (p. 246)
Replacing the remote key's battery(p. 252)
Locking and unlocking with detachablekey blade (p. 258)
Settings for remote and inside door unlock Several different sequences are available for remote unlocking.
To change this setting: 1.
Tap
Settings in the center display's Top
view.
2. Tap
My CarLockingRemote and
Interior Unlock.
3. Select alternative:
All Doors – unlocks all doors at the
same time.
Single Door – unlocks the driver's
door. Press the remote key unlock but- ton twice to unlock all doors.
The settings made here also affect centrallocking using the inside door handle.
Related information
Locking and unlocking using the remotekey (p. 249)
Locking and unlocking from inside thevehicle (p. 266)
Page 254 of 683
||
KEY, LOCKS AND ALARM
* Option/accessory.
252 approx. 1.5 meter (5 feet) along the sides of the vehicle or approx. 1 meter (3 feet) from thetailgate.
NOTE
The functions of the remote control key can be disrupted by ambient radio waves,buildings, topographical conditions, etc.The vehicle can always be locked/unlockedusing the key blade.
If the remote key is removed from the vehicle
If the remote key is removed from the vehicle while the engine is run- ning, the warning message
Vehicle
key not found Removed from
vehicle will be displayed in the instrument
panel and an audible signal will sound when the last door is closed.
The message will disappear when the key is returned to the vehicle and the O button on
the right-side steering wheel keypad ispressed or when the last door is closed again.
Related information
Remote key (p. 246)
Antenna locations for the start and locksystem (p. 265)
Keyless and touch-sensitive surfaces
*
(p. 262)
Replacing the remote key's battery
The battery in the remote key must be replaced when it is discharged.
NOTE
All batteries have a limited service life and must eventually be replaced (does notapply for Key Tag). The battery's service lifevaries depending on how often thevehicle/key is used.
The remote key battery should be replaced if
the information symbol illuminates and the message
Vehicle key bat. low is dis-
played in the instrument panel
the locks do not react after several attempts to lock or unlock the vehicleusing the remote key within approx.20 meter (65 feet) from the vehicle.
NOTE
Move closer to the vehicle and try to unlock it again.
The battery in the smaller key without but- tons 7
(the Key Tag) cannot be replaced. A new key can be ordered from an authorized Volvo workshop.
CAUTION
An end-of-life Key Tag must be turned in to an authorized Volvo workshop. The keymust be deleted from the vehicle becauseit can still be used to start the vehicle viabackup start.
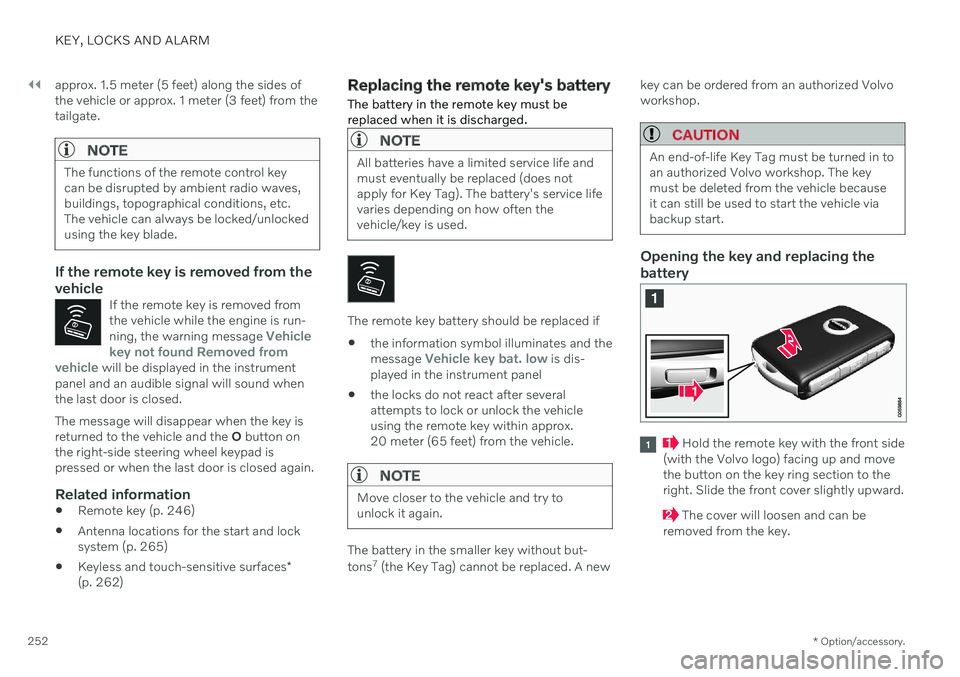
Opening the key and replacing the battery
Hold the remote key with the front side
(with the Volvo logo) facing up and move the button on the key ring section to theright. Slide the front cover slightly upward.
The cover will loosen and can be
removed from the key.
Page 255 of 683
KEY, LOCKS AND ALARM
}}
253
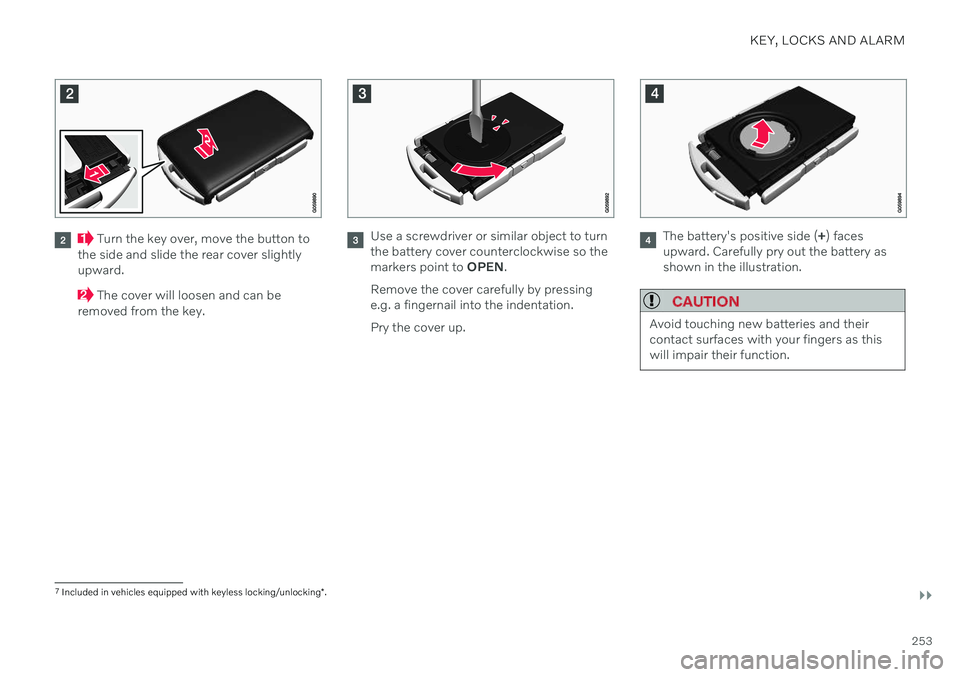
Turn the key over, move the button to
the side and slide the rear cover slightly upward.
The cover will loosen and can be
removed from the key.
Use a screwdriver or similar object to turn the battery cover counterclockwise so themarkers point to OPEN.
Remove the cover carefully by pressinge.g. a fingernail into the indentation. Pry the cover up.The battery's positive side ( +) faces
upward. Carefully pry out the battery as shown in the illustration.
CAUTION
Avoid touching new batteries and their contact surfaces with your fingers as thiswill impair their function.
7 Included in vehicles equipped with keyless locking/unlocking *.
Page 256 of 683
||
KEY, LOCKS AND ALARM
254
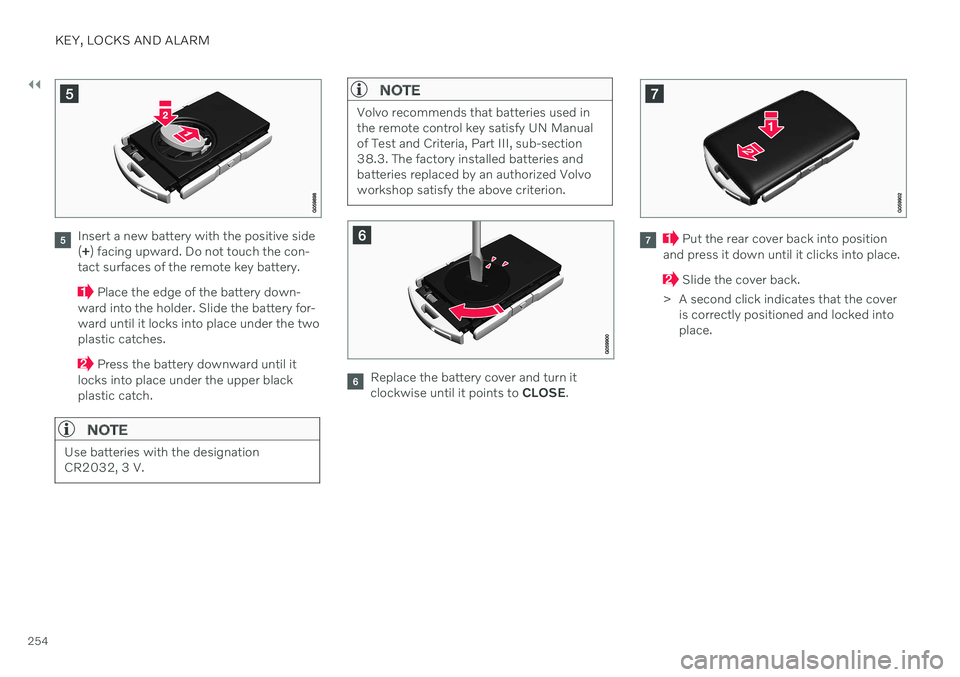
Insert a new battery with the positive side (+ ) facing upward. Do not touch the con-
tact surfaces of the remote key battery.
Place the edge of the battery down-
ward into the holder. Slide the battery for- ward until it locks into place under the twoplastic catches.
Press the battery downward until it
locks into place under the upper black plastic catch.
NOTE
Use batteries with the designation CR2032, 3 V.
NOTE
Volvo recommends that batteries used in the remote control key satisfy UN Manualof Test and Criteria, Part III, sub-section38.3. The factory installed batteries andbatteries replaced by an authorized Volvoworkshop satisfy the above criterion.
Replace the battery cover and turn it clockwise until it points to CLOSE.
Put the rear cover back into position
and press it down until it clicks into place.
Slide the cover back.
> A second click indicates that the cover is correctly positioned and locked into place.
Page 257 of 683
KEY, LOCKS AND ALARM
255
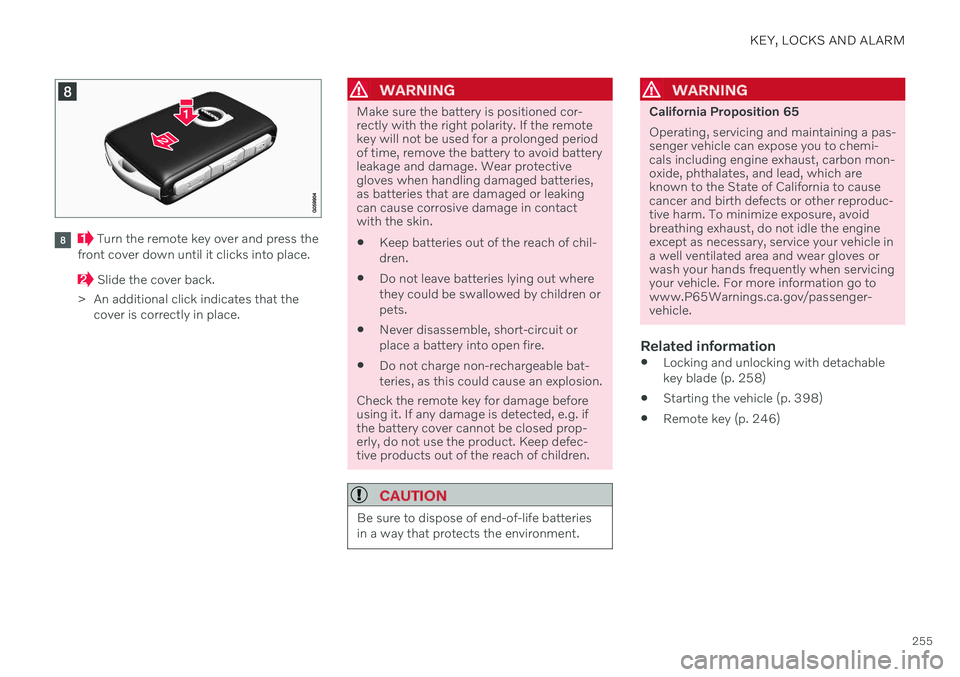
Turn the remote key over and press the
front cover down until it clicks into place.
Slide the cover back.
> An additional click indicates that the cover is correctly in place.
WARNING
Make sure the battery is positioned cor- rectly with the right polarity. If the remotekey will not be used for a prolonged periodof time, remove the battery to avoid batteryleakage and damage. Wear protectivegloves when handling damaged batteries,as batteries that are damaged or leakingcan cause corrosive damage in contactwith the skin. Keep batteries out of the reach of chil- dren.
Do not leave batteries lying out wherethey could be swallowed by children orpets.
Never disassemble, short-circuit orplace a battery into open fire.
Do not charge non-rechargeable bat-teries, as this could cause an explosion.
Check the remote key for damage before using it. If any damage is detected, e.g. ifthe battery cover cannot be closed prop-erly, do not use the product. Keep defec-tive products out of the reach of children.
CAUTION
Be sure to dispose of end-of-life batteries in a way that protects the environment.
WARNING
California Proposition 65 Operating, servicing and maintaining a pas- senger vehicle can expose you to chemi-cals including engine exhaust, carbon mon-oxide, phthalates, and lead, which areknown to the State of California to causecancer and birth defects or other reproduc-tive harm. To minimize exposure, avoidbreathing exhaust, do not idle the engineexcept as necessary, service your vehicle ina well ventilated area and wear gloves orwash your hands frequently when servicingyour vehicle. For more information go towww.P65Warnings.ca.gov/passenger-vehicle.
Related information
Locking and unlocking with detachable key blade (p. 258)
Starting the vehicle (p. 398)
Remote key (p. 246)