2021 VOLVO V90 CROSS COUNTRY jump start
[x] Cancel search: jump startPage 11 of 683
9
STARTING AND DRIVING
Starting the vehicle398
Switching off the vehicle 400
Ignition modes 401
Selecting ignition mode 402
Brake functions 403
Brakes 403
Brake Assist System 404
Braking on wet roads 405
Braking on salted roads 405
Maintenance of the brake system 405
Parking brake 406
Activating and deactivating the parking brake 406
Settings for automatically activat-ing the parking brake 408
Parking on a hill 408
Parking brake malfunction 408
Auto-hold brakes 409
Activating and deactivating Auto-hold at a standstill 410
Hill Start Assist 411
Braking assist after a collision 411
Regenerative braking *
411
Transmission 412
Automatic transmission 412
Shifting gears with automatic transmission413
Using the steering wheel paddles *
to shift 415
Shiftlock 417
Deactivating the automatic shiftlock 417
The kickdown function 418
The Launch function *
418
Automatic transmission symbolsand messages 419
All Wheel Drive (AWD) 419
Drive modes *
419
Changing drive mode *
421
Eco drive mode 422
Activating and deactivating Ecodrive mode using the function button 424
Start/Stop function 425
Driving with the Start/Stop function 425
Deactivating the Start/Stop function 426
Conditions for the Start/Stop function 427
Leveling control * and suspension
429
Leveling control settings *
432
Low Speed Control 432
Activating and deactivating LowSpeed Control using the functionbutton 433
Hill Descent Control
433
Activating and deactivating Hill Descent Control using the func-tion button 434
Economical driving 435
Preparing for a long trip 436
Winter driving 436
Driving through standing water 437
Opening/closing the fuel filler door 438
Refueling 438
Fuel 439
Octane rating 440
Emission controls 442
Overheating of engine and trans-mission 442
Battery drain 443
Jump starting using another battery 444
Driving with a trailer 446
Trailer Stability Assist *
448
Checking trailer lights 449
Towing using a towline 450
Attaching and removing the tow-ing eyelet 451
Recovery 453
HomeLink ®
* 454
Programming HomeLink ®
* 455
Page 402 of 683
||
STARTING AND DRIVING
400
NOTE
With a cold start, idling speed may be con- siderably higher than normal for certainengine types. This is done to get the emis-sions system up to normal operating tem-perature as quickly as possible, which min-imizes exhaust emissions and protects theenvironment.
Related information
Switching off the vehicle (p. 400)
Ignition modes (p. 401)
Adjusting the steering wheel (p. 203)
Jump starting using another battery (p. 444)
Selecting ignition mode (p. 402)
Switching off the vehicle
The vehicle can be switched off using the start knob in the tunnel console.
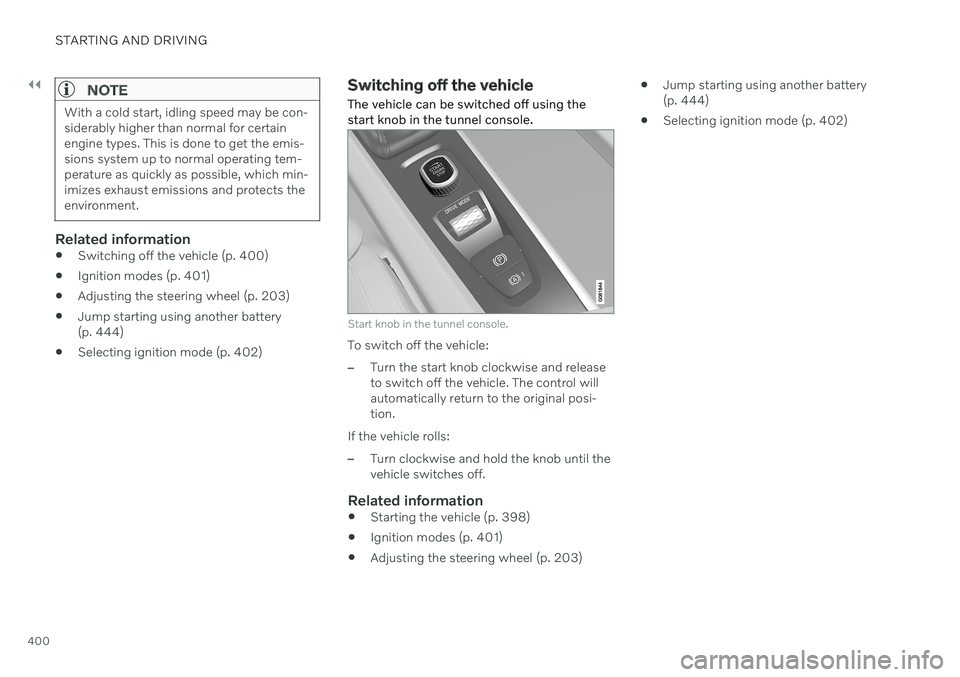
Start knob in the tunnel console.
To switch off the vehicle:
–Turn the start knob clockwise and release to switch off the vehicle. The control willautomatically return to the original posi-tion.
If the vehicle rolls:
–Turn clockwise and hold the knob until the vehicle switches off.
Related information
Starting the vehicle (p. 398)
Ignition modes (p. 401)
Adjusting the steering wheel (p. 203)
Jump starting using another battery(p. 444)
Selecting ignition mode (p. 402)
Page 404 of 683
||
STARTING AND DRIVING
402
Related information
Starting the vehicle (p. 398)
Adjusting the steering wheel (p. 203)
Jump starting using another battery (p. 444)
Selecting ignition mode (p. 402)
Selecting ignition mode
The vehicle's ignition can be put in various modes (levels) to make different functionsavailable.
Selecting an ignition mode
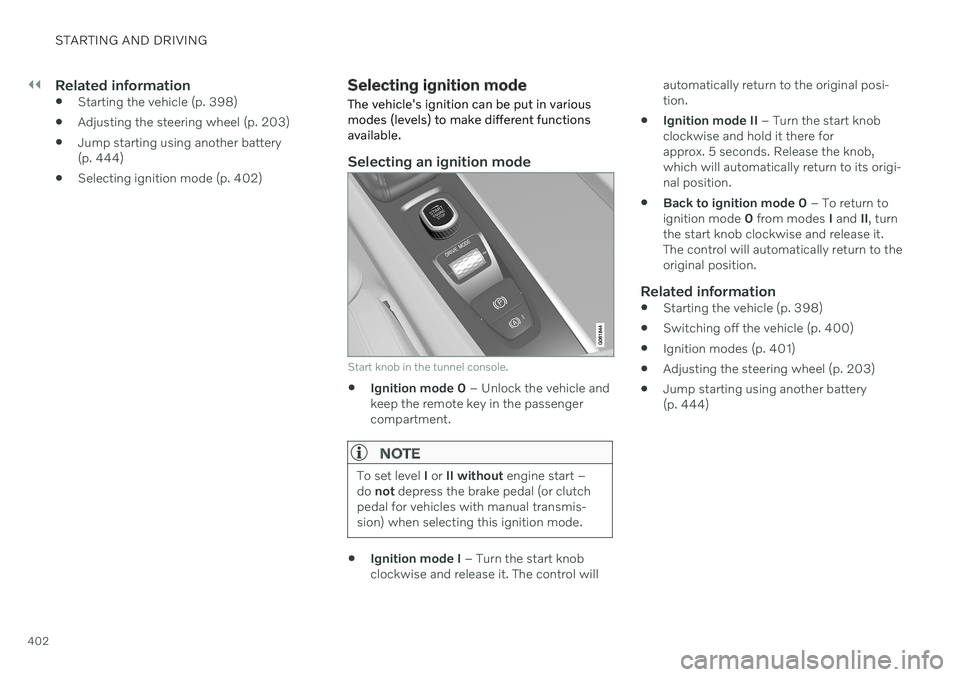
Start knob in the tunnel console.
Ignition mode 0
– Unlock the vehicle and
keep the remote key in the passenger compartment.
NOTE
To set level I or II without engine start –
do not depress the brake pedal (or clutch
pedal for vehicles with manual transmis- sion) when selecting this ignition mode.
Ignition mode I
– Turn the start knob
clockwise and release it. The control will automatically return to the original posi- tion.
Ignition mode II
– Turn the start knob
clockwise and hold it there forapprox. 5 seconds. Release the knob,which will automatically return to its origi-nal position.
Back to ignition mode 0
– To return to
ignition mode 0 from modes I and II, turn
the start knob clockwise and release it.The control will automatically return to theoriginal position.
Related information
Starting the vehicle (p. 398)
Switching off the vehicle (p. 400)
Ignition modes (p. 401)
Adjusting the steering wheel (p. 203)
Jump starting using another battery(p. 444)
Page 446 of 683
STARTING AND DRIVING
444
Jump starting using another battery If the start battery is discharged, current from another battery can be used to start the vehi-cle.
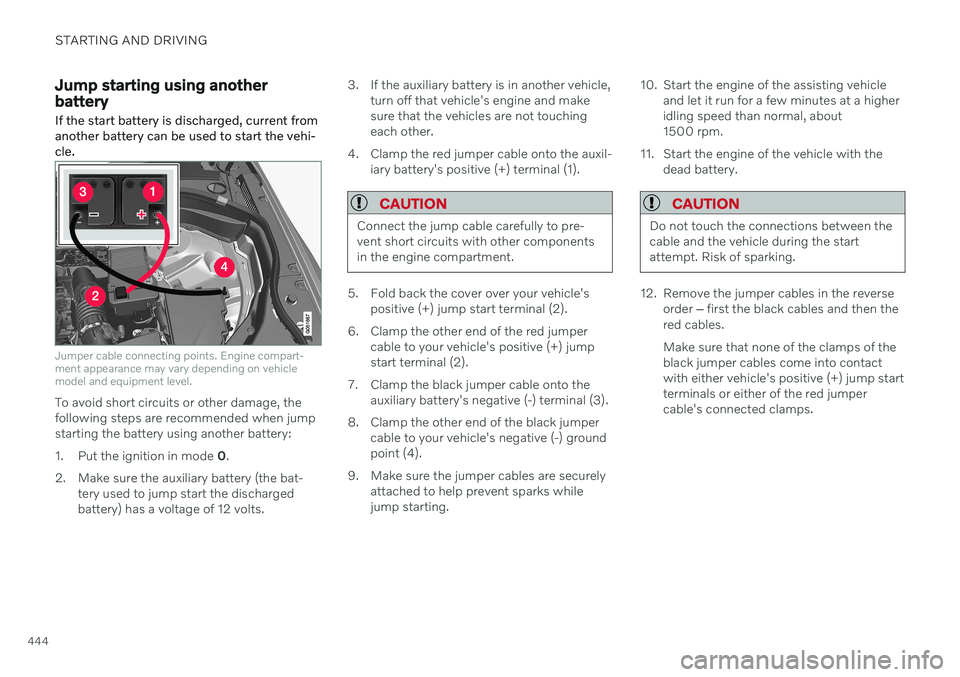
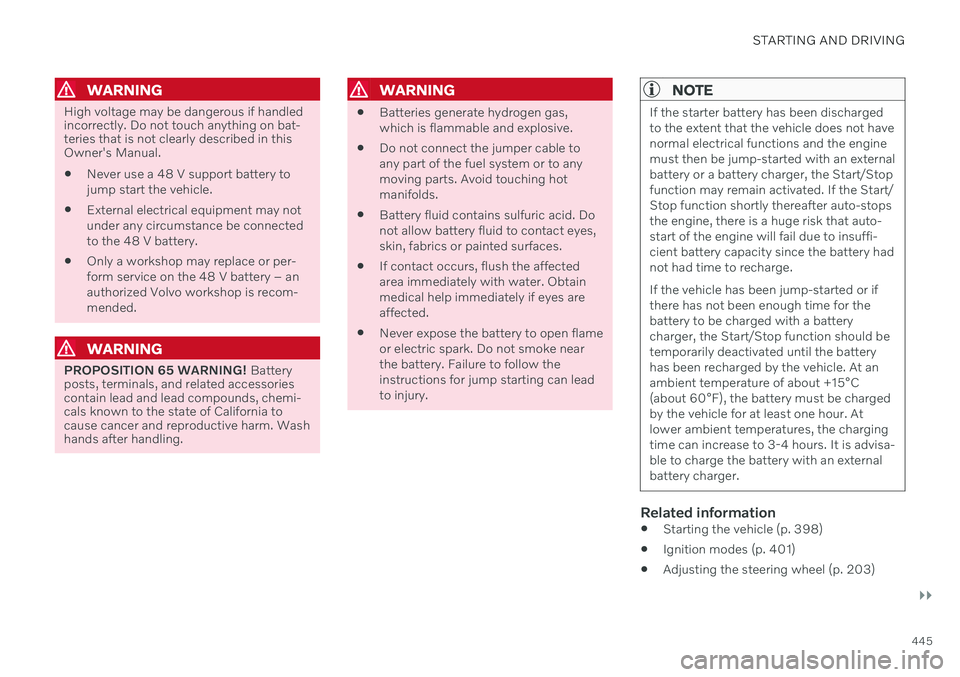
Jumper cable connecting points. Engine compart- ment appearance may vary depending on vehiclemodel and equipment level.
To avoid short circuits or other damage, the following steps are recommended when jumpstarting the battery using another battery:
1. Put the ignition in mode 0.
2. Make sure the auxiliary battery (the bat- tery used to jump start the discharged battery) has a voltage of 12 volts. 3. If the auxiliary battery is in another vehicle,
turn off that vehicle's engine and makesure that the vehicles are not touchingeach other.
4. Clamp the red jumper cable onto the auxil- iary battery's positive (+) terminal (1).
CAUTION
Connect the jump cable carefully to pre- vent short circuits with other componentsin the engine compartment.
5. Fold back the cover over your vehicle'spositive (+) jump start terminal (2).
6. Clamp the other end of the red jumper cable to your vehicle's positive (+) jump start terminal (2).
7. Clamp the black jumper cable onto the auxiliary battery's negative (-) terminal (3).
8. Clamp the other end of the black jumper cable to your vehicle's negative (-) groundpoint (4).
9. Make sure the jumper cables are securely attached to help prevent sparks whilejump starting. 10. Start the engine of the assisting vehicle
and let it run for a few minutes at a higheridling speed than normal, about1500 rpm.
11. Start the engine of the vehicle with the dead battery.
CAUTION
Do not touch the connections between the cable and the vehicle during the startattempt. Risk of sparking.
12. Remove the jumper cables in the reverseorder ‒ first the black cables and then the
red cables. Make sure that none of the clamps of the black jumper cables come into contactwith either vehicle's positive (+) jump startterminals or either of the red jumpercable's connected clamps.
Page 447 of 683
STARTING AND DRIVING
}}
445
WARNING
High voltage may be dangerous if handled incorrectly. Do not touch anything on bat-teries that is not clearly described in thisOwner's Manual. Never use a 48 V support battery to jump start the vehicle.
External electrical equipment may notunder any circumstance be connectedto the 48 V battery.
Only a workshop may replace or per-form service on the 48 V battery – anauthorized Volvo workshop is recom-mended.
WARNING
PROPOSITION 65 WARNING!
Battery
posts, terminals, and related accessories contain lead and lead compounds, chemi-cals known to the state of California tocause cancer and reproductive harm. Washhands after handling.
WARNING
Batteries generate hydrogen gas, which is flammable and explosive.
Do not connect the jumper cable toany part of the fuel system or to anymoving parts. Avoid touching hotmanifolds.
Battery fluid contains sulfuric acid. Donot allow battery fluid to contact eyes,skin, fabrics or painted surfaces.
If contact occurs, flush the affectedarea immediately with water. Obtainmedical help immediately if eyes areaffected.
Never expose the battery to open flameor electric spark. Do not smoke nearthe battery. Failure to follow theinstructions for jump starting can leadto injury.
NOTE
If the starter battery has been discharged to the extent that the vehicle does not havenormal electrical functions and the enginemust then be jump-started with an externalbattery or a battery charger, the Start/Stopfunction may remain activated. If the Start/Stop function shortly thereafter auto-stopsthe engine, there is a huge risk that auto-start of the engine will fail due to insuffi-cient battery capacity since the battery hadnot had time to recharge. If the vehicle has been jump-started or if there has not been enough time for thebattery to be charged with a batterycharger, the Start/Stop function should betemporarily deactivated until the batteryhas been recharged by the vehicle. At anambient temperature of about +15°C(about 60°F), the battery must be chargedby the vehicle for at least one hour. Atlower ambient temperatures, the chargingtime can increase to 3-4 hours. It is advisa-ble to charge the battery with an externalbattery charger.
Related information
Starting the vehicle (p. 398)
Ignition modes (p. 401)
Adjusting the steering wheel (p. 203)
Page 453 of 683
STARTING AND DRIVING
}}
451
WARNING
Ignition mode
II must be active – all
airbags are deactivated in ignition mode I.
Always have the remote key in thevehicle when it is towed.
WARNING
The brake and steering servos do not work when the engine is off – it takesabout 5 times more pressure on the brakepedal and steering requires much moreeffort than normal.
1. Turn on the hazard warning flashers.
2. Attach the towline to the towing eyelet.
3. Put the vehicle in ignition mode II – with-
out pressing the brake pedal, turn the start knob clockwise and hold it there for about4 seconds. Release the knob, which willautomatically return to its original position.
4. Move the gear selector to neutral (N) and release the parking brake. If the battery charge level is too low, it may not be possible to release the parkingbrake. Connect an auxiliary battery to thevehicle if the battery is discharged.
> The towing vehicle can now start driv-ing. 5. Keep the towline taut when the towing
vehicle slows down by applying light pres- sure to the brake pedal. This will helpavoid jarring movements.
6. Be prepared to apply the brakes to stop the vehicle.
Jump startingDo not tow the vehicle to start the engine. Usean auxiliary battery if the start battery's chargelevel is so low that the engine cannot bestarted.
CAUTION
Attempting to tow with the engine running could result in damage to the three-waycatalytic converter.
Related information
Attaching and removing the towing eyelet (p. 451)
Hazard warning flashers (p. 165)
Recovery (p. 453)
Jump starting using another battery(p. 444)
Selecting ignition mode (p. 402)
Transmission (p. 412)
Attaching and removing the towing eyelet
Use the towing eyelet when towing. Screw the towing eyelet securely into place in thethreaded outlet behind the cover on the right-hand side of the front and rear bumpers.
NOTE
If the vehicle is equipped with a towbar, there is no rear attachment for the towingeye.
Attaching the towing eyelet
Take out the towing eyelet, which is stored in a foam block under the floor inthe cargo compartment.
Page 602 of 683
MAINTENANCE AND SERVICE
600
Starter battery The starter battery is used to start the electri- cal system and power the starter motor andother electrical equipment in the vehicle.
The vehicle has a single-pole electrical system that uses the chassis and engine mount asconductors. The vehicle has a voltage-regulated alternating current generator. The starter battery is a 12 V battery, dimen- sioned for the carbon dioxide-reducing func-tions Start/Stop and regenerative chargingand to support the function of the vehicle'svarious systems. The service life and performance of the starter battery are affected by factors such as drivingstyle, driving conditions, climate, battery dis-charges, number of starts, etc. Never disconnect the starter battery while the engine is running.
Make sure the cables to the starter batteryare correctly connected and the clampsare securely tightened.
WARNING
Batteries generate hydrogen gas, which is flammable and explosive.
Do not connect the jumper cable toany part of the fuel system or to anymoving parts. Avoid touching hotmanifolds.
Battery fluid contains sulfuric acid. Donot allow battery fluid to contact eyes,skin, fabrics or painted surfaces.
If contact occurs, flush the affectedarea immediately with water. Obtainmedical help immediately if eyes areaffected.
Never expose the battery to open flameor electric spark. Do not smoke nearthe battery. Failure to follow theinstructions for jump starting can leadto injury.
Starter battery service life and capacity
The service life of the starter battery is affec- ted by several factors, such as number ofstarts, battery discharges, driving style, drivingconditions, climate, etc. The starting capacityof the battery reduces gradually over time. Thebattery must therefore be recharged if thevehicle is not used for a long period of time orif it is only driven short distances. Severe cold further limits starting capacity. If the starterbattery becomes discharged too many times,its service life will be shortened. To help keep the starter battery in good condi- tion, the vehicle should be driven at least15 minutes per week or the battery should beconnected to a battery charger with automatictrickle charging. A starter battery that isalways kept fully charged has the maximumservice life.
Location
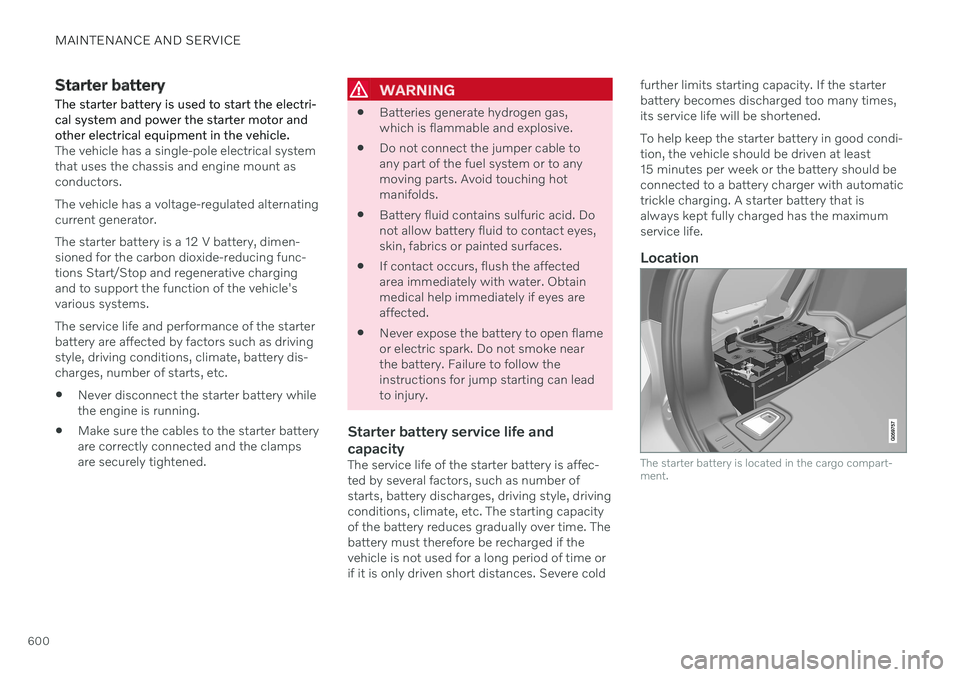
The starter battery is located in the cargo compart- ment.
Page 603 of 683

MAINTENANCE AND SERVICE
601
WARNING
If the starter battery is disconnected, the function for automatic opening and closingmust be reset to function correctly. A resetis required in order for the pinch protectionto work.
CAUTION
On certain models, the battery is secured with a tensioning strap. Make sure that thetensioning strap is always securely tight-ened.
Specifications for starter battery
Battery type H7 AGMH8 AGM
Voltage (V) 12 12
Cold start capacity A
- CCA B
(A) 800
850
Dimensions, L×W×H 315×175×190 mm (12.4×6.9×7.5 inches) 353×175×190 mm (13.9×6.9×7.5 inches)
Capacity (Ah) 80 95
A
According to EN standard.
B Cold Cranking Amperes.
Volvo recommends that batteries are replaced by an authorized Volvo workshop.
CAUTION
If replacing the battery, make sure you replace it with a battery of the same size,cold start capacity and type as the originalbattery (see the decal on the battery).
Related information
Battery symbols (p. 604)
Support battery (p. 602)
Jump starting using another battery (p. 444)
Reset procedure for pinch protection(p. 173)
Battery recycling (p. 604)