2021 VOLVO V90 CROSS COUNTRY brake
[x] Cancel search: brakePage 192 of 683
SEATS AND STEERING WHEEL
* Option/accessory.
190
Manual front seats
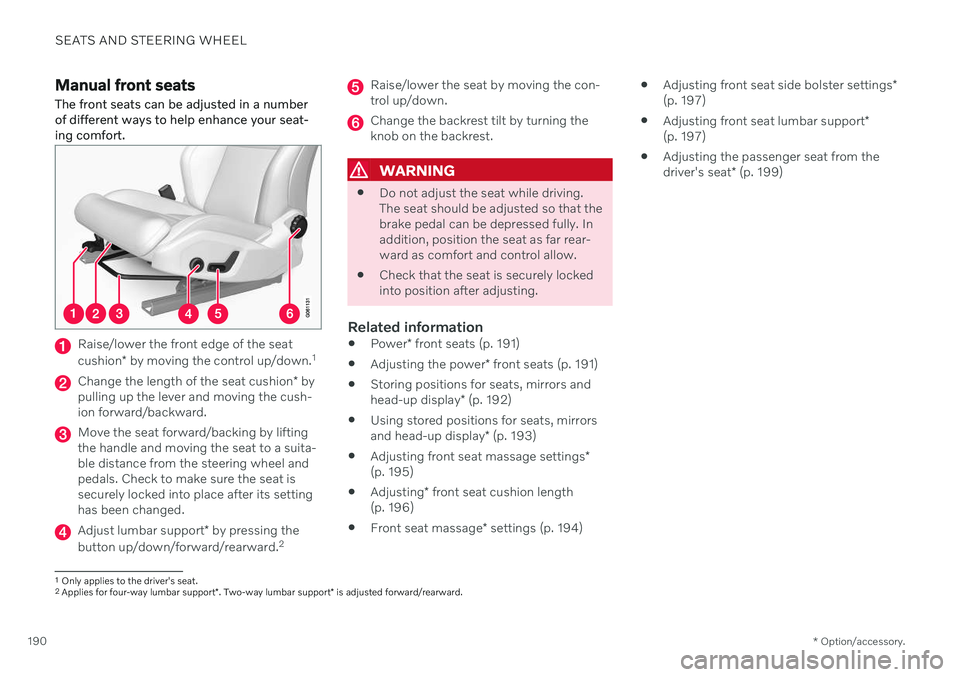
The front seats can be adjusted in a number of different ways to help enhance your seat-ing comfort.
Raise/lower the front edge of the seat cushion * by moving the control up/down. 1
Change the length of the seat cushion
* by
pulling up the lever and moving the cush- ion forward/backward.
Move the seat forward/backing by lifting the handle and moving the seat to a suita-ble distance from the steering wheel andpedals. Check to make sure the seat issecurely locked into place after its settinghas been changed.
Adjust lumbar support * by pressing the
button up/down/forward/rearward. 2
Raise/lower the seat by moving the con- trol up/down.
Change the backrest tilt by turning the knob on the backrest.
WARNING
Do not adjust the seat while driving. The seat should be adjusted so that thebrake pedal can be depressed fully. Inaddition, position the seat as far rear-ward as comfort and control allow.
Check that the seat is securely lockedinto position after adjusting.
Related information
Power
* front seats (p. 191)
Adjusting the power
* front seats (p. 191)
Storing positions for seats, mirrors and head-up display
* (p. 192)
Using stored positions for seats, mirrorsand head-up display
* (p. 193)
Adjusting front seat massage settings
*
(p. 195)
Adjusting
* front seat cushion length
(p. 196)
Front seat massage
* settings (p. 194)
Adjusting front seat side bolster settings
*
(p. 197)
Adjusting front seat lumbar support
*
(p. 197)
Adjusting the passenger seat from thedriver's seat
* (p. 199)
1
Only applies to the driver's seat.
2 Applies for four-way lumbar support *. Two-way lumbar support * is adjusted forward/rearward.
Page 196 of 683
||
SEATS AND STEERING WHEEL
* Option/accessory.
194
Front door closed
–Press and hold one of the memory buttons 1 (
) or 2 () until the seat, door mirrors
and head-up display stop in the positions stored in that memory button.
If the memory button is released, the seat,door mirrors and head-up display will stopmoving.
WARNING
This list point needs to be translated exactly to: "Because the driver's seatcan be adjusted with the ignition off,children should never be left unatten-ded in the vehicle.
Movement of the seat can be STOP-PED at any time by pressing any but-ton on the power seat control panel.
Do not adjust the seat while driving.
The seat should be adjusted so that thebrake pedal can be depressed fully. Inaddition, position the seat as far rear-ward as comfort and control allow.
The seat rails on the floor must not beobstructed in any way when the seat isin motion.
NOTE
For the stored positions to work, all driver profiles need to be in Protect Profilemode.
Related information
Manual front seats (p. 190)
Power
* front seats (p. 191)
Adjusting the power
* front seats (p. 191)
Storing positions for seats, mirrors and head-up display
* (p. 192)
Adjusting front seat massage settings
*
(p. 195)
Adjusting
* front seat cushion length
(p. 196)
Front seat massage
* settings (p. 194)
Adjusting front seat side bolster settings
*
(p. 197)
Adjusting front seat lumbar support
*
(p. 197)
Adjusting the passenger seat from thedriver's seat
* (p. 199)
Adjusting the door mirrors (p. 177)
Head-up display settings
* (p. 148)
Front seat massage * settings
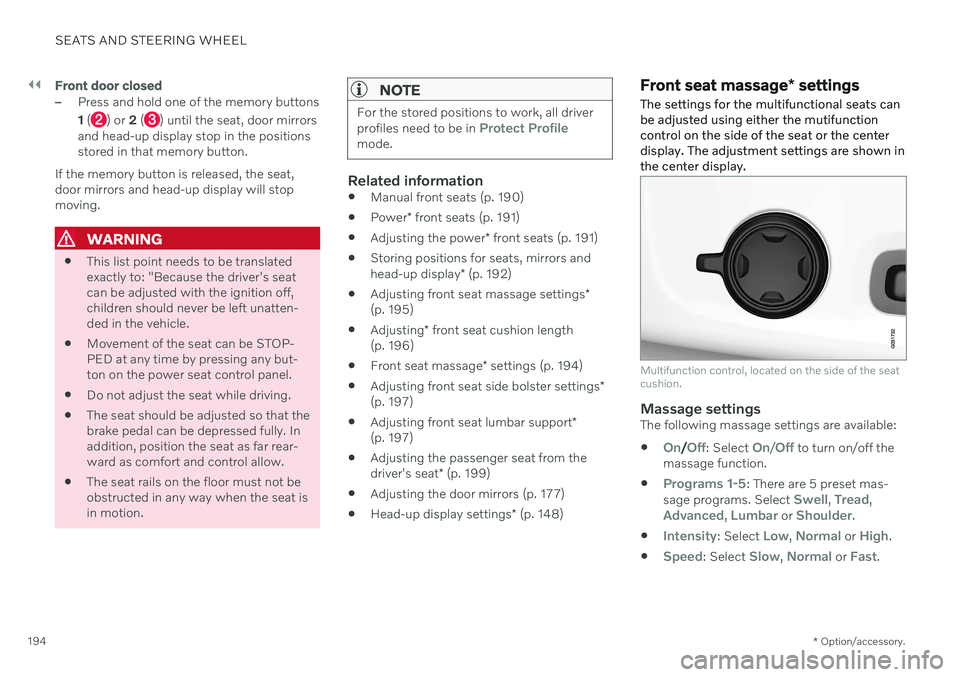
The settings for the multifunctional seats can be adjusted using either the mutifunctioncontrol on the side of the seat or the centerdisplay. The adjustment settings are shown inthe center display.
Multifunction control, located on the side of the seat cushion.
Massage settingsThe following massage settings are available:
On/Off: Select On/Off to turn on/off the
massage function.
Programs 1-5: There are 5 preset mas-
sage programs. Select Swell, Tread,Advanced, Lumbar or Shoulder.
Intensity: Select Low, Normal or High.
Speed: Select Slow, Normal or Fast.
Page 202 of 683
SEATS AND STEERING WHEEL
* Option/accessory.
200
Folding down the rear seat backrests The rear seat backrest is split into two sec- tions. The two sections can be folded forwardindividually.
WARNING
Adjust the seat and ensure it locks into position before driving. Use cautionwhen adjusting the seat. Uncontrolledor careless adjustments could lead toinjury.
Long objects must always be securelytied down to help prevent injury ordamage in the event of sudden brak-ing.
Always turn off the engine and applythe parking brake when loading orunloading the vehicle.
Put the gear selector in
P to help pre-
vent the gear selector from being inad-vertently moved.
CAUTION
When the backrest is folded down, make sure there are no objects in the rear seat,and the seat belts are not buckled. Other-wise there is a risk of damage to theupholstery.
CAUTION
The seat cushion of the integrated child restraint * must be in the stowed position
before the rear seat backrest can be folded down. The armrest * in the center seat must be
raised before the seat backrest is folded down. The ski hatch must be closed before the seat backrest is folded down.
NOTE
The front seats may need to be pushed for- ward and/or the backrest adjusted so thatthe rear seat backrests can be fully low-ered.
Folding down the backrestsThe vehicle must be stationary and at least one of the rear doors must be open before abackrest can be folded down.
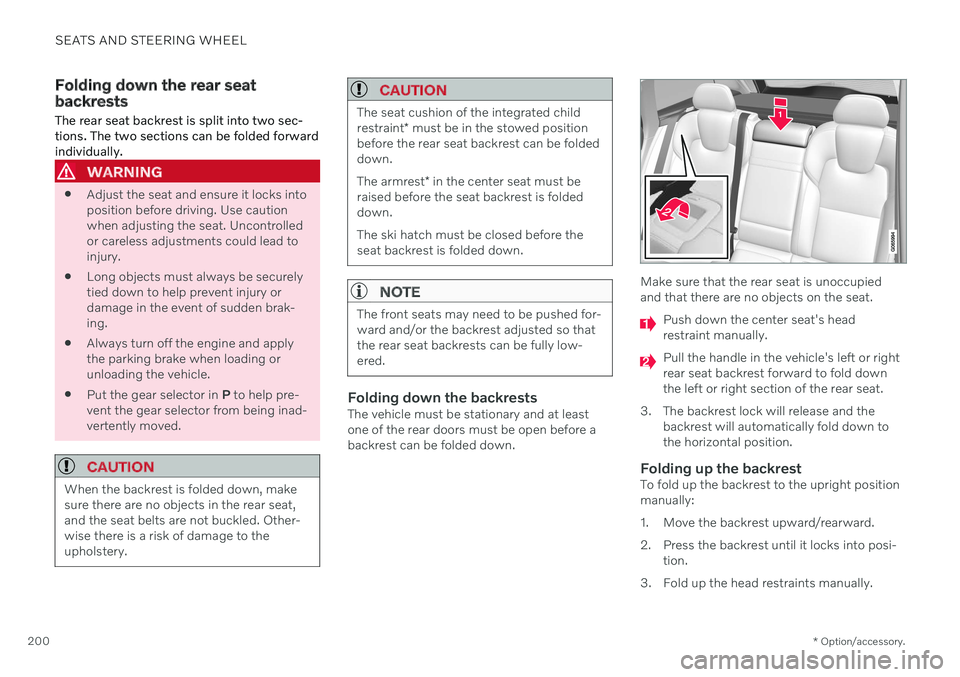
Make sure that the rear seat is unoccupied and that there are no objects on the seat.
Push down the center seat's head restraint manually.
Pull the handle in the vehicle's left or right rear seat backrest forward to fold downthe left or right section of the rear seat.
3. The backrest lock will release and the backrest will automatically fold down tothe horizontal position.
Folding up the backrestTo fold up the backrest to the upright positionmanually:
1. Move the backrest upward/rearward.
2. Press the backrest until it locks into posi-tion.
3. Fold up the head restraints manually.
Page 280 of 683

DRIVER SUPPORT
* Option/accessory.
278
Driver support systems
The vehicle is equipped with a number of driver support systems that can provide thedriver with active or passive assistance in var-ious situations.
The systems can, for example, help the driver:
maintain a set speed
maintain a set time interval to the vehicle ahead
help prevent a collision by warning thedriver and applying the brakes
park the vehicle.
Some of the systems are standard and othersare options. This also varies from market tomarket.
Related information
IntelliSafe – driver support and safety(p. 29)
Speed-dependent steering wheel resis-tance (p. 278)
Electronic Stability Control (p. 279)
Connected Safety (p. 284)
City Safety
™ (p. 331)
Road Sign Information
* (p. 286)
Cruise control (p. 291)
Adaptive Cruise Control
* (p. 294)
Pilot Assist
* (p. 304)
Curve Speed Assist (CSA)
* (p. 316)
Passing assistance
* (p. 318)
Lane Keeping Aid (p. 324)
Steering assistance at risk of collision(p. 345)
Rear Collision Warning
* (p. 351)
BLIS
* (p. 352)
Driver Alert Control (p. 356)
Distance Alert
* (p. 358)
Cross Traffic Alert
* (p. 360)
Park Assist
* (p. 364)
Park Assist Camera
* (p. 369)
Radar sensor (p. 387)
Camera (p. 390)
Speed-dependent steering wheel resistance Speed-dependent power steering increases the steering wheel resistance in pace withthe vehicle's speed, which can help give thedriver an enhanced feeling of control and sta-bility. Steering is stiffer on highways. Whenparking and at low speeds, it will be easier tomove the steering wheel.
Reduced powerIn rare situations, the power steering may need to work at reduced power and the steer-ing wheel may then feel more difficult tomove. This may happen when the powersteering becomes too hot and needs to betemporarily cooled. It can also happen if thereis a disturbance in power supply.
If there is reduced power, the message
Power steering
Assistance temporarily reduced
and this symbol are
shown in the instrument panel.
While the power steering is working at reduced power, the driver support functionsand systems with steering assistance are notavailable.
Page 281 of 683

DRIVER SUPPORT
}}
* Option/accessory.279
WARNING
If the temperature rises too high, the power steering may be forced to switch off com-pletely. In such a situation, the driver dis- play shows the message
Power steering
failure Stop safely along with a symbol.
Changing the level of steering wheel resistance *
In INDIVIDUAL drive mode, the level of steer- ing wheel resistance can be adjusted. 1.
Tap
Settings in the center display's Top
view.
2. Select
My CarDrive ModesSteering Force.
Steering wheel resistance settings can only be accessed if the vehicle is stationary or is mov-ing straight ahead at a low speed.
Related information
Driver support systems (p. 278)
Drive modes
* (p. 419)
Electronic Stability Control
The Electronic Stability Control (ESC 1
) func-
tion helps the driver avoid skidding and improves the vehicle's directional stability.
This symbol will be displayed in the instrument panel whenthe system is intervening. When the system has inter- vened to apply the brakes, apulsing sound may be heard
and the vehicle may accelerate more slowlythan expected when the accelerator pedal isdepressed.
The system consists of the following sub-func- tions:
Stability control 2
Spin control and active yaw control
Engine drag control
Trailer Stability Assist
WARNING
The function is supplementary driver support intended to facilitate drivingand help make it safer – it cannot han-dle all situations in all traffic, weatherand road conditions.
The driver is advised to read all sec-tions in the Owner's Manual about thisfunction to learn of its limitations,which the driver must be aware ofbefore using the function.
Driver support functions are not a sub-stitute for the driver's attention andjudgment. The driver is always respon-sible for ensuring the vehicle is drivenin a safe manner, at the appropriatespeed, with an appropriate distance toother vehicles, and in accordance withcurrent traffic rules and regulations.
Stability control 2This function helps control the driving andbraking force of each individual wheel in anattempt to stabilize the vehicle.
Spin control and active yaw controlThis function is active at low speeds andbrakes the wheels that are spinning to transfer
1
Electronic Stability Control
2 Also called traction control.
Page 285 of 683
DRIVER SUPPORT
283
Symbol Message Meaning
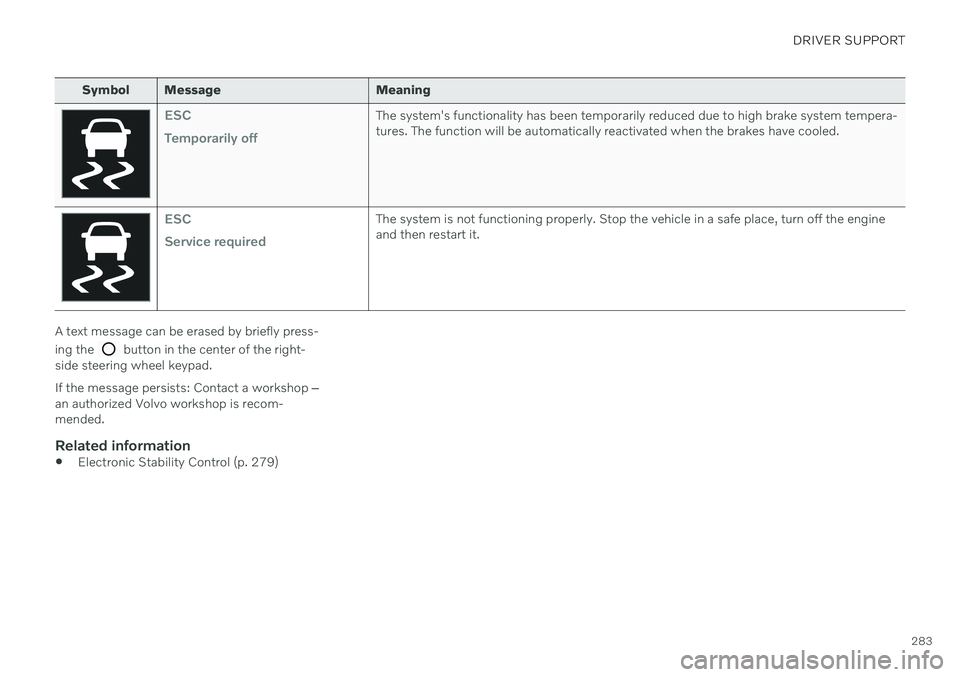
ESC Temporarily offThe system's functionality has been temporarily reduced due to high brake system tempera- tures. The function will be automatically reactivated when the brakes have cooled.
ESC Service requiredThe system is not functioning properly. Stop the vehicle in a safe place, turn off the engine and then restart it.
A text message can be erased by briefly press- ing the
button in the center of the right-
side steering wheel keypad. If the message persists: Contact a workshop ‒
an authorized Volvo workshop is recom- mended.
Related information
Electronic Stability Control (p. 279)
Page 294 of 683
||
DRIVER SUPPORT
* Option/accessory.
292
WARNING
The function is supplementary driver support intended to facilitate drivingand help make it safer – it cannot han-dle all situations in all traffic, weatherand road conditions.
The driver is advised to read all sec-tions in the Owner's Manual about thisfunction to learn of its limitations,which the driver must be aware ofbefore using the function.
Driver support functions are not a sub-stitute for the driver's attention andjudgment. The driver is always respon-sible for ensuring the vehicle is drivenin a safe manner, at the appropriatespeed, with an appropriate distance toother vehicles, and in accordance withcurrent traffic rules and regulations.
Using engine braking instead of applying the brakes
Cruise Control regulates speed by lightly applying the brakes. On downgrades, it cansometimes be desirable to roll a bit faster andlet speed be reduced instead by engine brak-ing alone. The driver can temporarily disen-gage the Cruise Control braking function. To disengage CC:
–Press the accelerator pedal about halfway down and then release it.
> Cruise Control will automatically disen-
gage the automatic brake function and speed will only be reduced using theengine braking function.
Related information
Driver support systems (p. 278)
Selecting and activating cruise control(p. 292)
Deactivating cruise control (p. 293)
Cruise control standby mode (p. 294)
Adjusting set speed for driver support(p. 321)
Switching between cruise control and Adaptive Cruise Control
* in the center dis-
play (p. 301)
Selecting and activating cruise control The Cruise Control (CC 29
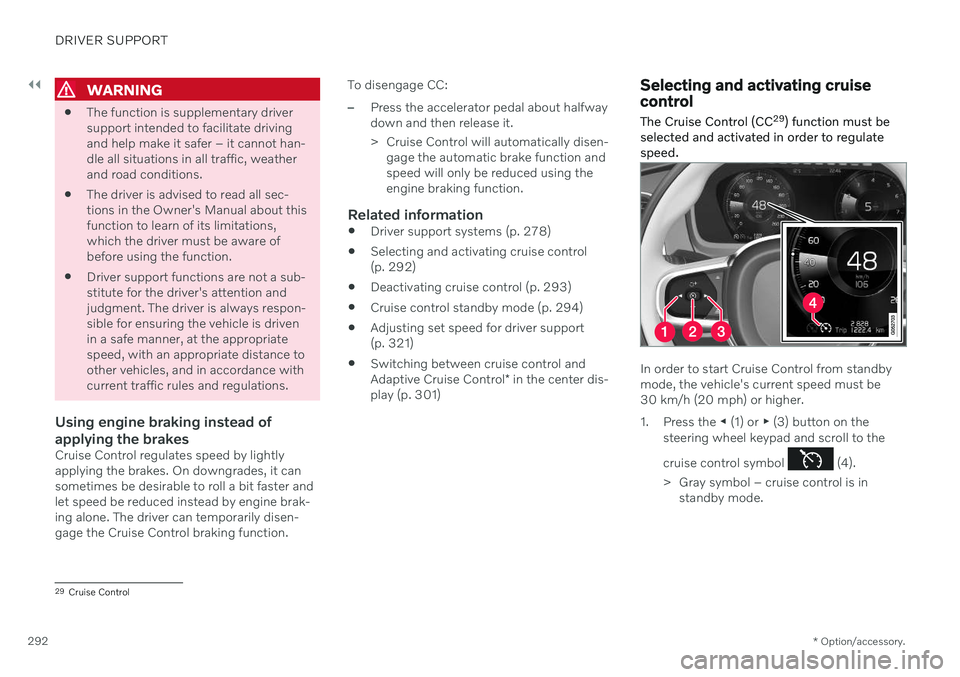
) function must be
selected and activated in order to regulate speed.
In order to start Cruise Control from standby mode, the vehicle's current speed must be30 km/h (20 mph) or higher.
1. Press the ◀ (1) or ▶ (3) button on the
steering wheel keypad and scroll to the cruise control symbol
(4).
> Gray symbol – cruise control is in standby mode.
29Cruise Control
Page 296 of 683

DRIVER SUPPORT
* Option/accessory.
294
Cruise control standby mode Cruise control (CC 31
) can be deactivated and
put in standby mode. This may happen auto- matically or be due to driver intervention.
Standby mode means that the function is selected in the instrument panel but not acti-vated. In standby mode, cruise control will notregulate speed.
Standby mode due to action by the
driver
Cruise control will be deactivated and put instandby mode if any of the following occurs:
The brakes are applied.
The gear selector is moved to
N.
The vehicle is driven faster than the setspeed for more than 1 minute.
The driver must then control the vehicle'sspeed. Temporarily increasing speed using the accel- erator pedal, e.g. when passing another vehi-cle, will not affect the setting. The vehicle willreturn to the set speed when the acceleratorpedal is released.
Automatic standby modeThe function may automatically go intostandby mode if one of the following occurs: The wheels lose traction.
The engine speed (rpm) is too low/high.
The temperature in the brake system becomes too high.
The vehicle's speed goes below 30 km/h(20 mph).
The driver must then control the vehicle'sspeed.
Related information
Cruise control (p. 291)
Selecting and activating cruise control(p. 292)
Deactivating cruise control (p. 293)
Adaptive Cruise Control
*32
Adaptive Cruise Control (ACC 33
) can help the
driver to maintain a constant speed, com- bined with a preset time interval to the vehi-cle in front.
The camera/radar sensor measures the distance to the vehicle ahead.
Adaptive Cruise Control can help provide a more relaxed driving experience on long tripson highways or long, straight roads with eventraffic flows. The driver sets a speed and a time interval to the vehicle ahead. If the camera/radar sensordetects a slower-moving vehicle ahead, yourvehicle's speed will be automatically adaptedaccording to the set time interval to that vehi-
31 Cruise Control
32 Depending on market, this function can be either standard or optional.
33 Adaptive Cruise Control