2021 VOLVO V90 CROSS COUNTRY steering wheel
[x] Cancel search: steering wheelPage 488 of 683
||
AUDIO, MEDIA AND INTERNET
486Changing track/song - tap the desired track in the center display, or press
or below
the center display or on the right-side steering wheel keypad. Rewinding/fast-forwarding - tap the time axis in the center display and drag it sideways, or press and hold
or below the center
display or on the right-side steering wheel keypad. Changing media source - select from among previous sources in the app, tap the desiredapp in App view or use the right-side steeringwheel keypad to select the app in the app menu
.
Library - tap the button to
play from the library.
Shuffle - tap the button to
play tracks in a random order.
Similar - tap the button to
use Gracenote to search for similar music on the USBdevice and create a playlistfrom the music found. Theplaylist can contain up to 50tracks.
Change device - tap the but-
ton to toggle between USB devices when more than oneis connected.
Related information
Media player (p. 483)
Media searches (p. 486)
Sound settings (p. 462)
Apps (p. 464)
Gracenote ®
(p. 487)
Voice control for radio and media (p. 153)
Media searches
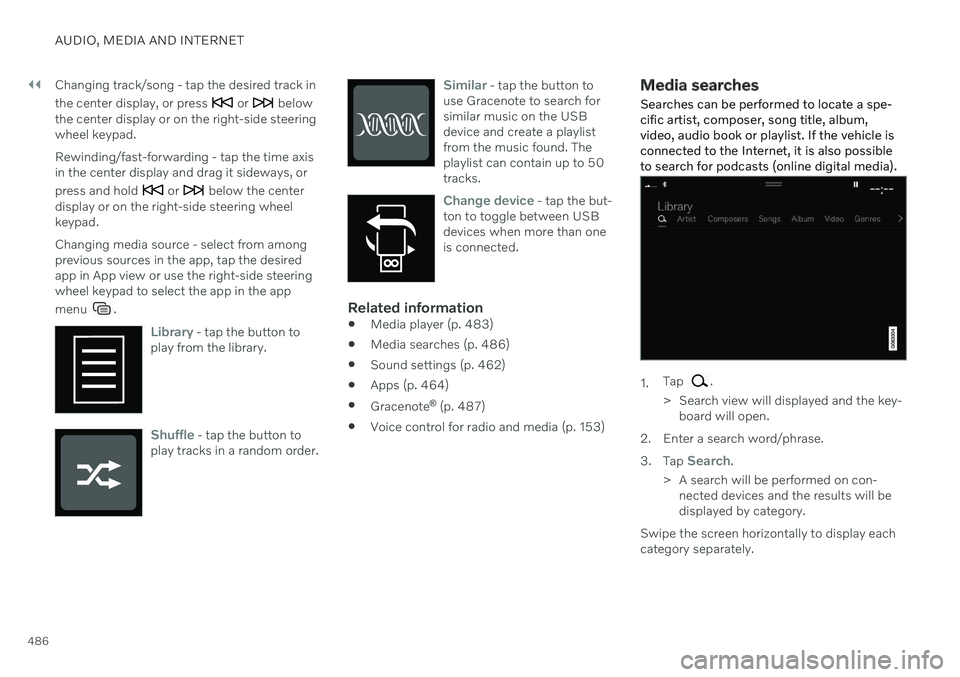
Searches can be performed to locate a spe- cific artist, composer, song title, album,video, audio book or playlist. If the vehicle isconnected to the Internet, it is also possibleto search for podcasts (online digital media).
1. Tap .
> Search view will displayed and the key- board will open.
2. Enter a search word/phrase. 3. Tap
Search.
> A search will be performed on con- nected devices and the results will be displayed by category.
Swipe the screen horizontally to display eachcategory separately.
Page 494 of 683
||
AUDIO, MEDIA AND INTERNET
* Option/accessory.
492
Format File extension
AVI .avi
AVI (DivX) .avi, .divx
ASF .asf, .wmv
Subtitles
Format File extension
SubViewer .sub
SubRip .srt
SSA .ssa
DivX ®
DivX-certified devices have been tested for high-quality DivX (.divx, .avi) video playback.When you see the DivX logo, you have thefreedom to play your favorite DivX videos.
Profile DivX Home Theater
Video codec DivX, MPEG-4
Resolution 720x576Audio speed (bit rate) 4.8Mbps
Frame rate 30 fps
File extension .divx, .avi
Max. file size 4 GB
Audio codec MP3, AC3
Subtitles XSUBSpecial func- tions Multiple subtitles, multi-ple audio, resume play
Reference Meets all requirements of the DivX Home Theaterprofile. Visit divx.com formore information andsoftware tools to convertyour files into DivX HomeTheater video.
Related information
Media player (p. 483)
Video (p. 488)
Playing DivX ®
(p. 488)
Apple ®
CarPlay ®
*
With CarPlay 9
, you can listen to music, make
phone calls, get driving instructions, send/ receive messages and use Siri, all whileremaining focused on driving.
CarPlay works with select iOS devices. If the car doesnot already support CarPlay,this can be retrofitted. Con-tact a Volvo retailer to installCarPlay.
Information about supported apps and com- patible iOS devices are available on the Applewebsite: www.apple.com/ios/carplay/. Usingapps that are not compatible with CarPlaymay sometimes mean that the connectionbetween the device and the vehicle is broken.Please note that Volvo is not responsible forthe content of CarPlay. When using map navigation via CarPlay, guid- ance will only be shown on the center displayand not in the instrument panel or head-updisplay. When navigation is started through Apple CarPlay, any current route guidance from thevehicle's own systems will be discontinued. CarPlay apps can be controlled from the cen- ter display, an iOS device or with the right-side steering wheel keypad (for certain func-tions). The apps can also be voice-controlled
Page 495 of 683
AUDIO, MEDIA AND INTERNET
}}
* Option/accessory.493
using Siri. Press and hold the
button on
the steering wheel to start voice control with Siri. Press briefly to activate the vehicle's ownvoice control system. If Siri cuts off too soon, press and hold the
10 button on the steer-
ing wheel..
By using Apple CarPlay you acknowledge the following: Apple CarPlay is a serviceprovided by Apple Inc. under its terms andconditions. Volvo Cars is thus notresponsible for Apple CarPlay or itsfeatures/applications. When using AppleCarPlay, certain information from your car(including its position) is transferred toyour iPhone. In relation to Volvo Cars, youare fully responsible for your and anyothers person
Page 499 of 683
AUDIO, MEDIA AND INTERNET
* Option/accessory.497
NOTE
When a device is connected to Android Auto, it is possible to stream to anothermedia player via Bluetooth. Bluetooth isactive while Android Auto is in use.
When using navigation guidance provided by Android Auto, navigation will only be shownon the center display and not in the instrumentpanel or head-up display. Android Auto can be controlled from the cen- ter display, with the right-side steering wheelkeypad or by using voice commands. Press and hold the steering wheel button
to
start the Google Assistant and press briefly to deactivate it.
By using Android Auto, you acknowledge the following: Android Auto is a serviceprovided by Google Inc. under its termsand conditions. Volvo Cars is notresponsible for Android Auto or itsfeatures or applications. When you useAndroid Auto, your car transfers certaininformation (including its location) to yourconnected Android phone. You are fullyresponsible for your and any otherperson
Page 501 of 683
AUDIO, MEDIA AND INTERNET
}}
* Option/accessory.499
by tethering using the device's Wi-Fi hot- spot.
Related information
Android Auto
* (p. 496)
Connecting the vehicle to the Internet viaa phone (Wi-Fi) (p. 515)
Phone
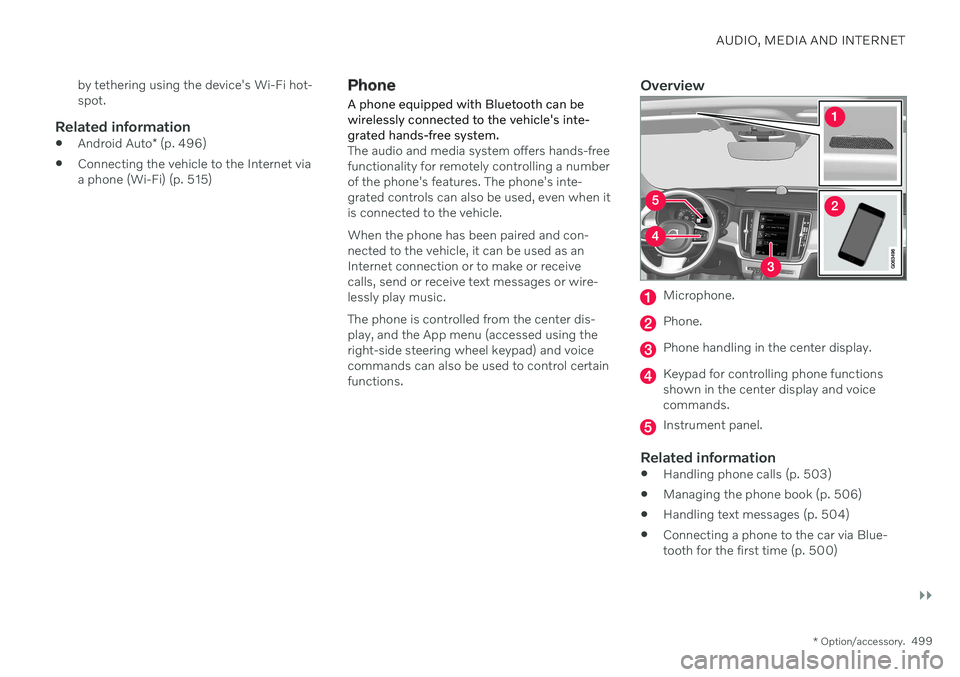
A phone equipped with Bluetooth can be wirelessly connected to the vehicle's inte-grated hands-free system.
The audio and media system offers hands-free functionality for remotely controlling a numberof the phone's features. The phone's inte-grated controls can also be used, even when itis connected to the vehicle. When the phone has been paired and con- nected to the vehicle, it can be used as anInternet connection or to make or receivecalls, send or receive text messages or wire-lessly play music. The phone is controlled from the center dis- play, and the App menu (accessed using theright-side steering wheel keypad) and voicecommands can also be used to control certainfunctions.
Overview
Microphone.
Phone.
Phone handling in the center display.
Keypad for controlling phone functions shown in the center display and voicecommands.
Instrument panel.
Related information
Handling phone calls (p. 503)
Managing the phone book (p. 506)
Handling text messages (p. 504)
Connecting a phone to the car via Blue- tooth for the first time (p. 500)
Page 506 of 683
||
AUDIO, MEDIA AND INTERNET
504opened using the
button on the right-side
steering wheel keypad.
Making multiple calls
While the call is in progress: 1. Tap
Add call.
2. Select from the list of recent calls, favor- ites or contacts.
3. Tap an item/row in the list of recent calls or
for the contact in the phone book.
4. Tap
Swap call to switch between calls.
5. Tap
to end the current call.
Group (conference) calls
While multiple calls are in progress: 1.
Tap
Join calls to merge ongoing calls.
2. Tap
to end the call.
Incoming callsIncoming phone calls will be shown on the instrument panel and in the center display.Manage the calls using the right-side steeringwheel keypad or the center display. 1.
Tap
Answer/Reject.
2. Tap
to end the call.
Incoming calls while another call is in progress
1.
Tap Answer/Reject. 2.
Tap
to end the call.
Privacy–While a call is in progress, tap Privacyand select setting:
Switch to mobile phone - the hands-
free function will be disabled and the call will proceed on the cellular phone.
Driver focused - the microphone in the
ceiling liner on the passenger side will be muted and the call will proceedusing the vehicle's hands-free function.
Related information
Phone (p. 499)
Connecting a phone to the car via Blue-tooth for the first time (p. 500)
Voice control for cellular phones (p. 152)
Handling the App menu in the instrumentpanel (p. 109)
Entering characters, letters and words byhand in the center display (p. 133)
Managing the phone book (p. 506)
Handling text messages (p. 504)
Sound settings (p. 462)
Handling text messages 21
A Bluetooth-connected cellular phone's text messages can be handled in the vehicle.
Text message functionality needs to be acti- vated in certain phones. Not all phones arefully compatible and therefore cannot displaycontacts and messages in the vehicle.
Handling text messages in the center
display
Text messages are only shown in the centerdisplay if the relevant setting is made.
Tap
Messages in App view
to handle text messages in the center display.
NOTE
When the vehicle is moving:
Only one row of the message will be displayed. Tap
Read out to have the
entire message read aloud.
The center display's keyboard cannot be used.
Page 507 of 683
AUDIO, MEDIA AND INTERNET
* Option/accessory.505
Reading text messages in the center display aloud
Tap the icon to have the message read aloud.
Sending text messages in the center display22
1. It is possible to reply to text messages or
create a new message.
To reply to a text message - tap the name of the contact who sent the mes- sage and then tap
Answer.
To create a new message - tap
Create
new. Select a contact or enter a phone
number.
2. Write the message. 3. Tap
Send.
Handling text messages in the instrument panel
Text messages are only shown in the instru- ment panel if the relevant setting is made.
Reading new text messages in the instrument panel aloud
–To have the message read aloud, selectRead out using the steering wheel key-
pad.
Dictating replies in the instrument panel
After the text message has been read aloud, it is possible to dictate a brief reply if the vehiclehas an Internet connection.
–Tap Answer using the steering wheel key-
pad. A dictation dialog will start.
Message alertAlerts can be activated and deactivated in the text message settings.
Related information
Phone (p. 499)
Text message settings (p. 505)
Phone settings (p. 506)
Internet-connected vehicle
* (p. 514)
Voice control for cellular phones (p. 152)
Entering characters, letters and words byhand in the center display (p. 133)
Connecting a phone to the car via Blue-tooth for the first time (p. 500)
Terms of use and data sharing (p. 520)
Text message settings Settings for handling text messages received through a connected phone can be personal-ized.
1.
Tap Settings in the Top view.
2. Tap
CommunicationText Messagesand select settings:
Notification in center display - dis-
play text message notifications in the center display's status bar.
Notification in driver display - dis-
plays notifications in the driver's display and incoming messages can be man-aged using the steering wheel's right-hand keypad.
Text message tone - select tone for
incoming text messages.
Related information
Phone (p. 499)
Connecting a phone to the car via Blue- tooth for the first time (p. 500)
Handling text messages (p. 504)
Phone settings (p. 506)
21
Only applies to certain markets. Contact a Volvo retailer for more information.22Only certain phones can send text messages via the vehicle. The connected phone must support the Bluetooth profile Message Access Profile (MAP).
Page 566 of 683
LOADING, STORAGE AND PASSENGER COMPARTMENT
* Option/accessory.
564
Passenger compartment interior
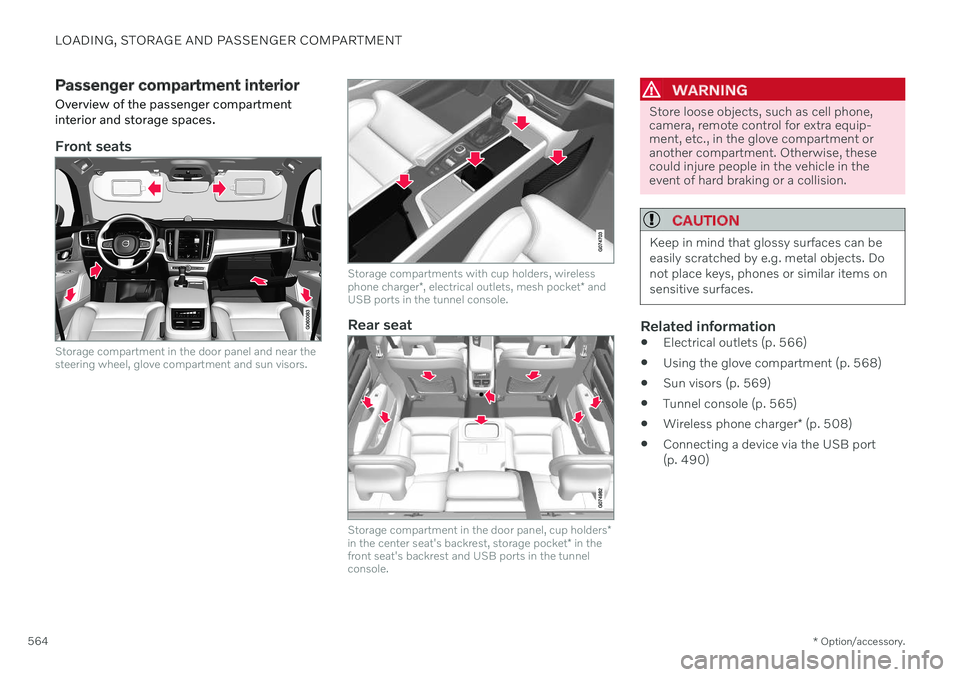
Overview of the passenger compartment interior and storage spaces.
Front seats
Storage compartment in the door panel and near the steering wheel, glove compartment and sun visors.
Storage compartments with cup holders, wireless phone charger *, electrical outlets, mesh pocket * and
USB ports in the tunnel console.
Rear seat
Storage compartment in the door panel, cup holders *
in the center seat's backrest, storage pocket * in the
front seat's backrest and USB ports in the tunnel console.
WARNING
Store loose objects, such as cell phone, camera, remote control for extra equip-ment, etc., in the glove compartment oranother compartment. Otherwise, thesecould injure people in the vehicle in theevent of hard braking or a collision.
CAUTION
Keep in mind that glossy surfaces can be easily scratched by e.g. metal objects. Donot place keys, phones or similar items onsensitive surfaces.
Related information
Electrical outlets (p. 566)
Using the glove compartment (p. 568)
Sun visors (p. 569)
Tunnel console (p. 565)
Wireless phone charger
* (p. 508)
Connecting a device via the USB port (p. 490)