2021 VOLVO V90 CROSS COUNTRY steering wheel
[x] Cancel search: steering wheelPage 423 of 683
STARTING AND DRIVING
}}
* Option/accessory.421
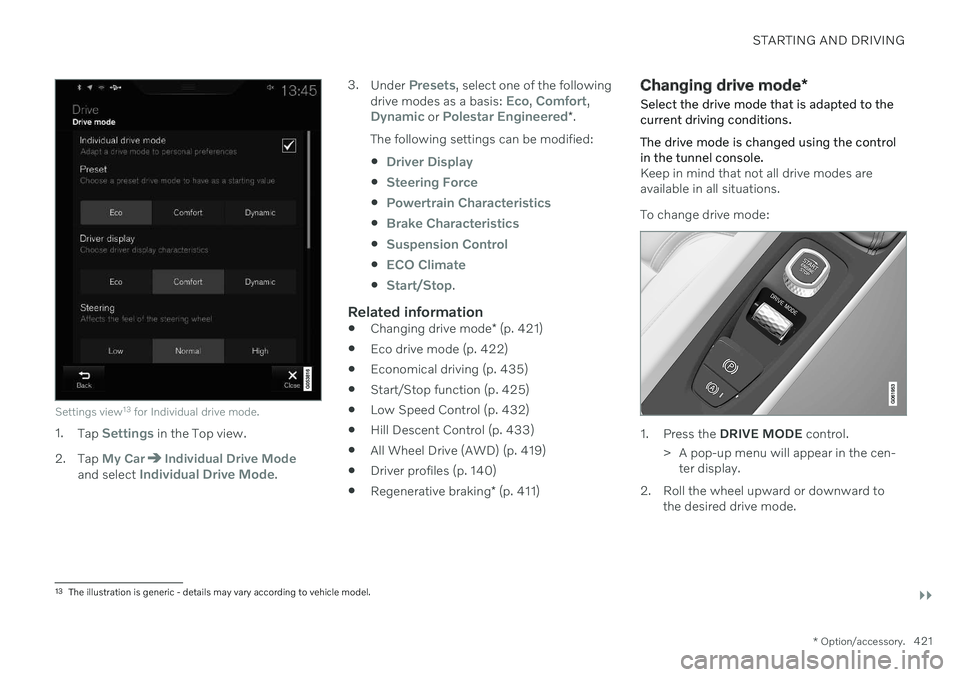
Settings view13
for Individual drive mode.
1. Tap Settings in the Top view.
2. Tap
My CarIndividual Drive Modeand select Individual Drive Mode. 3.
Under
Presets, select one of the following
drive modes as a basis: Eco, Comfort,Dynamic or Polestar Engineered* .
The following settings can be modified:
Driver Display
Steering Force
Powertrain Characteristics
Brake Characteristics
Suspension Control
ECO Climate
Start/Stop.
Related information
Changing drive mode
* (p. 421)
Eco drive mode (p. 422)
Economical driving (p. 435)
Start/Stop function (p. 425)
Low Speed Control (p. 432)
Hill Descent Control (p. 433)
All Wheel Drive (AWD) (p. 419)
Driver profiles (p. 140)
Regenerative braking
* (p. 411)
Changing drive mode *
Select the drive mode that is adapted to the current driving conditions. The drive mode is changed using the control in the tunnel console.
Keep in mind that not all drive modes are available in all situations. To change drive mode:
1. Press the DRIVE MODE control.
> A pop-up menu will appear in the cen- ter display.
2. Roll the wheel upward or downward to the desired drive mode.
13The illustration is generic - details may vary according to vehicle model.
Page 425 of 683
STARTING AND DRIVING
}}
* Option/accessory.423
Limitations
Eco Coast is not available if
the engine and/or transmission are not at normal working temperatures
the gear selector is moved from
D to man-
ual shifting mode
the vehicle's speed is not within the65-140 km/h (40-87 mph) range
the gradient of the downgrade is morethan approximately 6%
the steering wheel paddles
* are being
used for manual shifting.
Deactivating and turning off Eco Coast
In certain situations, it may be advisable to deactivate or turn off Eco Coast so that enginebraking can be used. These situations mightinclude driving down steep hills or beforepassing another vehicle to help ensure thiscan be done as safely as possible. Deactivate Eco Coast by
pressing the accelerator or brake pedal
moving the gear selector to manual mode
using the steering wheel paddles
* to shift.
Turn off Eco Coast by
switching to another drive mode
*
deactivating
Eco drive mode in Function
view. It is possible to roll short distances even with- out Eco Coast in order to help conserve fuel.However, for the best fuel economy, EcoCoast should be activated and used to rolllonger distances.
Cruise control Eco CruiseWhen cruise control is activated in the Ecodrive mode, the vehicle's acceleration and deceleration will be slower than in other drivemodes to help further conserve fuel. Becauseof this, the vehicle's actual speed may beslightly above or below the set speed.
On a level road, the vehicle's actual speedmay differ from the set speed when cruisecontrol is active and the vehicle is coast-ing.
On a steep uphill gradient, the vehicle'sspeed is reduced until the transmissiondownshifts. Reduced acceleration is theninitiated in order to reach the set speed.
On a downhill gradient in which the vehi- cle is coasting, the vehicle's actual speed may be slightly above or below the setspeed. The function uses engine brakingto keep the set speed. If necessary, thenormal brakes are also applied.
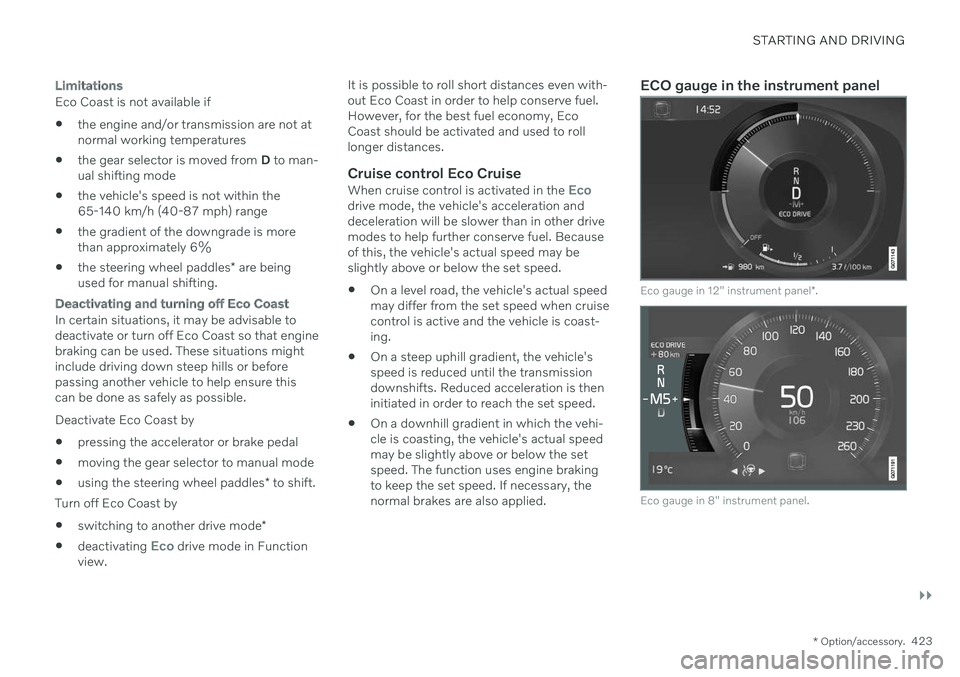
ECO gauge in the instrument panel
Eco gauge in 12" instrument panel
*.
Eco gauge in 8" instrument panel.
Page 427 of 683
STARTING AND DRIVING
}}
* Option/accessory.425
Start/Stop function Start/Stop is a function that temporarily switches off the engine when the vehicle hasstopped, e.g. at a traffic light or in heavy traf-fic, and then starts it again automaticallywhen needed.
The Start/Stop function reduces fuel con- sumption, which helps to reduce exhaustemissions. The system makes it possible to drive more economically and climate-smart by letting theengine auto-stop when appropriate.
Related information
Driving with the Start/Stop function(p. 425)
Conditions for the Start/Stop function(p. 427)
Drive modes
* (p. 419)
Driving with the Start/Stop function
Start/stop is a function that temporarily turns off the engine when the vehicle is stationaryand then automatically starts it when needed.
The Start/Stop function is available when the ignition is started and can be activated if cer-tain conditions are met. The instrument panel indicates when the func- tion is
Available
active
not available.
All of the vehicle's ordinary systems, such aslighting, radio, etc. function normally when theengine has been auto-stopped. Certain func-tions may be temporarily reduced howeversuch as the climate system's blower speed orextremely high audio system volume.
Auto-stopTo auto-stop the engine: Stop the vehicle by applying the brakes and keep the brake pedal depressed. Theengine will auto-stop.
In
Comfort or Eco drive mode, the engine
may auto-stop before the vehicle has com- pletely stopped. With Adaptive Cruise Control or Pilot Assistactivated, the engine will auto-stop aboutthree seconds after the vehicle has stopped.
Auto-startThe following conditions must be met for theengine to auto-start.
Release the brake pedal. The engine willauto-start and the vehicle can be driven.On an uphill gradient, Hill Start Assist (HSA 14
) will activate to help prevent the
vehicle from rolling backward.
When the Auto-hold function is activated, auto-start will be delayed until the acceler-ator is pressed.
When Adaptive Cruise Control or PilotAssist are activated, the engine will auto-start when the accelerator pedal is depressed or the
button on the left-
side steering wheel keypad is pressed.
Maintain pressure on the brake pedal and press the accelerator pedal. The enginewill auto-start.
On a downhill gradient: Release the brakepedal slightly so that the vehicle begins toroll. The engine will auto-start after a slightincrease in speed.
14
Hill Start Assist
Page 429 of 683
STARTING AND DRIVING
}}
427
Conditions for the Start/Stop functionCertain conditions must be met for Start/ Stop to function.
If any condition is not met, this will be indi- cated in the instrument panel.
The engine does not auto-stopThe engine will not auto-stop if: The vehicle has not reached a speed of ca 10 km/h (6 mph) after starting.
After several auto-stops, the speed mustagain exceed approximately ca 10 km/h(6 mph) before the next auto-stop.
The driver has not fastened the seatbelt.
The engine is not running at its normaloperating temperature.
The ambient temperature is underapproximately -5 °C (23 °F) or overapproximately 30 °C (86 °F).
Windshield heating is activated.
The climate system settings and theactual climate in the passenger compart-ment differ.
The vehicle is in reverse.
The driver is making large steering wheelmovements.
The road gradient is very steep.
The hood is open.
Driving at high altitude and the engine hasnot reached its normal operating tempera-ture.
ABS has been activated.
Hard braking (even if the ABS system hasnot been activated).
Many starts during a short period of timehave triggered the starter motor's over-heating protection.
The exhaust system's particulate filter isfull.
A trailer is connected to the vehicle's elec-trical system.
The transmission is not running at its nor-mal operating temperature.
The gear selector is in mode
M (±
).
If traffic conditions allow it (for example ina traffic jam).
The engine does not auto-startThe engine will not auto-start after an auto-stop if:
The driver is not wearing a seat belt, thegear selector is in the
P position and the
driver's door is open. The engine must bestarted normally.
The engine auto-starts while the brake pedal is depressed
In the following situations, the engine will auto-start even if the brake pedal isdepressed:
High levels of condensation on the insideof the windows.
The climate system settings and theactual climate in the passenger compart-ment differ.
The brake pedal is pumped repeatedly.
The hood is open.
The vehicle begins to roll or increasesspeed slightly if the engine auto-stoppedbefore the vehicle was at a standstill.
The driver's seat belt is unbuckled with thegear selector in the
D or N positions.
The gear selector is moved from
D to R or
M (± ).
The driver's door is opened with the gearselector in
D. An audible signal and a text
message informs the driver that the igni-tion is on.
WARNING
Do not open the hood if the engine has auto-stopped. Turn off the engine byswitching off the ignition before lifting thehood.
Page 437 of 683
STARTING AND DRIVING
}}
* Option/accessory.435
Related information
Hill Descent Control (p. 433)
Changing drive mode
* (p. 421)
Economical driving
A more economical driving style can help lower fuel consumption.
Before driving
If possible, precondition the vehicle before driving.
If preconditioning is not possible when itis cold outside, use seat and steeringwheel heating first. Avoid heating theentire passenger compartment to reducethe amount of current being taken fromthe start battery.
Avoid using idling to warm up the vehiclebefore driving.
The type of tires and inflation pressureused could affect energy consumption –consult an authorized Volvo retailer foradvice on suitable tires.
Remove unnecessary items from the vehi-cle - the heavier the load, the higher thefuel consumption.
While driving
Activate Eco drive mode.
Use gear selector position
D as often as
possible.
When using manual gear shifting, drive using the highest possible gear. Use the gear indicator 19
.
Maintain a steady speed and a generous following distance to traffic ahead to mini-mize braking. Use engine braking if possi-ble.
Higher speeds increase energy consump-tion because air resistance increases withspeed.
In a cold climate, reduce heating of thewindshield/rear window, mirrors, seatsand the steering wheel.
Avoid driving with the windows open.
Do not use the accelerator pedal to keepthe vehicle stationary on an uphill gradi-ent. Instead, activate the auto-hold brakefunction at a standstill.
Use trip data to see current fuel consump-tion.
WARNING
Never turn off the engine while the vehicle is moving, e.g. when driving downhill. Thisdeactivates certain important systemssuch as power steering and brakes.
19
Only available in certain markets.
Page 447 of 683
STARTING AND DRIVING
}}
445
WARNING
High voltage may be dangerous if handled incorrectly. Do not touch anything on bat-teries that is not clearly described in thisOwner's Manual. Never use a 48 V support battery to jump start the vehicle.
External electrical equipment may notunder any circumstance be connectedto the 48 V battery.
Only a workshop may replace or per-form service on the 48 V battery – anauthorized Volvo workshop is recom-mended.
WARNING
PROPOSITION 65 WARNING!
Battery
posts, terminals, and related accessories contain lead and lead compounds, chemi-cals known to the state of California tocause cancer and reproductive harm. Washhands after handling.
WARNING
Batteries generate hydrogen gas, which is flammable and explosive.
Do not connect the jumper cable toany part of the fuel system or to anymoving parts. Avoid touching hotmanifolds.
Battery fluid contains sulfuric acid. Donot allow battery fluid to contact eyes,skin, fabrics or painted surfaces.
If contact occurs, flush the affectedarea immediately with water. Obtainmedical help immediately if eyes areaffected.
Never expose the battery to open flameor electric spark. Do not smoke nearthe battery. Failure to follow theinstructions for jump starting can leadto injury.
NOTE
If the starter battery has been discharged to the extent that the vehicle does not havenormal electrical functions and the enginemust then be jump-started with an externalbattery or a battery charger, the Start/Stopfunction may remain activated. If the Start/Stop function shortly thereafter auto-stopsthe engine, there is a huge risk that auto-start of the engine will fail due to insuffi-cient battery capacity since the battery hadnot had time to recharge. If the vehicle has been jump-started or if there has not been enough time for thebattery to be charged with a batterycharger, the Start/Stop function should betemporarily deactivated until the batteryhas been recharged by the vehicle. At anambient temperature of about +15°C(about 60°F), the battery must be chargedby the vehicle for at least one hour. Atlower ambient temperatures, the chargingtime can increase to 3-4 hours. It is advisa-ble to charge the battery with an externalbattery charger.
Related information
Starting the vehicle (p. 398)
Ignition modes (p. 401)
Adjusting the steering wheel (p. 203)
Page 450 of 683
||
STARTING AND DRIVING
* Option/accessory.
448
Related information
Trailer Stability Assist
* (p. 448)
Checking trailer lights (p. 449)
Towing capacity and tongue weight (p. 656)
Overheating of engine and transmission(p. 442)
Trailer Stability Assist
*
Trailer Stability Assist (TSA 23
) is part of the
ESC 24
stability system and is a function
designed to help stabilize a vehicle that is towing a trailer when the vehicle and trailerhave begun to sway. The function is addedwhen installing a towbar. Contact a Volvoretailer for more information.
Reasons for swayingA vehicle towing a trailer may begin to sway for various reasons. Normally this only occursat high speeds. However, if the trailer is over-loaded or unevenly distributed, e.g. too farback, there is a risk of swaying even at lowspeeds. Swaying may be caused by factors such as:
The vehicle and trailer are hit by a sudden, strong crosswind.
The vehicle and trailer are traveling on anuneven road or over a bump.
Sudden movements of the steering wheel.
Once swaying has begun, it can be difficult orimpossible to stop it. This makes the vehicleand trailer difficult to control and there is a riskof swerving into oncoming traffic or driving offthe road.
Trailer Stability Assist functionTrailer Stability Assist continuously monitorsthe vehicle's movements, particularly lateralmovements. If swaying is detected, the brakesare applied individually on the front wheels,which has a stabilizing effect on the vehicleand trailer. This is often enough to enable thedriver to regain control of the vehicle. If the Trailer Stability Assist function's first attempt is not adequate to stop the swayingmotion, the brakes are applied on all wheelsand engine power is temporarily reduced. Asthe swaying motion begins to decrease andthe vehicle and trailer have once againbecome stable, TSA stops regulating thebrakes/engine power and the driver regainscontrol of the vehicle.
NOTE
Trailer Stability Assist is deactivated if the driver activates ESC Sport Mode in the
center display's menu system.
Trailer Stability Assist may not intervene if the driver tries to compensate for the swayingmotion by moving the steering wheel rapidly,because the system will then not be able todetermine if it is the trailer or the driver caus-ing the swaying.
23 Trailer Stability Assist
24 Electronic Stability Control
Page 452 of 683
||
STARTING AND DRIVING
* Option/accessory.
450
Checking trailer lights *
Automatic check
When the trailer has been connected to the vehicle's electrical system, its lights can bechecked by automatically activating them.This function helps the driver check that thetrailer's lights are functioning correctly beforestarting to drive. In order to perform this check, the vehicle must be switched off.
1. When a trailer is connected to the towbar,
the message
Automatic Trailer Lamp
Check will appear in the instrument panel.
2. Acknowledge the message by pressing the O button on the right-side steering
wheel keypad.
> The light check will begin.
3. Get out of the vehicle to perform the check.
> All of the lights on the trailer will beginflashing, and then illuminate separately one at a time.
4. Visually check that all of the trailer's lights are functioning correctly.
5. After a short time, all of the trailer's lights will start flashing again.
> The light check is completed.
Disabling the automatic check
The automatic light check can be disabled in the center display. 1.Tap
Settings in the Top view.
2. Tap
My CarLights and Lighting.
3. Deselect
Automatic Trailer Lamp
Check.
Manual check
If the automatic check has been disabled, the check can be started manually. 1. Tap
Settings in the Top view.
2. Tap
My CarLights and Lighting.
3. Select
Manual Trailer Lamp Check.
> The light check will begin. Get out of the vehicle to perform the check.
Related information
Driving with a trailer (p. 446)
Towing using a towline
This section refers to one vehicle being towed behind another using a towline.
Before towing another vehicle, check applica- ble speed limit regulations.
Preparations and towing
CAUTION
For some transmission variants, it is not possible to shift from P position if theengine is switched off. Contact an author-ized Volvo workshop for assistance towingor call a professional towing service.
CAUTION
Note that the vehicle must always be towed with the wheels rolling forward.
Do not tow a vehicle with automatictransmission at a speed greater than80 km/h (50 mph) or for a distancegreater than 80 km (50 miles).