2021 VOLKSWAGEN TRANSPORTER lock
[x] Cancel search: lockPage 187 of 486
Switching on the refrigerator box
• Slide the cover open =>Fig. 149 (D.
• Move switch =>Fig. 150 CD to I position. When the refrigerator box is switched on, the lamp in the box lights up.
• Fill the refrigerator box and then close the lid =>&.
Switching off the refrigerator box
• Slide the cover open =>Fig. 149 (D.
• Move switch =>Fig. 150 CD to 0 position. The in-dicator lamp in the refrigerator box goes out.
• Close the cover.
Notes on cleaning and care
Clean the refrigerator box thoroughly before using it for the first time, if it is dirty or if it has not been used for a long time.
To avoid stains and mildew in the refrigerator box if it remains unused for a long time, leave the cover slightly open.
• Use water and normal household cleaning fluid to clean the refrigerator box.
• The refrigerator box should be defrosted regu-larly to prevent layers of ice forming. To do this, switch the refrigerator box off and leave the cover open. Do not use an additional heat source to de-frost the refrigerator more quickly. This could dam-age the refrigerator =>
If the refrigerator box is left on when the engine is not running, the additional battery runs down. The refrigerator box is therefore fitted with a battery monitor. The battery monitor will switch the refriger-ated box off if the charge of the additional battery becomes too low. The battery monitor will switch the refrigerator box on again as soon as the addi-tional battery has reached a suitable charge level, for example, after a long journey.
Rear-seat telephony, Business
a:n Introduction
This chapter contains information on the following subjects:
Components . . . . . . . . . . . . . . . . . . . . . . . . . . . . 189
Pairing a mobile telephone before using it for the first time . . . . . . . . . 190
Functional description ........... . 190
A WARNING
Objects that are not secured, or are secured incorrectly, can cause serious injuries in the event of a sudden driving or braking manoeu-vre or accident.
• The refrigerator box lid must always be kept closed and locked when the vehicle is in motion.
• Never use the refrigerator box as a table or stowage compartment when the vehicle is In motion.
A WARNING
If the ambient temperature In the vehicle Is too low, the temperature in the refrigerator box could fall below +2 •c {+35 °F) degrees. ThIs could cause the contents of the refriger-ator box to freeze and bottles and other con-tainers to burst, potentially causing Injuries.
• Do not use the refrigerator box when the ambient temperature Is too low.
CD
Handling the refrigerator box incorrectly could damage it.
• Do not place containers, food or other ob-jects which are warmer than +50 •c (+122 •F) In the refrigerator box.
• Do not place corrosive substances or sol-vents in the refrigerator box.
• Do not use an additional heat source to de-frost the refrigerator box.
m The refrigerator box is not suitable for cooling W the vehicle interior. The refrigerator box should only be used to keep food cool and for transporting heat-sensitive items on short journeys.
The rear-seat telephony system (hands-free sys-tem in the passenger compartment with Private Mode) works independently of other provision for mobile telephones fitted in the vehicle. Neither the
Equipment, Business 1187
Page 188 of 486
menus provided by way of the instrument cluster nor the factory-installed radio or navigation system can be used to make rear-seat telephony settings.
lfv'hen pairing a mobile telephone with the rear-seat telephony system using the hands-free profile (HFP) and when the mobile telephone is not in the charging base, observe the information on use of a mobile telephone in the vehicle without connection to the external aerial =>page 399.
Follow the operating manual for your mobile tele· phone and the instructions provided by the acces-sory manufacturer.
You may experience poor reception or may be cut off in areas where the signal is weak.
Most electronic devices are shielded against high-frequency signals. In rare cases, however, it Is pos-sible that electronic devices will not be shielded against high-frequency signals emitted by the rear-seat telephony system. This can cause Interfer-ence.
Bluetooth
Bluetooth technology is used to connect a mobile telephone to the hands-free system fitted In a vehi· cle. Pairing needs to be carried out once only in or-der to use the rear-seat telephony system with a Bluetooth mobile telephone.
Use compatible Bluetooth devices only. Information on compatible Bluetooth products Is available from your Volkswagen Commercial Vehicles dealer or on the Internet.
Some Bluetooth mobile telephones are detected and connected automatically when the ignition is switched on. For this to happen, the mobile tele-phone and the Bluetooth function in the telephone must be switched on, and all active Bluetooth con-nections to other units must be disconnected.
The Bluetooth connection is free of charge.
Bluetooth® is a registered trademark of Blue-tooth® SIG, Inc.
Declaration of conformity
BURY Sp. z o.o. herewith declares that this system complies with the basic requirements and the rele· van! stipulations of directive 1999/5/EG. This sys-tem has been classified as belonging to Device Class 1. A manufacturer's declaration of conformity for this system can be requested from the following e-mail address: [email protected]. Please formulate all enquiries either In English or German.
((
166 I Before the journey
Additional information and warnings:
• Digital voice enhancement =>page 173
• Accessories, modifications, repairs and renewal of parts =>page 394
• Radio or navigation system =>Booklet Radio, provision for mobile telephone, infotainment sys-tem, navigation system
A wARNING
Accidents and Injuries can occur If the driver Is distracted. Using the telephone or the rear· seat telephony system can distract you from what Is happening on the road.
• Select volume settings that allow signals from outside the vehicle (such as emergency services sirens) to be easily heard at all times. Comply with legal regulations.
• Your call may be cut off or you may be un-able to make calls If you are In an area with no mobile telephone network coverage, an area where the network Is very weak or, In some cases, In a tunnel, garage or under-pass. This also means that no emergency calls can be made.
• In some countries, lt Is only possible to make an emergency call from the rear-seat telephony system if it is connected to a mo-bile telephone containing a SIM card that is "unlocked" and has sufficient credit.
A WARNING
Any mobile telephone that is not secured or Is incorrectly secured in the vehicle could be flung though the interior during a sudden driving or braking manoeuvre, or In the event of an accident. This could cause Injuries.
• You should never position or attach a mo-bile telephone on a door, on the windscreen or above or near to the areas marked "AIR-BAG" on the steering wheel, the dash panel and the seat backrests, or between these areas and the vehicle occupants. The mobile telephone could cause serious Injury In an accident, especially when the alrbags Inflate.
A WARNING
Always switch off the mobile telephone when filling the tank and in areas with a risk of ex-plosion. Electromagnetic radiation can gener-ate sparks which can In turn start a fire.
• The mobile telephone can automatically log Itself Into the mobile telephone network again If the Bluetooth connection to the rear-seat telephony system has been Interrupted. I>
Page 190 of 486
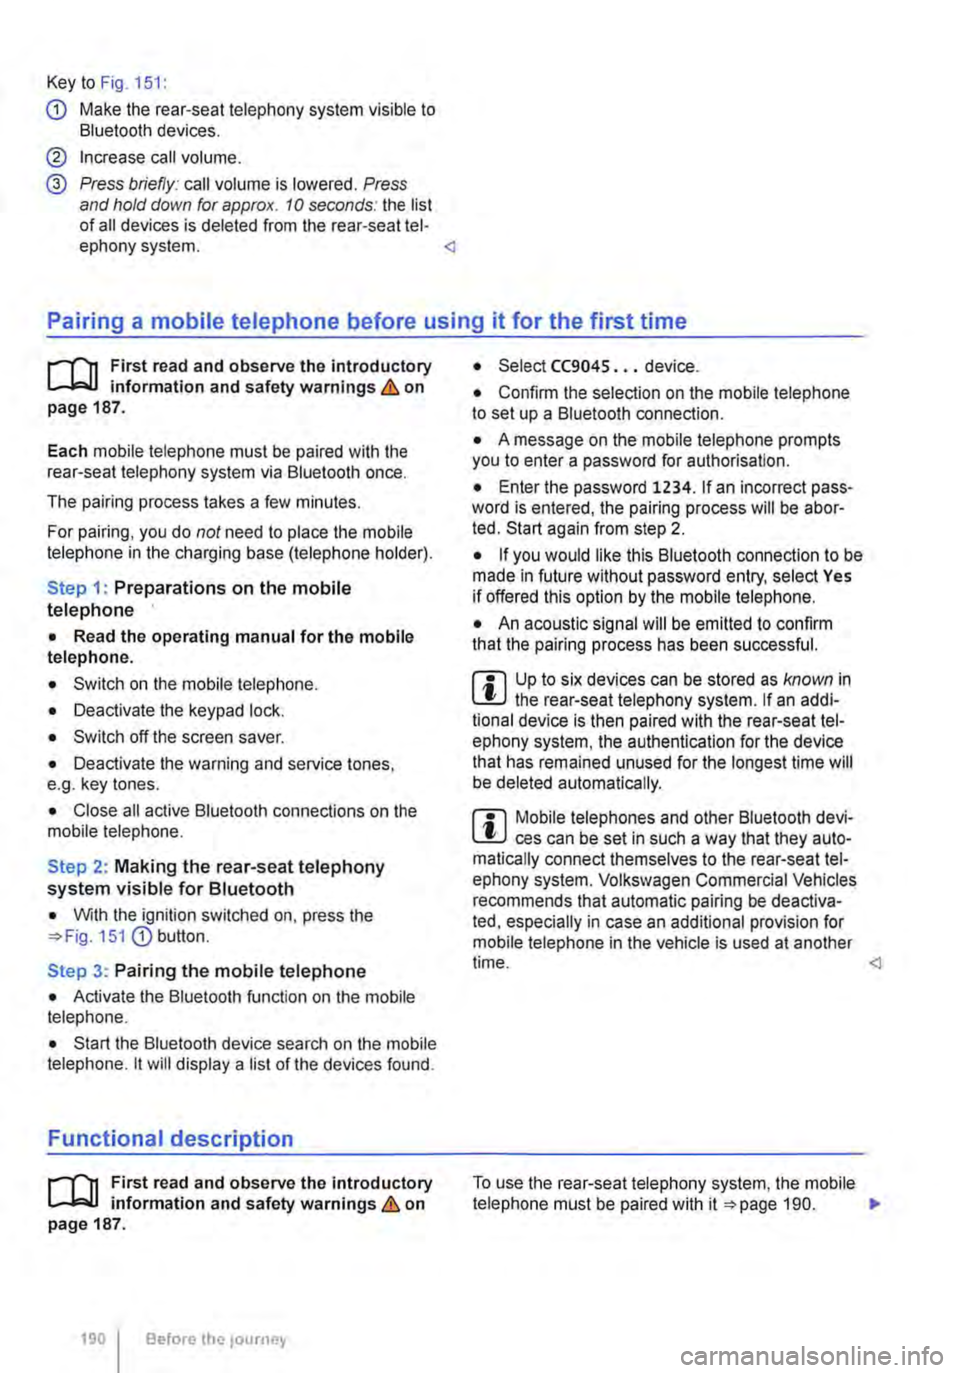
Key to Fig. 151:
G) Make the rear-seat telephony system visible to Bluetooth devices.
@ Increase call volume.
@ Press briefly: call volume is lowered. Press and hold down for approx. 10 seconds: the list of all devices is deleted from the rear-seat tel-ephony system.
il""'n First read and observe the introductory L--i=J.I information and safety warnings & on page 187.
Each mobile telephone must be paired with the rear-seat telephony system via Bluetooth once.
The pairing process takes a few minutes.
For pairing, you do not need to place the mobile telephone in the charging base (telephone holder).
Step 1: Preparations on the mobile telephone
• Read the operating manual for the mobile telephone.
• Switch on the mobile telephone.
• Deactivate the keypad lock.
• Switch off the screen saver.
• Deactivate the warning and service tones, e.g. key tones.
• Close all active Bluetooth connections on the mobile telephone.
Step 2: Making the rear-seat telephony system visible for Bluetooth
• With the ignition switched on, press the 151 G) button.
Step 3: Pairing the mobile telephone
• Activate the Bluetooth function on the mobile telephone.
• Start the Bluetooth device search on the mobile telephone. it will display a list of the devices found.
Functional description
il""'n First read and observe the introductory L--i=J.I information and safety warnings & on page 187.
190 I Before the journey
• Select CC9045 ... device.
• Confirm the selection on the mobile telephone to set up a Bluetooth connection.
• A message on the mobile telephone prompts you to enter a password for authorisation.
• Enter the password 1234. If an incorrect pass-word is entered, the pairing process will be abor-ted. Start again from step 2.
• If you would like this Bluetooth connection to be made in future without password entry, select Yes if offered this option by the mobile telephone.
• An acoustic signal will be emitted to confirm that the pairing process has been successful.
m Up to six devices can be stored as known in L!.J the rear-seat telephony system. If an addi-tional device is then paired with the rear-seat tel-ephony system, the authentication for the device that has remained unused for the longest time will be deleted automatically.
m Mobile telephones and other Bluetooth devi-L!.J ces can be set in such a way that they auto-matically connect themselves to the rear-seat tel-ephony system. Volkswagen Commercial Vehicles recommends that automatic pairing be deactiva-ted, especially in case an additional provision for mobile telephone in the vehicle is used at another time.
Page 191 of 486
When the mobile telephone has been paired with the rear-seat telephony system via Bluetooth, the following applies:
• There is a connection between the mobile tele-phone and the microphone at the rear on the right in the passenger compartment headliner.
• Incoming calls are output over the vehicle loud-speaker in the rear right side trim paneL
• The digital voice enhancement (DVE) is switch-ed off during a telephone calL
When a paired mobile telephone is in the charging base (telephone holder), the following applies:
• The mobile telephone is connected to the exter-nal aerial via the charging base.
• If the vehicle key is in the ignition lock. the bat-tery in the mobile telephone will be charged, if nec-essary.
Using the telephone handset
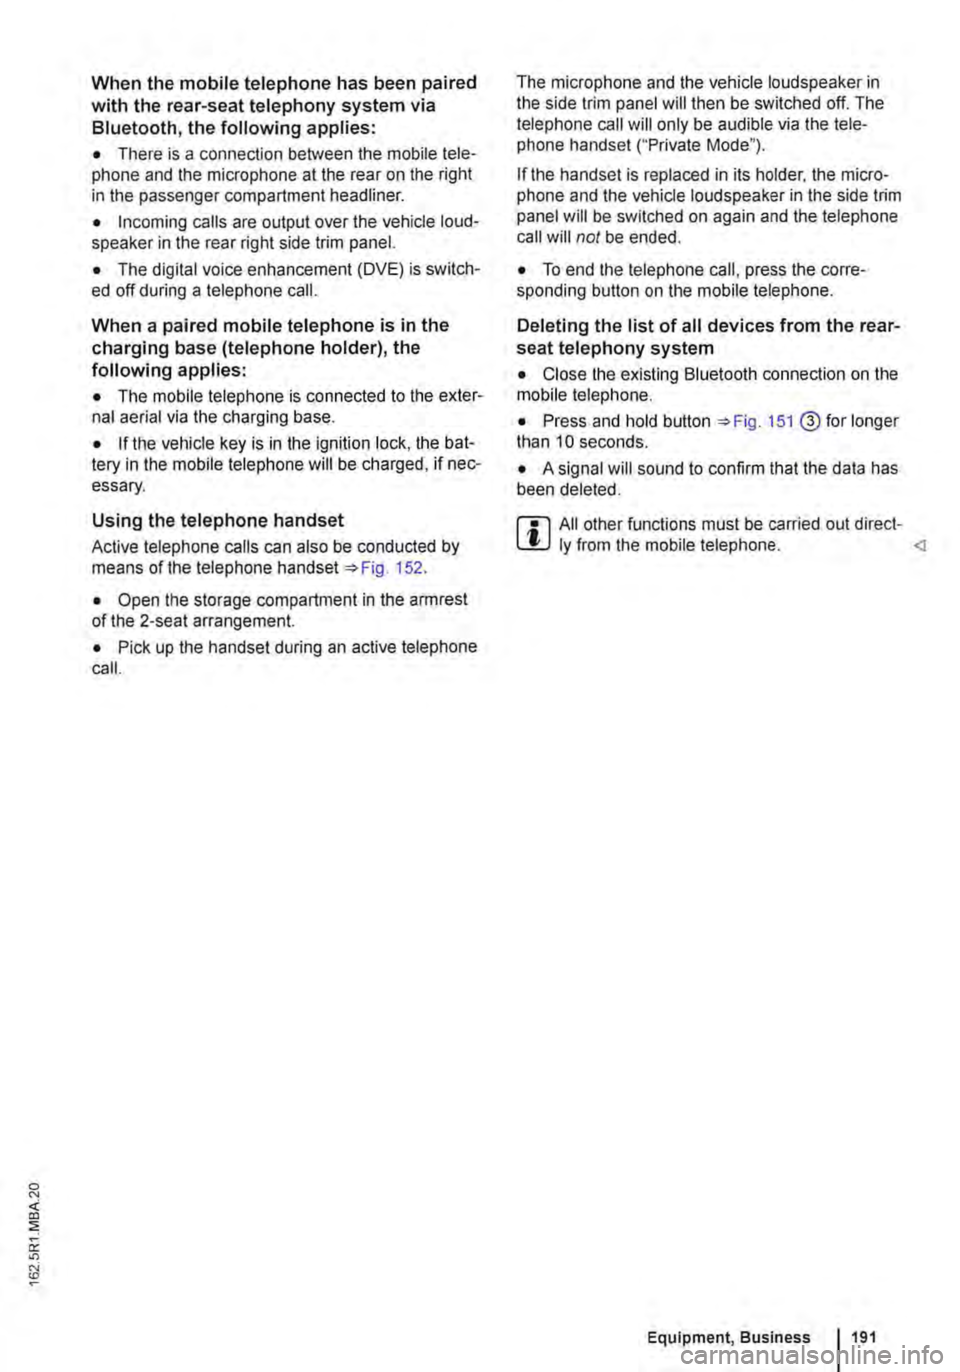
Active telephone calls can also be conducted by means of the telephone handset 152.
• Open the storage compartment in the armrest of the 2-seat arrangement.
• Pick up the handset during an active telephone calL
The microphone and the vehicle loudspeaker in the side trim panel will then be switched off. The telephone call will only be audible via the tele-phone handset ("Private Mode").
If the handset is replaced in its holder, the micro-phone and the vehicle loudspeaker in the side trim panel will be switched on again and the telephone call will not be ended.
• To end the telephone call, press the corre-sponding button on the mobile telephone.
Deleting the list of all devices from the rear-seat telephony system
• Close the existing Bluetooth connection on the mobile telephone.
• Press and hold button 151@ for longer than 10 seconds.
• A signal will sound to confirm that the data has been deleted.
m All other functions must be carried out direct-L!J ly from the mobile telephone.
Page 193 of 486
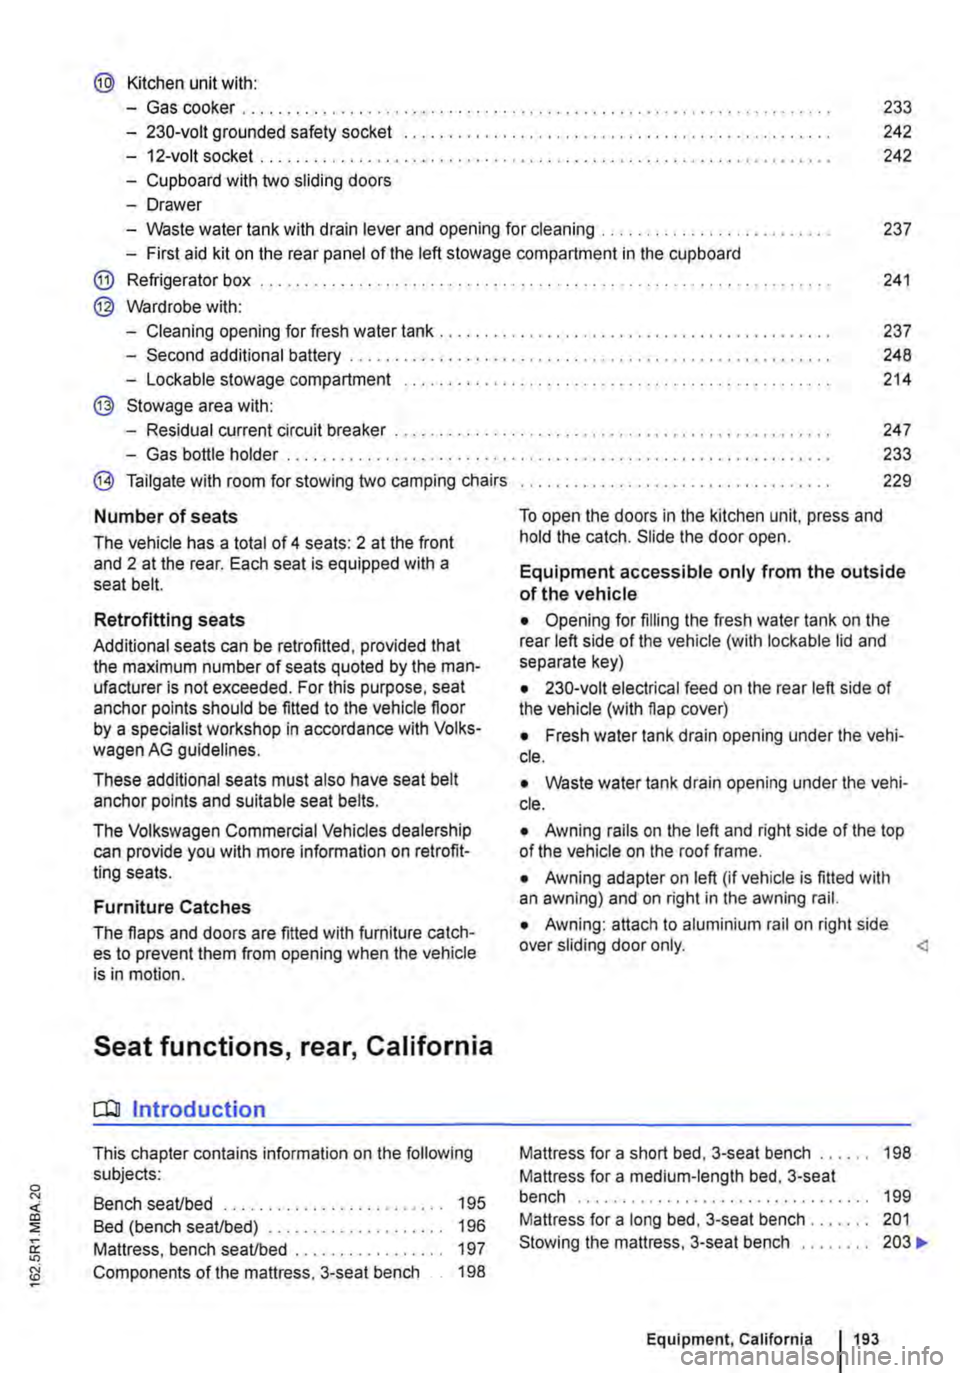
@ Kitchen unit with:
-Gas cooker ................................... . 233
242
242
-230-volt grounded safety socket ................. .
-12-volt socket .............................•..................................
-Cupboard with two sliding doors
-Drawer
-Waste water tank with drain lever and opening for cleaning ...... . 237
-First aid kit on the rear panel of the left stowage compartment in the cupboard
@ Refrigerator box ...
@ Wardrobe with:
241
-Cleaning opening for fresh water tank . . . . . . . . . . . . . . . . . . . . . . . . . . . . . . . . . . . . . . . 237
-Second additional battery . . . . . ........ , . . . . . . . . . . . . . . . . . . . . . . . . . . 248
-Lockable stowage compartment . . . . . . . . . . . . . . . . . . . . . . . . . . . . . . . . . . . . . . . . . . . . . . . . 214
@ Stowage area with:
-Residual current circuit breaker ............... , ...... . 247
233
229
-Gas bottle holder .................. .
® Tailgate with room for stowing two camping chairs
Number of seats
The vehicle has a total of 4 seats: 2 at the front and 2 at the rear. Each seat is equipped with a seat belt.
Retrofitting seats
Additional seats can be retrofitted, provided that the maximum number of seats quoted by the man-ufacturer is not exceeded. For this purpose, seat anchor points should be fitted to the vehicle floor by a specialist workshop in accordance with Volks-wagen AG guidelines.
These additional seats must also have seat belt anchor points and suitable seat belts.
The Volkswagen Commercial Vehicles dealership can provide you with more information on retrofit-ting seats.
Furniture Catches
The flaps and doors are fitted with furniture catch-es to prevent them from opening when the vehicle is in motion.
Seat functions, rear, California
ClJ Introduction
This chapter contains information on the following subjects:
Bench seat/bed . . . . . . . . . . . . . . . . . . . . • • . . . 195
Bed (bench seat/bed) . . . . . . . . . . . 196 Mattress, bench seat/bed . . . . . . . . . . . . . . . . . 197
Components of the mattress, 3-seat bench . . 198
To open the doors in the kitchen unit, press and hold the catch. Slide the door open.
Equipment accessible only from the outside of the vehicle
• Opening for filling the fresh water tank on the rear left side of the vehicle (with lockable lid and separate key)
• 230-volt electrical feed on the rear left side of the vehicle (with flap cover)
• Fresh water tank drain opening under the vehi-cle.
• Waste water tank drain opening under the vehi-cle.
• Awning rails on the left and right side of the top of the vehicle on the roof frame.
• Awning adapter on left (if vehicle is fitted with an awning) and on right in the awning rail.
• Awning: attach to aluminium rail on right side over sliding door only.
Mattress for a medium-length bed, 3-seat bench . . . . . . . . . . . . . . . . . . . . . . . . . . . . 199 Mattress for a long bed, 3-seat bench . . . . . . . 201 Stowing the mattress, 3-seat bench . . . . . . . . 203 .,..
Equipment, California 1193
Page 195 of 486
Bench seat/bed
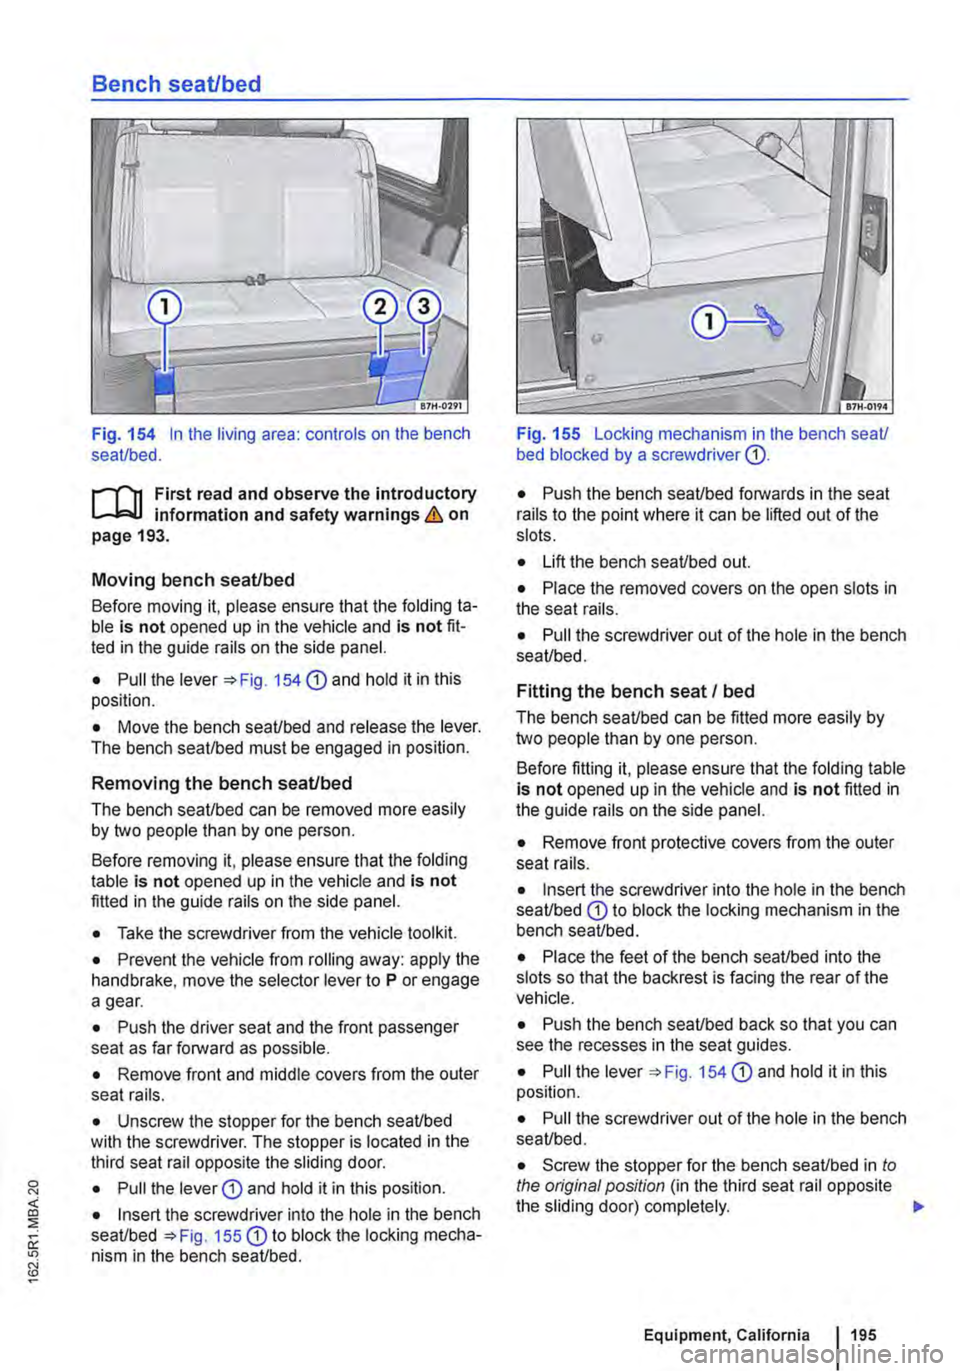
Fig. 154 In the living area: controls on the bench seat/bed.
ill1 First read and observe the introductory l-J::,jJ information and safety warnings & on page 193.
Moving bench seat/bed
Before moving it, please ensure that the folding ta-ble is not opened up in the vehicle and is not fit-ted in the guide rails on the side panel.
• Pull the lever '*Fig. 154 CD and hold it in this position.
• Move the bench seat/bed and release the lever. The bench seat/bed must be engaged in position.
Removing the bench seat/bed
The bench seat/bed can be removed more easily by two people than by one person.
Before removing it, please ensure that the folding table is not opened up in the vehicle and is not fitted in the guide rails on the side panel.
• Take the screwdriver from the vehicle tool kit.
• Prevent the vehicle from rolling away: apply the handbrake, move the selector lever to P or engage a gear.
• Push the driver seat and the front passenger seat as far forward as possible.
• Remove front and middle covers from the outer seat rails.
• Unscrew the stopper for the bench seat/bed with the screwdriver. The stopper is located in the third seat rail opposite the sliding door.
• Pull the lever G) and hold it in this position.
• Insert the screwdriver into the hole in the bench seat/bed =>Fig. 155 G) to block the locking mecha-nism in the bench seat/bed.
Fig. 155 Locking mechanism in lhe bench seat/ bed blocked by a screwdriver G).
• Push the bench seat/bed forwards in the seat rails to the point where it can be lifted out of the slots.
• Lift the bench seat/bed out.
• Place the removed covers on the open slots in the seat rails.
• Pull the screwdriver out of the hole in the bench seat/bed.
Fitting the bench seat I bed
The bench seat/bed can be fitted more easily by two people than by one person.
Before fitting it, please ensure that the folding table is not opened up in the vehicle and is not fitted in the guide rails on the side panel.
• Remove front protective covers from the outer seat rails.
• Insert the screwdriver into the hole in the bench seat/bed G) to block the locking mechanism in the bench seat/bed.
• Place the feet of the bench seat/bed into the slots so that the backrest is facing the rear of the vehicle.
• Push the bench seat/bed back so that you can see the recesses in the seat guides.
• Pull the lever =>Fig. 154 G) and hold it in this position.
• Pull the screwdriver out of the hole in the bench seat/bed.
• Screw the stopper for the bench seat/bed in to the original position (in the third seat rail opposite the sliding door) completely. .,.
Equipment, California 195
Page 197 of 486
Mattress, bench seat/bed
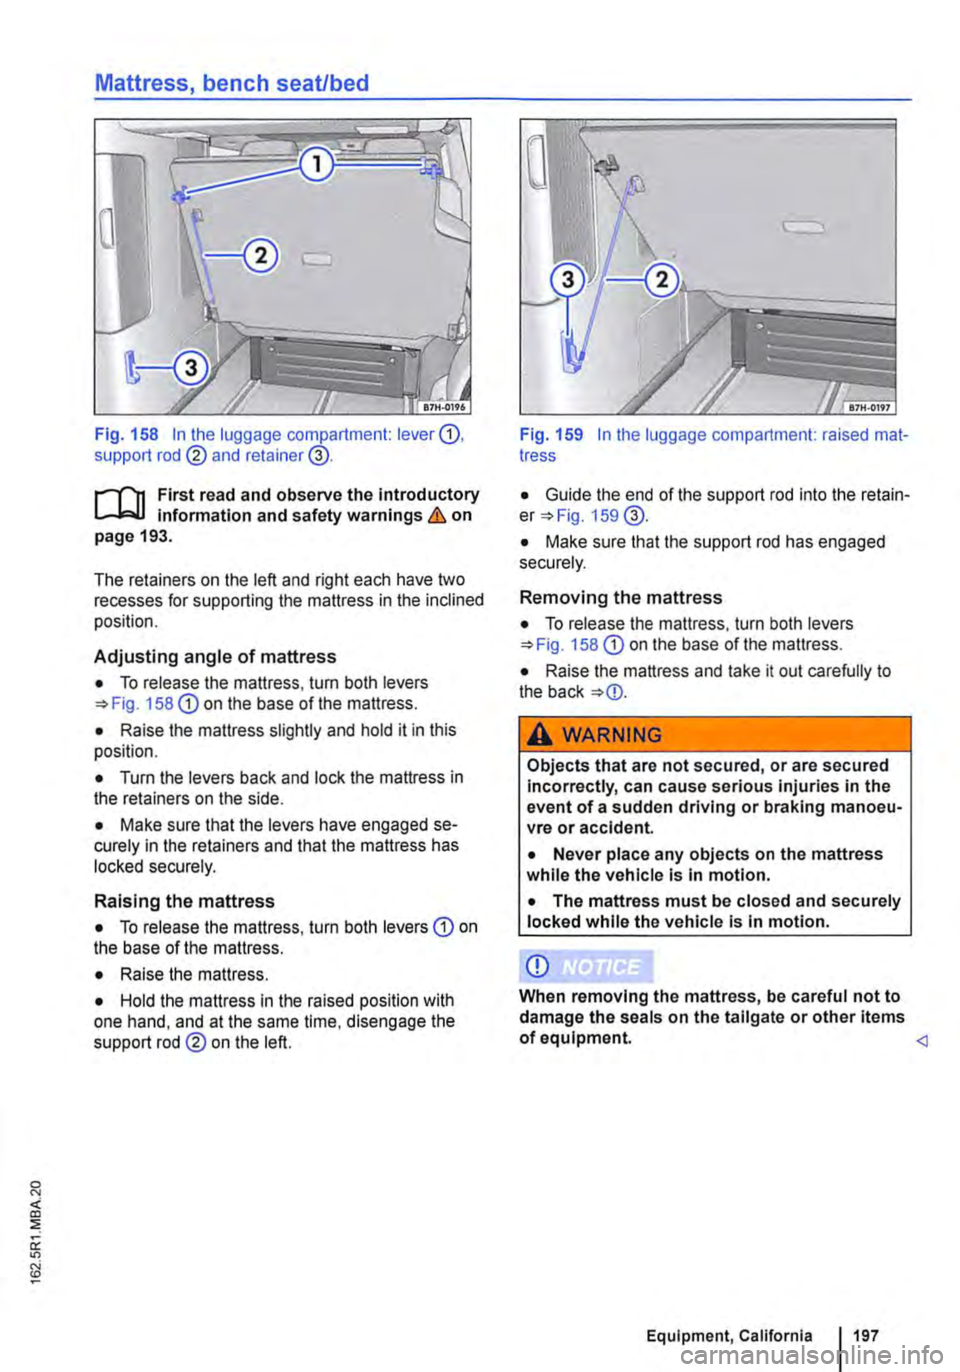
Fig. 158 In the luggage compartment: lever G), support rod @ and retainer@.
r--('n First read and observe the Introductory L.-.J,:.lJ information and safety warnings & on page 193.
The retainers on the left and right each have two recesses for supporting the mattress in the inclined position.
Adjusting angle of mattress
• To release the mattress, turn both levers 158 G) on the base of the mattress.
• Raise the mattress slightly and hold it in this position.
• Turn the levers back and lock the mattress in the retainers on the side.
• Make sure that the levers have engaged se-curely in the retainers and that the mattress has locked securely.
Raising the mattress
• To release the mattress, turn both levers G) on the base of the mattress.
• Raise the mattress.
• Hold the mattress in the raised position with one hand, and at the same time, disengage the support rod@ on the left.
Fig. 159 In the luggage compartment: raised mat-tress
• Guide the end of the support rod into the retain-er 159@.
• Make sure that the support rod has engaged securely.
Removing the mattress
• To release the mattress, turn both levers 158 G) on the base of the mattress.
• Raise the mattress and take it out carefully to the back
A WARNING
Objects that are not secured, or are secured Incorrectly, can cause serious injuries in the event of a sudden driving or braking manoeu-vre or accident.
• Never place any objects on the mattress while the vehicle Is In motion.
• The mattress must be closed and securely locked while the vehicle is In motion.
CD
When removing the mattress, be careful not to damage the seals on the tailgate or other items of equipment.
Page 204 of 486
Central control panel, California
COl Introduction
This chapter contains information on the following subjects:
Controls . . . . . . . . . . . . . . . . . . . . . . . . . . . . . . . 204
Display . . . . . . . . . . . . . . . . . . . . • . . . . 205
Menu structure . . . . . . . . . . . . . . . . . . . . . . . . . . 206 Programming the wake up time . . . . . . . • . . . . 207
Programming the countdown timer . . . . . . . . . 207
The central control panel is the "control and infor-mation centre" for the camping equipment. The central control panel can be used to open and con-trol the following displays and functions:
• Opening and closing the electric pop-up roof 221
• Displays showing the ambient temperature, clock and charging status of the additional batter-ies 205
Controls
• Switching the refrigerator box on and off or set-ting the temperature =>page 241
• Status display and control of supplementary heater 251
• Programming countdown timer 207
• Programming the wake up time 207
• Setting the clock
Additional information:
• Cleaning the central control panel 254
• Rectifying faults on the camping equipment 254
q Donnerstag g
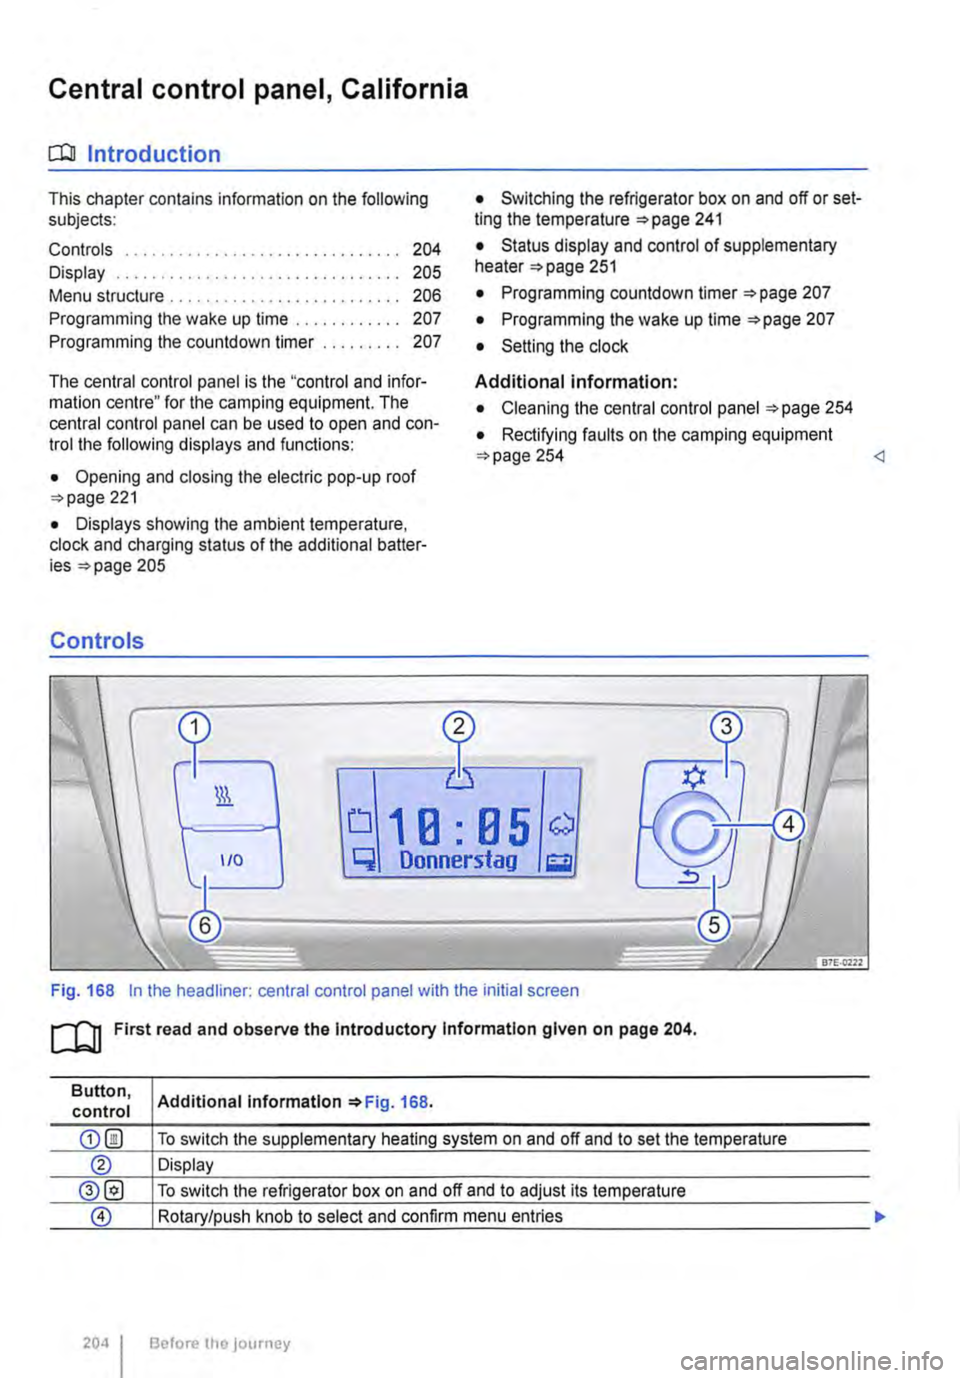
Fig. 168 In the headliner: central control panel with the initial screen
ro First read and observe the Introductory Information given on page 204.
Button, control
204 I
Additional Information 168.
To switch the supplementary heating system on and off and to set the temperature
Display
To switch the refrigerator box on and off and to adjust its temperature
Rotary/push knob to select and confirm menu entries
Before the journey