2021 VOLKSWAGEN T-ROC connect
[x] Cancel search: connectPage 256 of 502

Function
When switched on, the Blind Spot Monitor is active from a speed of approx. 15 km/h (9 mph).
In the following driving situations, the yellow indicator lamp will light up in the corresponding
exterior mirror: ⇒ Fig. 124
If your vehicle is being overtaken.
When overtaking another vehicle with a speed difference of up to approximately 10 km/h (6 mph).
No display will be shown if the takeover manoeuvre is much faster.
If a vehicle is detected in the blind spot and the turn signal is additionally activated in the direction
of the detected vehicle ⇒ , the yellow indicator lamp will flash.
In vehicles with the lane keeping system, the yellow indicator lamp will flash even if you do not
activate the turn signal when leaving your lane, provided that the lane keeping system is switched on
(Blind Spot Monitor Plus). The driver is warned by a corrective steering intervention when changing
lanes during a possible critical situation (information level, warning level). This also occurs when the
turn signal is activated for the corresponding direction. If the steering intervention is overridden by
the driver, the steering wheel vibrates to give an additional warning.
The quicker another vehicle approaches, the earlier there is a corresponding display in the exterior
mirror.
Automatic deactivation
The radar sensors for the Blind Spot Monitor will switch off automatically if, for example, the system
detects that a radar sensor is continuously covered. This can be caused by a layer of ice or snow in
front of the radar sensor, for example.
A text message will be shown on the instrument cluster display.
If the Blind Spot Monitor has been automatically deactivated, the system cannot be activated until
the ignition has been switched off and back on again.
The Blind Spot Monitor is automatically deactivated and cannot be activated when the factory-fitted
towing bracket is electrically connected to a trailer or similar ⇒ Trailer towing . Once a trailer is
electrically connected to the vehicle and the driver pulls away, a text message appears in the
instrument cluster display to inform the driver that the Blind Spot Monitor has been deactivated.
The Blind Spot Monitor will be automatically activated again when the trailer has been unhitched
from the vehicle. This applies if the function was previously activated. The Blind Spot Monitor must
be deactivated manually if you tow a trailer using a towing bracket that was not fitted at the factory.
Troubleshooting
First read and observe the introductoryinformation and safety warnings⇒Introduction
Blind Spot Monitor is not working
The indicator lamp lights up yellow.
Go to a qualified workshop.
Page 266 of 502
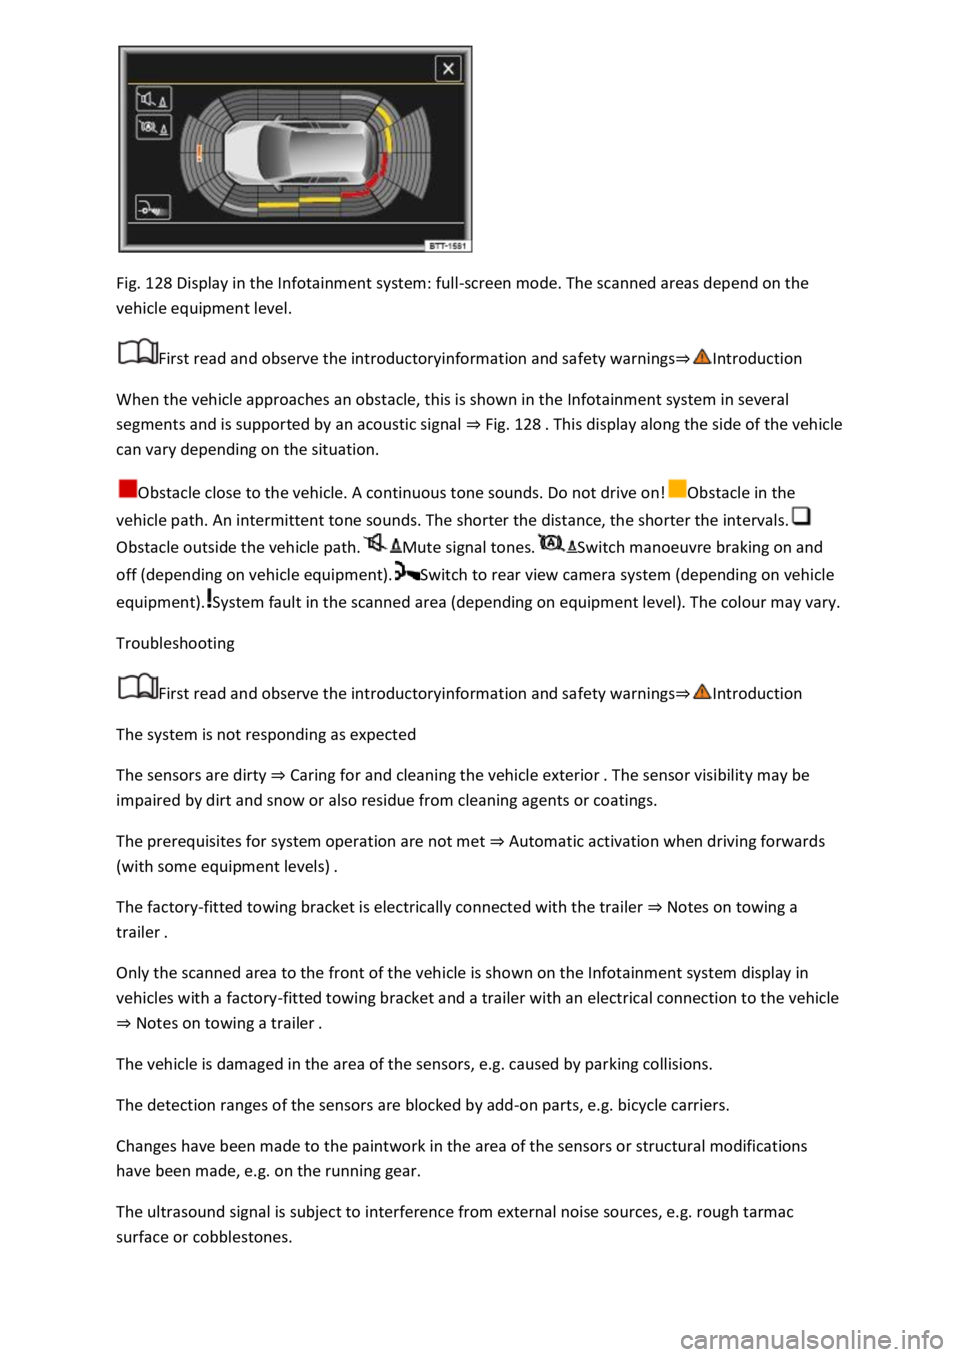
Fig. 128 Display in the Infotainment system: full-screen mode. The scanned areas depend on the
vehicle equipment level.
First read and observe the introductoryinformation and safety warnings⇒Introduction
When the vehicle approaches an obstacle, this is shown in the Infotainment system in several
segments and is supported by an acoustic signal ⇒ Fig. 128 . This display along the side of the vehicle
can vary depending on the situation.
Obstacle close to the vehicle. A continuous tone sounds. Do not drive on!Obstacle in the
vehicle path. An intermittent tone sounds. The shorter the distance, the shorter the intervals.
Obstacle outside the vehicle path.Mute signal tones.Switch manoeuvre braking on and
off (depending on vehicle equipment).Switch to rear view camera system (depending on vehicle
equipment).System fault in the scanned area (depending on equipment level). The colour may vary.
Troubleshooting
First read and observe the introductoryinformation and safety warnings⇒Introduction
The system is not responding as expected
The sensors are dirty ⇒ Caring for and cleaning the vehicle exterior . The sensor visibility may be
impaired by dirt and snow or also residue from cleaning agents or coatings.
The prerequisites for system operation are not met ⇒ Automatic activation when driving forwards
(with some equipment levels) .
The factory-fitted towing bracket is electrically connected with the trailer ⇒ Notes on towing a
trailer .
Only the scanned area to the front of the vehicle is shown on the Infotainment system display in
vehicles with a factory-fitted towing bracket and a trailer with an electrical connection to the vehicle
⇒ Notes on towing a trailer .
The vehicle is damaged in the area of the sensors, e.g. caused by parking collisions.
The detection ranges of the sensors are blocked by add-on parts, e.g. bicycle carriers.
Changes have been made to the paintwork in the area of the sensors or structural modifications
have been made, e.g. on the running gear.
The ultrasound signal is subject to interference from external noise sources, e.g. rough tarmac
surface or cobblestones.
Page 268 of 502

Switching on and off
First read and observe the introductoryinformation and safety warnings⇒Introduction
Switching on the rear view camera system
Select reverse gear.
OR: press the button.
Switching off the rear view camera system
Drive forwards at a speed of at least 10 km/h (6 mph).
Display representation
First read and observe the introductoryinformation and safety warnings⇒Introduction
The functions and displays of the rear view camera system image vary according to the equipment
level and may differ from each other.
The display of the reversing camera picture varies if the factory-fitted towing bracket is electrically
connected to the trailer ⇒ Notes on towing a trailer .
Functions and symbols of the rear view camera system
You can make settings by means of the function buttons when the rear view camera system is
switched on. Some setting options depend on the vehicle equipment.
xClose current display.Adjust display: brightness, contrast, colour.Switch to Park
Distance Control ⇒ Park Distance Control .Show Park Distance Control display.Hide Park
Distance Control display.
Orientation lines
Red line: safety distance to the rear.
Green lateral lines: extension of the vehicle.
Prerequisites
First read and observe the introductoryinformation and safety warnings⇒Introduction
The prerequisites for parking using the rear view camera system must be met.
Do not exceed a speed of approximately 15 km/h (9 mph).
Width of the parking space: vehicle width + 0.2 m.
The following conditions must be met in order to display a correct image:
The boot lid is closed.
The surrounding area has a flat surface.
Vehicle does not have a heavy load at the rear.
Page 269 of 502

Parking
Fig. 129 Infotainment system display: parking using the rear view camera system.
First read and observe the introductoryinformation and safety warnings⇒Introduction
Key to ⇒ Fig. 129 :
Choose parking space.Drive towards the selected parking space.Align the vehicle in the
parking space.1Road.2Selected parking space.3Side limits of the selected parking space.4Rear limit
of the parking space.
Parking using the rear view camera system
Position the vehicle in front of the parking space ⇒ Fig. 129② .
Select reverse gear.
Reverse slowly and steer the vehicle so that the lateral lines lead into the selected parking space.
The lines must correspond to the lateral boundary lines of the parking space ③ .
Stop when the horizontal line reaches the rear boundary ④ .
Troubleshooting
First read and observe the introductoryinformation and safety warnings⇒Introduction
The system is not responding as expected
The camera is dirty ⇒ Caring for and cleaning the vehicle exterior . The camera visibility may be
impaired by dirt and snow or even residue from cleaning agents or coatings.
The system requirements must be met ⇒ Prerequisites .
The factory-fitted towing bracket is electrically connected with the trailer ⇒ Notes on towing a
trailer .
The vehicle is damaged in the area around the camera, e.g. caused by parking collisions.
Page 271 of 502

NOTICE
Park Assist uses parked vehicles, the kerbs and other objects as guidance. Make sure that the tyres
and wheel rims are not damaged when parking the vehicle. If necessary, stop the parking procedure
in good time to prevent damage to the vehicle.
Prerequisites
First read and observe the introductoryinformation and safety warnings⇒Introduction
The following prerequisites must be met for driving into and out of parking spaces:
The traction control system (TCS) must be switched on ⇒ Brake support systems .
Distance: maintain a distance of 0.5 – 2.0 metres when driving past the parking space.
The parking space must have at least the dimensions required by Park Assist.
Speed when driving past the parking space (for parking spaces parallel to the road): not above
40 km/h (25 mph).
Speed when driving past the parking space (for parking spaces perpendicular to the road): not above
20 km/h (12 mph).
Maximum speed: 7 km/h (4 mph). An automatic braking intervention can take place when driving
into a parking space.
No trailer is connected electrically with the factory-fitted towing bracket ⇒ Notes on towing a
trailer .
The parking manoeuvre can be continued after the automatic brake intervention.
The automatic braking intervention takes place a maximum of once per parking manoeuvre. The
parking manoeuvre will be cancelled if a speed of approximately 7 km/h (4 mph) is exceeded again.
WARNING
Do not let the automatic braking intervention triggered by Park Assist tempt you to take any risks
while driving. The system is not a substitute for the full concentration of the driver.
Park Assist has system-related limitations. In some situations, automatic braking intervention may
function only in a limited way or not at all.
You should always be prepared to brake the vehicle yourself.
The automatic braking intervention is ended after approximately 1.5 seconds. Depress the brake
pedal of the vehicle yourself following the automatic braking intervention.
Looking for a parking space
Page 277 of 502

Rear Traffic Alert monitors the traffic crossing behind the vehicle when reversing out of a parking
space or manoeuvring. Rear Traffic Alert functions using radar sensors in the rear bumper.
Key to ⇒ Fig. 134 :
Critical situation. Do not drive on!Possible critical situation.
Detection of a critical situation can also take place acoustically:
A warning signal will sound and a text message will be displayed in the instrument cluster for
vehicles without Park Distance Control.
In vehicles with Park Distance Control, an acoustic signal will sound with the continuous tone of Park
Distance Control. If the Park Distance Control is deactivated, no warning can be given to the driver
and the Rear Traffic Alert system will also be switched off temporarily.
If there is a system fault in the scanned area, the indicator lamp will light up yellow on the
instrument cluster display.
Automatic braking intervention to minimise damage
If Rear Traffic Alert detects an approaching road user and the driver has not pressed the brake, the
system can brake automatically.
Automatic braking intervention is activated when reversing at speeds of between 1–12 km/h (1–
7 mph). The vehicle is held stationary for up to two seconds after vehicle standstill has been
detected.
After automatic braking intervention is activated to prevent damage to the vehicle, the system
requires approximately ten seconds before it can activate another automatic braking intervention.
Automatic braking intervention can be interrupted by pressing the accelerator or brake pedal
sharply and taking control of the vehicle.
Automatic deactivation
Rear Traffic Alert is deactivated automatically and cannot be switched on if the factory-fitted towing
bracket is electrically connected to a trailer or similar ⇒ Notes on towing a trailer . Once a trailer is
electrically connected to the vehicle and the driver pulls away, a text message appears in the
instrument cluster display to inform the driver that Rear Traffic Alert has been deactivated. Rear
Traffic Alert will be automatically activated again when the trailer has been unhitched from the
vehicle. This applies if the functions were previously activated. Rear Traffic Alert must be switched
off manually for trailer towing if a non-factory-fitted towing bracket is used.
WARNING
The intelligent Rear Traffic Alert technology cannot overcome the laws of physics, and functions only
within the limits of the system. Do not let the assistance function of Rear Traffic Alert tempt you to
take any safety risks while driving. The system is not a substitute for the full concentration of the
driver.
Page 289 of 502

Insert the cigarette lighter back into the socket.
WARNING
Improper use of the cigarette lighter can cause fires, burns and other serious injuries.
Always use the cigarette lighter properly, and only use it to light tobacco products.
Never leave children unsupervised in the vehicle. The cigarette lighter can be used when the ignition
is switched on.
The cigarette lighter socket can also be used as a 12-volt socket ⇒ Electrical sockets .
Electrical sockets
Introduction
This chapter contains information on the followingsubjects:
⇒ Electrical sockets in the vehicle
Electrical equipment can be connected to the sockets in the vehicle.
The electrical devices must be in good condition. Do not use faulty devices.
The 12-volt socket will work only when the ignition is switched on.
WARNING
Improper use of the sockets and electrical accessories can cause fires and severe injuries.
Never leave children unsupervised in the vehicle. Sockets and the devices connected to them can be
used when the ignition is switched on.
If the electrical device gets too hot, switch off the device immediately and disconnect it from the
socket.
NOTICE
In order to prevent damage to the electrical system, never connect equipment that supplies electric
power, such as solar panels or battery chargers for charging the 12-volt battery, to the 12-volt
socket.
Use only electrical devices that have been approved in accordance with current guidelines
concerning electromagnetic compatibility.
In order to avoid damage due to voltage fluctuations, always switch off any electrical devices before
switching the ignition on or off and before starting the engine. When the start/stop system
Page 290 of 502

automatically switches off and restarts the engine, it is not necessary to switch off any connected
electrical consumers.
Never connect electrical devices requiring more than the rated power to a 12-volt socket. The
vehicle's electrical system can be damaged if the maximum power consumption is exceeded.
Observe the operating instructions of the electrical devices!
Using electrical consumers with the engine switched off and the ignition switched on will drain the
12-volt battery.
Unshielded devices can cause interference in the Infotainment system and vehicle electronics.
Electrical sockets in the vehicle
Fig. 141 In the front part of the centre console and in the rear centre console: 12-volt socket with
hinged flap ① or 12-volt socket with removable cover ②.
First read and observe the introductoryinformation and safety warnings⇒Introduction
Maximum power rating
Electrical socket Maximum power rating
12 volts 120 watts
The maximum power rating of the individual sockets must never be exceeded. The power rating of
each device is stated on its type plate.
If there are several sockets in the vehicle and two or more devices are connected at the same time,
the overall power consumption of all connected electrical devices must never exceed 190 W ⇒ .
Multimedia
Subwoofer