2021 VOLKSWAGEN T-ROC ECU
[x] Cancel search: ECUPage 123 of 502

Items in the luggage compartment could cause damage when pushing the rear seat forwards or
backwards.
When the rear seat is moved forwards, objects can get into the space between the seat and luggage
compartment floor. Remove any items or objects from this space before pushing the rear seat back.
NOTICE
Sharp edges can damage the seats.
Do not touch the seats with sharp-edged objects. Sharp-edged objects such as zips, rivets on clothing
or belts can damage surfaces. Open Velcro fasteners can also cause damage.
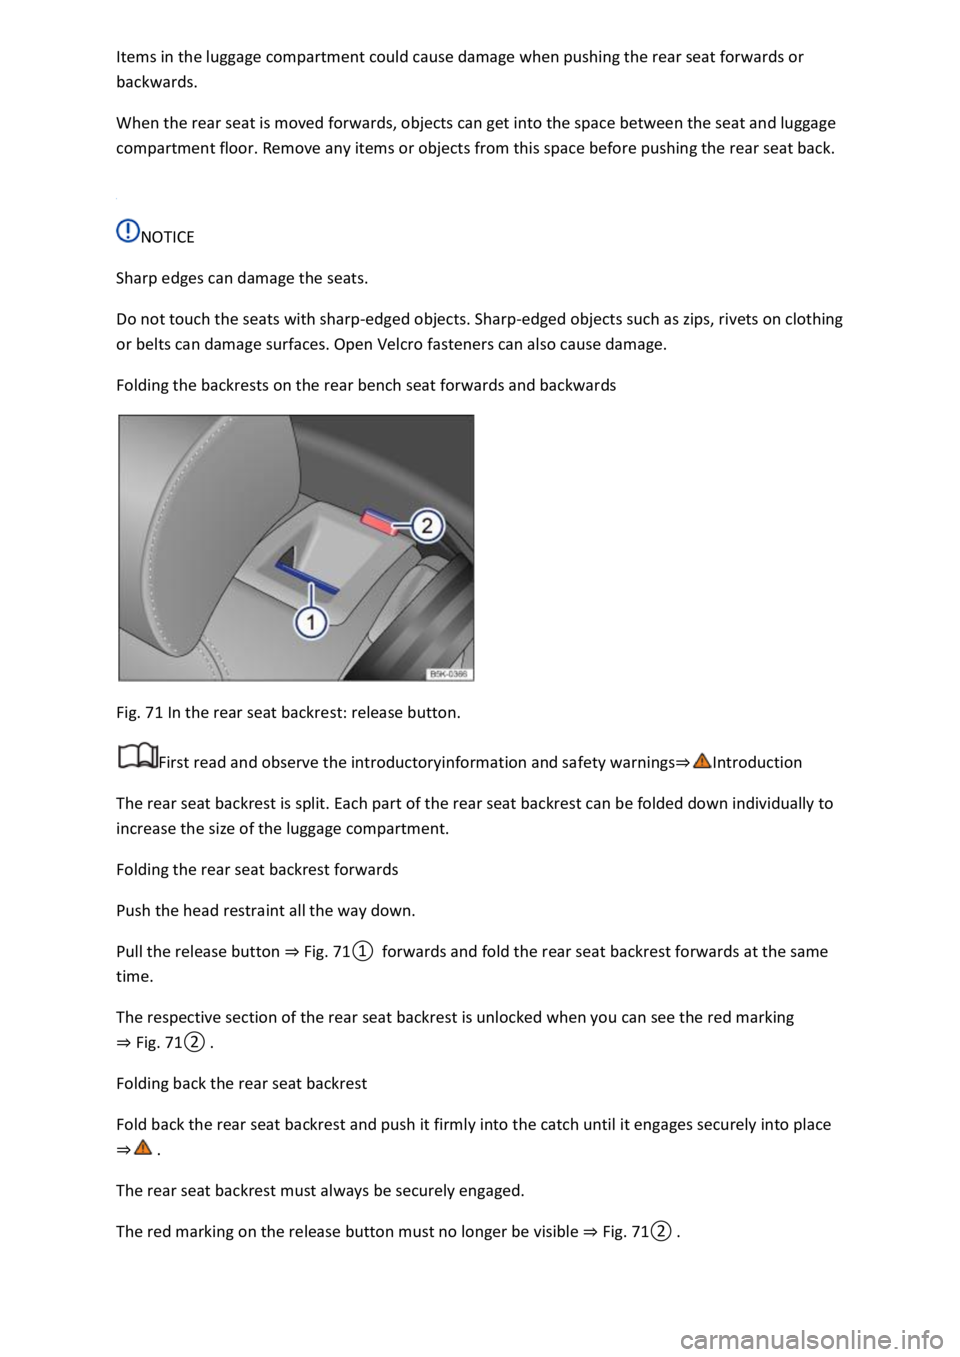
Folding the backrests on the rear bench seat forwards and backwards
Fig. 71 In the rear seat backrest: release button.
First read and observe the introductoryinformation and safety warnings⇒Introduction
The rear seat backrest is split. Each part of the rear seat backrest can be folded down individually to
increase the size of the luggage compartment.
Folding the rear seat backrest forwards
Push the head restraint all the way down.
Pull the release button ⇒ Fig. 71① forwards and fold the rear seat backrest forwards at the same
time.
The respective section of the rear seat backrest is unlocked when you can see the red marking
⇒ Fig. 71② .
Folding back the rear seat backrest
Fold back the rear seat backrest and push it firmly into the catch until it engages securely into place
⇒ .
The rear seat backrest must always be securely engaged.
The red marking on the release button must no longer be visible ⇒ Fig. 71② .
Page 124 of 502

WARNING
Injuries can be caused if the rear seat backrests are folded forwards and backwards in an
uncontrolled way and without taking due care.
While folding the rear seat backrest forward, always make sure that no people or animals are in its
path.
Never fold the rear seat backrest forwards or backwards while the vehicle is in motion.
Ensure that the seat belt is not trapped or damaged when folding back the rear seat backrest.
Always keep hands, fingers, feet or other body parts away from the swivel area when folding the
rear seat backrest forwards and backwards.
Ensure that each rear seat backrest engages securely, otherwise the seat belts for the rear seats will
not offer maximum protection. This applies to the centre seat of the rear bench seat in particular. If
a seat is occupied and the corresponding rear seat backrest has not engaged securely into place, the
seat occupant and rear seat backrest may move forwards in the event of a sudden braking or driving
manoeuvre or during accidents.
Adults and children must not use seats if the corresponding backrest is folded forwards or is not
engaged securely into place.
NOTICE
Damage to the vehicle or to other objects could be caused if the rear bench seat backrest is folded
forwards and backwards in an uncontrolled way or without due care.
Before folding the rear seat backrests forwards, always adjust the front seats so that the rear head
restraints or rear seat cushions do impact the front seats.
Before folding down the rear seat backrest, always make sure that there are no objects located in its
path.
Head restraints
Introduction
This chapter contains information on the followingsubjects:
⇒ Adjusting the head restraints
⇒ Removing and installing head restraints
The following section describes the options for adjusting and removing the head restraints. Always
ensure that you adjust the correct sitting position ⇒ Sitting position .
Every seat is fitted with a head restraint. The centre head restraint at the rear is designed solely for
use with the centre rear bench seat. Therefore you should not install this head restraint in any of the
other positions.
Page 126 of 502

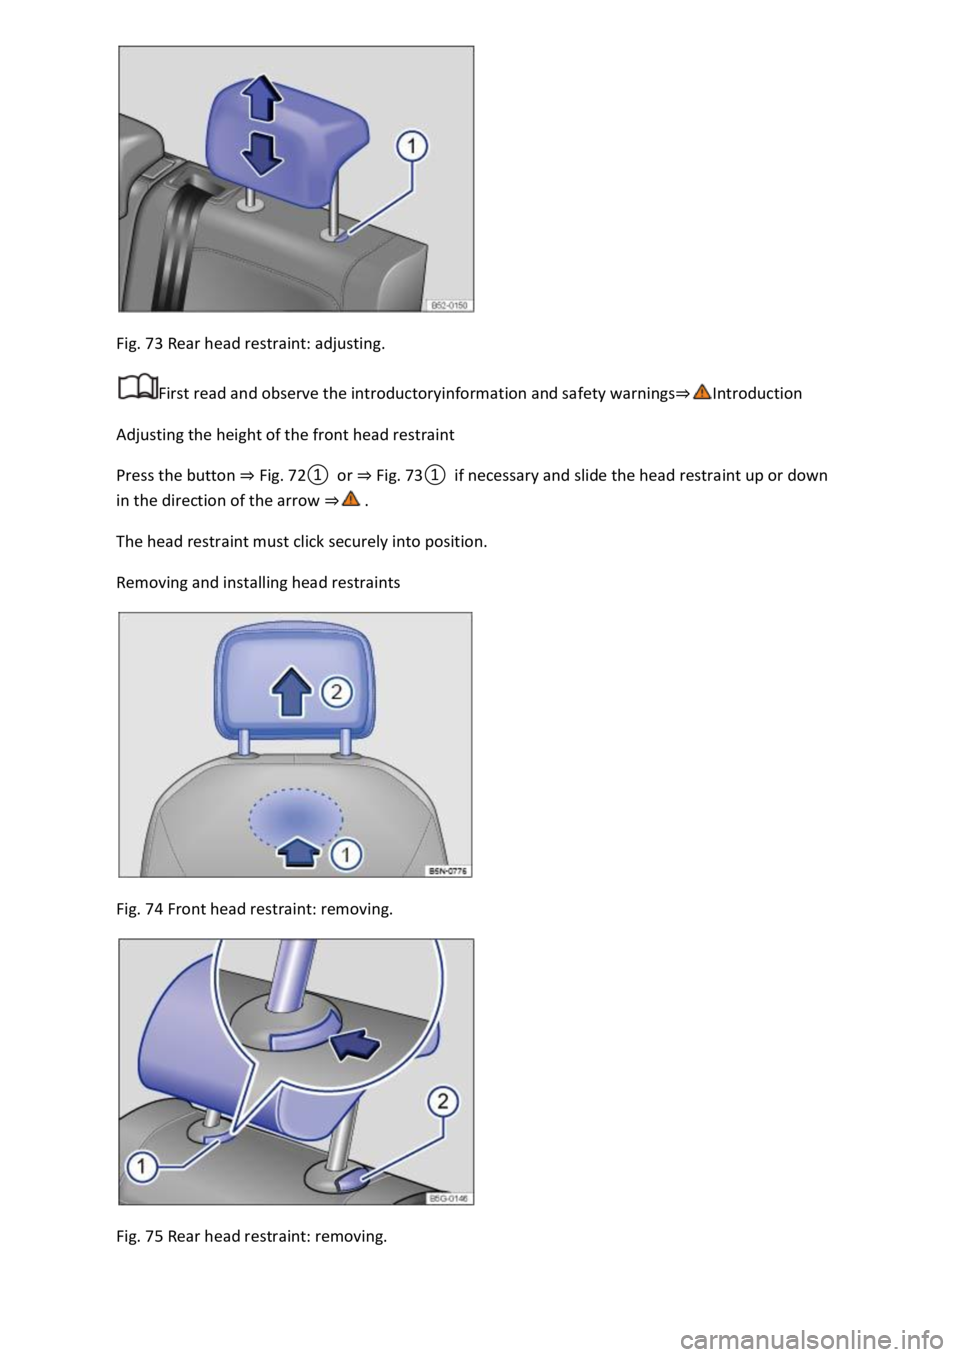
Fig. 73 Rear head restraint: adjusting.
First read and observe the introductoryinformation and safety warnings⇒Introduction
Adjusting the height of the front head restraint
Press the button ⇒ Fig. 72① or ⇒ Fig. 73① if necessary and slide the head restraint up or down
in the direction of the arrow ⇒ .
The head restraint must click securely into position.
Removing and installing head restraints
Fig. 74 Front head restraint: removing.
Fig. 75 Rear head restraint: removing.
Page 127 of 502

First read and observe the introductoryinformation and safety warnings⇒Introduction
Removing the front head restraints
Lower the head restraint if necessary ⇒ .
To release the head restraint, feel for the recess in the marked area on the rear side and press it in
the direction of the arrow ⇒ Fig. 74① .
Pull the head restraint out in the direction of the arrow ⇒ Fig. 74② .
Fitting the front head restraints
Position the head restraint correctly over the head restraint guides and then insert into the guides of
the corresponding seat backrest.
Slide the head restraint all the way down until the guide pins click into place.
Adjust the head restraint so a correct sitting position can be assumed.
Removing the rear head restraints
Release the rear bench seat backrest and fold the backrest forwards.
Push the head restraint all the way up ⇒ .
Press button ⇒ Fig. 75① on the head restraint guide.
At the same time, press button ② while a second person pulls the head restraint out fully.
Fold back the rear seat backrest and allow it to engage securely.
Fitting the rear head restraints
Release the rear bench seat backrest and fold the backrest forwards.
Position the head restraint correctly over the head restraint guides and then insert into the guides of
the corresponding seat backrest.
Press and hold the button ⇒ Fig. 75② and push down the head restraint.
Fold back the rear seat backrest and allow it to engage securely.
Adjust the head restraint so that a correct sitting position can be assumed ⇒ Sitting position .
Seat functions
Centre armrest
Page 169 of 502

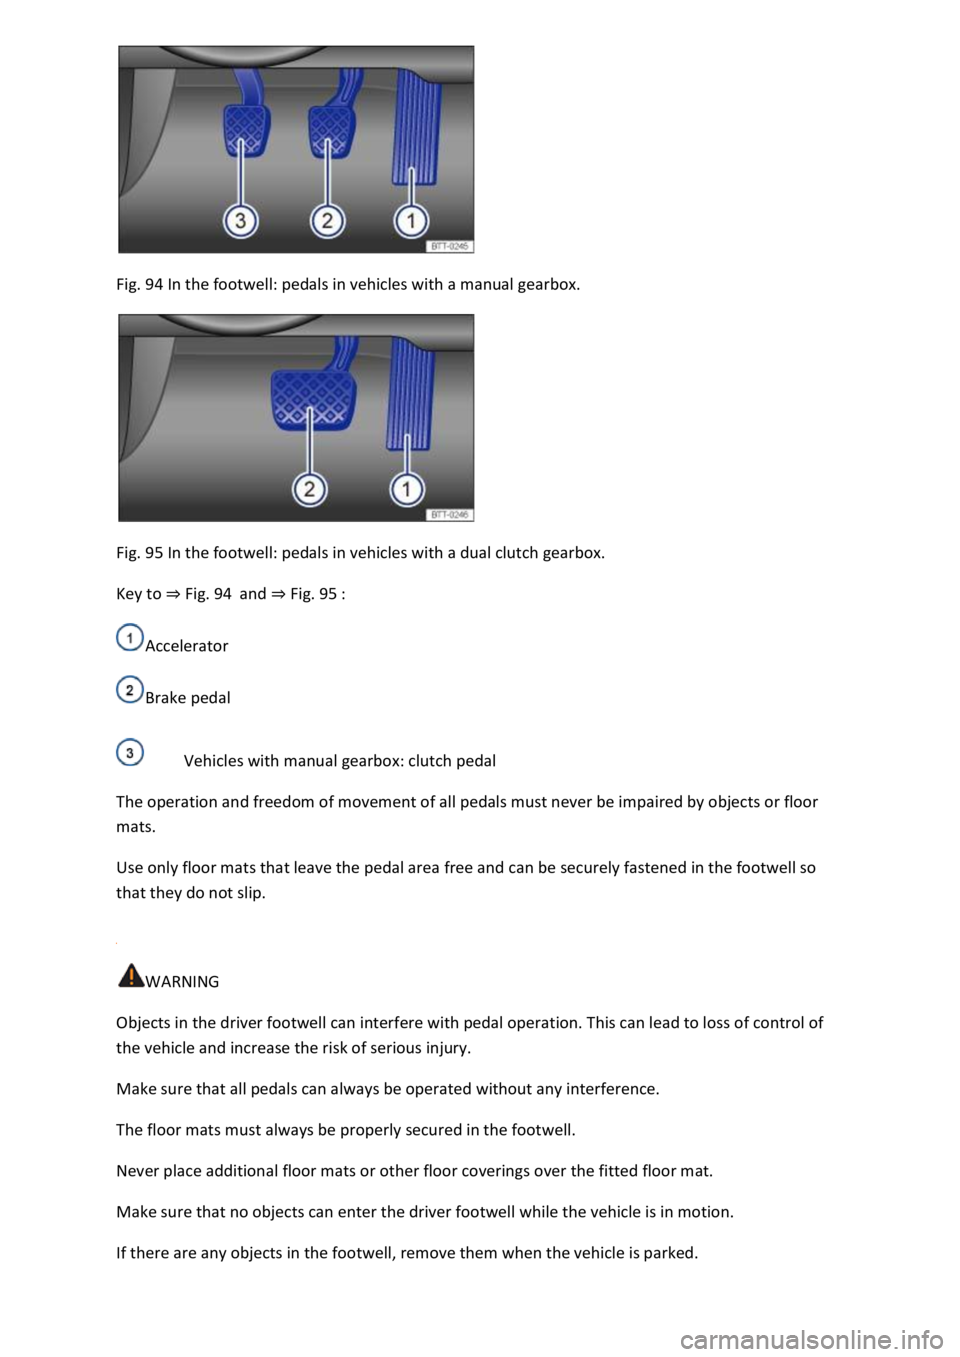
Fig. 94 In the footwell: pedals in vehicles with a manual gearbox.
Fig. 95 In the footwell: pedals in vehicles with a dual clutch gearbox.
Key to ⇒ Fig. 94 and ⇒ Fig. 95 :
Accelerator
Brake pedal
Vehicles with manual gearbox: clutch pedal
The operation and freedom of movement of all pedals must never be impaired by objects or floor
mats.
Use only floor mats that leave the pedal area free and can be securely fastened in the footwell so
that they do not slip.
WARNING
Objects in the driver footwell can interfere with pedal operation. This can lead to loss of control of
the vehicle and increase the risk of serious injury.
Make sure that all pedals can always be operated without any interference.
The floor mats must always be properly secured in the footwell.
Never place additional floor mats or other floor coverings over the fitted floor mat.
Make sure that no objects can enter the driver footwell while the vehicle is in motion.
If there are any objects in the footwell, remove them when the vehicle is parked.
Page 177 of 502

If the front brake pads are checked, the rear brake pads should be checked at the same time. A
visual check of the thickness of all brake pads should be carried out regularly by checking the brake
pads through the openings in the rims or from the underside of the vehicle. If necessary, remove the
wheels to carry out a comprehensive check. Volkswagen recommends using a Volkswagen
dealership for this purpose.
Driving a loaded vehicle
For good vehicle handling when driving a loaded vehicle, please observe the following:
Stow all items of luggage securely ⇒ Stowing luggage and loads .
Accelerate particularly cautiously and carefully.
Avoid sudden braking and driving manoeuvres.
Brake earlier than in normal driving.
If applicable, observe the information concerning the roof carrier ⇒ Roof carrier .
WARNING
Moving loads can severely impair the vehicle's stability and driving safety which could cause
accidents and serious injuries.
Secure items properly so they cannot slide about.
Use suitable lashing or securing straps when securing heavy objects.
Securely engage the rear seat backrests.
Driving with an open boot lid
Driving with an open boot lid is particularly dangerous. All objects and the open boot lid must be
secured properly. Take the appropriate measures to reduce the amount of poisonous exhaust fumes
that could enter into the vehicle.
WARNING
Driving with an unlocked or open boot lid can cause serious injuries.
Always drive with the boot lid closed.
Always stow all items in the luggage compartment securely. Loose objects can fall out of the luggage
compartment and injure other road users.
Always drive especially carefully and think ahead.
Page 220 of 502

Checklist
To ensure your own safety and the safety of your passengers, observe the following points before
driving offroad:
Obtain sufficient information before driving into offroad terrain with the vehicle.
Do not plan day stages that are too long. Take increased fuel consumption for offroad driving into
account.
Fill up the tank. Fuel consumption is considerably higher offroad.
Check that your tyres are suitable for the offroad journey you have planned. Recommendation for
difficult offroad terrain: always have offroad tyres fitted to your vehicle.
Check the tyre pressure on all tyres and correct if necessary. This includes the temporary spare
wheel, if present.
Check engine oil level and refill engine oil as necessary. The engine will be supplied with engine oil
when it is driven on or across a slope only if the engine oil level is sufficient.
Completely refill the washer fluid reservoir with water and washer fluid.
Fit the towing eye at the front or rear. It is not always possible to fit the towing eye when the vehicle
is stuck.
Check the vehicle toolkit and add tools according to individual requirements Useful accessories for
offroad driving.
Stow luggage in the vehicle as evenly and as low as possible. Secure all loose items.
Before driving offroad, Volkswagen recommends attending an offroad driving course, particularly if
you have no or very little experience.
Page 228 of 502

Fig. 116 On steep slopes: always use the doors facing up the hill to get out of the vehicle.
First read and observe the introductoryinformation and safety warnings⇒Introduction
Traversing a slope is one of the most dangerous offroad situations ⇒ .
It may look harmless, but you should not underestimate the difficulty and danger of traversing a
slope. A vehicle could slide away, tip over or roll when in this position. This can cause severe or fatal
injuries for all vehicle occupants.
Check whether you can use a safer route before driving across a slope.
If you have to drive at an angle, make sure the ground is as firm as possible. The vehicle is more
likely to slip and tip over on slippery or soft ground. Always make sure that the tilt angle does not
become too large due to uneven ground. The vehicle could otherwise tip over and start to roll.
When the vehicle is tilted at a large angle, the wheels on the lower side of the vehicle must never
enter dips or hollows. The wheels on the higher side of the vehicle must never drive over bumps, for
example rocks, tree trunks or other obstacles.
If the vehicle threatens to tip over, steer immediately into the fall line and depress the accelerator
slightly ⇒ Fig. 115 . If it is not possible to steer into the fall line, then steer uphill and depress the
accelerator slightly.
The centre of gravity of the vehicle should be as low as possible. The weight of all vehicle occupants
should be evenly distributed. People with a larger or heavier build should sit on the higher side of
the vehicle. Remove the roof carrier and secure heavy items. The vehicle could tip over if items were
to slide suddenly ⇒ .
WARNING
Never try to traverse a slope, particularly if it is too steep for the vehicle. The vehicle could slide
away, tip over or roll. Please note the following points in order to reduce the risk of accidents and
serious injuries:
You should never underestimate the difficulty and danger of traversing a slope. Never choose an
unsafe route or take a risk which could endanger you or your passengers. If you are in any doubt
about the safety of the route, turn round and choose another way.