2021 VOLKSWAGEN T-ROC roof
[x] Cancel search: roofPage 102 of 502

There is a fault in the locking system.
Go to a qualified workshop. Volkswagen recommends using a Volkswagen dealership for this
purpose.
Turn signals do not flash
If the turn signals do not flash as confirmation when the vehicle is locked:
At least one of the doors or the boot lid is not closed.
OR: convenience closing is in progress and not all windows and the glass roof have been closed.
Vehicle locks itself automatically
The vehicle will lock itself again automatically after approx. 45 seconds if one of the following
conditions applies:
The vehicle has been unlocked but not opened.
The ignition has not been switched on.
The boot lid has not been opened.
The vehicle has been unlocked using the lock cylinder.
The vehicle has been locked using the central locking button in the vehicle interior.
Response when locking the vehicle with a second vehicle key
Keyless Access: the vehicle key located inside the vehicle will be blocked from starting the engine if
the vehicle has been locked from the outside using a second vehicle key. Press the button on the
vehicle key in the vehicle interior to enable it to start the engine ⇒ Starting and stopping the
engine .
Locking the vehicle after airbags have been triggered
The entire vehicle is unlocked if the airbags are activated in an accident. Depending on the extent of
the damage, the vehicle can be locked as follows after an accident:
Switch the ignition off and then back on again.
Automatic deactivation of the sensors
The vehicle is not unlocked or locked for an extended period.
A sensor has been triggered an excessive number of times.
Reactivating the sensors:
Unlock the vehicle with the button in the vehicle key.
NOTICE
Page 104 of 502

OR: switch on the ignition using a valid vehicle key. A short alarm lasting around one second may
sound.
On vehicles with Keyless Access: grip the door handle ⇒ Unlocking or locking the vehicle with
Keyless Access .
The anti-theft alarm will not function correctly if the 12-volt vehicle battery is weak or discharged.
Interior monitoring system and anti-tow alarm
Fig. 60 In the roof console: sensors for the interior monitoring system (arrows).
If movements are detected in the vehicle interior when the vehicle is locked, the interior monitoring
system will trigger an alarm ⇒ Fig. 60 .
The anti-tow alarm will be triggered if the vehicle is lifted.
Switching on the interior monitoring system and anti-tow alarm
Close the stowage compartments in the roof console so that the sensors can function.
Close the windows, glass roof, doors and boot lid
Press the locking button once.
The interior monitoring system and anti-tow alarm are activated.
Temporarily switching off the interior monitoring system and anti-tow alarm
The interior monitoring and the anti-tow alarm can be switched off temporarily in the Vehicle
settings menu in the Infotainment system ⇒ Infotainment system controls and displays .
To avoid false alarms, deactivate interior monitoring and the anti-tow alarm in the following
situations:
If any people or animals are to remain inside the vehicle.
If the vehicle is to be loaded onto another vehicle, transported or towed away.
If the vehicle is to be parked in a car wash or a two-storey garage.
If one or more windows or the glass roof are fully or partly open.
Page 111 of 502

Opening and closing windows
The buttons are located in the doors ⇒ Vehicle overviews .
Opening the windows: press the button. Closing the windows: pull the button.Press to disable
the electric window buttons in the rear doors.
The windows can still be opened or closed using the buttons for a short time after the ignition has
been switched off, provided the driver door and the front passenger door are not opened.
One-touch opening and closing
The one-touch opening and closing function can be used to fully open and close the windows. The
individual buttons do not have to be held to do this.
One-touch closing: pull the button for the appropriate window up briefly into the second position.
One-touch opening: press the button for the appropriate window down briefly into the second
position.
Stopping the one-touch function: press or pull the button for the appropriate window again.
Convenience opening and closing
The windows can be opened and closed from outside the vehicle using the vehicle key when the
ignition is switched off:
Press and hold the locking or unlocking button on the vehicle key.
In vehicles with keyless locking and starting system Keyless Access: place your finger on the locking
sensor in the door handle for a few seconds until the windows are closed ⇒ Unlocking or locking the
vehicle with Keyless Access . The vehicle key must be within the operating range.
To interrupt this function, release the locking or unlocking button OR remove your finger from the
sensor.
A valid vehicle key must be located within the operating range. All turn signals will flash once as
confirmation that all the windows and the glass roof have been closed.
Set the convenience opening settings in the Vehicle settings menu in the Infotainment system
⇒ Infotainment system controls and displays .
WARNING
Careless or unsupervised use of the electric windows can cause serious injuries.
The electric windows should only be opened or closed when you are sure that nobody is in their
operating area.
Never leave children or people requiring assistance alone in the vehicle when the vehicle is locked.
The windows can no longer be opened in an emergency.
Page 113 of 502

Ensure that nobody obstructs the path of the window, especially if a window is being closed when
the roll-back function is not active.
The roll-back function does not prevent fingers or other body parts from being pressed against the
window frame and being injured.
The roll-back function is also activated if the windows are closed using the vehicle key for
convenience closing.
Troubleshooting
One-touch opening and closing does not work
One-touch opening and closing is deactivated if the 12-volt vehicle battery has been disconnected or
discharged while the windows were not fully closed. The function must then be reset:
Switch on the ignition.
Close all windows and doors.
Pull up the button for the respective window and hold it in this position for several seconds.
Release the button, then pull it up again and hold it in this position. The one-touch function is now
ready for operation again.
The one-touch function can be restored for individual windows or for several windows at the same
time.
Closing windows without roll-back function
Attempt to close the window again within a few seconds by holding the button. The roll-back
function will be deactivated for a small part of the path of the closing window.
If the closing procedure takes longer than several seconds, the roll-back function will be reactivated.
If it is still stiff or obstructed, the window will stop and open again automatically.
Please go to a qualified workshop if the window still cannot be closed.
Glass roof
Opening and closing the glass roof
Page 114 of 502

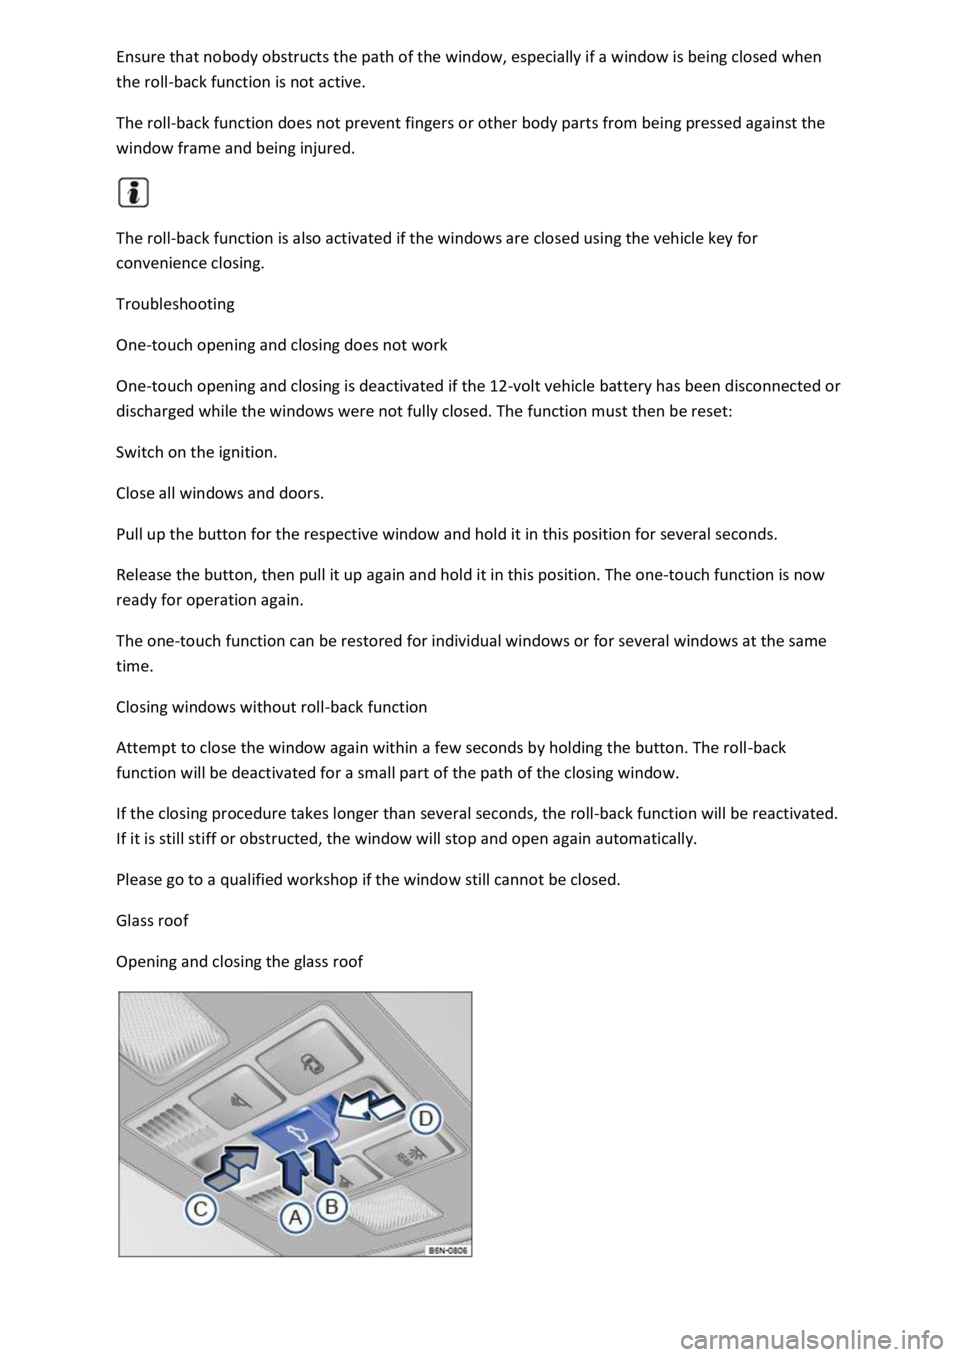
Fig. 66 In the roof: button for the glass roof.
The term glass roof is used as a standard term for the panorama sliding/tilting roof.
The glass roof is a roof opening system featuring two glass elements. The rear glass element is fixed
and cannot be opened.
The button has two positions. First stage: fully or partially tilt, open or close the roof. Second
stage: automatically move the roof to the respective limit position. Press the button again to stop
the one-touch function.
Tilting the glass roof: push the button ⇒ Fig. 66Ⓑ to the first position. One-touch function: push
button Ⓑ to the second position.
Closing the tilted glass roof: push the button Ⓐ to the first position. One-touch function: push
button Ⓐ to the second position.
Opening the glass roof: push the button Ⓒ to the first position. One-touch function up to
convenience position: push button Ⓒ to the second position.
Closing the glass roof: push the button Ⓓ to the first position. One-touch function: push button Ⓓ
to the second position.
Stopping one-stop function of the opening or closing procedure: push button Ⓒ or Ⓓ again.
WARNING
Careless or unsupervised use of the glass roof can cause serious injuries.
Open and close the glass roof only when you are sure that nobody is obstructing the path of the
roof.
Always take all vehicle keys with you every time you leave the vehicle.
Never leave children or people requiring assistance alone in the car, particularly if they have access
to the vehicle key. Unsupervised use of the vehicle key can lock the vehicle, start the engine, switch
on the ignition and operate the glass roof.
The glass roof can still be opened or closed for a short time after the ignition has been switched off,
provided that the driver door or front passenger door are not opened.
NOTICE
To avoid damage during cold weather, clear any ice and snow off the vehicle roof before opening or
tilting the glass roof.
Always close the glass roof when you leave the vehicle or if it starts to rain. Any rain entering the
vehicle when the glass roof is open or tilted could cause significant damage to the electrical system.
This can result in further damage to the vehicle.
Page 115 of 502

Remove leaves and other loose items from the glass roof guide rails at regular intervals using a
vacuum cleaner, or by hand.
The roll-back function will not work properly if there is a malfunction in the glass roof. Go to a
qualified workshop.
Convenience opening or closing of the glass roof
Convenience opening and closing
The glass roof can be opened and closed from outside the vehicle using the vehicle key:
Press and hold the locking or unlocking button on the vehicle key. The glass roof is tilted or closed.
In vehicles with the Keyless Access locking and starting system: place your finger on the locking
sensor in the door handle for a few seconds until the glass roof is closed ⇒ Unlocking or locking the
vehicle with Keyless Access .
Release the locking or unlocking button to interrupt this function.
The convenience closing function closes all the windows in the doors and the glass roof. All turn
signals will flash once as confirmation that all the windows and the glass roof have been closed.
Make settings for operation of the glass roof in the Vehicle settings menu in the Infotainment
system ⇒ Infotainment system controls and displays .
Some settings can be saved in the user accounts for personalisation and therefore change
automatically when the user account is changed ⇒ Personalisation .
Glass roof roll-back function
The roll-back function reduces the risk of crush injuries ⇒ . If the glass roof is obstructed during
the closing process, it will open again immediately.
Check to see why the glass roof has not closed.
Try to close the glass roof again.
If the glass roof still cannot be closed, close it without the roll-back function.
Closing the glass roof without the roll-back function
Press the button to the second position Ⓓ until the glass roof has fully closed.
The glass roof will now close without the roll-back function.
Please go to a qualified workshop if the glass roof still cannot be closed.
If you release the switch during the closing procedure, the glass roof will open automatically.
Page 116 of 502

WARNING
Closing the glass roof without the roll-back function can cause serious injuries.
Always close the glass roof carefully.
Ensure that nobody obstructs the path of the glass roof, especially if the roll-back function is not
active when it is closed.
The roll-back function does not prevent fingers or other body parts from being pressed against the
roof frame and being injured.
The roll-back function is also activated if you use the convenience closing function on the vehicle key
to close the windows and the glass roof.
Troubleshooting
Glass roof does not close
The glass roof works only when the ignition is switched on. The glass roof can still be opened or
closed for a short time after the ignition has been switched off, provided that the driver door or
front passenger door are not opened.
Steering wheel
Adjusting the steering wheel position
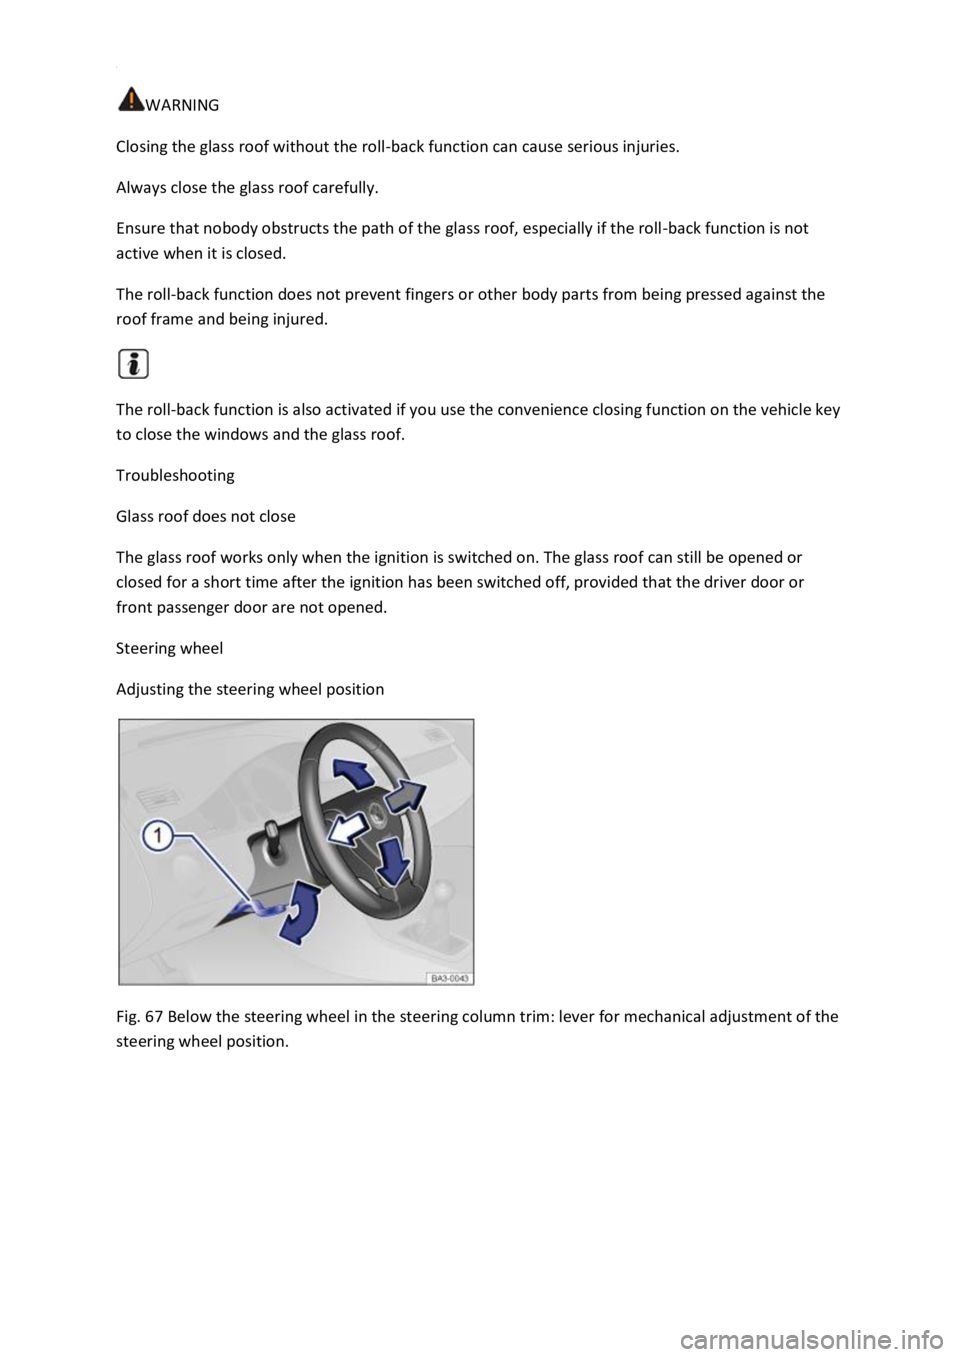
Fig. 67 Below the steering wheel in the steering column trim: lever for mechanical adjustment of the
steering wheel position.
Page 125 of 502

Correct head restraint adjustment
Adjust the head restraint so that its upper edge is at the same height as the top of the head, but not
lower than eye level. Position the back of your head as close to the head restraint as possible.
Head restraint adjustment for small people
Push the head restraint all the way down, even if the head is then located underneath the top edge
of the head restraint. There may be a small gap between the head restraint and backrest in the
lowest position.
Head restraint adjustment for tall people
Push the head restraint up as far as it will go.
WARNING
Driving without head restraints or with incorrectly adjusted head restraints increases the risk of
serious or fatal injuries in the event of an accident or sudden driving or braking manoeuvre.
If a seat is occupied, the head restraint for that seat must be fitted and adjusted correctly.
Each vehicle occupant must adjust the head restraint to suit their body size in order to reduce the
risk of neck injuries in an accident. The upper edge of the head restraint must, as far as possible, be
level with the top of the head, but no lower than eye level. Position the back of your head in the
middle and as close to the head restraint as possible.
Never adjust the head restraint when the vehicle is in motion.
NOTICE
When removing or fitting head restraints, make sure that they do not hit the roof, the front seat
backrest or other vehicle parts. This will prevent damage from occurring.
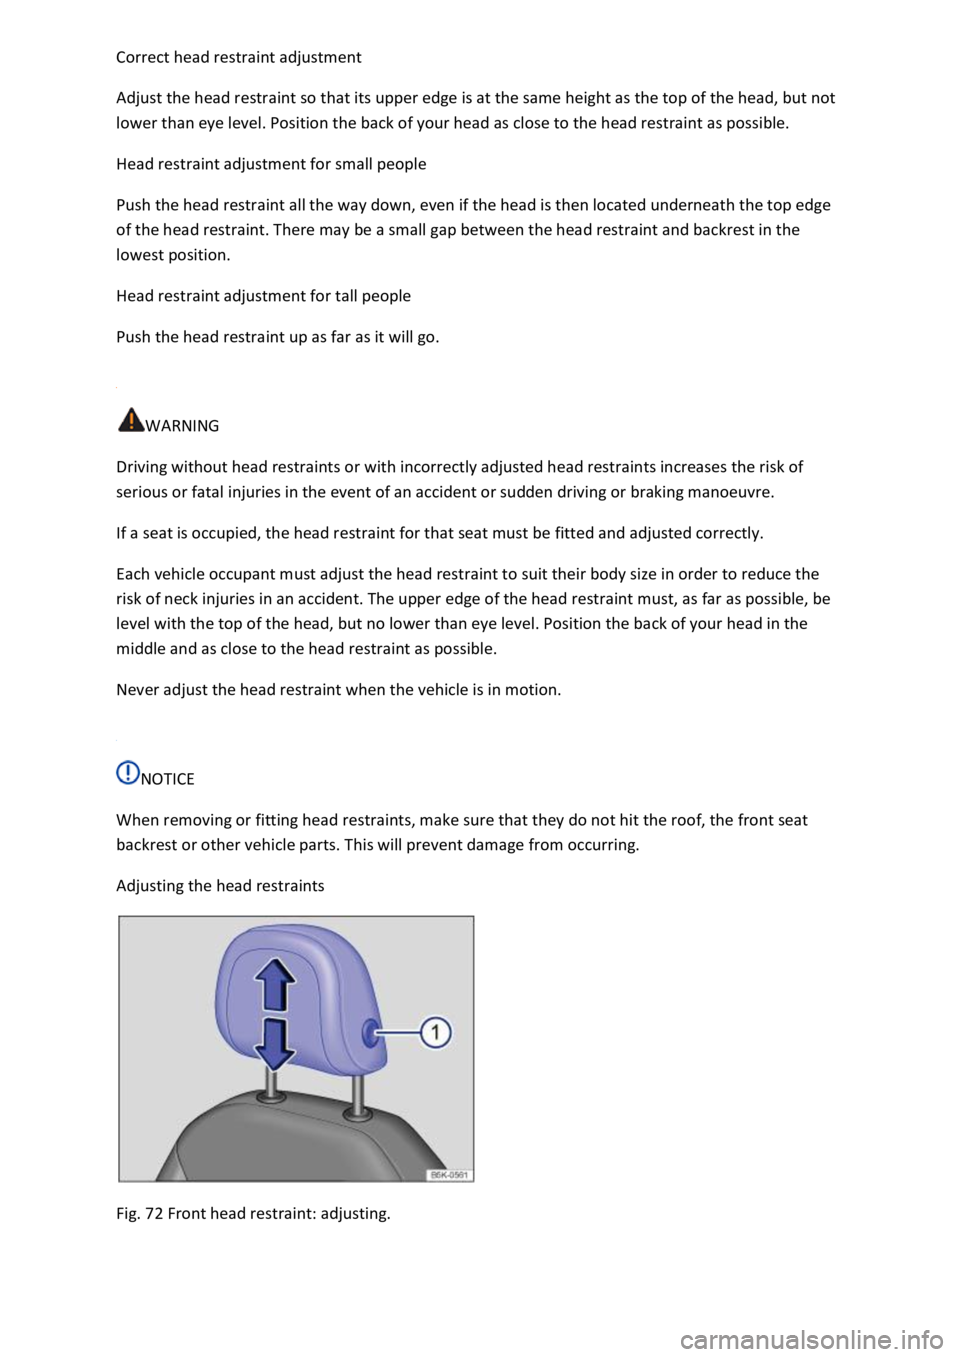
Adjusting the head restraints
Fig. 72 Front head restraint: adjusting.