2021 VOLKSWAGEN T-ROC AUX
[x] Cancel search: AUXPage 165 of 502

Operating noises can be heard if the auxiliary heater is switched on.
The 12-volt vehicle battery will discharge if the auxiliary heating or ventilation is run several times
over an extended period. Drive the vehicle for an appropriate distance in between in order to
recharge the 12-volt vehicle battery.
The fuel gauge indication may not be accurate (just above the reserve quantity) when the vehicle is
parked on a slope; this may restrict the function of the auxiliary heater.
The auxiliary heater may switch on automatically when the engine is started at temperatures below
+5°C (+41°F) in order to provide additional hea ng power. The supplementary heating function will
switch off again automatically after a short time.
Programming the auxiliary heater and ventilation
First read and observe the introductoryinformation and safety warnings⇒Introduction
Opening the Auxiliary heater menu
The auxiliary heater is programmed in the Infotainment system.
Manual air conditioning system
Press the button on the Infotainment system.
Touch the Vehicle and function buttons.
Climatronic
Open the air conditioning settings in the Infotainment system.
Touch the function button.
Changing operating mode
Open the Auxiliary heater menu.
Press the Heating or Ventilation function buttons to change mode.
At high outside temperatures, the auxiliary ventilation system directs fresh air into the vehicle and
prevents the accumulation of heat.
Programming the auxiliary heater
Activation is always for one heating or ventilation operation only. The departure time must be
activated again for every start.
Page 166 of 502

Before programming, check that the date and time set in the vehicle are correct ⇒ Time .
Open the Auxiliary heater menu.
Touch the Set function button.
Select one of the memory locations for a Departure time.
Touch the Activate function button.
Manual air conditioning system: the programmed departure time determines the time at which
the auxiliary heater or ventilation should switch off. The point at which the heating or ventilation
process starts is determined depending on the programmed running time.
Climatronic: on the basis of the programmed departure time, the vehicle automatically
calculates the start time for heating or ventilation to the currently set temperature depending on
the outside temperature.
Press the Running time function button under Adjust in order to select the running time when the
auxiliary heater is switched on using the immediate heat button or remote control.
Checking programming
If a departure time has been activated, the LED in the immediate heat button will light up on the
Climatronic control panel for approximately 10 seconds after the ignition is switched off.
WARNING
Never program the auxiliary heating system so that is switched on and run in unventilated or
enclosed spaces. Among other things, the emissions from the auxiliary heater contain carbon
monoxide, which is an odourless and colourless poisonous gas. Carbon monoxide can cause people
to lose consciousness. It can also cause death.
Remote control
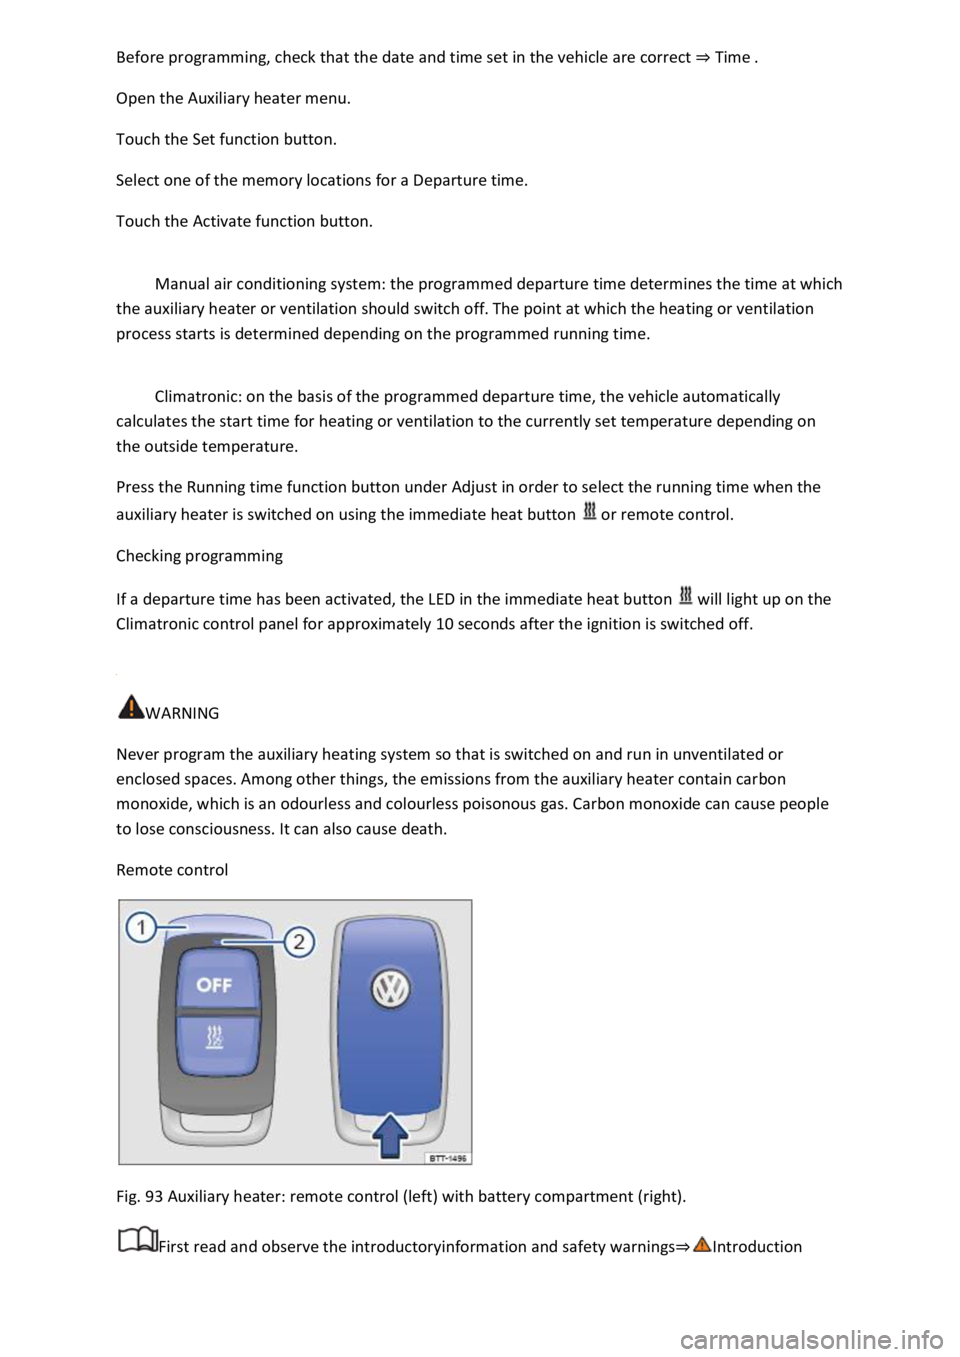
Fig. 93 Auxiliary heater: remote control (left) with battery compartment (right).
First read and observe the introductoryinformation and safety warnings⇒Introduction
Page 167 of 502

Switching the auxiliary heater on and off using the remote control
Switching on: press the button ⇒ Fig. 93 .
The auxiliary heater is switched on when the LED on the remote control is lit up green.
Switching off: press the button ⇒ Fig. 93 .
The auxiliary heater is switched off when the LED on the remote control is lit up red.
LED in the remote control
The LED ⇒ Fig. 93 ② provides feedback on various operating states when you press a button.
Lit up
greenThe auxiliary heater is switched on.redThe auxiliary heater is switched off.
Flashing irregularly
greenAuxiliary heater disabled: the fuel tank is nearly empty, the 12-volt vehicle battery voltage is
too low or a malfunction has occurred. Refuel and drive long enough to recharge the 12-volt vehicle
battery or visit a qualified workshop.
Flashing regularly
red or greenSwitch-on or switch-off signal has not been received. Move closer to the vehicle.
Lit up or flashing
orangeThe button cell (battery) in the remote control is weak. Replace the button cell.
Range
The remote control has a range of a few hundred metres when the button cell is fully charged.
Maintain a distanced of at least 2 metres between the remote control and the vehicle.
Avoid any obstacles between the remote control and the vehicle.
Hold the remote control with the aerial ⇒ Fig. 93 ① pointing vertically upwards.
Do not cover the aerial.
Adverse weather or a weak battery cell will significantly reduce the range.
Renewing the button cell in the remote control
The button cell in the remote control must be replaced if the indicator lamp does not light up.
Insert a suitable object, e.g. a screwdriver, in the recess on the side in the direction of the arrow
⇒ Fig. 93 .
Use the object to lever off the battery cover.
Slide the battery cover forwards slightly in the direction of the arrow.
Page 245 of 502

Objects that cannot be detected
Vehicles that are driving outside the sensor range in close proximity to your vehicle, e.g. vehicles
that are driving offset to your vehicle or motorbikes.
Vehicles that change into your lane directly in front of your vehicle.
Vehicles with bodies or attachments that project beyond the vehicle.
Oncoming vehicles or vehicles crossing your path.
Pedestrians who are stationary, moving towards the vehicle or moving in the same direction as the
vehicle.
Function limitations
In tight bends.
Driving in heavy rain, snow or heavy spray.
Driving in multi-storey car parks.
Driving on roads with embedded metal objects, e.g. railway tracks.
Reversing.
If TCS is switched off manually.
If ESC is taking corrective action.
If the radar sensor is dirty or covered.
If there is a fault in several brake lights on the vehicle or on a trailer with an electrical connection to
the vehicle ⇒ .
If the vehicle accelerates hard or the accelerator is fully depressed.
In complex driving situations, e.g. at traffic islands.
In unclear traffic situations, e.g. vehicles ahead are braking heavily or turning off.
If there is a fault in Front Assist.
Switching off Front Assist
If the vehicle is used in a capacity other than driving in normal traffic, e.g. offroad.
If the vehicle is being towed or is loaded onto another vehicle.
If the radar sensor is covered temporarily by add-on parts, e.g. auxiliary headlights.
If the radar sensor is faulty.
After external force on the radar sensor, e.g. after a frontal collision.
In the event of multiple unwanted interventions.
Page 322 of 502

Mounting points
879 mm
at least 65 mm
350 – 420 mm
334 mm
554 mm
1,017 mm
1,051 mm
WARNING
Electrical cables that are not connected properly or are connected incorrectly can cause faults in the
entire vehicle electronics system and also cause accidents and serious injuries.
clusters or to other unsuitable power sources. Use only suitable connectors for connection of the
trailer.
WARNING
The trailer can become detached from the towing vehicle if the towing bracket is unsuitable or
incorrectly fitted. This can cause serious accidents and fatal injuries.
Use only towing brackets which have been approved by Volkswagen for your vehicle type.
Fuel and emission control
Safety notes on handling fuel
WARNING
Incorrect handling of fuel can cause explosions, fire, serious burns and other injuries.
⇒ Switching the auxiliary heater and ventilation on and
off , the ignition, your mobile phone and other radio equipment before refuelling.
Page 350 of 502

1) Note installation position. Factory-fitted fuse location as shown in illustration ⇒ Fig. 173 .
Fuse tables for fuses in the engine compartment
First read and observe the introductoryinformation and safety warnings⇒Introduction
The table shows the fuse locations of the electrical consumers relevant for the driver. The first
column in the table contains the location. The other columns contain the fuse type, the amp rating
and the consumer protected by the fuse.
Depending on the market and specification of your vehicle, the fuse numbers and positions may
differ to those given in the table. If necessary, ask your Volkswagen dealership for the exact fuse
assignment.
F65 amps, ATO®, brake light sensor.F1440 amps, JCASE®, windscreen heating.F1515 amps, ATO®,
horn.F1930 amps, ATO®, front wipers.F3720 amps, ATO®, auxiliary heater.
Changing a blown fuse
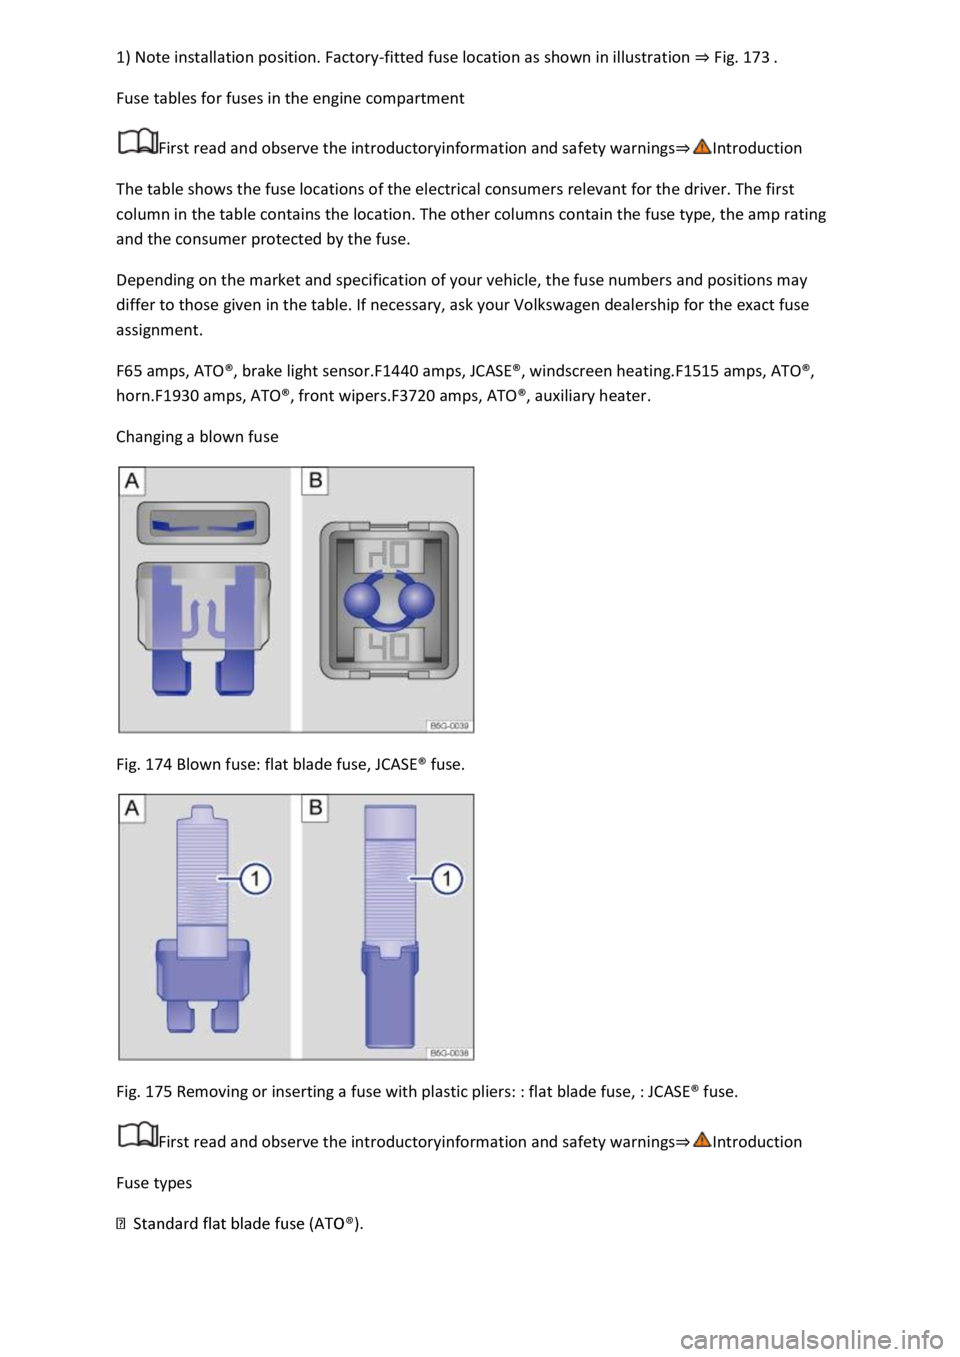
Fig. 174 Blown fuse: flat blade fuse, JCASE® fuse.
Fig. 175 Removing or inserting a fuse with plastic pliers: : flat blade fuse, : JCASE® fuse.
First read and observe the introductoryinformation and safety warnings⇒Introduction
Fuse types
Page 387 of 502

Fig. 192 Battery window on the top of the 12-volt vehicle battery (illustration).
First read and observe the introductoryinformation and safety warnings⇒Introduction
The electrolyte level of the 12-volt vehicle battery should be checked regularly in high-mileage
vehicles, in hot countries and in older 12-volt vehicle batteries. The 12-volt vehicle battery is
otherwise maintenance-free.
Vehicles with an auxiliary heater ⇒ Auxiliary heater and ventilation are fitted with special vehicle
batteries. The electrolyte level of these 12-volt vehicle batteries cannot be checked for technical
reasons. Go to a qualified workshop to have the 12-volt vehicle battery checked.
Preparations
eparing the vehicle for working in the engine compartment ⇒ In the engine compartment .
⇒ In the engine compartment .
Checking the electrolyte level (12-volt vehicle batteries with battery window)
e for you to clearly see the colour indicator in the round
battery window on the top of the 12-volt vehicle battery ⇒ Fig. 192 (arrow). Never use naked
flames or glowing objects as a light source.
s according to the electrolyte level in the
12-volt vehicle battery.
Light yellow or without colourThe electrolyte level of the 12-volt vehicle battery is too low. The 12-
volt vehicle battery should be checked and replaced by a qualified workshop if necessary.BlackThe
electrolyte level of the 12-volt vehicle battery is correct.
WARNING
Any work on the 12-volt vehicle battery can cause serious chemical burns, explosions and electric
shocks.
Page 389 of 502

Connecting the 12-volt vehicle battery
-volt vehicle
battery.
e cable and then the negative cable ⇒ .
Various indicator lamps may light up after the 12-volt vehicle battery has been connected and the
ignition is switched on. They will go out when you drive a short distance at a speed of approximately
15 – 20 km/h (10 – 12 mph). If the indicator lamps remain lit up, the vehicle should be checked by a
qualified workshop.
If the 12-volt vehicle battery was disconnected for an extended period, the system may not able to
calculate or correctly display the time when the next service is due ⇒ Instrument cluster . Observe
the maximum permissible service intervals ⇒ Service .
Automatic switch-off for electrical consumers
The intelligent vehicle electrical system management function automatically implements a range of
measures to prevent the 12-volt vehicle battery from discharging under high loads:
power supply to the 12-volt socket and the cigarette lighter may be interrupted temporarily
while the engine is being started.
The vehicle electrics management system cannot always prevent the 12-volt vehicle battery from
being discharged, for example if the ignition is left on over a long period with the engine off or the
side lights or parking lights are left on over a long period of time.
12-volt vehicle battery is discharged
gnition is switched on.
⇒ Auxiliary heater and ventilation .
WARNING
Incorrectly mounting the battery and using incorrect 12-volt vehicle batteries can cause short
circuits, fire and serious injuries.
-free and leak-proof 12-volt vehicle batteries that have the same
properties, specifications and dimensions as the factory-fitted 12-volt vehicle battery.
WARNING
A highly explosive mixture of gases is given off when the 12-volt vehicle battery is being charged.