Page 125 of 502

Correct head restraint adjustment
Adjust the head restraint so that its upper edge is at the same height as the top of the head, but not
lower than eye level. Position the back of your head as close to the head restraint as possible.
Head restraint adjustment for small people
Push the head restraint all the way down, even if the head is then located underneath the top edge
of the head restraint. There may be a small gap between the head restraint and backrest in the
lowest position.
Head restraint adjustment for tall people
Push the head restraint up as far as it will go.
WARNING
Driving without head restraints or with incorrectly adjusted head restraints increases the risk of
serious or fatal injuries in the event of an accident or sudden driving or braking manoeuvre.
If a seat is occupied, the head restraint for that seat must be fitted and adjusted correctly.
Each vehicle occupant must adjust the head restraint to suit their body size in order to reduce the
risk of neck injuries in an accident. The upper edge of the head restraint must, as far as possible, be
level with the top of the head, but no lower than eye level. Position the back of your head in the
middle and as close to the head restraint as possible.
Never adjust the head restraint when the vehicle is in motion.
NOTICE
When removing or fitting head restraints, make sure that they do not hit the roof, the front seat
backrest or other vehicle parts. This will prevent damage from occurring.
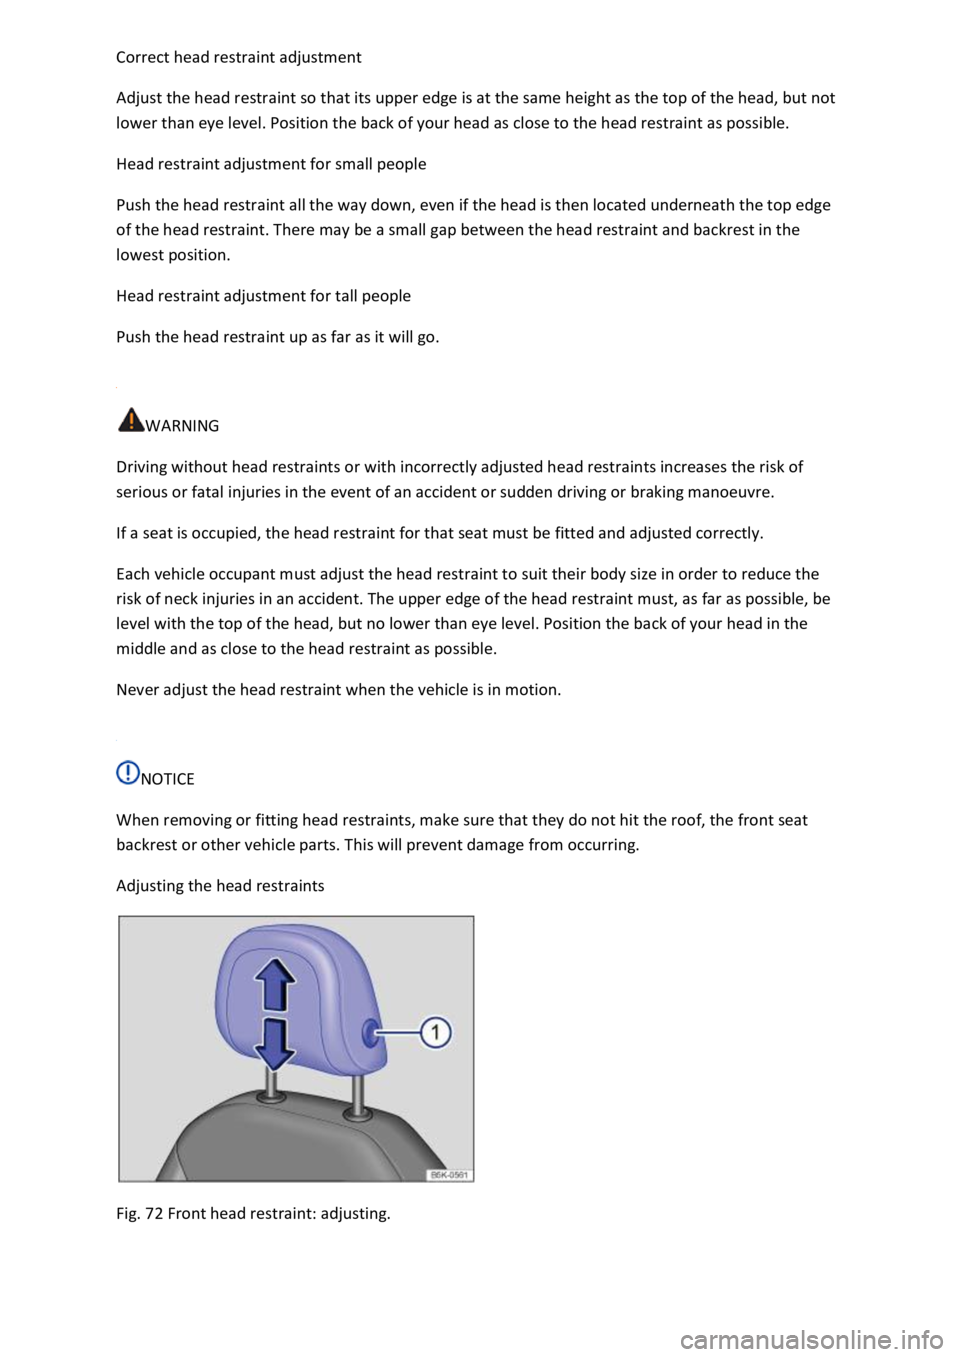
Adjusting the head restraints
Fig. 72 Front head restraint: adjusting.
Page 126 of 502
Fig. 73 Rear head restraint: adjusting.
First read and observe the introductoryinformation and safety warnings⇒Introduction
Adjusting the height of the front head restraint
Press the button ⇒ Fig. 72① or ⇒ Fig. 73① if necessary and slide the head restraint up or down
in the direction of the arrow ⇒ .
The head restraint must click securely into position.
Removing and installing head restraints
Fig. 74 Front head restraint: removing.
Fig. 75 Rear head restraint: removing.
Page 127 of 502

First read and observe the introductoryinformation and safety warnings⇒Introduction
Removing the front head restraints
Lower the head restraint if necessary ⇒ .
To release the head restraint, feel for the recess in the marked area on the rear side and press it in
the direction of the arrow ⇒ Fig. 74① .
Pull the head restraint out in the direction of the arrow ⇒ Fig. 74② .
Fitting the front head restraints
Position the head restraint correctly over the head restraint guides and then insert into the guides of
the corresponding seat backrest.
Slide the head restraint all the way down until the guide pins click into place.
Adjust the head restraint so a correct sitting position can be assumed.
Removing the rear head restraints
Release the rear bench seat backrest and fold the backrest forwards.
Push the head restraint all the way up ⇒ .
Press button ⇒ Fig. 75① on the head restraint guide.
At the same time, press button ② while a second person pulls the head restraint out fully.
Fold back the rear seat backrest and allow it to engage securely.
Fitting the rear head restraints
Release the rear bench seat backrest and fold the backrest forwards.
Position the head restraint correctly over the head restraint guides and then insert into the guides of
the corresponding seat backrest.
Press and hold the button ⇒ Fig. 75② and push down the head restraint.
Fold back the rear seat backrest and allow it to engage securely.
Adjust the head restraint so that a correct sitting position can be assumed ⇒ Sitting position .
Seat functions
Centre armrest
Page 128 of 502
Fig. 76 Front centre armrest.
Fig. 77 Rear fold-out centre armrest.
Front centre armrest
To move it backwards and forwards: push the centre armrest in the direction of the arrow all the
way forwards ⇒ Fig. 76 , or all the way backwards.
Rear centre armrest
There may be a centre armrest in the rear seat backrest that can be folded out of the middle seat.
To fold it down, pull the loop in the direction of the arrow ⇒ Fig. 77 .
To fold it back: fold the centre armrest upwards in the opposite direction of the arrow ⇒ Fig. 77 and
push it into the backrest as far as it will go.
WARNING
When fully open or not completely closed, the front centre armrest can restrict the freedom of
movement of the driver's arms and therefore cause accidents and serious injuries.
Always keep stowage compartments closed while the vehicle is in motion.
Never transport an adult or child on the centre armrest. An incorrect seating position can cause
serious injury.
Page 129 of 502

WARNING
The rear centre armrest must always be folded up while the vehicle is in motion in order to reduce
the risk of injury.
The middle seat on the rear bench seat must never be used when the centre armrest is folded down
– neither by adults nor children. An incorrect sitting position can cause severe injuries.
Lights
Turn signals
Switching turn signals on and off
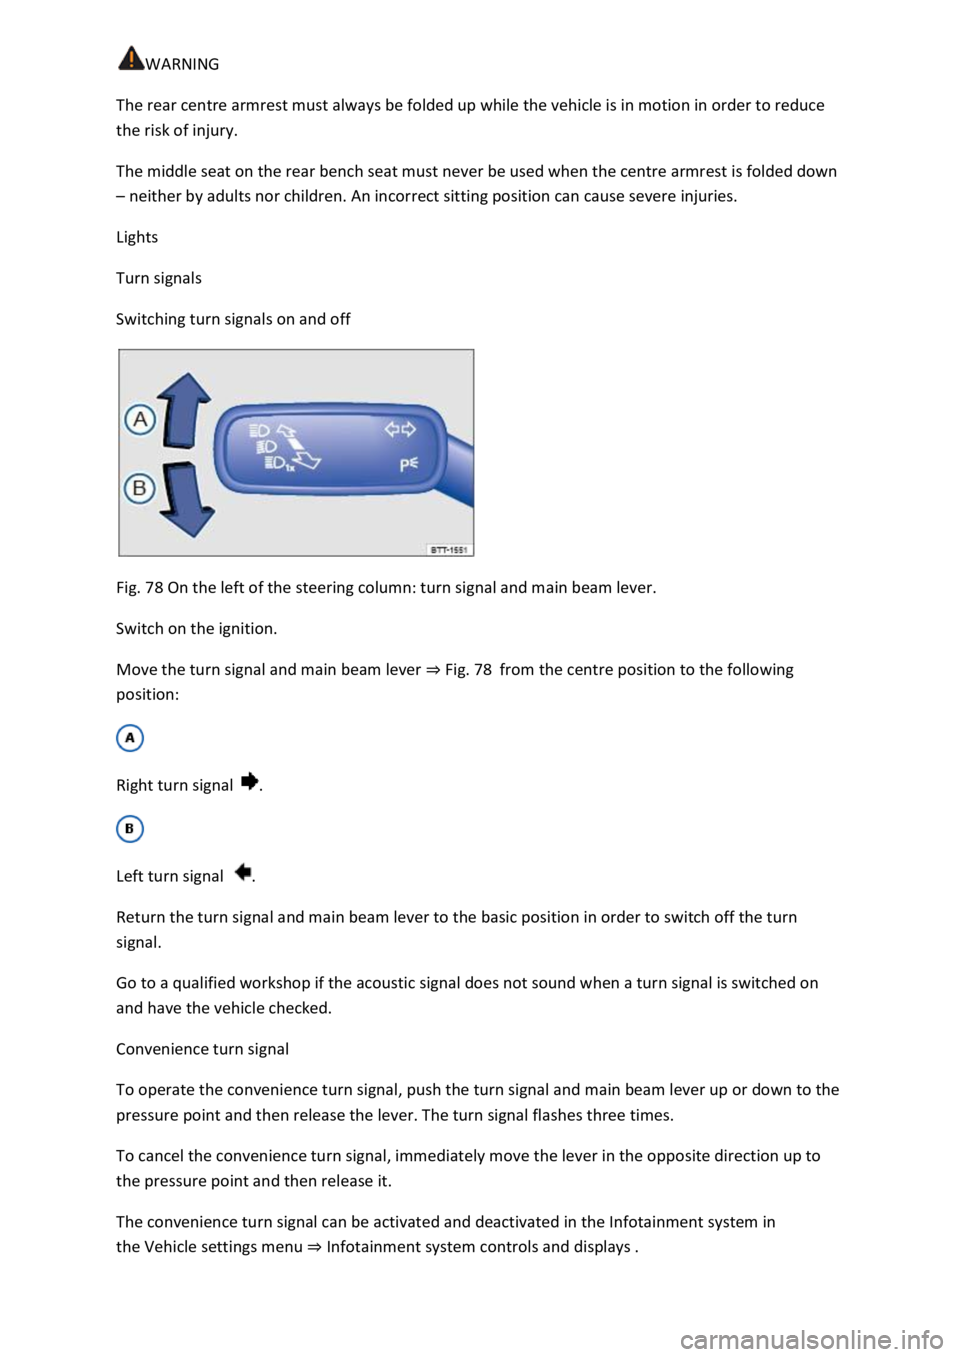
Fig. 78 On the left of the steering column: turn signal and main beam lever.
Switch on the ignition.
Move the turn signal and main beam lever ⇒ Fig. 78 from the centre position to the following
position:
Right turn signal .
Left turn signal .
Return the turn signal and main beam lever to the basic position in order to switch off the turn
signal.
Go to a qualified workshop if the acoustic signal does not sound when a turn signal is switched on
and have the vehicle checked.
Convenience turn signal
To operate the convenience turn signal, push the turn signal and main beam lever up or down to the
pressure point and then release the lever. The turn signal flashes three times.
To cancel the convenience turn signal, immediately move the lever in the opposite direction up to
the pressure point and then release it.
The convenience turn signal can be activated and deactivated in the Infotainment system in
the Vehicle settings menu ⇒ Infotainment system controls and displays .
Page 130 of 502

WARNING
Incorrect use of turn signals, a failure to use turn signals, or forgetting to switch off a turn signal can
confuse other road users. This could lead to accidents and serious injuries.
Always activate the turn signal in good time when changing lanes and performing overtaking or
turning manoeuvres.
Always switch off the turn signal once the lane change or overtaking or turning manoeuvre has been
completed.
The hazard warning lights also work when the ignition is switched off ⇒ In an emergency .
Some settings can be stored in the user accounts of the personalisation function and therefore
change when the user account changes ⇒ Personalisation .
Vehicle lighting
Switching lights on and off
Fig. 79 Next to the steering wheel: light switch (one variant).
Switching lights on
Switch on the ignition.
Turn the light switch to the appropriate position:
Automatic headlights: dipped beam is switched on or off depending on the brightness level
and the weather ⇒ , ⇒ Automatic headlights .The side lights and daytime running
lights are switched on. The symbol in the light switch lights up green.The dipped beam headlights
are switched on.
Switching lights off
Switch off the ignition.
Page 131 of 502

Turn the light switch to the appropriate position:
The lights are switched off.Leaving Home function (orientation lighting) can be switched on
⇒ Coming Home and Leaving Home function (orientation lighting) .Side lights or continuous
parking light on both sides of the vehicle switched on ⇒ Switching the parking lights on and off . The
symbol in the light switch lights up green.Dipped beam is switched off – the side lights will stay
on as long as the vehicle key is in the ignition lock or, in vehicles with Keyless Access, the driver door
is closed.
Daytime running lights
The daytime running lights (dependent on equipment level) can increase the visibility of your vehicle
in traffic during the day.
The daytime running lights are switched on every time the ignition is switched on when the light
switch is in position , or (when brightness is detected).
The daytime running lights cannot be switched on or off manually.
WARNING
Accidents and serious injuries can occur if the road is not sufficiently illuminated and other road
users have difficulty seeing the vehicle, or cannot see it at all.
The light assist systems are designed only to provide support; the driver is responsible for the
correct vehicle lights being switched on.
Always switch on the dipped beam headlights if it is dark, raining or visibility is poor.
WARNING
The side lights or daytime running lights are not bright enough to illuminate the road ahead and to
ensure that other road users are able to see you.
Always switch on the dipped beam headlights if it is dark, raining or visibility is poor.
The tail light clusters are not switched on with the daytime running lights. If the tail light clusters are
not switched on, the vehicle may not be visible to other road users if it is dark, raining, or if visibility
is poor.
WARNING
The automatic headlights ( ) switch dipped beam on and off only when there is a change in
the level of brightness.
Switch on dipped beam manually if required by the weather conditions, e.g. in fog.
Page 133 of 502

If the vehicle key has been removed from the ignition lock and the driver door opened, acoustic
warnings sound under the following conditions:
If the parking light is switched on.
If the side lights are switched on or the rear fog light is switched on .
When the Coming Home function is switched on, no signal tone will be given as a reminder that a
light is still switched on when leaving the vehicle.
Some settings can be stored in the user accounts of the personalisation function and therefore
change when the user account changes ⇒ Personalisation .
Troubleshooting
Turn signal indicator lamp
If a turn signal on the vehicle has failed, the indicator lamp will start flashing twice as fast.
The indicator lamp flashes green.
Check the lighting and change the appropriate bulb as required ⇒ Changing bulbs .
If the problem persists, go to a qualified workshop.
Does not apply in China and Japan: trailer turn signals indicator lamp
The indicator lamp goes out if a trailer turn signal or all trailer lights stop working.
The indicator lamp flashes green.
Check the lighting and change the appropriate bulb as required ⇒ Changing bulbs .
If the problem persists, go to a qualified workshop.
Vehicle lighting not working
Vehicle lighting has failed either completely or partially.
The indicator lamp lights up yellow.
Check the lighting and change the appropriate bulb as required ⇒ Changing bulbs .
If the problem persists, go to a qualified workshop.
Fault in rain/light sensor
In the light switch position , the vehicle lighting is not switched on or off automatically.
The indicator lamp lights up yellow.
Switch the ignition off and on.
If the problem persists, go to a qualified workshop.