2021 TOYOTA YARIS HATCHBACK light
[x] Cancel search: lightPage 103 of 568

103
2
YARIS(HB) Owner's Manual_Europe_MK0001_en
2-1. Instrument cluster
Vehicle status information and indicators
(→P.103)
Use the displayed information as a ref-
erence only.
Following items will be displayed.
�z“Trip”
• “Average Speed”: Displays the aver-
age vehicle speed since engine start*
• “Distance”: Displays the distance
driven since engine start*
• “Total Time”: Displays the elapsed
time since engine start*
*
: These items are reset each time the
engine stops.
�z“Total”
• “Average Speed”: Displays the aver-
age vehicle speed since the display
was reset
*
• “Distance”: Displays the distance
driven since the display was reset*
• “Total Time”: Displays the elapsed
time since the display was reset*
*
: To reset, display the desired item and
press and hold the meter control
switch.
■Meter display settings that can
be changed
�zClock setting (vehicles without
navigation/multimedia system)
→P. 9 2
�zLanguage
Select to change the language dis-
played.
�zUnits
Select to change the units of measure displayed.
�zEco Driving Indicator Light (if
equipped)
Select to enable/disable the Eco Driv-
ing Indicator Light.
�z
• Fuel economy display
Select to change the average fuel con-
sumption display between after
start/after reset/after refuel. (→P.100)
�z (if equipped)
Select to display/not display the audio
system linked display.
�z
Select to change the displayed content
of the following:
• Drive information type
Select to change the drive information
type display between after start/after
reset.
• Drive information items
Select to set the first and second items
of the drive information display to any of
the following: average vehicle
speed/distance/elapsed time.
�zPop-up display
Select to enable/disable pop-up dis-
plays for each relevant system.
�zMulti-information display off
Select to turn the multi-information dis-
play off.
To turn the multi-information display on
again, press any of the following meter
control switches
//// /.
Settings display
Page 110 of 568

110
YARIS(HB) Owner's Manual_Europe_MK0001_en
2-1. Instrument cluster
past 15 minutes is divided by color
into past averages and averages
attained since the engine switch
was last turned to ON. Use the dis-
played average fuel consumption
as a reference.
The image is an example only, and may
vary slightly from actual conditions.
■History
1Press the “MENU” button.
2Select “Info” on the “Menu”
screen.
If a screen other than “History” is dis-
played, select “History”.
Best recorded fuel consumption
Latest fuel consumption
Previous fuel consumption
record
Updating the latest fuel con-
sumption data
Resetting the history data
The average fuel consumption his-
tory is divided by color into past
averages and the average fuel con-
sumption since the last updated.
Use the displayed average fuel
consumption as a reference.
The image is an example only, and may
vary slightly from actual conditions.
■Updating the history data
Update the latest fuel consumption by
selecting “Clip” to measure the current
fuel consumption again.
■Resetting the data
The fuel consumption data can be
deleted by selecting “Clear”.
■Cruising range
Displays the estimated maximum dis-
tance that can be driven with the quan-
tity of fuel remaining.
This distance is computed based on
your average fuel consumption.
As a result, the actual distance that can
be driven may differ from that displayed.
Page 121 of 568

121
3
YARIS(HB) Owner's Manual_Europe_MK0001_en
3-2. Opening, closing and locking the doors
Before driving
■Using the entry function (vehi-
cles with a smart entry & start
system)
1 Unlocks all the doors
The door cannot be unlocked for 3 sec-
onds after the door is locked.
2 Locks all the doors
Check that the door is securely locked.
■Wireless remote control
→ P. 1 1 6
■Key
→ P. 1 1 7
■Operation signals
→ P. 1 1 7
■Door lock switches
→ P. 1 1 9
WARNING
●When closing the back door, take extra care to prevent your fingers,
etc., from being caught.
●When closing the back door, make
sure to press it lightly on its outer surface. If the back door handle is used to fully close the back door, it
may result in hands or arms being caught.
●Do not pull on the back door damper stay ( →P.122) to close the back door, and do not hang on the
back door damper stay. Doing so may cause hands to be caught or the back door damper stay to
break, causing an accident.
●If a bicycle carrier or similar heavy
object is attached to the back door, it may suddenly shut again after being opened, causing someone’s
hands, head or neck to be caught and injured. When installing an accessory part to the back door,
using a genuine Toyota part is rec- ommended.
Unlocking and locking the
back door from the outside
Unlocking and locking the
back door from the inside
Page 122 of 568

122
YARIS(HB) Owner's Manual_Europe_MK0001_en
3-2. Opening, closing and locking the doors
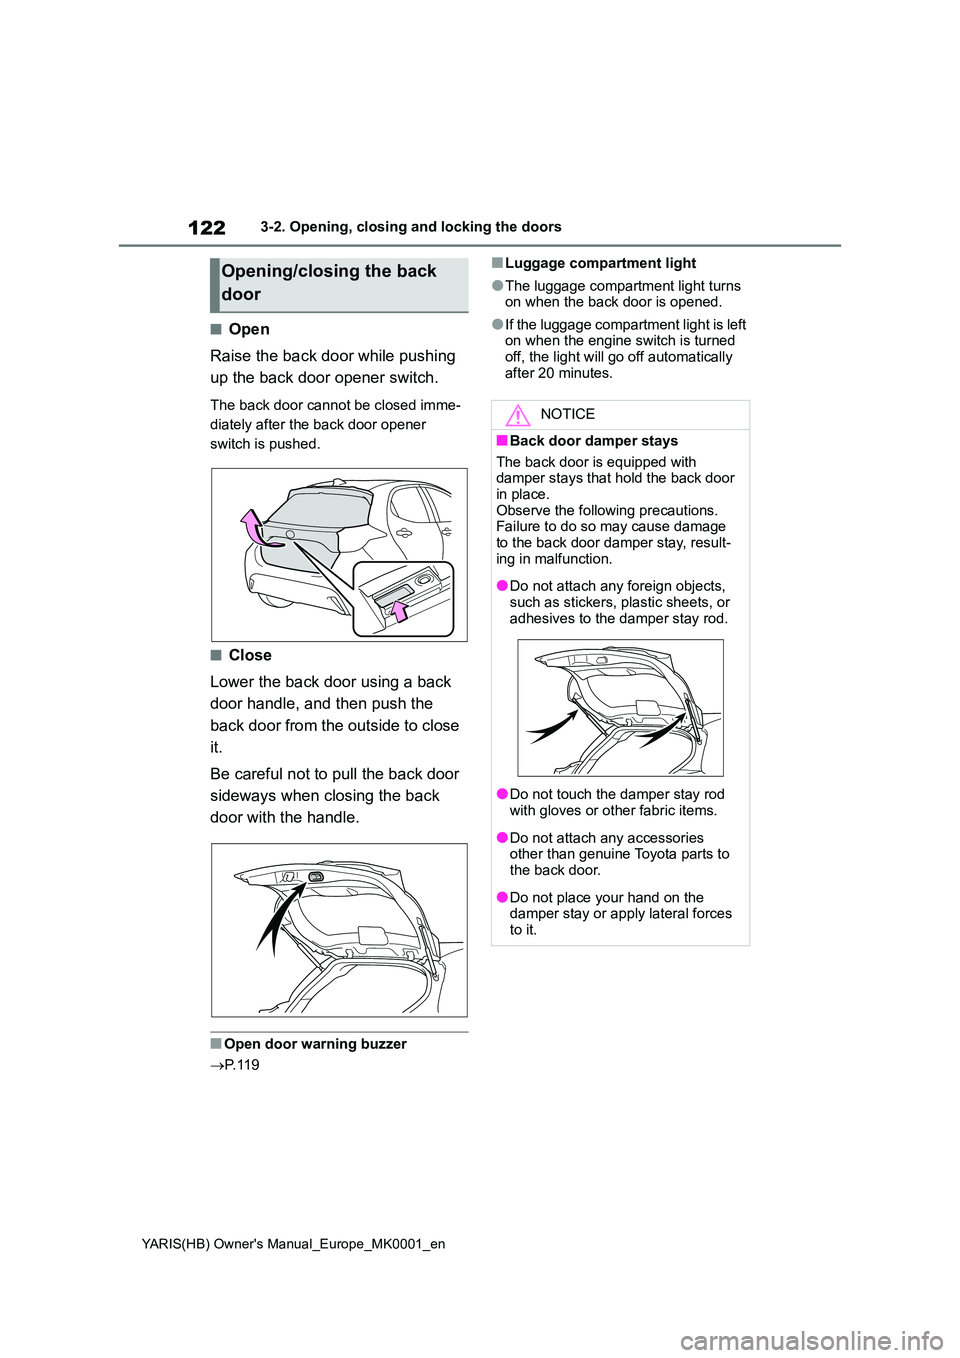
■Open
Raise the back door while pushing
up the back door opener switch.
The back door cannot be closed imme-
diately after the back door opener
switch is pushed.
■Close
Lower the back door using a back
door handle, and then push the
back door from the outside to close
it.
Be careful not to pull the back door
sideways when closing the back
door with the handle.
■Open door warning buzzer
→ P. 1 1 9
■Luggage compartment light
●The luggage compartment light turns on when the back door is opened.
●If the luggage compartment light is left on when the engine switch is turned
off, the light will go off automatically after 20 minutes.
Opening/closing the back
door
NOTICE
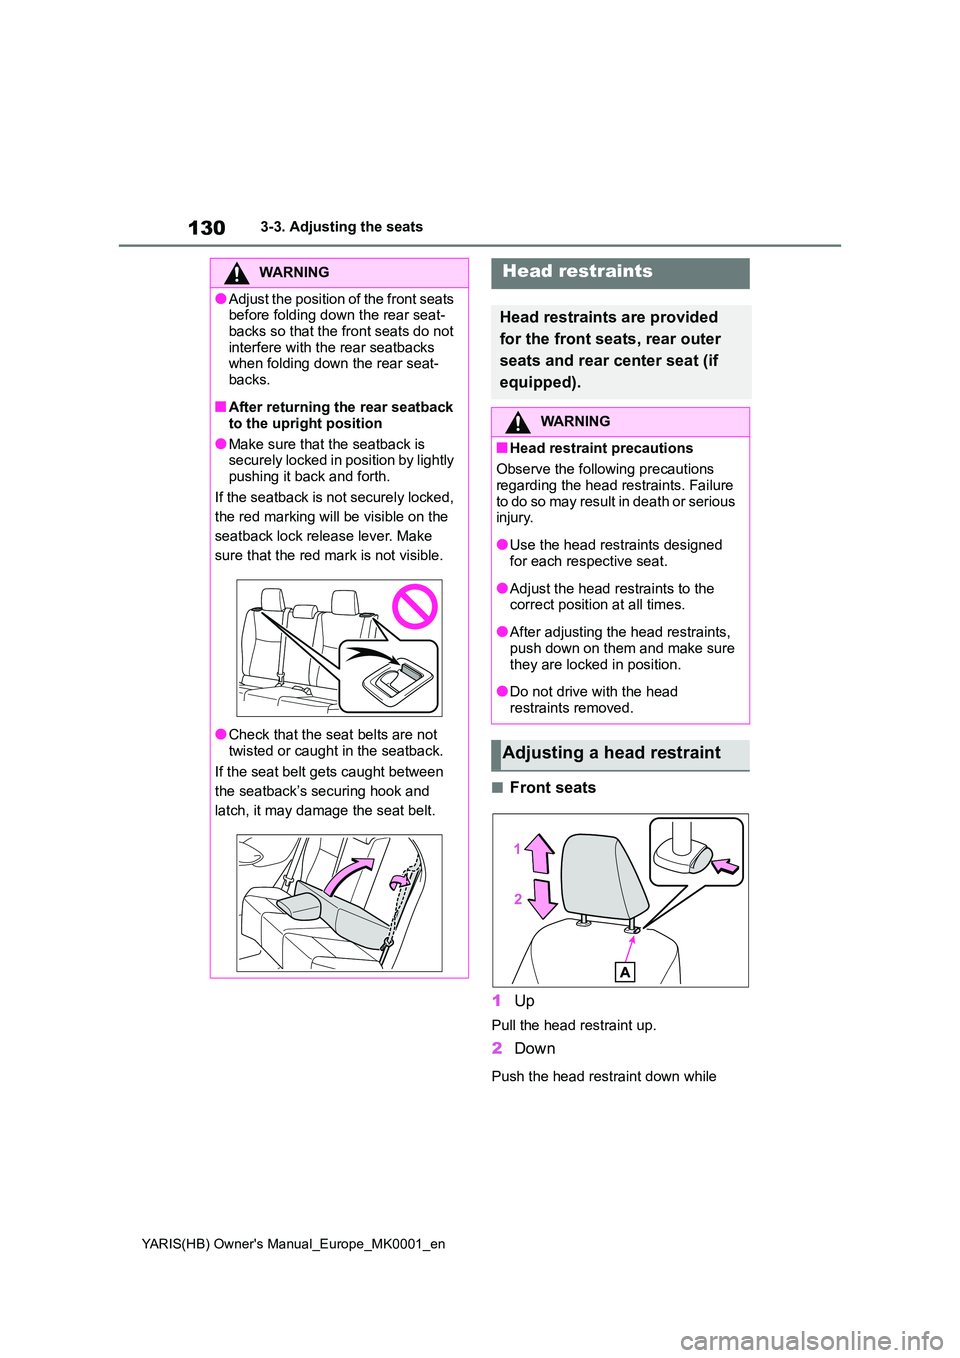
■Back door damper stays
The back door is equipped with damper stays that hold the back door in place.
Observe the following precautions. Failure to do so may cause damage to the back door damper stay, result-
ing in malfunction.
●Do not attach any foreign objects,
such as stickers, plastic sheets, or adhesives to the damper stay rod.
●Do not touch the damper stay rod with gloves or other fabric items.
●Do not attach any accessories other than genuine Toyota parts to the back door.
●Do not place your hand on the damper stay or apply lateral forces
to it.
Page 126 of 568

126
YARIS(HB) Owner's Manual_Europe_MK0001_en
3-2. Opening, closing and locking the doors
wash the vehicle:
• Place the electronic key in a location 2
m (6 ft.) or more away from the vehi-
cle. (Take care to ensure that the key
is not stolen.)
• Set the electronic key to battery-sav-
ing mode to disable the smart entry &
start system. (→P.124)
●If the electronic key is inside the vehi-
cle and a door handle becomes wet
during a car wash, a message may be
shown on the multi-information dis-
play and a buzzer will sound outside
the vehicle. To turn off the alarm, lock
all the doors.
●The lock sensor may not work prop-
erly if it comes into contact with ice,
snow, mud, etc. Clean the lock sensor
and attempt to operate it again.
●A sudden handle operation or a han-
dle operation immediately after enter-
ing the effective range may prevent
the doors from being unlocked. Touch
the door unlock sensor and check that
the doors are unlocked before pulling
the door handle again.
●If there is another electronic key in the
detection area, it may take slightly lon-
ger to unlock the doors after the door
handle is gripped.
■When the vehicle is not driven for
extended periods
●To prevent theft of the vehicle, do not
leave the electronic key within 2 m (6
ft.) of the vehicle.
●The smart entry & start system can be
deactivated in advance. (→P.422)
●Setting the electronic key to battery-
saving mode helps to reduce key bat-
tery depletion. (→P.124)
■To operate the system properly
Make sure to carry the electronic key
when operating the system. Do not get
the electronic key too close to the vehi-
cle when operating the system from the
outside of the vehicle.
Depending on the position and holding
condition of the electronic key, the key
may not be detected correctly and the system may not operate properly. (The
alarm may go off accidentally, or the
door lock prevention function may not
operate.)
■If the smart entry & start system
does not operate properly
●Locking and unlocking the doors:
→P. 4 0 0
●Starting the engine: →P. 4 0 0
■Customization
Some functions can be customized.
(→P.422)
■If the smart entry & start system
has been deactivated in a custom-
ized setting
●Locking and unlocking the doors: Use
the wireless remote control or
mechanical key. (→P.116, 400)
●Starting the engine and changing
engine switch modes: →P. 4 0 0
●Stopping the engine: →P. 1 6 1
■Certification for the smart entry &
start system
→P. 4 7 7
Page 130 of 568

130
YARIS(HB) Owner's Manual_Europe_MK0001_en
3-3. Adjusting the seats
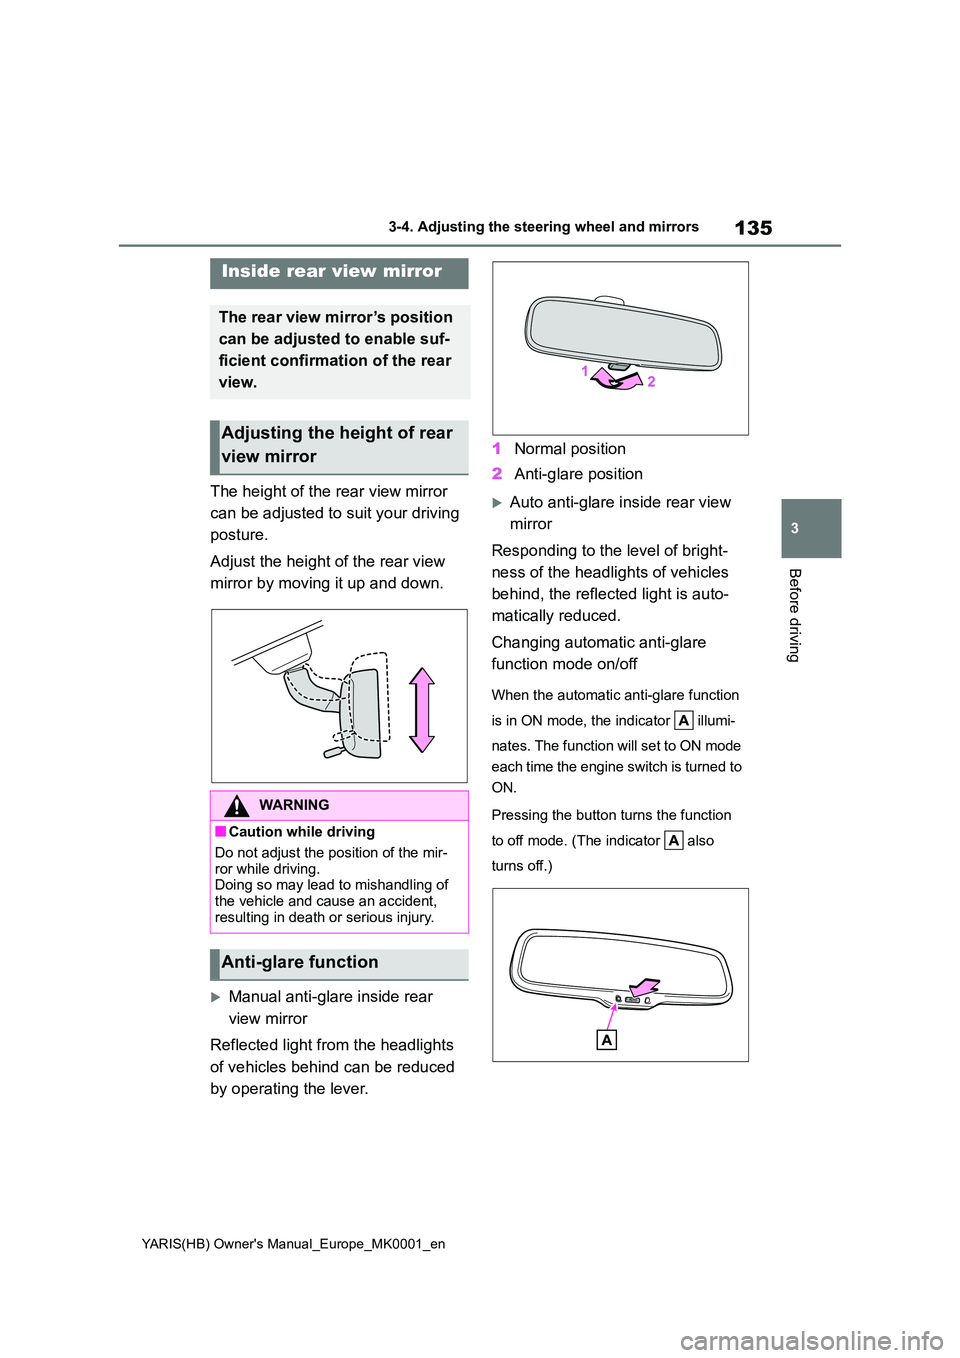
■Front seats
1 Up
Pull the head restraint up.
2Down
Push the head restraint down while
WARNING
●Adjust the position of the front seats before folding down the rear seat-
backs so that the front seats do not interfere with the rear seatbacks when folding down the rear seat-
backs.
■After returning the rear seatback
to the upright position
●Make sure that the seatback is securely locked in position by lightly
pushing it back and forth.
If the seatback is not securely locked,
the red marking will be visible on the
seatback lock release lever. Make
sure that the red mark is not visible.
●Check that the seat belts are not
twisted or caught in the seatback.
If the seat belt gets caught between
the seatback’s securing hook and
latch, it may damage the seat belt.
Head restraints
Head restraints are provided
for the front seats, rear outer
seats and rear center seat (if
equipped).
WARNING
■Head restraint precautions
Observe the following precautions
regarding the head restraints. Failure to do so may result in death or serious injury.
●Use the head restraints designed for each respective seat.
●Adjust the head restraints to the correct position at all times.
●After adjusting the head restraints, push down on them and make sure
they are locked in position.
●Do not drive with the head
restraints removed.
Adjusting a head restraint
Page 135 of 568

135
3
YARIS(HB) Owner's Manual_Europe_MK0001_en
3-4. Adjusting the steering wheel and mirrors
Before driving
The height of the rear view mirror
can be adjusted to suit your driving
posture.
Adjust the height of the rear view
mirror by moving it up and down.
Manual anti-glare inside rear
view mirror
Reflected light from the headlights
of vehicles behind can be reduced
by operating the lever.
1 Normal position
2 Anti-glare position
Auto anti-glare inside rear view
mirror
Responding to the level of bright-
ness of the headlights of vehicles
behind, the reflected light is auto-
matically reduced.
Changing automatic anti-glare
function mode on/off
When the automatic anti-glare function
is in ON mode, the indicator illumi-
nates. The function will set to ON mode
each time the engine switch is turned to
ON.
Pressing the button turns the function
to off mode. (The indicator also
turns off.)
Inside rear view mirror
The rear view mirror’s position
can be adjusted to enable suf-
ficient confirmation of the rear
view.
Adjusting the height of rear
view mirror
WARNING
■Caution while driving
Do not adjust the position of the mir-
ror while driving. Doing so may lead to mishandling of the vehicle and cause an accident,
resulting in death or serious injury.
Anti-glare function
Page 139 of 568

139
3
YARIS(HB) Owner's Manual_Europe_MK0001_en
3-5. Opening and closing the windows
Before driving
3-5.Opening and c los ing the win dows
*: If equipped
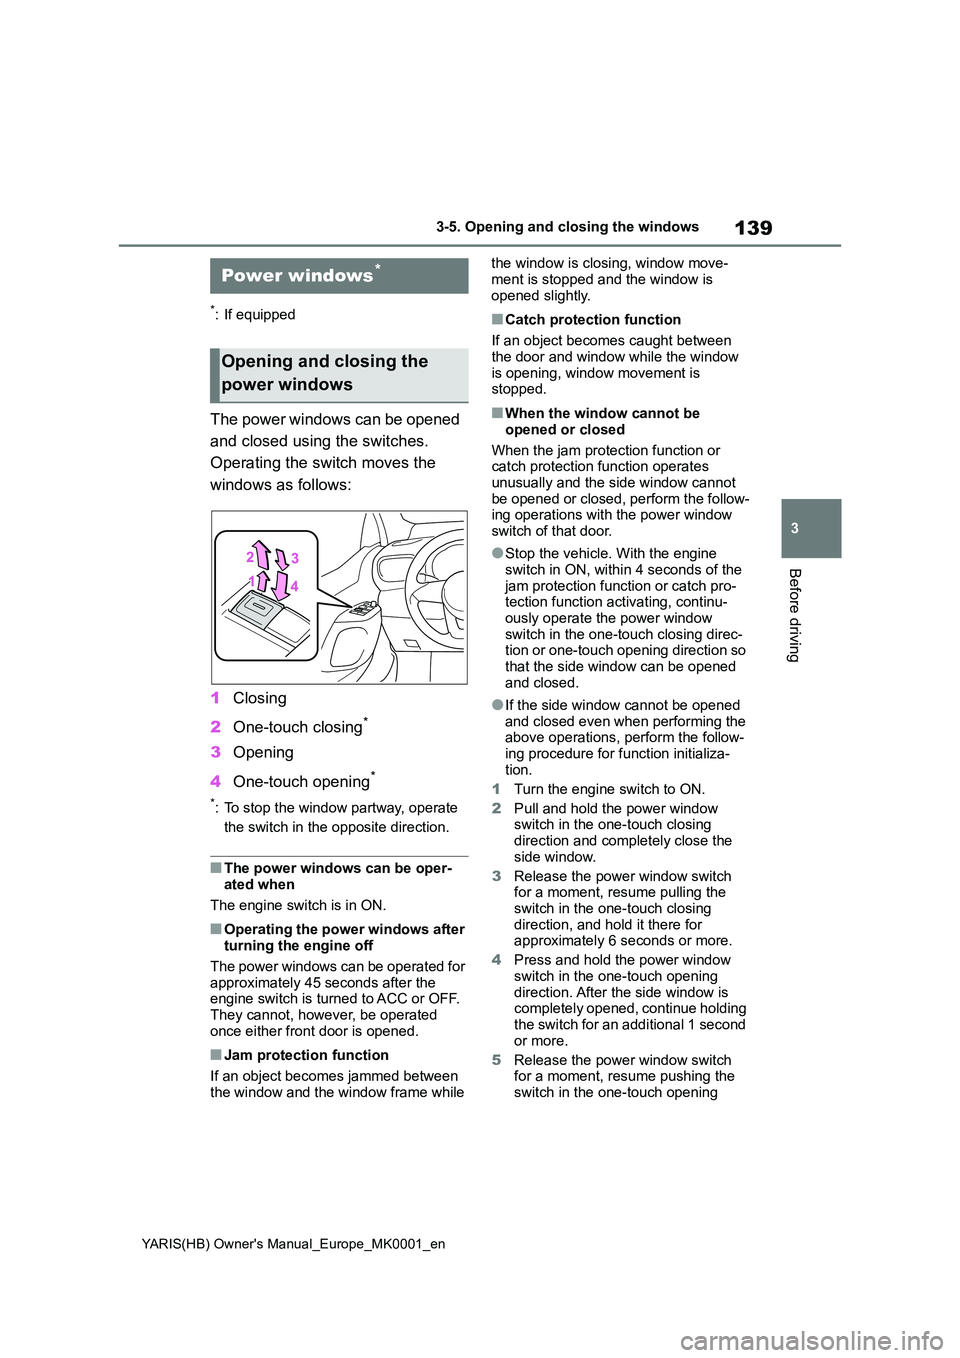
The power windows can be opened
and closed using the switches.
Operating the switch moves the
windows as follows:
1 Closing
2 One-touch closing*
3Opening
4 One-touch opening*
*: To stop the window partway, operate
the switch in the opposite direction.
■The power windows can be oper-
ated when
The engine switch is in ON.
■Operating the power windows after turning the engine off
The power windows can be operated for approximately 45 seconds after the engine switch is turned to ACC or OFF.
They cannot, however, be operated once either front door is opened.
■Jam protection function
If an object becomes jammed between
the window and the window frame while
the window is closing, window move-
ment is stopped and the window is opened slightly.
■Catch protection function
If an object becomes caught between
the door and window while the window is opening, window movement is stopped.
■When the window cannot be
opened or closed
When the jam protection function or catch protection function operates
unusually and the side window cannot be opened or closed, perform the follow-ing operations with the power window
switch of that door.
●Stop the vehicle. With the engine
switch in ON, within 4 seconds of the jam protection function or catch pro-tection function activating, continu-
ously operate the power window switch in the one-touch closing direc-tion or one-touch opening direction so
that the side window can be opened and closed.
●If the side window cannot be opened and closed even when performing the above operations, perform the follow-
ing procedure for function initializa- tion.
1 Turn the engine switch to ON.
2 Pull and hold the power window switch in the one-touch closing
direction and completely close the side window.
3 Release the power window switch for a moment, resume pulling the
switch in the one-touch closing direction, and hold it there for approximately 6 seconds or more.
4 Press and hold the power window
switch in the one-touch opening direction. After the side window is completely opened, continue holding
the switch for an additional 1 second or more.
5 Release the power window switch for a moment, resume pushing the
switch in the one-touch opening
Power windows*
Opening and closing the
power windows