Page 91 of 308

913-2. Destination search
3
Navigation system
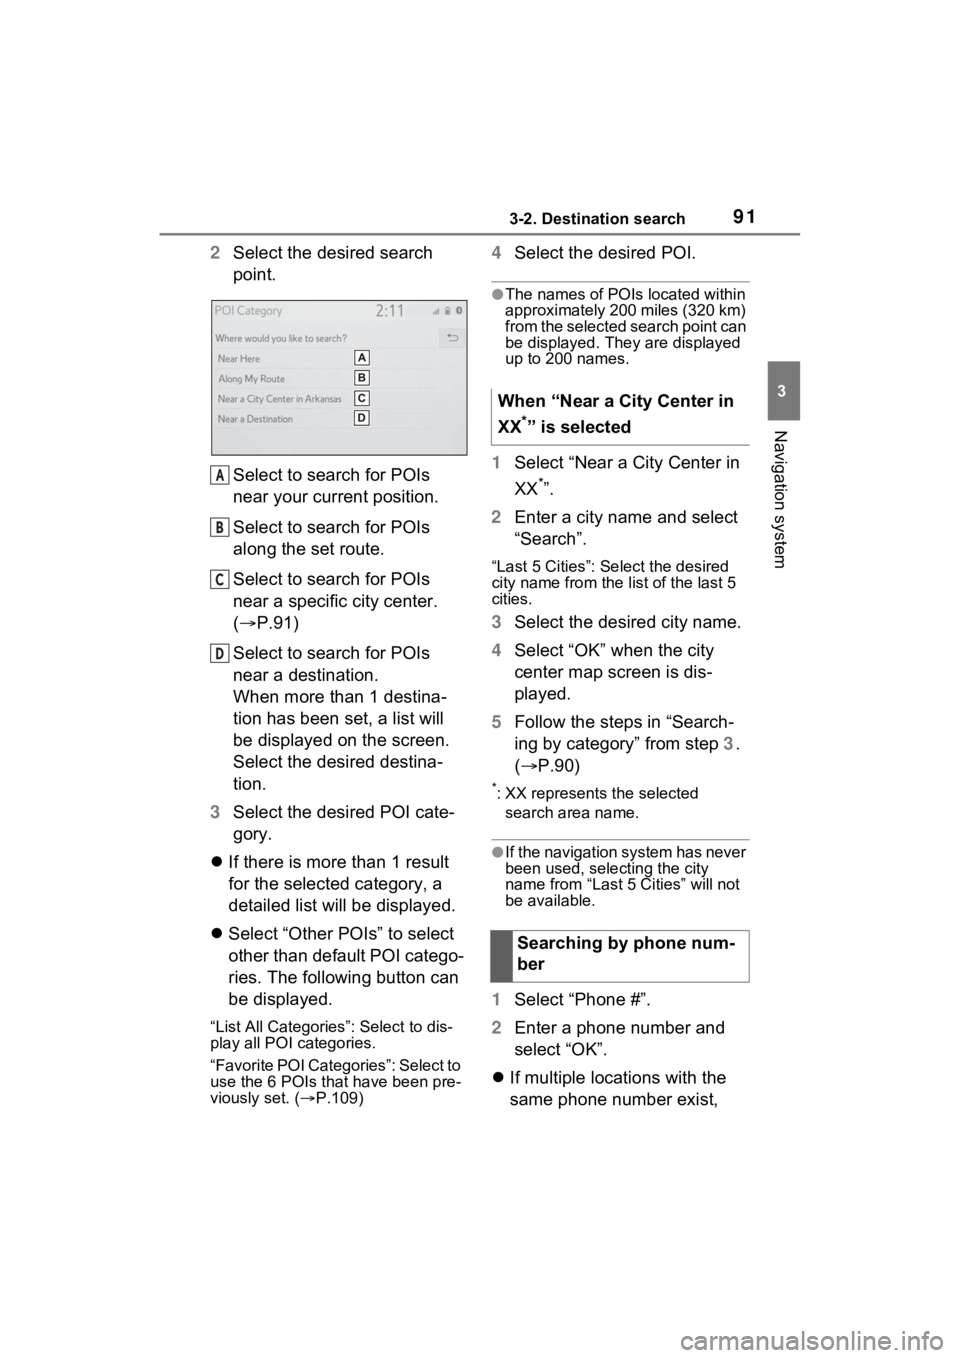
2Select the desired search
point.
Select to search for POIs
near your current position.
Select to search for POIs
along the set route.
Select to search for POIs
near a specific city center.
( P.91)
Select to search for POIs
near a destination.
When more than 1 destina-
tion has been set, a list will
be displayed on the screen.
Select the desired destina-
tion.
3 Select the desired POI cate-
gory.
If there is more than 1 result
for the selected category, a
detailed list will be displayed.
Select “Other POIs” to select
other than default POI catego-
ries. The following button can
be displayed.
“List All Categories”: Select to dis-
play all POI categories.
“Favorite POI Categories”: Select to
use the 6 POIs tha t have been pre-
viously set. ( P.109)
4 Select the desired POI.
●The names of POIs located within
approximately 200 miles (320 km)
from the selected search point can
be displayed. They are displayed
up to 200 names.
1Select “Near a City Center in
XX
*”.
2 Enter a city name and select
“Search”.
“Last 5 Cities”: Select the desired
city name from the list of the last 5
cities.
3Select the desired city name.
4 Select “OK” when the city
center map screen is dis-
played.
5 Follow the steps in “Search-
ing by category” from step 3.
( P.90)
*: XX represents the selected
search area name.
●If the navigation system has never
been used, selecting the city
name from “Last 5 Cities” will not
be available.
1 Select “Phone #”.
2 Enter a phone number and
select “OK”.
If multiple locations with the
same phone number exist,
A
B
C
D
When “Near a City Center in
XX
*” is selected
Searching by phone num-
ber
Page 92 of 308

923-2. Destination search
the list screen will be dis-
played.
●If there is no match for the entered
phone number, a list of identical
numbers with different area codes
will be displayed.
To use this function, it is neces-
sary to register a home and/or a
favorite location. Up to 2 favor-
ites can be registered as preset
destinations. (P.104, 105)
To set the home or a preset des-
tination as the destination,
select the corresponding button.
1 Turn the power switch to
ACC or ON.
2 Press the “MAP” button.
3 Select the desired item.
Select to set the registered
home as the destination.
Select to set a registered
favorite as the destination.
(Up to 2 favorites can be reg-
istered as preset destina-
tions.)
The estimated time of arrival
to the registered home and
preset destinations from the
current position will be dis-
played.
If the home or a preset desti-
nation has not been regis-
tered, “Save Home” or “Save
Favorite” will be displayed,
respectively. To register a
home or preset destination,
select the corresponding but-
ton.
●When the destination is very close
to the current po sition, “Nearby”
will be displayed.
●The one-touch buttons for home
and favorites will disappear after
the vehicle has been driven for a
while.
●The color of the estimated arrival
time indicator may change
depending on the traffic informa-
tion received.
●This function is available when
“Automatic Destination List Info” is
set to on. ( P.108)
One-touch setting
home/favorite as a desti-
nation
A
B
Page 106 of 308

1063-4. Setup
phone number of a registered
favorites list entry can be edited.
1Select the desired favorites
list entry.
Each time a star icon is
selected, its color will change.
Colored star icons indicate
that the favorite is registered
to the corresponding preset
destination button. Up to 2
entries can be registered as
quick favorite destinations.
( P.92)
2 Select the desired item to be
edited.
Select to edit the favorites list
entry name.
Select to edit location infor-
mation.
Select to edit the phone num-
ber.
Select to change the icon to
be displayed on the map
screen. ( P.106)
Select to set display of the
favorites list entry name
on/off.
Select to delete the favorites
list entry. 3
Select “OK”.
1 Select “Icon”.
2 Select the desired icon.
■Icons with sound
A sound for some favorites list
entries can be set. When the
vehicle approaches the location
of the favorites list entry, the
selected sound will be heard.
: Select to play the sound.
●When “Bell (with Direction)” is
selected, select an arrow to adjust
the direction and select “OK”.
●The bell sounds only when the
vehicle approaches this point in
the direction that has been set.
Areas to be avoided because of
traffic jams, construction work or
other reasons can be registered
as “Areas to Avoid”.
1 Display the navigation set-
tings screen. ( P.104)
2 Select “Areas to Avoid”.
A
B
C
D
E
F
Changing the icon
Setting up areas to avoid
Page 121 of 308
121
4
4
Audio/visual system
Audio/visual system
4-1. Basic operationQuick reference........... 122
Some basics ............... 123
4-2. Radio operation AM/FM/SiriusXM (SXM) radio .......................... 127
4-3. Media operation USB memory............... 136
iPod/iPhone (Apple Car- Play) .......................... 138
Android Auto ............... 141
Bluetooth
® audio ......... 142
4-4. Audio/visual remote con- trols
Steering switches ........ 146
4-5. Setup Audio settings ............. 148
4-6. Tips for operating the audio/visual system
Operating information . 150
Page 122 of 308
1224-1. Basic operation
4-1.Basic operation
The audio control screen can be reached by the following methods:
From the “AUDIO” button
1 Press the “AUDIO” button.
From the “MENU” button
1 Press the “MENU” button, then select “Audio”.
Using the radio ( P.127)
Playing a USB memory ( P.136)
Playing an iPod/iPhone (Apple CarPlay
*) ( P.138)
Using the Android Auto
* ( P.141)
Playing a Bluetooth
® device ( P.142)
Using the steering wheel audio switches ( P.146)
Audio system settings ( P.148)
*: This function is not made availa ble in some countries or areas.
Quick reference
Functional overview
Page 128 of 308

1284-2. Radio operation
Press and hold for continu-
ous seek.
Turn to step up/down fre-
quencies/channels.
Turn to move up/down the
station list. Also, the knob
can be used to enter selec-
tions on the list screens by
pressing it.
●The radio automatically changes
to stereo reception when a stereo
broadcast is received.
●The radio automatically blends to
an HD Radio signal in AM or FM
where available.
Radio mode has a mix preset
function, which can store up to
36 stations (6 stations per page
x 6 pages) from any of the AM,
FM or SXM bands.
1Tune in the desired station.
2 Select and hold “(Hold Edit)”.
When “(Hold Edit)” is
selected, a confirmation mes-
sage appears. Select “Yes”
and select “OK”.
To change the preset station
to a different one, select and hold the preset station.
●The number of preset radio sta-
tions displayed on the screen can
be changed. (
P.148)
AM/FM*3 and SXM radio pro-
gram can be cached and played
back in a time-shifted manner.
*1: If equipped
*2: This function is not made avail- able in some countries or areas.
*3: Premium Audio only
■Automatic playback of the
cache
If the radio broadcast is inter-
rupted by another audio output,
such as an incoming phone call,
the system will automatically
cache the interrupted portion
and perform time-shift playback
when the interruption ends. This
function is available when “Auto
Pause” is set to on. ( P.129)
■Playing back the cache
manually
The broadcast cached in the
program cache can be played
back manually.
1 Select “SXM Replay”
*1, 2 or
“Radio Replay”
*3.
*1: Audio (If equipped)
*2: Audio Plus
*3: Premium Audio
Presetting a station
B
�&�D�F�K�L�Q�J���D���U�D�G�\
L�R���S�U�R��
�J�U�D�P�
��������
Page 138 of 308
1384-3. Media operation
*: This function is not made avail-able in some countries or areas.
The iPod/iPhone operation
screen can be reached by the
following methods: P.123
Connecting an iPod/iPhone
( P.124)
When an Android Auto con-
nection is established, this
function will be unavailable.
An Apple CarPlay connection
is not established
Select to display the audio
source selection screen.
Select to return to the top
screen.
Select to display a song list
screen.
Select to display the play
mode selection screen.
Select to display the sound
NOTICE
●Do not push down on or apply
unnecessary pressure to the
portable player while it is con-
nected as this may damage the
portable player or its terminal.
●Do not insert foreign objects into
the port as this may damage the
portable player or its terminal.
iPod/iPhone (Apple
CarPlay*)
Overview
Control screen
A
B
C
D
E
Page 139 of 308

1394-3. Media operation
4
Audio/visual system
setting screen. (P.124)
Select to set repeat playback.
( P.140)
Select to change the track.
Select and hold to fast
rewind.
Select to play/pause.
Select to change the track.
Select and hold to fast for-
ward.
Select to set random play-
back. ( P.140)
Displays cover art
Select to change the album.
Select to change the artist.
Select to change the playlist.
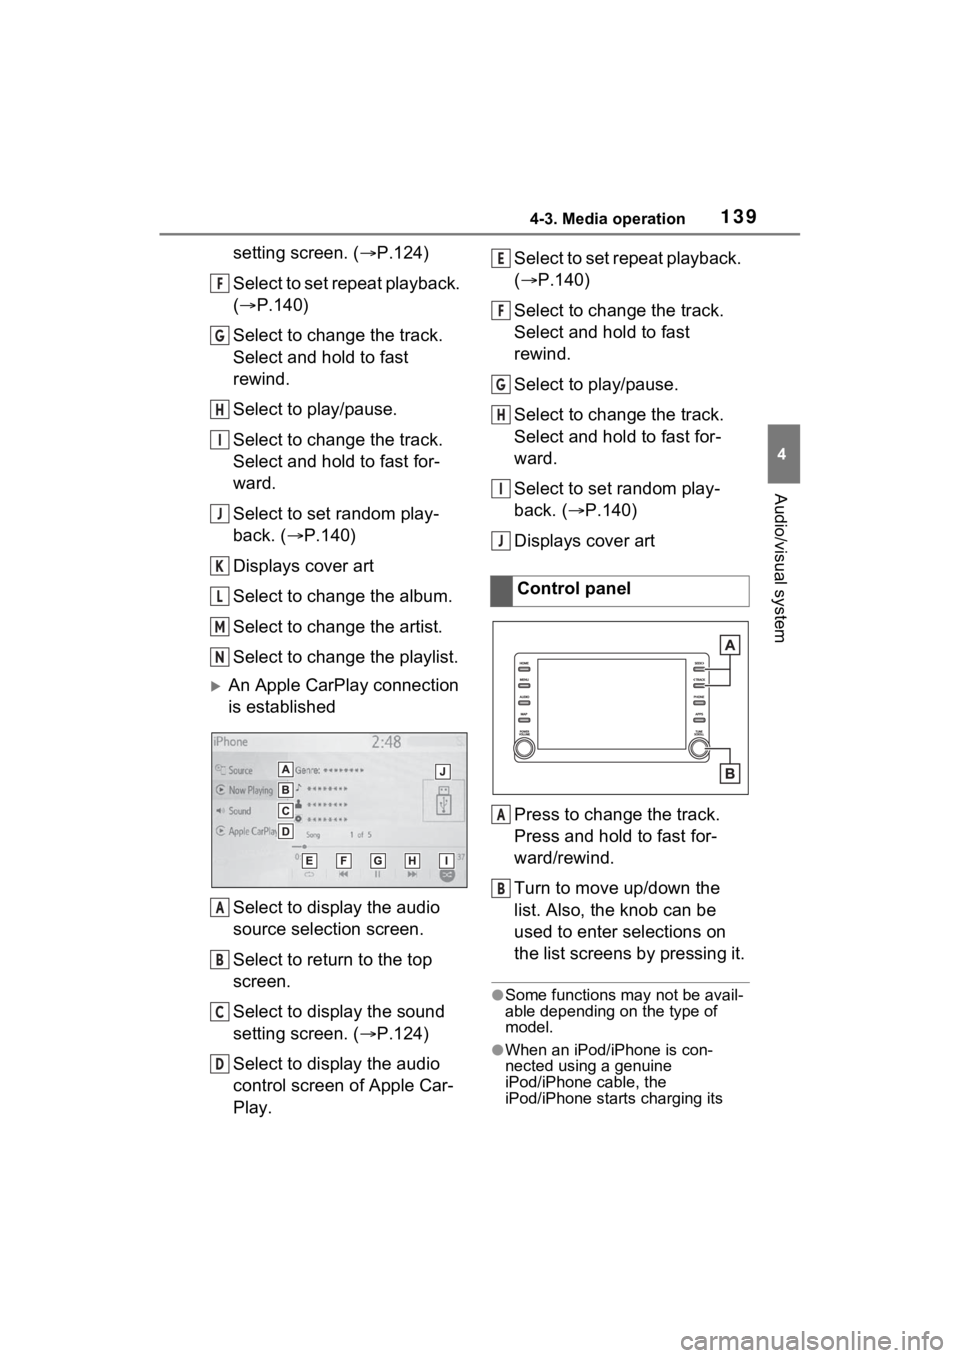
An Apple CarPlay connection
is established
Select to display the audio
source selection screen.
Select to return to the top
screen.
Select to display the sound
setting screen. ( P.124)
Select to display the audio
control screen of Apple Car-
Play. Select to set repeat playback.
(
P.140)
Select to change the track.
Select and hold to fast
rewind.
Select to play/pause.
Select to change the track.
Select and hold to fast for-
ward.
Select to set random play-
back. ( P.140)
Displays cover art
Press to change the track.
Press and hold to fast for-
ward/rewind.
Turn to move up/down the
list. Also, the knob can be
used to enter selections on
the list screens by pressing it.
●Some functions may not be avail-
able depending on the type of
model.
●When an iPod/iPhone is con-
nected using a genuine
iPod/iPhone cable, the
iPod/iPhone starts charging its
F
G
H
I
J
K
L
M
N
A
B
C
D
Control panel
E
F
G
H
I
J
A
B