2021 TOYOTA PROACE EV child lock
[x] Cancel search: child lockPage 42 of 360
42
► With total unlocking activated and the child lock deactivated, to unlock the vehicle and start opening a door, press the button corresponding to the door you wish to open.► With selective unlocking activated, to unlock only the loading area and start opening a door, press the button corresponding to the door you wish to open.► In both cases, pressing the button again reverses the direction of the door's movement.
Closing
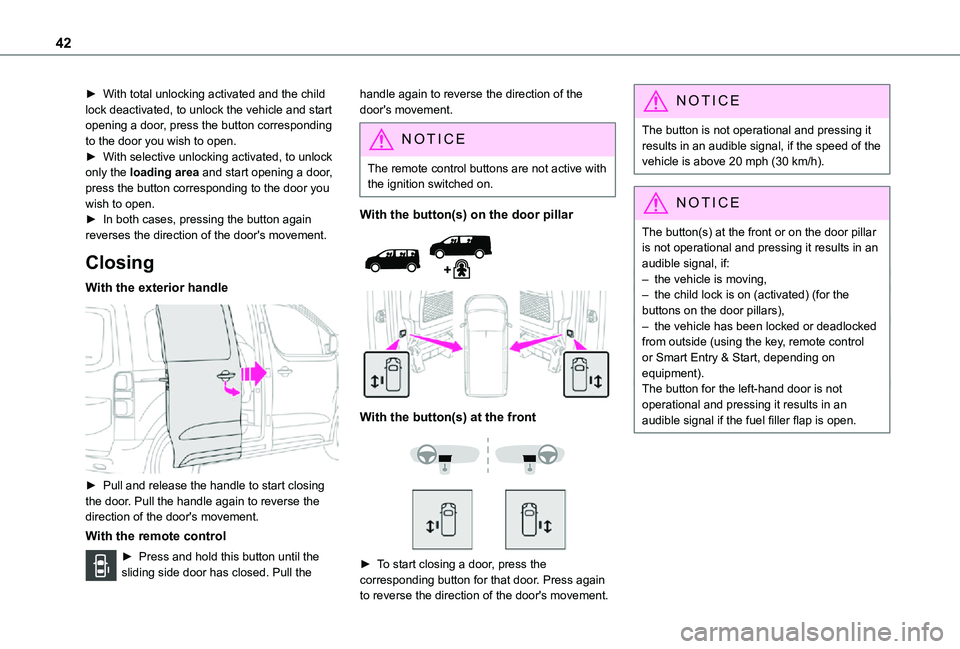
With the exterior handle
► Pull and release the handle to start closing the door. Pull the handle again to reverse the direction of the door's movement.
With the remote control
► Press and hold this button until the sliding side door has closed. Pull the
handle again to reverse the direction of the door's movement.
NOTIC E
The remote control buttons are not active with the ignition switched on.
With the button(s) on the door pillar
With the button(s) at the front
► To start closing a door, press the corresponding button for that door. Press again to reverse the direction of the door's movement.
NOTIC E
The button is not operational and pressing it results in an audible signal, if the speed of the vehicle is above 20 mph (30 km/h).
NOTIC E
The button(s) at the front or on the door pillar is not operational and pressing it results in an audible signal, if:– the vehicle is moving,– the child lock is on (activated) (for the buttons on the door pillars),– the vehicle has been locked or deadlocked from outside (using the key, remote control or Smart Entry & Start, depending on equipment).The button for the left-hand door is not operational and pressing it results in an audible signal if the fuel filler flap is open.
Page 43 of 360

43
Access
2
General
recommendations for the
sliding side doors
WARNI NG
Doors must only be operated when the vehicle is stationary.For your safety and that of your passengers, as well as for correct operation of the doors, you are strongly advised not to drive with a door open.Always check that it is safe to operate the door and in particular, be sure not to leave children or animals near the door controls without supervision.The audible warning, the lighting of the "door open" warning lamp and the message on the screen are there to remind you. Contact any authorized Toyota retailer or Toyota authorized repairer, or any reliable repairer if
you want to deactivate this warning.Lock the vehicle when you use an automatic car wash.
WARNI NG
Before opening or closing and while moving doors, ensure that no person, animal or object is in the door frame or any other position that would block the desired movement, inside or outside the vehicle.If this advice is not followed, injuries or damage may occur if any part of a person or an object is trapped or caught.Electrical door opening is disabled at speeds above 2 mph (3 km/h):– However, if the vehicle started moving while the doors were open, the speed must be reduced below 19 mph (30 km/h) before they can be closed.– Any attempt to open a door electrically using the interior handle while driving results in it only being possible to open the door manually.– This situation is accompanied by the audible warning, the lighting of the "door open" warning lamp and the message on the
screen. To release the door and be able to operate it again, it is necessary to stop the vehicle.
WARNI NG
Take care not to block the guide space on the floor so that the door can slide correctly.For safety and functional reasons, do not drive with the sliding side door open.
NOTIC E
The electric controls are disabled in the event of an impact. Manual opening and closing remain possible.
NOTIC E
While starting the engine, door movements are paused, resuming when the engine is running.
NOTIC E
Depending on the engine fitted, if the door is closed and an opening request is issued in Stop mode of Stop & Start, the door will open slightly and then stop. In Start mode, the door will resume its movement when the engine re-starts.
Page 82 of 360
82
WARNI NG
Never use the ISOFIX ring provided for fixing the strap of a child seat with Top Tether.
Rear windows in row 2
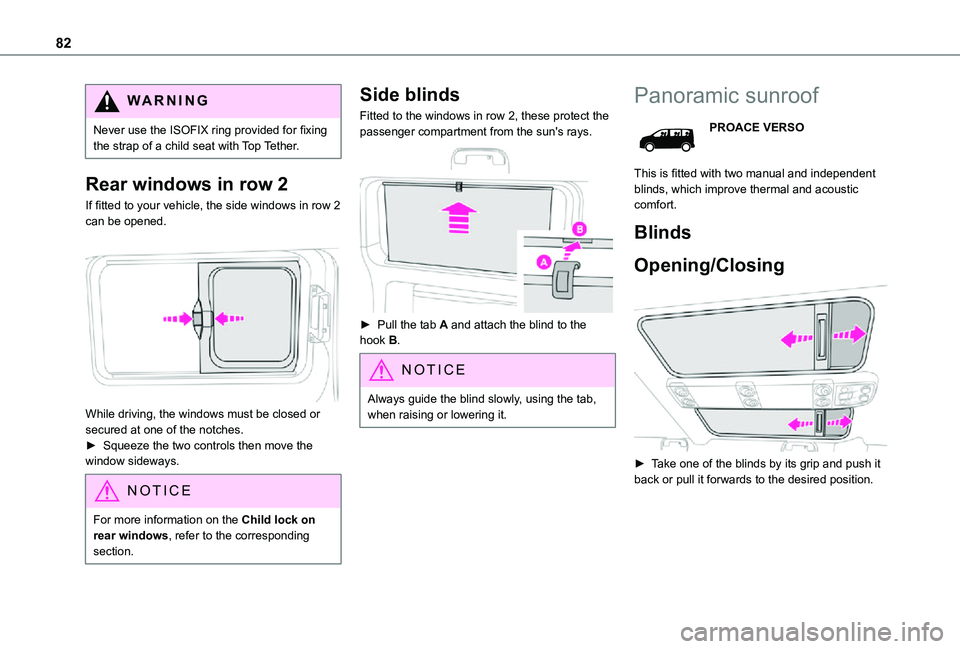
If fitted to your vehicle, the side windows in row 2 can be opened.
While driving, the windows must be closed or secured at one of the notches.
► Squeeze the two controls then move the window sideways.
NOTIC E
For more information on the Child lock on rear windows, refer to the corresponding
section.
Side blinds
Fitted to the windows in row 2, these protect the passenger compartment from the sun's rays.
► Pull the tab A and attach the blind to the hook B.
NOTIC E
Always guide the blind slowly, using the tab, when raising or lowering it.
Panoramic sunroof
PROACE VERSO
This is fitted with two manual and independent blinds, which improve thermal and acoustic comfort.
Blinds
Opening/Closing
► Take one of the blinds by its grip and push it back or pull it forwards to the desired position.
Page 125 of 360
125
Safety
5
WARNI NG
Installing a booster seatThe chest part of the seat belt must be positioned on the child's shoulder without touching the neck.Ensure that the lap part of the seat belt passes correctly over the child's thighs.Use a booster seat with backrest, equipped with a belt guide at shoulder level.
WARNI NG
Additional protectionsTo prevent accidental opening of the doors and rear windows, use the "Child lock".Take care not to open the rear windows by more than one third.To protect young children from the rays of the sun, fit side blinds on the rear windows.As a safety precaution, do not leave:– a child alone and unattended in a vehicle,– a child or an animal in a vehicle which is exposed to the sun, with the windows closed,– the keys within reach of children inside the vehicle.
Child seat at the rear
Row 2
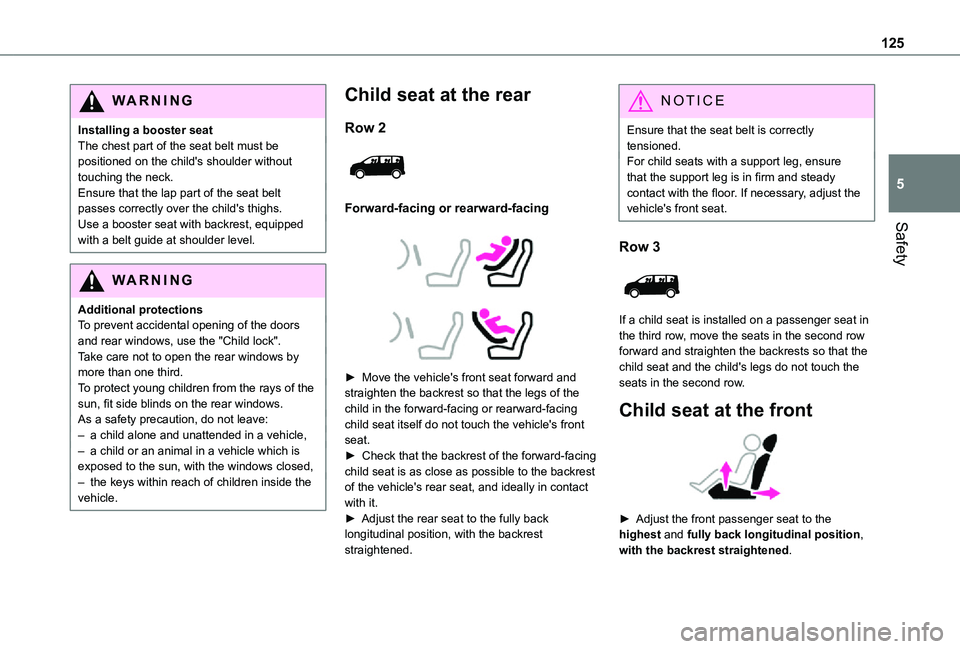
Forward-facing or rearward-facing
► Move the vehicle's front seat forward and straighten the backrest so that the legs of the child in the forward-facing or rearward-facing child seat itself do not touch the vehicle's front seat.► Check that the backrest of the forward-facing child seat is as close as possible to the backrest of the vehicle's rear seat, and ideally in contact with it.► Adjust the rear seat to the fully back longitudinal position, with the backrest straightened.
NOTIC E
Ensure that the seat belt is correctly tensioned.For child seats with a support leg, ensure that the support leg is in firm and steady contact with the floor. If necessary, adjust the vehicle's front seat.
Row 3
If a child seat is installed on a passenger seat in the third row, move the seats in the second row forward and straighten the backrests so that the child seat and the child's legs do not touch the seats in the second row.
Child seat at the front
► Adjust the front passenger seat to the highest and fully back longitudinal position, with the backrest straightened.
Page 146 of 360
146
Seati-Size restraint system
PROACE VERSO
Row 2 and 3
Rear seats with seat and bench seati-U (c)
Rear seats with 2 individual seatsNot i-Size
Rear seats with 1 individual seatNot i-Size
i-U:Suitable for forward facing and rearward facing "Universal" i-Size restr\
aint systems.
i-UF:Only suitable for forward facing "Universal" i-Size restraint systems.
(a)Refer to the current legislation in the country in which you are driving\
before placing a child in this seat position.
(b)The seat can be installed centrally in the vehicle; it then prevents the use of the outer seats.
(c)The seat in row 2 cannot be used when an i-Size child seat is installed \
immediately behind.
Manual child lock
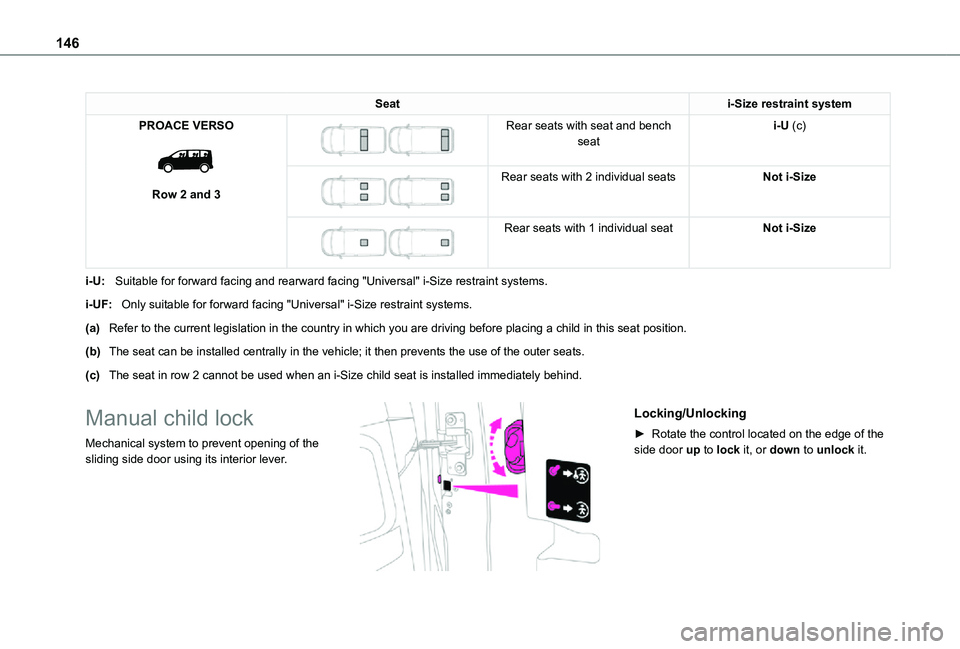
Mechanical system to prevent opening of the sliding side door using its interior lever.
Locking/Unlocking
► Rotate the control located on the edge of the side door up to lock it, or down to unlock it.
Page 147 of 360
147
Safety
5
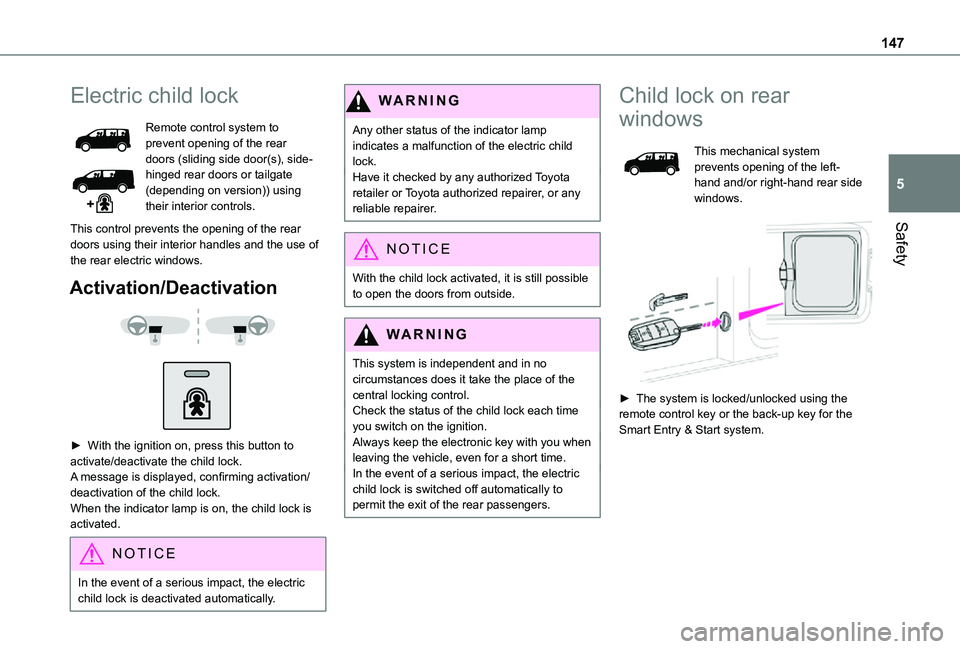
Electric child lock
Remote control system to prevent opening of the rear doors (sliding side door(s), side-hinged rear doors or tailgate (depending on version)) using their interior controls.
This control prevents the opening of the rear doors using their interior handles and the use of the rear electric windows.
Activation/Deactivation
► With the ignition on, press this button to activate/deactivate the child lock.A message is displayed, confirming activation/deactivation of the child lock.When the indicator lamp is on, the child lock is activated.
NOTIC E
In the event of a serious impact, the electric child lock is deactivated automatically.
WARNI NG
Any other status of the indicator lamp indicates a malfunction of the electric child lock.Have it checked by any authorized Toyota retailer or Toyota authorized repairer, or any reliable repairer.
NOTIC E
With the child lock activated, it is still possible to open the doors from outside.
WARNI NG
This system is independent and in no circumstances does it take the place of the central locking control.Check the status of the child lock each time you switch on the ignition.Always keep the electronic key with you when leaving the vehicle, even for a short time.In the event of a serious impact, the electric child lock is switched off automatically to permit the exit of the rear passengers.
Child lock on rear
windows
This mechanical system prevents opening of the left-hand and/or right-hand rear side windows.
► The system is locked/unlocked using the remote control key or the back-up key for the Smart Entry & Start system.
Page 222 of 360
222
WARNI NG
Never top up from an AdBlue® dispenser reserved for heavy goods vehicles.
Storage recommendations
AdBlue® freezes at about -11°C and deteriorates above +25°C. Containers should be stored in a cool area and protected from direct sunlight.Under these conditions, the fluid can be kept for at least a year.If the fluid has frozen, it can be used once it has completely thawed out in the ambient air.
WARNI NG
Never store AdBlue® containers in your vehicle.
Precautions for use
AdBlue® is a urea-based solution. This fluid is non-flammable, colourless and odourless (when kept in a cool place).In the event of contact with the skin, wash the affected area with soap and running water. In the event of contact with the eyes, immediately rinse the eyes with large amounts of water or with an eye wash solution for at least 15 minutes. Seek medical attention if you feel a persistent burning sensation or irritation.
If swallowed, immediately wash out the mouth with clean water and then drink plenty of water.In certain conditions (high temperature, for example), the risk of release of ammonia cannot be excluded: do not inhale the fluid. Ammonia vapours have an irritant effect on mucous membranes (eyes, nose and throat).
WARNI NG
Store AdBlue® out of the reach of children, in
its original container.
Procedure
Before starting the top-up procedure, ensure that the vehicle is parked on a flat and level surface.In wintry conditions, ensure that the temperature of the vehicle is above -11 °C. Otherwise the AdBlue® may be frozen and so cannot be poured into its tank. Park the vehicle in a warmer area for a few hours to allow the top-up to be carried out.
WARNI NG
Never put the AdBlue® into the Diesel fuel tank.
WARNI NG
If any AdBlue® is splashed, or if there are any spillages on the bodywork, rinse immediately with cold water or wipe with a damp cloth.If the fluid has crystallised, clean it off using a sponge and hot water.
WARNI NG
Important: in the event of a top-up after a breakdown because of a lack of AdBlue, it is essential to wait around 5 minutes before switching on the ignition, without opening the driver’s door, unlocking the vehicle, inserting the key into the ignition switch, or bringing the key for the "Smart Entry & Start" system into the passenger compartment.Switch on the ignition, then wait for 10 seconds before starting the engine.
► Switch off the ignition and remove the key from the switch to switch off the engine.or► With Smart Entry & Start, press the "START/STOP" button to switch off the engine.
Page 319 of 360

319
Alphabetical index
Changing to free-wheeling 250Charge level indicator (Electric) 22Charging cable 203Charging cable (Electric) 202Charging connector (Electric) 201, 207–208, 210Charging flap (Electric) 201, 207–208, 210Charging system (Electric) 5, 9, 27, 199, 215Charging the traction battery (Electric) 21, 199, 207–208, 210Checking the engine oil level 19Checking the levels 216–217Checking tyre pressures (using the kit) 229–232Checks 215, 218–220Checks, routine 218–220Child lock 146–147Child lock on rear windows 147Children 11 9, 128, 134–136, 142, 143, 143–144, 144Children (safety) 146Child seats 11 9, 124–125, 127–128, 131–132, 144
Child seats, conventional 127–128, 131–132Child seats, i-Size 144Child seats, ISOFIX 134–136, 142, 143, 143–144, 144Cleaning (advice) 200, 225–226Closing the boot 48Closing the doors 30, 35, 47Collision Risk Alert 185–186Compressor, tyre inflation 229Configuration, vehicle 26–27
Connected applications 304Connection, Bluetooth 271, 285–286, 305, 310–3 11Connection, Wi-Fi network 305–306Connectivity 304Consumption figures 27Container, AdBlue® 222Control, emergency boot release 38Control, emergency door 30, 37–38Control, heated seats 56Control stalk, lighting 99Control stalk, wipers 105–107Control unit 202–203Courtesy lamp 97Courtesy lamp, front 97–98, 242Courtesy lamp, rear 97–98, 242Courtesy lamps 97–98, 242Cover, load space 79Crew cab, fixed 73–74Crew cab, folding 74Cruise control 173, 175–176, 178–181Cruise control,
adaptive 175–176, 181, 183–185Cruise control by speed limit recognition 175–176Cruise control, dynamic with Stop function 175–176Cup holder 75
D
DAB (Digital Audio Broadcasting) - Digital radio 267, 282, 308Date (setting) 29, 288, 314Daytime running lamps 101, 238–240Deactivating the passenger airbag 121, 126–127Deactivation of DSC (ESC) 11 3Deadlocking 36Deferred charging 27, 209Deferred charging (Electric) 27–28, 201, 207Defrosting 58, 91Demisting 91Demisting, rear 92Demisting, rear screen 92Dimensions 259Dipstick 19, 216Direction indicators 100, 238–239, 241, 243Display, head-up 172–173Domestic charging 203Domestic charging (Electric) 208, 210, 257
Door pockets 76Doors, rear 47Doors, side 43Doors, side-hinged 35–36, 47, 241Driver’s attention warning 188–189Drive selector (Electric) 164, 219Driving 148–149Driving aids camera (warnings) 170Driving aids (recommendations) 170Driving economically 8