2021 TOYOTA PROACE CITY VERSO roof
[x] Cancel search: roofPage 3 of 272
3
Contents
Cruise control - particular recommendations 126Programmable cruise control 126Adaptive Cruise Control 129Memorising speeds 133Active Safety Brake with Collision Risk Alert and Intelligent emergency braking assistance 133Active Lane Departure Warning System 136Blind Spot Monitoring System 139Active Blind Spot Monitoring System 141Distraction detection 141Parking sensors 143Top Rear Vision 145Park Assist 147
7Practical information
Compatibility of fuels 151Refuelling 151Misfuel prevention (Diesel) 153Snow chains 153Towing device 154Towing device with quickly
detachable towball 156Energy economy mode 157Roof bars / Roof rack 157Bonnet 158Engine compartment 159Checking levels 160Speed checks 162AdBlue® (Diesel engines) 164Free-wheeling 167
Advice on care and maintenance 167
8In the event of a breakdown
Running out of fuel (Diesel) 169Tool kit 169Temporary puncture repair kit 170Spare wheel 173Changing a bulb 176Changing a fuse 18212 V battery 184Towing 188
9Technical data
Dimensions 190Engine technical data and towed loads 191Identification markings 194
10Bluetooth® audio system
First steps 195Steering mounted controls 196Menus 197Radio 197DAB (Digital Audio Broadcasting) radio 198
Media 200Telephone 202Frequently asked questions 206
11TOYOTA Connect Radio
First steps 208Steering mounted controls 209Menus 210Applications 2 11
Radio 212DAB (Digital Audio Broadcasting) radio 213Media 214Telephone 215Settings 219Frequently asked questions 221
12TOYOTA Connect Nav
First steps 223Steering mounted controls 224Menus 224Voice commands 226Navigation 230Connected navigation 232Applications 235Radio 238DAB (Digital Audio Broadcasting) radio 240Media 240Telephone 242Settings 245Frequently asked questions 247
■Alphabetical index
Page 5 of 272

5
Overview
Instruments and controls
1.Bonnet release
2.Dashboard fuses
3.Horn
4.Instrument panel
5.AlarmCourtesy lampWarning lamp display for seat belts and front passenger airbagPanoramic roof blind controlInterior rear view mirrorMonitoring mirrorEmergency call button
6.Monochrome screen with audio system
Touch screen with TOYOTA Connect Radio or TOYOTA Connect Nav
7.USB port
8.HeatingManual air conditioningDual-zone automatic air conditioningFront demisting - defrostingRear screen demisting – defrosting
9.Electric parking brake"START/STOP" button
10.Gearbox
11 .12 V socket
12.230 V accessory socket
13.Glove boxUSB port (inside the glove box)
14.Glove box
15.Front passenger airbag deactivation (on the side of the glove box, with the door open)
Steering mounted controls
1.External lighting / direction indicators control leverVoice recognition activation button
2.Wiper / screenwash / trip computer control lever
3.Controls to select the multimedia source (SRC), manage music (LIST) and manage phone calls ("telephone" symbol)
4.Speed Limiter / Programmable Cruise Control / Adaptive cruise control controls
5.Instrument panel display mode selection wheel
6.Voice controlVolume adjustment
7.Audio system setting controls
Page 7 of 272

7
Eco-driving
Eco-driving
Eco-driving refers to a range of everyday practices that allow the motorist to optimise their fuel consumption and CO2emissions.
Optimise your use of the gearbox
With a manual gearbox, move off gently and change up promptly. While accelerating, change up early.With an automatic gearbox, favour automatic mode and avoid pressing the accelerator pedal heavily or suddenly.The gear efficiency indicator prompts you to engage the most suitable gear: whenever this indication is displayed on the instrument panel, follow it straight away.With an automatic gearbox, this indicator appears only in manual mode.
Drive smoothly
Maintain a safe distance between vehicles, use engine braking rather than the brake pedal and press the accelerator gradually. These attitudes
help to save fuel, reduce CO2 emissions and decrease general traffic noise.If the vehicle has the steering-mounted "CRUISE" control, use cruise control at speeds above 40 km/h (25 mph) when the traffic is flowing well.
Use electrical equipment wisely
Before moving off, if the passenger compartment is too warm, ventilate it by opening the windows and air vents before using the air conditioning.At speeds above 50 km/h (31 mph), close the windows and leave the air vents open.Consider using equipment that can help keep the temperature in the passenger compartment down (sunroof blind and window blinds, etc.).Unless automatically regulated, switch off the air conditioning as soon as the desired temperature has been reached.Switch off the demisting and defrosting functions, if they are not managed automatically.Switch off the heated seat as soon as possible.Switch off the headlamps and foglamps when the visibility conditions do not require their use.Avoid running the engine before moving off, particularly in winter; your vehicle will warm up much faster while driving.As a passenger, avoid connecting your multimedia devices (film, music, video game, etc.) to help reduce consumption of electrical
energy, and hence fuel.Disconnect all portable devices before leaving the vehicle.
Limit the causes of excess consumption
Spread loads throughout the vehicle; place the heaviest items in the boot, as close as possible to the rear seats.Limit the loads carried in the vehicle and minimise wind resistance (roof bars, roof rack,
bicycle carrier, trailer, etc.). Preferably, use a roof box.Remove roof bars and roof racks after use.At the end of winter, remove snow tyres and refit summer tyres.
Comply with servicing instructions
Check tyre pressures regularly, with the tyres cold, referring to the label in the door aperture on the driver's side.Carry out this check in particular:– before a long journey.– at each change of season.– after a long period out of use.Do not overlook the spare wheel and, where applicable, the tyres on your trailer or caravan.Have your vehicle serviced regularly (engine oil, oil filter, air filter, passenger compartment filter, etc.) and observe the schedule of operations in the manufacturer's service schedule.With a Diesel engine, if the SCR system is faulty, your vehicle will emit pollution. Visit a TOYOTA dealer or a qualified workshop as soon as
possible to restore your vehicle’s nitrogen oxide emissions to regulatory compliance.When filling the fuel tank, do not continue after the third nozzle cut-out, to avoid overflow.You will only see the fuel consumption of your new vehicle settle down to a consistent average after the first 3,000 kilometres (1,900 miles).
Page 35 of 272
35
Access
2
The alarm is triggered if anyone breaks a window, enters the passenger compartment or moves inside the vehicle.
NOTIC E
If your vehicle is fitted with Additional Heating / Ventilation, volumetric monitoring is not compatible with this system.For more information on Additional Heating / Ventilation, refer to the corresponding section.
Anti-tilt monitoring
The system checks for any change in the attitude of the vehicle.The alarm is triggered if the vehicle is lifted or moved.
NOTIC E
When the vehicle is parked, the alarm will not be triggered if the vehicle is knocked.
Locking the vehicle with full
alarm system
Activation
► Switch off the engine and exit the vehicle.► Lock the vehicle using the remote control or the "Keyless Entry and Starting" system.
The monitoring system is active: the red indicator lamp in the button flashes every second and the direction indicators come on for about 2 seconds.
NOTIC E
Following an instruction to lock the vehicle, the exterior perimeter monitoring is activated after 5 seconds and the interior volumetric
and anti-tilt monitoring after 45 seconds.
NOTIC E
If an opening (door, boot or bonnet) is not closed properly, the vehicle is not locked but the exterior perimeter monitoring will be activated after 45 seconds at the same time as the interior volumetric and anti-tilt monitoring.
Deactivation
► Press the unlocking button on the remote control.or► Unlock the vehicle with the Keyless Entry and Starting system.The monitoring system is deactivated: the
indicator lamp in the button goes off and the direction indicators flash for about 2 seconds.
NOTIC E
When the vehicle automatically locks itself again (as happens if a door or the boot is not opened within 30 seconds of unlocking), the monitoring system is also reactivated automatically.
Locking the vehicle
with exterior perimeter
monitoring only
Disable volumetric and anti-tilt monitoring to avoid unwanted alarm triggering in certain cases, such as:– Slightly open window or sunroof. – Washing the vehicle.– Changing a wheel.– Towing your vehicle.– Transport on a ship or ferry.
Deactivating the interior volumetric
and anti-tilt monitoring
► Switch off the ignition and within 10 seconds press the alarm button until its red indicator lamp is on fixed.► Get out of the vehicle.► Immediately lock the vehicle using the remote control or the "Keyless Entry and Starting" system.
Page 48 of 272
48
WARNI NG
The head restraint has a frame with notches which prevents it from lowering; this is a safety device in case of impact.The adjustment is correct when the upper edge of the head restraint is level with the top of the head.Never drive with the head restraints removed; they must be fitted and correctly adjusted.
WARNI NG
Never drive with passengers seated at the rear when the head restraints are removed or not in the high position; the head restraints must be in place and in the high position.
NOTIC E
For more information on the Seat belts, refer to the corresponding section.
Interior fittings
Mats
Fitting
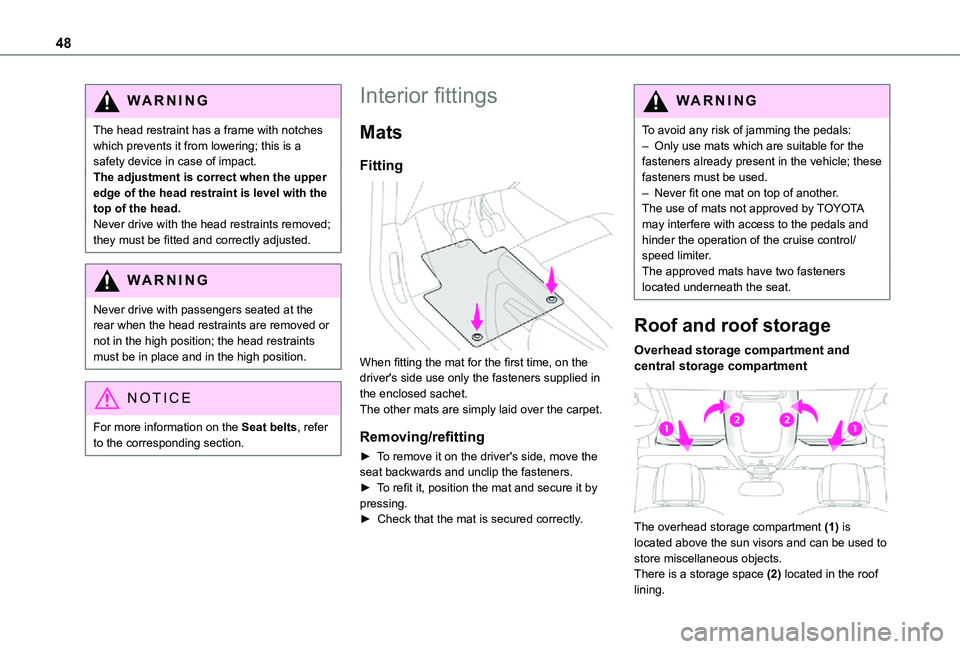
When fitting the mat for the first time, on the driver's side use only the fasteners supplied in the enclosed sachet.The other mats are simply laid over the carpet.
Removing/refitting
► To remove it on the driver's side, move the seat backwards and unclip the fasteners.► To refit it, position the mat and secure it by pressing.► Check that the mat is secured correctly.
WARNI NG
To avoid any risk of jamming the pedals:– Only use mats which are suitable for the fasteners already present in the vehicle; these fasteners must be used.– Never fit one mat on top of another.The use of mats not approved by TOYOTA may interfere with access to the pedals and hinder the operation of the cruise control/speed limiter.The approved mats have two fasteners located underneath the seat.
Roof and roof storage
Overhead storage compartment and central storage compartment
The overhead storage compartment (1) is located above the sun visors and can be used to
store miscellaneous objects.There is a storage space (2) located in the roof lining.
Page 49 of 272
49
Ease of use and comfort
3
The maximum permitted load is 6 kg (13 lb).
WARNI NG
In the event of sharp deceleration, objects placed in the central storage compartment of the roof may be transformed into projectiles.
Rear storage compartment
This compartment is accessible from the rear
seats and from the vehicle's boot.It has a capacity of 60 litres and the maximum permitted load is 10 kg (22 lb).
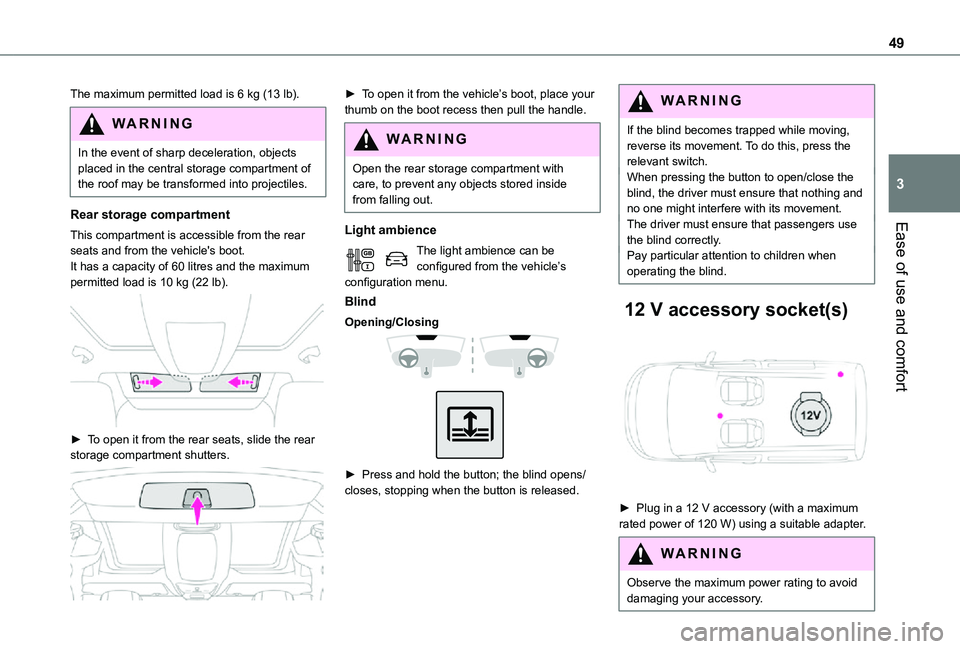
► To open it from the rear seats, slide the rear storage compartment shutters.
► To open it from the vehicle’s boot, place your thumb on the boot recess then pull the handle.
WARNI NG
Open the rear storage compartment with care, to prevent any objects stored inside from falling out.
Light ambience
The light ambience can be configured from the vehicle’s configuration menu.
Blind
Opening/Closing
► Press and hold the button; the blind opens/closes, stopping when the button is released.
WARNI NG
If the blind becomes trapped while moving, reverse its movement. To do this, press the relevant switch.When pressing the button to open/close the blind, the driver must ensure that nothing and no one might interfere with its movement.The driver must ensure that passengers use the blind correctly.Pay particular attention to children when operating the blind.
12 V accessory socket(s)
► Plug in a 12 V accessory (with a maximum rated power of 120 W) using a suitable adapter.
WARNI NG
Observe the maximum power rating to avoid damaging your accessory.
Page 52 of 272
52
Floor boxes
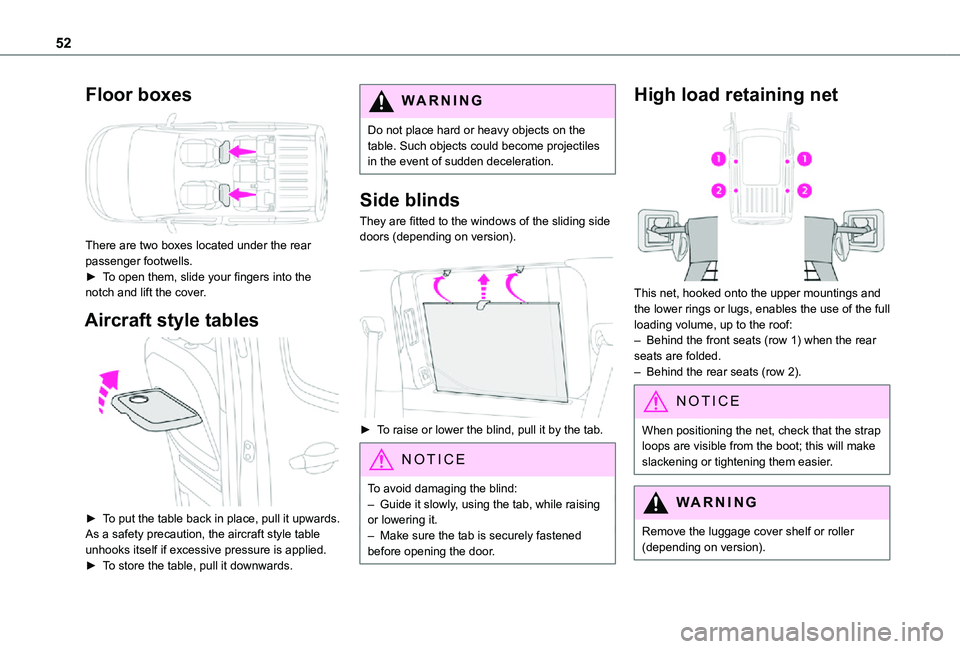
There are two boxes located under the rear passenger footwells.► To open them, slide your fingers into the notch and lift the cover.
Aircraft style tables
► To put the table back in place, pull it upwards.As a safety precaution, the aircraft style table unhooks itself if excessive pressure is applied.► To store the table, pull it downwards.
WARNI NG
Do not place hard or heavy objects on the table. Such objects could become projectiles in the event of sudden deceleration.
Side blinds
They are fitted to the windows of the sliding side doors (depending on version).
► To raise or lower the blind, pull it by the tab.
NOTIC E
To avoid damaging the blind:– Guide it slowly, using the tab, while raising or lowering it.– Make sure the tab is securely fastened
before opening the door.
High load retaining net
This net, hooked onto the upper mountings and the lower rings or lugs, enables the use of the full loading volume, up to the roof:– Behind the front seats (row 1) when the rear seats are folded.– Behind the rear seats (row 2).
NOTIC E
When positioning the net, check that the strap loops are visible from the boot; this will make slackening or tightening them easier.
WARNI NG
Remove the luggage cover shelf or roller
(depending on version).
Page 70 of 272
70
indicator lamps come on on the instrument panel.The function is deactivated if the fog lamps are switched on or the system detects dense fog.When the fog lamps are switched off or the vehicle leaves the area of dense fog, the function is automatically reactivated.This indicator lamp goes out when the function is deactivated.
Pause
If the situation requires a change of headlamp beam, the driver can take over at any time.► A "headlamp flash" pauses the function and the system changes to "automatic illumination of headlamps" mode:– if the "AUTO" and "Dipped beam" indicator lamps were on, the system changes to main beam,– if the "AUTO" and "Main beam" indicator lamps were on, the system changes to dipped beam.To reactivate the system, flash the headlamps
again.
NOTIC E
The system may suffer interference or not work correctly:– under conditions of poor visibility (snow, heavy rain, etc.),
– if the windscreen in front of the camera is dirty, misted or obscured (for example, by a sticker, etc.),– if the vehicle is facing highly reflective signs.When the system detects thick fog, it temporarily deactivates the function.The system is not able to detect:– road users that do not have their own lighting, such as pedestrians,– vehicles whose lighting is obscured (for example: vehicles running behind a safety barrier on a motorway),– vehicles at the top or bottom of a steep slope, on winding roads, on crossroads.
WARNI NG
Clean the windscreen regularly, particularly the area in front of the camera.The internal surface of the windscreen can also become misted around the camera. In humid and cold weather, demist the windscreen regularly.Do not allow snow to accumulate on the bonnet or roof of the vehicle as this could obstruct the detection camera.
Headlamp beam height
adjustment
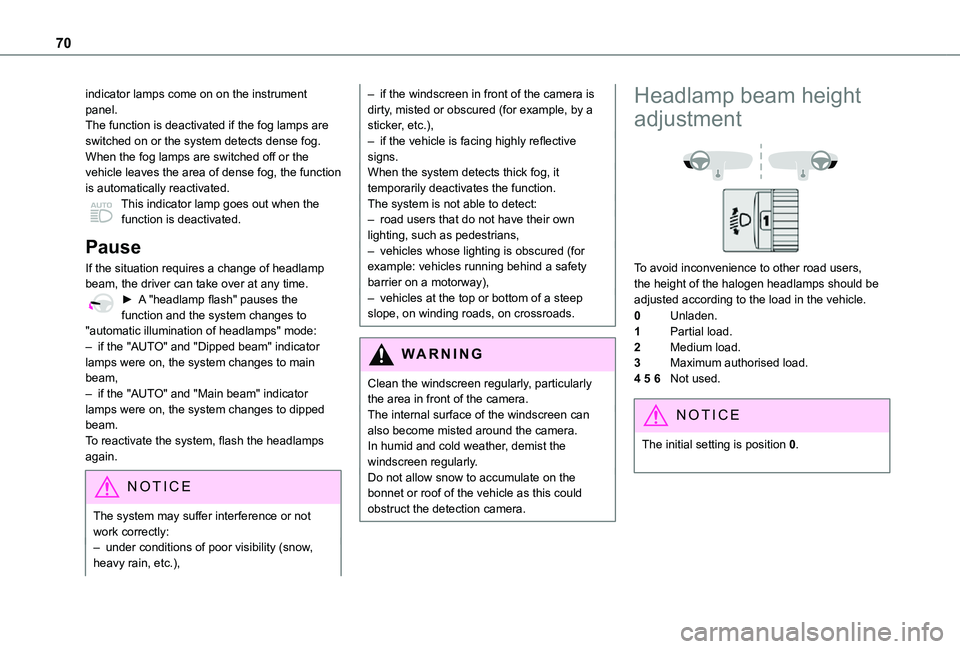
To avoid inconvenience to other road users, the height of the halogen headlamps should be adjusted according to the load in the vehicle.
0Unladen.
1Partial load.
2Medium load.
3Maximum authorised load.
4 5 6Not used.
NOTIC E
The initial setting is position 0.