2021 TOYOTA PROACE CITY VERSO mirror
[x] Cancel search: mirrorPage 42 of 272
42
ECO
Do not use the function when the seat is not occupied.Reduce the heating intensity as soon as possible.When the seat and passenger compartment have reached a satisfactory temperature, switch the function off; reducing electricity consumption in turn decreases fuel consumption.
WARNI NG
Prolonged use of the heated seats is not recommended for those with sensitive skin.There is a risk of burns for people whose perception of heat is impaired (illness, taking medication, etc.).To keep the heated pad intact and to prevent a short circuit:– do not place sharp or heavy objects on the
seat,– do not kneel or stand on the seat,– do not spill liquids onto the seat,– never use the heating function if the seat is wet.
Steering wheel
adjustment
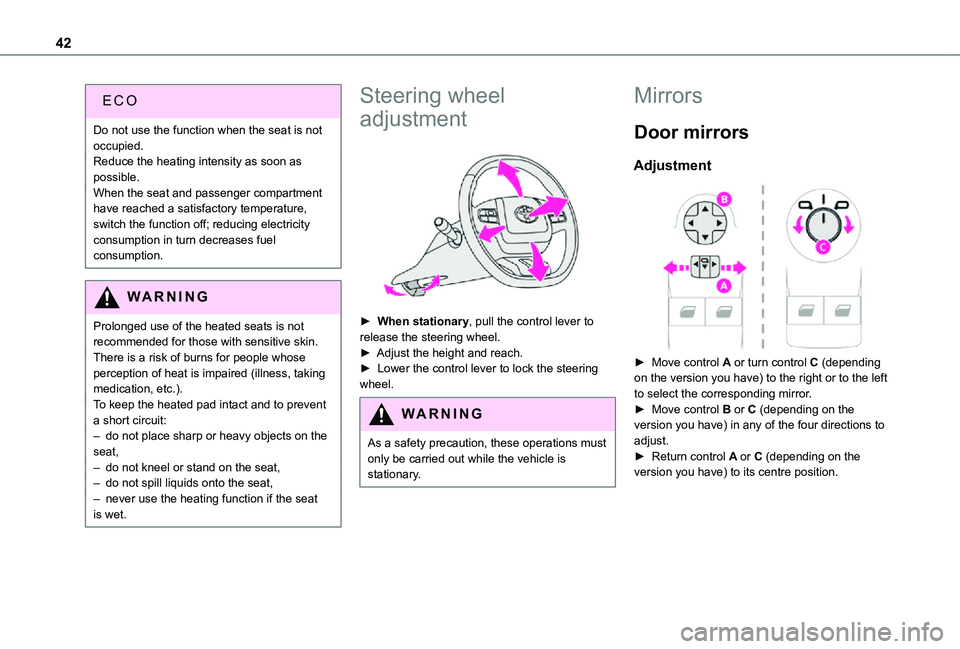
► When stationary, pull the control lever to release the steering wheel.► Adjust the height and reach.► Lower the control lever to lock the steering wheel.
WARNI NG
As a safety precaution, these operations must only be carried out while the vehicle is stationary.
Mirrors
Door mirrors
Adjustment
► Move control A or turn control C (depending on the version you have) to the right or to the left to select the corresponding mirror.► Move control B or C (depending on the version you have) in any of the four directions to adjust.
► Return control A or C (depending on the version you have) to its centre position.
Page 43 of 272
43
Ease of use and comfort
3
WARNI NG
As a safety measure, the mirrors should be adjusted to reduce the blind spots.The objects observed are, in reality, closer than they appear.Take this into account when assessing the distance of vehicles approaching from behind.
Manual folding
You can manually fold the mirrors (parking obstruction, narrow garage, etc.)► Turn the mirror towards the vehicle.
Electric folding
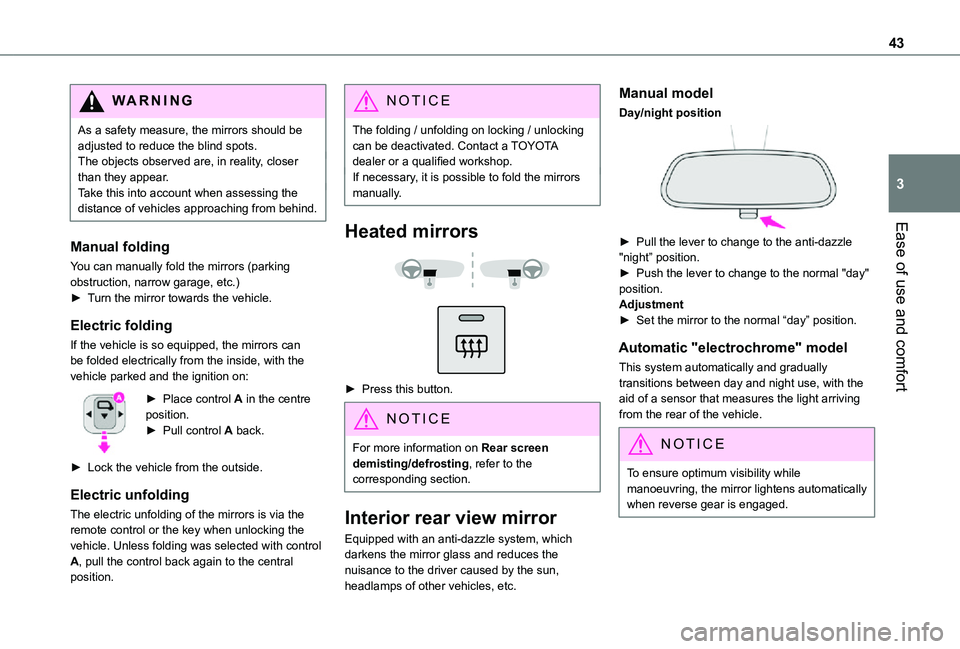
If the vehicle is so equipped, the mirrors can be folded electrically from the inside, with the vehicle parked and the ignition on:
► Place control A in the centre position.► Pull control A back.
► Lock the vehicle from the outside.
Electric unfolding
The electric unfolding of the mirrors is via the remote control or the key when unlocking the vehicle. Unless folding was selected with control A, pull the control back again to the central position.
NOTIC E
The folding / unfolding on locking / unlocking can be deactivated. Contact a TOYOTA dealer or a qualified workshop.If necessary, it is possible to fold the mirrors manually.
Heated mirrors
► Press this button.
NOTIC E
For more information on Rear screen demisting/defrosting, refer to the corresponding section.
Interior rear view mirror
Equipped with an anti-dazzle system, which
darkens the mirror glass and reduces the nuisance to the driver caused by the sun, headlamps of other vehicles, etc.
Manual model
Day/night position
► Pull the lever to change to the anti-dazzle
"night” position.► Push the lever to change to the normal "day" position.Adjustment► Set the mirror to the normal “day” position.
Automatic "electrochrome" model
This system automatically and gradually transitions between day and night use, with the aid of a sensor that measures the light arriving from the rear of the vehicle.
NOTIC E
To ensure optimum visibility while manoeuvring, the mirror lightens automatically when reverse gear is engaged.
Page 44 of 272
44
Child-monitoring mirror
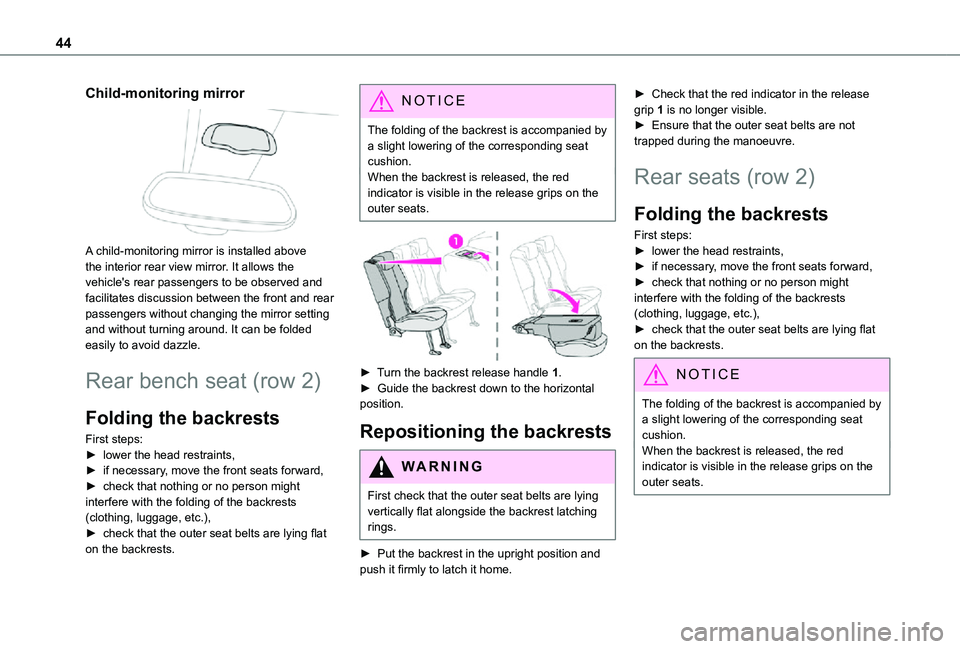
A child-monitoring mirror is installed above the interior rear view mirror. It allows the vehicle's rear passengers to be observed and facilitates discussion between the front and rear passengers without changing the mirror setting and without turning around. It can be folded easily to avoid dazzle.
Rear bench seat (row 2)
Folding the backrests
First steps:► lower the head restraints,► if necessary, move the front seats forward,► check that nothing or no person might interfere with the folding of the backrests (clothing, luggage, etc.),► check that the outer seat belts are lying flat on the backrests.
NOTIC E
The folding of the backrest is accompanied by a slight lowering of the corresponding seat cushion.When the backrest is released, the red indicator is visible in the release grips on the outer seats.
► Turn the backrest release handle 1.► Guide the backrest down to the horizontal position.
Repositioning the backrests
WARNI NG
First check that the outer seat belts are lying vertically flat alongside the backrest latching rings.
► Put the backrest in the upright position and push it firmly to latch it home.
► Check that the red indicator in the release grip 1 is no longer visible.► Ensure that the outer seat belts are not trapped during the manoeuvre.
Rear seats (row 2)
Folding the backrests
First steps:► lower the head restraints,► if necessary, move the front seats forward,► check that nothing or no person might interfere with the folding of the backrests (clothing, luggage, etc.),► check that the outer seat belts are lying flat on the backrests.
NOTIC E
The folding of the backrest is accompanied by a slight lowering of the corresponding seat cushion.When the backrest is released, the red indicator is visible in the release grips on the outer seats.
Page 50 of 272
50
WARNI NG
The connection of an electrical device not approved by TOYOTA, such as a USB charger, may adversely affect the operation of vehicle electrical systems, causing faults such as poor radio reception or interference with displays in the screens.
USB port(s)
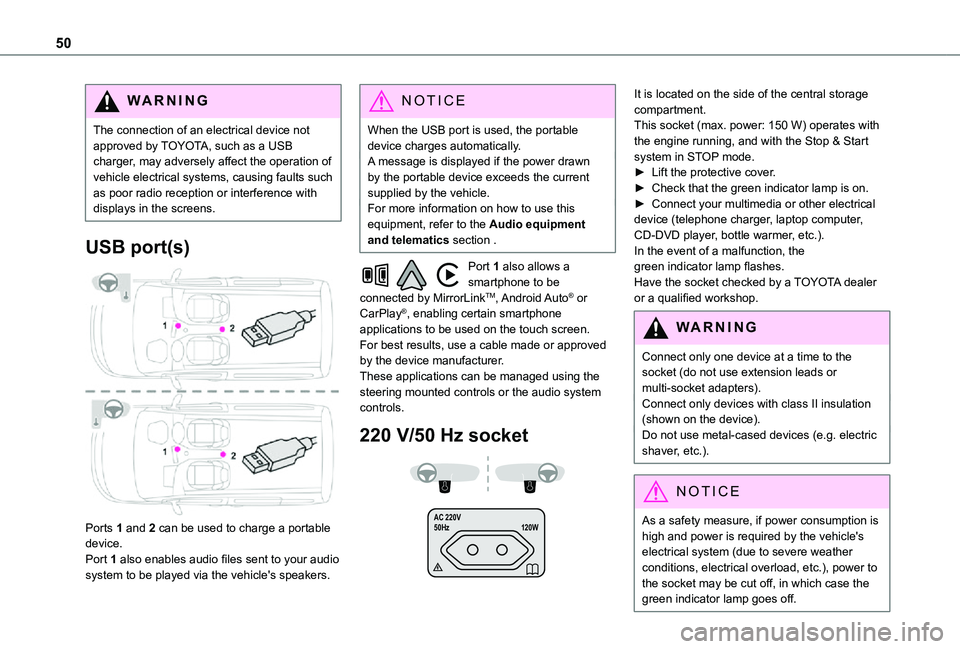
Ports 1 and 2 can be used to charge a portable device.
Port 1 also enables audio files sent to your audio system to be played via the vehicle's speakers.
NOTIC E
When the USB port is used, the portable device charges automatically.A message is displayed if the power drawn by the portable device exceeds the current supplied by the vehicle.For more information on how to use this equipment, refer to the Audio equipment and telematics section .
Port 1 also allows a smartphone to be connected by MirrorLinkTM, Android Auto® or CarPlay®, enabling certain smartphone applications to be used on the touch screen.For best results, use a cable made or approved by the device manufacturer.These applications can be managed using the steering mounted controls or the audio system controls.
220 V/50 Hz socket
AC 220 V
50Hz 120W
It is located on the side of the central storage compartment.This socket (max. power: 150 W) operates with the engine running, and with the Stop & Start system in STOP mode.► Lift the protective cover.► Check that the green indicator lamp is on.► Connect your multimedia or other electrical device (telephone charger, laptop computer, CD-DVD player, bottle warmer, etc.).In the event of a malfunction, the green indicator lamp flashes.Have the socket checked by a TOYOTA dealer or a qualified workshop.
WARNI NG
Connect only one device at a time to the socket (do not use extension leads or multi-socket adapters).Connect only devices with class II insulation (shown on the device).Do not use metal-cased devices (e.g. electric shaver, etc.).
NOTIC E
As a safety measure, if power consumption is high and power is required by the vehicle's
electrical system (due to severe weather conditions, electrical overload, etc.), power to the socket may be cut off, in which case the green indicator lamp goes off.
Page 61 of 272
61
Ease of use and comfort
3
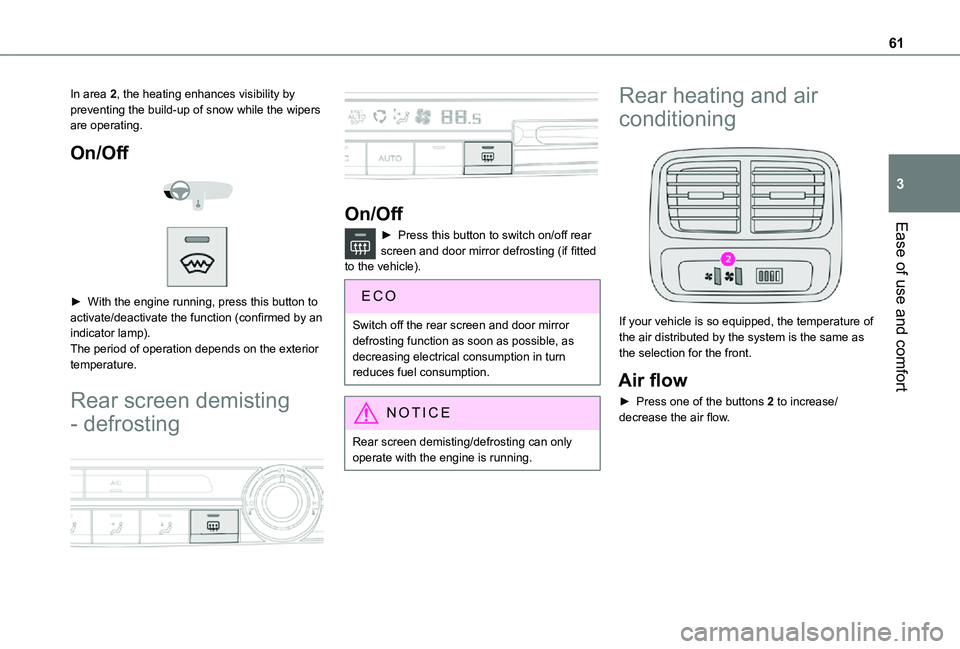
In area 2, the heating enhances visibility by preventing the build-up of snow while the wipers are operating.
On/Off
► With the engine running, press this button to activate/deactivate the function (confirmed by an indicator lamp).The period of operation depends on the exterior temperature.
Rear screen demisting
- defrosting
On/Off
► Press this button to switch on/off rear screen and door mirror defrosting (if fitted to the vehicle).
Switch off the rear screen and door mirror defrosting function as soon as possible, as decreasing electrical consumption in turn reduces fuel consumption.
NOTIC E
Rear screen demisting/defrosting can only operate with the engine is running.
Rear heating and air
conditioning
If your vehicle is so equipped, the temperature of the air distributed by the system is the same as the selection for the front.
Air flow
► Press one of the buttons 2 to increase/decrease the air flow.
Page 68 of 272
68
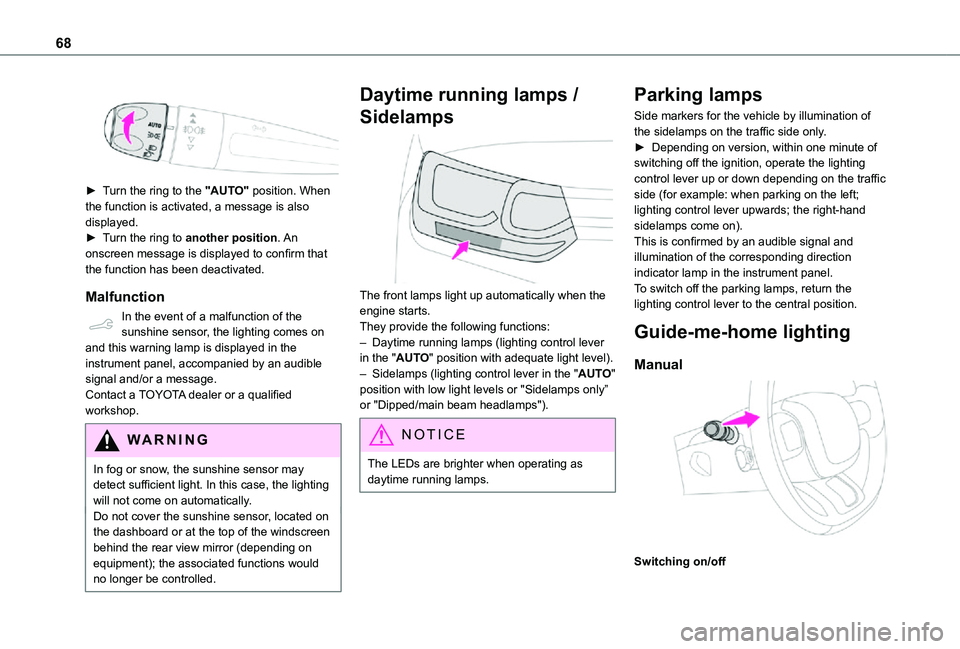
► Turn the ring to the "AUTO" position. When the function is activated, a message is also displayed.► Turn the ring to another position. An
onscreen message is displayed to confirm that the function has been deactivated.
Malfunction
In the event of a malfunction of the sunshine sensor, the lighting comes on and this warning lamp is displayed in the instrument panel, accompanied by an audible signal and/or a message.Contact a TOYOTA dealer or a qualified workshop.
WARNI NG
In fog or snow, the sunshine sensor may detect sufficient light. In this case, the lighting will not come on automatically.Do not cover the sunshine sensor, located on the dashboard or at the top of the windscreen behind the rear view mirror (depending on equipment); the associated functions would no longer be controlled.
Daytime running lamps /
Sidelamps
The front lamps light up automatically when the engine starts.They provide the following functions:– Daytime running lamps (lighting control lever in the "AUTO" position with adequate light level).– Sidelamps (lighting control lever in the "AUTO" position with low light levels or "Sidelamps only” or "Dipped/main beam headlamps").
NOTIC E
The LEDs are brighter when operating as daytime running lamps.
Parking lamps
Side markers for the vehicle by illumination of the sidelamps on the traffic side only.► Depending on version, within one minute of switching off the ignition, operate the lighting control lever up or down depending on the traffic side (for example: when parking on the left; lighting control lever upwards; the right-hand sidelamps come on).This is confirmed by an audible signal and illumination of the corresponding direction indicator lamp in the instrument panel.To switch off the parking lamps, return the lighting control lever to the central position.
Guide-me-home lighting
Manual
Switching on/off
Page 73 of 272
73
Lighting and visibility
4
Changing a wiper blade
Removing/refitting at the front
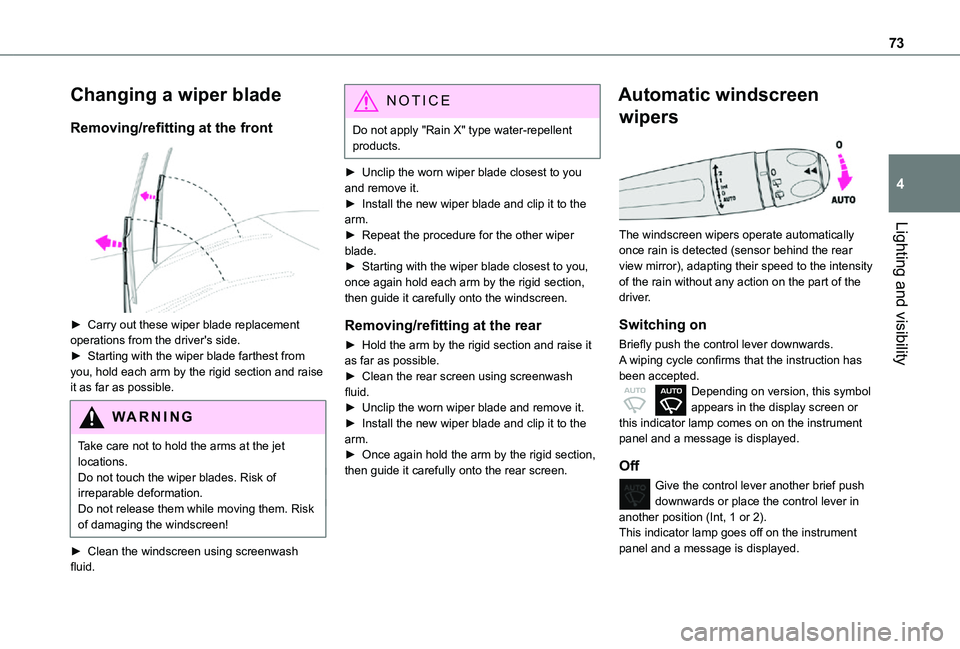
► Carry out these wiper blade replacement operations from the driver's side.► Starting with the wiper blade farthest from you, hold each arm by the rigid section and raise it as far as possible.
WARNI NG
Take care not to hold the arms at the jet locations.Do not touch the wiper blades. Risk of irreparable deformation.Do not release them while moving them. Risk of damaging the windscreen!
► Clean the windscreen using screenwash fluid.
NOTIC E
Do not apply "Rain X" type water-repellent products.
► Unclip the worn wiper blade closest to you and remove it.► Install the new wiper blade and clip it to the arm.► Repeat the procedure for the other wiper blade.► Starting with the wiper blade closest to you, once again hold each arm by the rigid section, then guide it carefully onto the windscreen.
Removing/refitting at the rear
► Hold the arm by the rigid section and raise it as far as possible.► Clean the rear screen using screenwash fluid.► Unclip the worn wiper blade and remove it.► Install the new wiper blade and clip it to the arm.
► Once again hold the arm by the rigid section, then guide it carefully onto the rear screen.
Automatic windscreen
wipers
The windscreen wipers operate automatically
once rain is detected (sensor behind the rear view mirror), adapting their speed to the intensity of the rain without any action on the part of the driver.
Switching on
Briefly push the control lever downwards.A wiping cycle confirms that the instruction has been accepted.Depending on version, this symbol appears in the display screen or this indicator lamp comes on on the instrument panel and a message is displayed.
Off
Give the control lever another brief push downwards or place the control lever in another position (Int, 1 or 2).This indicator lamp goes off on the instrument panel and a message is displayed.
Page 74 of 272
74
NOTIC E
If the ignition has been off for more than one minute, the automatic wipers must be reactivated by pushing the control lever downwards.
Operating fault
If a fault occurs with the automatic windscreen wipers, the wipers will operate in intermittent mode.Have it checked by a TOYOTA dealer or a qualified workshop.
WARNI NG
Do not cover the rain sensor, located at the top of the windscreen behind the rear view mirror (depending on equipment); the associated functions would no longer be controlled.Switch off the automatic windscreen wipers when using an automatic car wash.In winter, it is advisable to wait until the windscreen is completely clear of ice before activating the automatic rain sensitive wipers.