2021 TOYOTA PROACE CITY VERSO ECU
[x] Cancel search: ECUPage 52 of 272
52
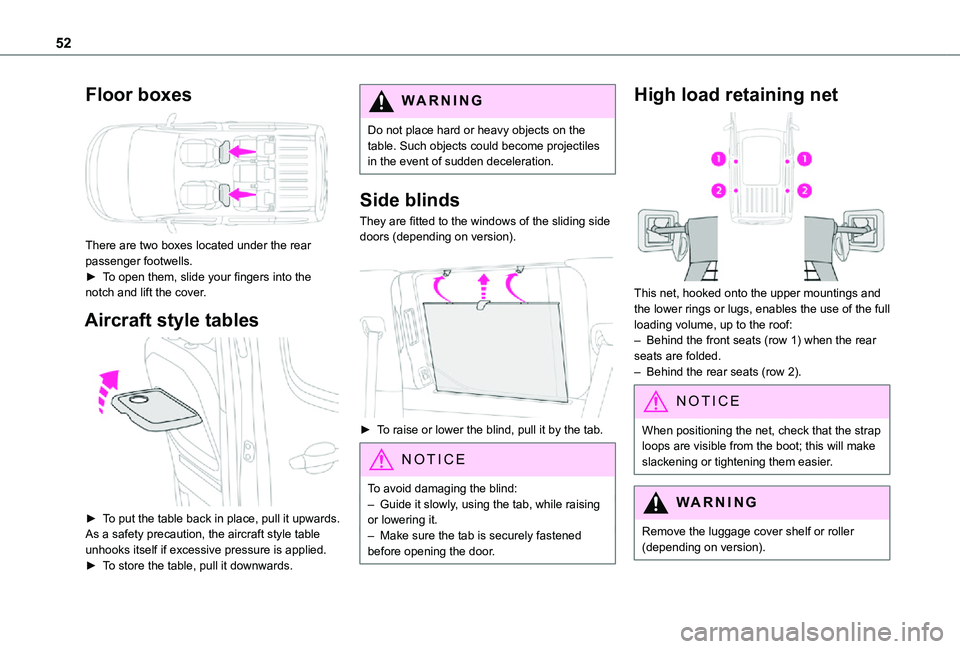
Floor boxes
There are two boxes located under the rear passenger footwells.► To open them, slide your fingers into the notch and lift the cover.
Aircraft style tables
► To put the table back in place, pull it upwards.As a safety precaution, the aircraft style table unhooks itself if excessive pressure is applied.► To store the table, pull it downwards.
WARNI NG
Do not place hard or heavy objects on the table. Such objects could become projectiles in the event of sudden deceleration.
Side blinds
They are fitted to the windows of the sliding side doors (depending on version).
► To raise or lower the blind, pull it by the tab.
NOTIC E
To avoid damaging the blind:– Guide it slowly, using the tab, while raising or lowering it.– Make sure the tab is securely fastened
before opening the door.
High load retaining net
This net, hooked onto the upper mountings and the lower rings or lugs, enables the use of the full loading volume, up to the roof:– Behind the front seats (row 1) when the rear seats are folded.– Behind the rear seats (row 2).
NOTIC E
When positioning the net, check that the strap loops are visible from the boot; this will make slackening or tightening them easier.
WARNI NG
Remove the luggage cover shelf or roller
(depending on version).
Page 53 of 272
53
Ease of use and comfort
3
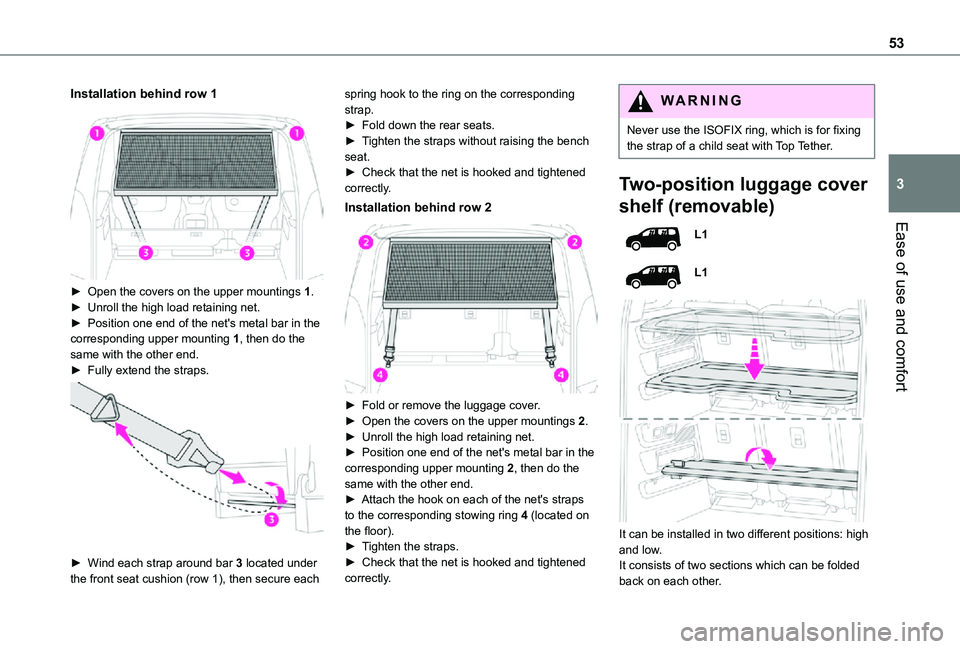
Installation behind row 1
► Open the covers on the upper mountings 1.► Unroll the high load retaining net.► Position one end of the net's metal bar in the corresponding upper mounting 1, then do the same with the other end.► Fully extend the straps.
► Wind each strap around bar 3 located under the front seat cushion (row 1), then secure each
spring hook to the ring on the corresponding strap.► Fold down the rear seats.► Tighten the straps without raising the bench seat.► Check that the net is hooked and tightened correctly.
Installation behind row 2
► Fold or remove the luggage cover.► Open the covers on the upper mountings 2.► Unroll the high load retaining net.
► Position one end of the net's metal bar in the corresponding upper mounting 2, then do the same with the other end.► Attach the hook on each of the net's straps to the corresponding stowing ring 4 (located on the floor).► Tighten the straps.► Check that the net is hooked and tightened correctly.
WARNI NG
Never use the ISOFIX ring, which is for fixing the strap of a child seat with Top Tether.
Two-position luggage cover
shelf (removable)
L1
L1
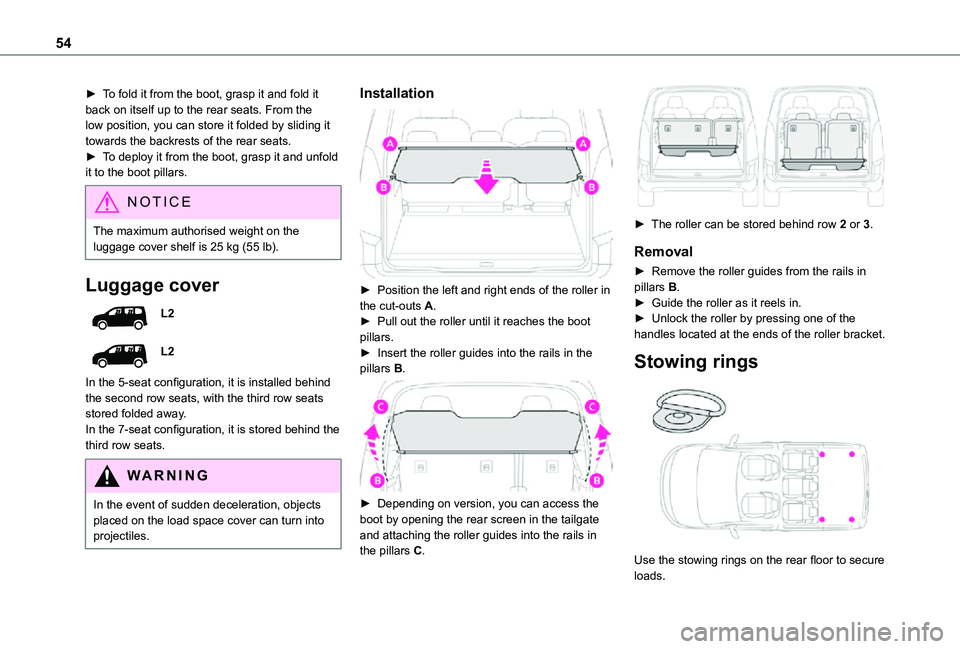
It can be installed in two different positions: high and low.It consists of two sections which can be folded back on each other.
Page 54 of 272
54
► To fold it from the boot, grasp it and fold it back on itself up to the rear seats. From the low position, you can store it folded by sliding it towards the backrests of the rear seats.► To deploy it from the boot, grasp it and unfold it to the boot pillars.
NOTIC E
The maximum authorised weight on the
luggage cover shelf is 25 kg (55 lb).
Luggage cover
L2
L2
In the 5-seat configuration, it is installed behind the second row seats, with the third row seats stored folded away.In the 7-seat configuration, it is stored behind the third row seats.
WARNI NG
In the event of sudden deceleration, objects placed on the load space cover can turn into projectiles.
Installation
► Position the left and right ends of the roller in the cut-outs A.► Pull out the roller until it reaches the boot pillars.► Insert the roller guides into the rails in the pillars B.
► Depending on version, you can access the boot by opening the rear screen in the tailgate and attaching the roller guides into the rails in the pillars C.
► The roller can be stored behind row 2 or 3.
Removal
► Remove the roller guides from the rails in pillars B.► Guide the roller as it reels in.► Unlock the roller by pressing one of the handles located at the ends of the roller bracket.
Stowing rings
Use the stowing rings on the rear floor to secure loads.
Page 55 of 272
55
Ease of use and comfort
3
As a safety precaution in case of sharp braking, we recommend placing heavy objects as far forwards as possible (i.e. near the cab).We recommend using the stowing rings on the floor to firmly secure the load.
WARNI NG
When washing your vehicle, never clean the inside directly using a water jet.
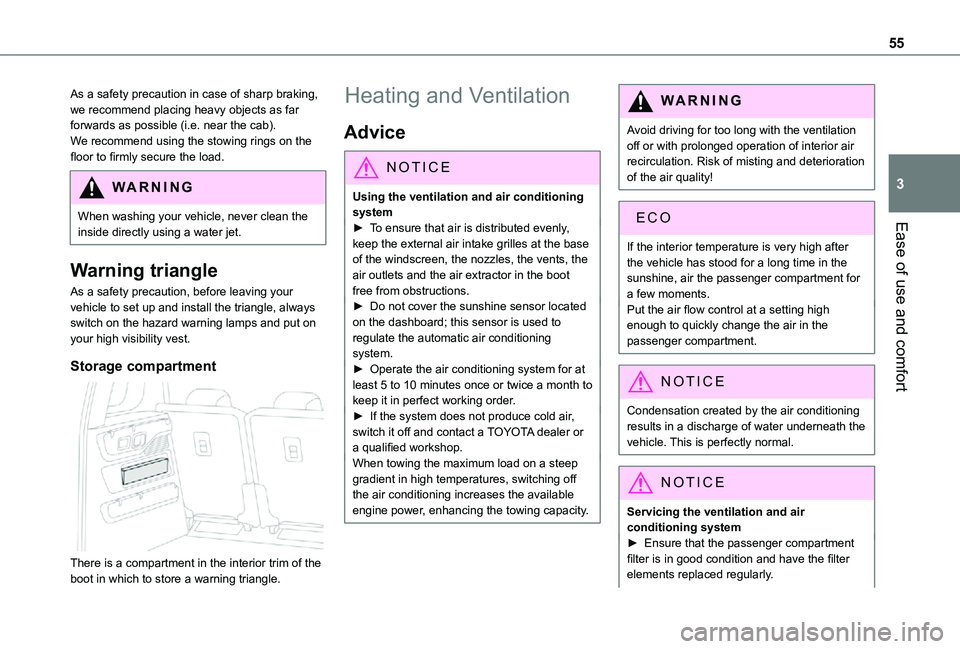
Warning triangle
As a safety precaution, before leaving your vehicle to set up and install the triangle, always switch on the hazard warning lamps and put on your high visibility vest.
Storage compartment
There is a compartment in the interior trim of the boot in which to store a warning triangle.
Heating and Ventilation
Advice
NOTIC E
Using the ventilation and air conditioning system► To ensure that air is distributed evenly,
keep the external air intake grilles at the base of the windscreen, the nozzles, the vents, the air outlets and the air extractor in the boot free from obstructions.► Do not cover the sunshine sensor located on the dashboard; this sensor is used to regulate the automatic air conditioning system.► Operate the air conditioning system for at least 5 to 10 minutes once or twice a month to keep it in perfect working order.► If the system does not produce cold air, switch it off and contact a TOYOTA dealer or a qualified workshop.When towing the maximum load on a steep gradient in high temperatures, switching off the air conditioning increases the available engine power, enhancing the towing capacity.
WARNI NG
Avoid driving for too long with the ventilation off or with prolonged operation of interior air recirculation. Risk of misting and deterioration of the air quality!
If the interior temperature is very high after the vehicle has stood for a long time in the sunshine, air the passenger compartment for a few moments.Put the air flow control at a setting high enough to quickly change the air in the passenger compartment.
NOTIC E
Condensation created by the air conditioning results in a discharge of water underneath the vehicle. This is perfectly normal.
NOTIC E
Servicing the ventilation and air conditioning system► Ensure that the passenger compartment filter is in good condition and have the filter elements replaced regularly.
Page 85 of 272
85
Safety
5
NOTIC E
These seat belt warning lamps only apply to row 2.
Advice
WARNI NG
The driver must ensure that passengers use the seat belts correctly and that they are all fastened before setting off.Wherever you are seated in the vehicle, always fasten your seat belt, even for short journeys.Do not interchange the seat belt buckles, as they will not fulfil their role fully.Before and after use, ensure that the seat belt is reeled in correctly.After folding or moving a seat or rear bench seat, ensure that the seat belt is positioned and reeled in correctly.
WARNI NG
InstallationThe lower part of the strap must be positioned as low as possible on the pelvis.The upper part must be positioned in the hollow of the shoulder.In order to be effective, a seat belt must:– be tightened as close to the body as possible,– be pulled in front of you with a smooth movement, checking that it does not twist,– be used to restrain only one person,– not show any signs of cuts or fraying,– not be converted or modified in order not to affect its performance.
WARNI NG
Recommendations for childrenUse a suitable child seat if the passenger is less than 12 years old or shorter than one and a half metres (4 ft 11").Never use the same seat belt to secure more than one child.Never carry a child on your lap.For more information on Child seats, refer to the corresponding section.
WARNI NG
MaintenanceIn accordance with current safety regulations, for all repairs on your vehicle's seat belts, go to a qualified workshop with the skills and equipment needed, which a TOYOTA dealer is able to provide.Have the seat belts checked regularly by a TOYOTA dealer or a qualified workshop, particularly if the straps show signs of damage.Clean the seat belt straps with soapy water or a textile cleaning product, sold by TOYOTA dealers.
WARNI NG
In the event of an impactDepending on the nature and seriousness of impacts, the pyrotechnic pretensioner device may trigger before and independently
of airbag deployment. Deployment of the pretensioners is accompanied by a slight discharge of harmless smoke and a noise, due to the activation of the pyrotechnic cartridge incorporated in the system.In all cases, the airbag warning lamp comes on.Following an impact, have the seat belt system checked, and if necessary replaced, by a TOYOTA dealer or a qualified workshop.
Page 88 of 272
88
WARNI NG
In the event of a minor impact or bump at the side of the vehicle or if the vehicle rolls over, the airbags may not be deployed.In the event of a rear or front collision, none of the lateral airbags are deployed.
Advice
WARNI NG
For the airbags to be fully effective, observe the safety recommendations below.Adopt a normal upright sitting position.Fasten the seat belt ensuring it is correctly positioned and adjusted.Do not leave anything between the occupants and the airbags (a child, pet, object, etc.), nor fix or attach anything close to or in the way of the airbag release trajectory; this could cause injuries during their deployment.Never modify the original definition of your vehicle, particularly in the area directly around the airbags.After an accident or if the vehicle has been stolen, have the airbag systems checked.
All work on the airbag systems must only be performed by a TOYOTA dealer or a qualified workshop.Even if all of the precautions mentioned are observed, a risk of injury or of minor burns to the head, chest or arms cannot be ruled out when an airbag is deployed. The airbag inflates almost instantly (within a few milliseconds) then deflates within the same time discharging the hot gas via openings provided for this purpose.
WARNI NG
Front airbagsDo not drive holding the steering wheel by its spokes or resting your hands on the centre part of the wheel.Passengers must not place their feet on the dashboard.Do not smoke as deployment of the airbags can cause burns or the risk of injury from a
cigarette or pipe.Never remove or pierce the steering wheel or hit it violently.Do not fix or attach anything to the steering wheel or dashboard, as this could cause injuries when the airbags are deployed.
WARNI NG
Lateral airbagsUse only approved covers on the seats, compatible with the deployment of the lateral airbags. For information on the range of seat covers suitable for your vehicle, contact a TOYOTA dealer.Do not fix or attach anything to the seat backrests (clothes, etc.), as this could cause injuries to the thorax or arm when the lateral airbag is deployed.Do not sit with the upper part of the body any nearer to the door than necessary.The vehicle's front door panels include side impact sensors.A damaged door or any unauthorised or incorrectly executed work (modification or repair) on the front doors or their interior trim could compromise the operation of these sensors - risk of malfunction of the lateral airbags!Such work must only be done by a TOYOTA
dealer or a qualified workshop.
Page 89 of 272
89
Safety
5
WARNI NG
Curtain airbagsDo not fix or attach anything to the roof, as this could cause head injuries when the curtain airbag is deployed.Do not remove the grab handles installed on the roof, as they play a part in securing the curtain airbags.
Child seats
NOTIC E
The regulations on carrying children are specific to each country. Refer to the legislation in force in your country.
For maximum safety, please observe the following recommendations:– In accordance with European regulations, all children under the age of 12 or less than 150 cm (4 ft 11”) tall must travel in approved child seats suited to their weight, on seats fitted with a seat belt or ISOFIX mountings.– Statistically, the safest seats in your vehicle for carrying children are the rear seats.– Children weighing less than 9 kg (20 lb) must travel in the "rear facing" position, whether in the front or rear of the vehicle.
NOTIC E
It is recommended that children travel on the rear seats of the vehicle:– ‘rear facing’ up to the age of 3,– ‘forward facing’ over the age of 3.
WARNI NG
Make sure that the seat belt is correctly positioned and tightened.For child seats with a support leg, ensure that the support leg is in firm and steady contact with the floor.
WARNI NG
Remove and stow the head restraint before installing a child seat with backrest on a passenger seat. Refit the head restraint once the child seat has been removed.
Advice
WARNI NG
An incorrectly installed child seat compromises the child's safety in the event of an accident.Ensure that there is no seat belt or seat belt buckle under the child seat, as this could destabilise it.
Remember to fasten the seat belts or the harness of child seats, keeping the slack relative to the child's body to a minimum, even for short journeys.When installing a child seat using the seat belt, ensure that the seat belt is tightened correctly on the child seat and that it secures the child seat firmly on the seat of the vehicle. If the passenger seat is adjustable, move it forwards if necessary.Remove the head restraint before installing a child seat with a backrest on a passenger seat.Ensure that the head restraint is stored or attached securely to prevent it from being thrown around the vehicle in the event of sharp braking. Refit the head restraint once the child seat has been removed.
Page 92 of 272
92
WARNI NG
Vehicles not equipped with a deactivation controlInstalling a “rear facing” child seat on the front passenger seat or bench seat is expressly prohibited! Doing so would expose the child to the risk of death or serious injury in the event of airbag deployment.
Deactivating/Reactivating the front
passenger airbag
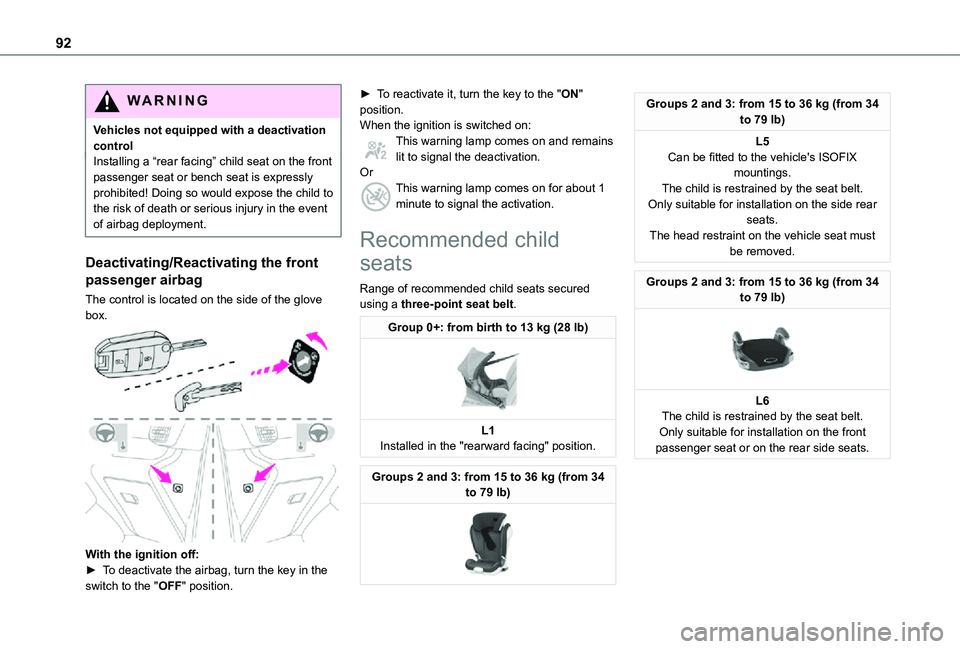
The control is located on the side of the glove box.
With the ignition off:► To deactivate the airbag, turn the key in the switch to the "OFF" position.
► To reactivate it, turn the key to the "ON" position.When the ignition is switched on:This warning lamp comes on and remains lit to signal the deactivation.OrThis warning lamp comes on for about 1 minute to signal the activation.
Recommended child
seats
Range of recommended child seats secured using a three-point seat belt.
Group 0+: from birth to 13 kg (28 lb)
L1
Installed in the "rearward facing" position.
Groups 2 and 3: from 15 to 36 kg (from 34 to 79 lb)
Groups 2 and 3: from 15 to 36 kg (from 34 to 79 lb)
L5Can be fitted to the vehicle's ISOFIX mountings.The child is restrained by the seat belt.Only suitable for installation on the side rear seats.The head restraint on the vehicle seat must
be removed.
Groups 2 and 3: from 15 to 36 kg (from 34 to 79 lb)
L6The child is restrained by the seat belt.Only suitable for installation on the front passenger seat or on the rear side seats.