Page 52 of 172
522-4. Other settings
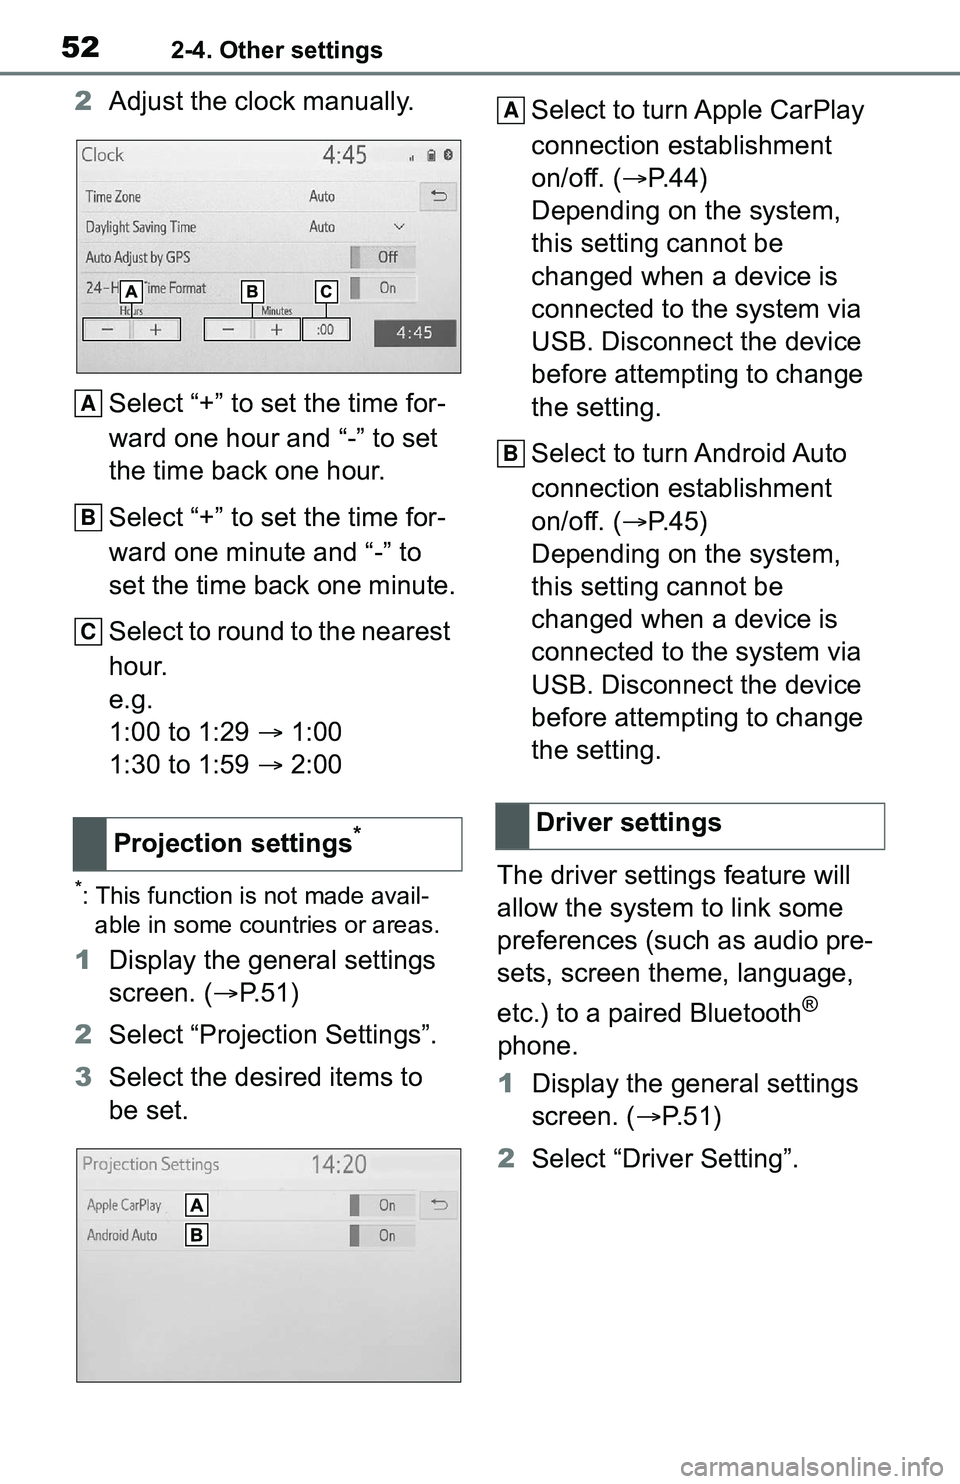
2Adjust the clock manually.
Select “+” to set the time for-
ward one hour and “-” to set
the time back one hour.
Select “+” to set the time for-
ward one minute and “-” to
set the time back one minute.
Select to round to the nearest
hour.
e.g.
1:00 to 1:29 1:00
1:30 to 1:59 2:00
*: This function is not made avail-
able in some countries or areas.
1 Display the general settings
screen. ( P.51)
2 Select “Projection Settings”.
3 Select the desired items to
be set. Select to turn Apple CarPlay
connection establishment
on/off. (
P.44)
Depending on the system,
this setting cannot be
changed when a device is
connected to the system via
USB. Disconnect the device
before attempting to change
the setting.
Select to turn Android Auto
connection establishment
on/off. ( P.45)
Depending on the system,
this setting cannot be
changed when a device is
connected to the system via
USB. Disconnect the device
before attempting to change
the setting.
The driver settings feature will
allow the system to link some
preferences (such as audio pre-
sets, screen theme, language,
etc.) to a paired Bluetooth
®
phone.
1 Display the general settings
screen. ( P. 5 1 )
2 Select “Driver Setting”.
Projection settings
*
A
B
C
�'�U�L�Y�H�U���V�H�W�W�L�Q�J�V
A
B
Page 53 of 172
532-4. Other settings
2
Basic function
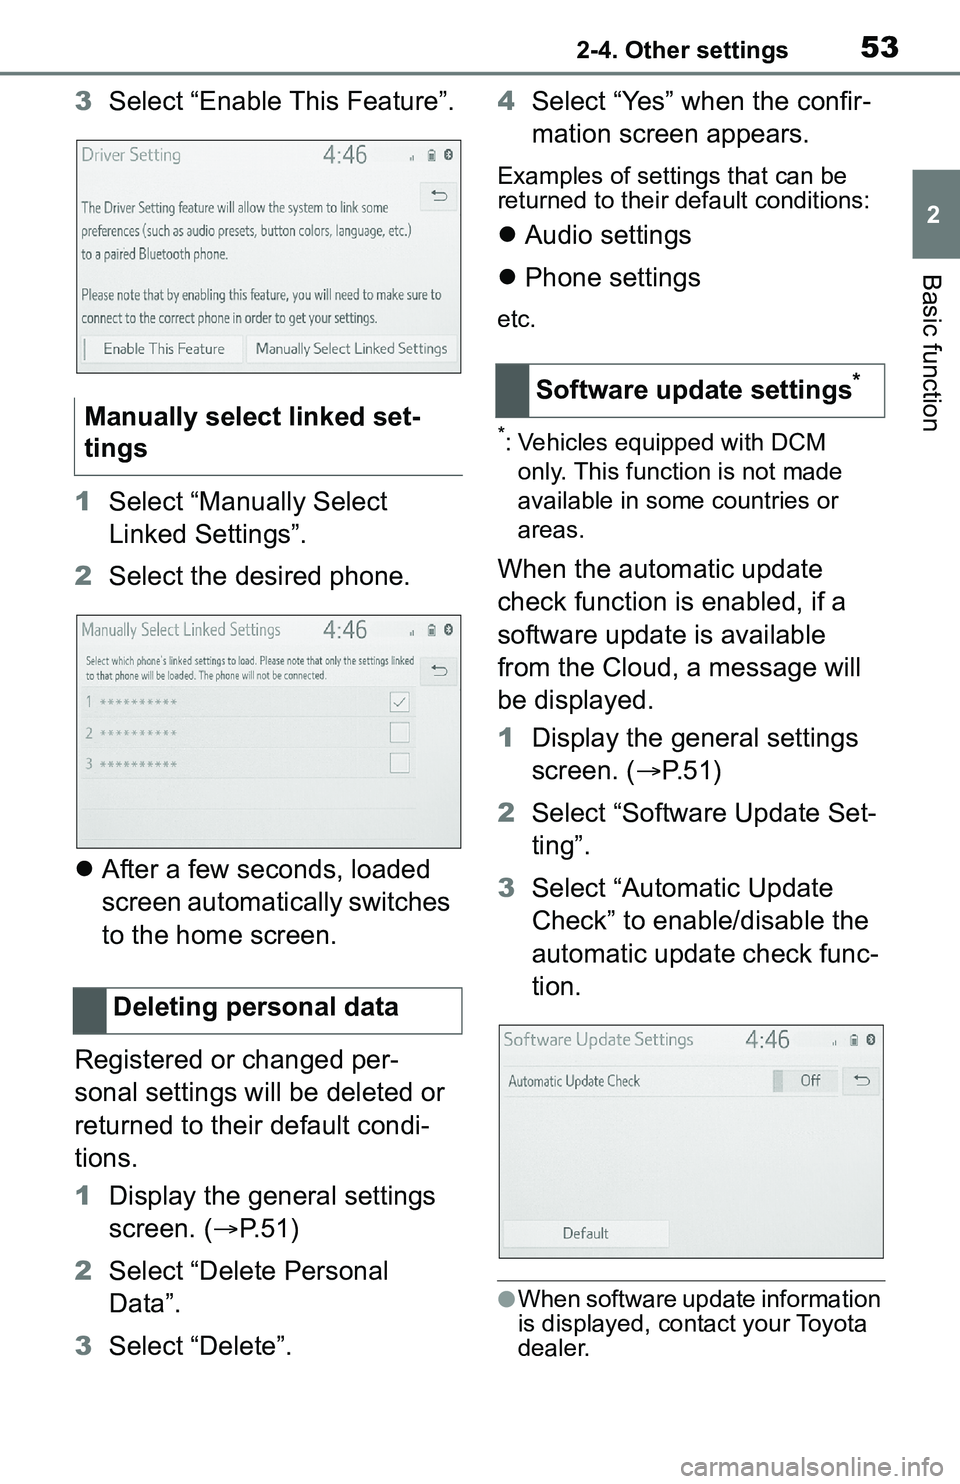
3Select “Enable This Feature”.
1 Select “Manually Select
Linked Settings”.
2 Select the desired phone.
After a few seconds, loaded
screen automatically switches
to the home screen.
Registered or changed per-
sonal settings will be deleted or
returned to their default condi-
tions.
1 Display the general settings
screen. ( P.51)
2 Select “Delete Personal
Data”.
3 Select “Delete”. 4
Select “Yes” when the confir-
mation screen appears.
Examples of settings that can be
returned to their default conditions:
Audio settings
Phone settings
etc.
*: Vehicles equipped with DCM
only. This function is not made
available in some countries or
areas.
When the automatic update
check function is enabled, if a
software update is available
from the Cloud, a message will
be displayed.
1 Display the general settings
screen. ( P. 5 1 )
2 Select “Software Update Set-
ting”.
3 Select “Automatic Update
Check” to enable/disable the
automatic update check func-
tion.
●When software update information
is displayed, contact your Toyota
dealer.
Manually select linked set-
tings
Deleting personal data
Software update settings*
Page 55 of 172
552-4. Other settings
2
Basic function
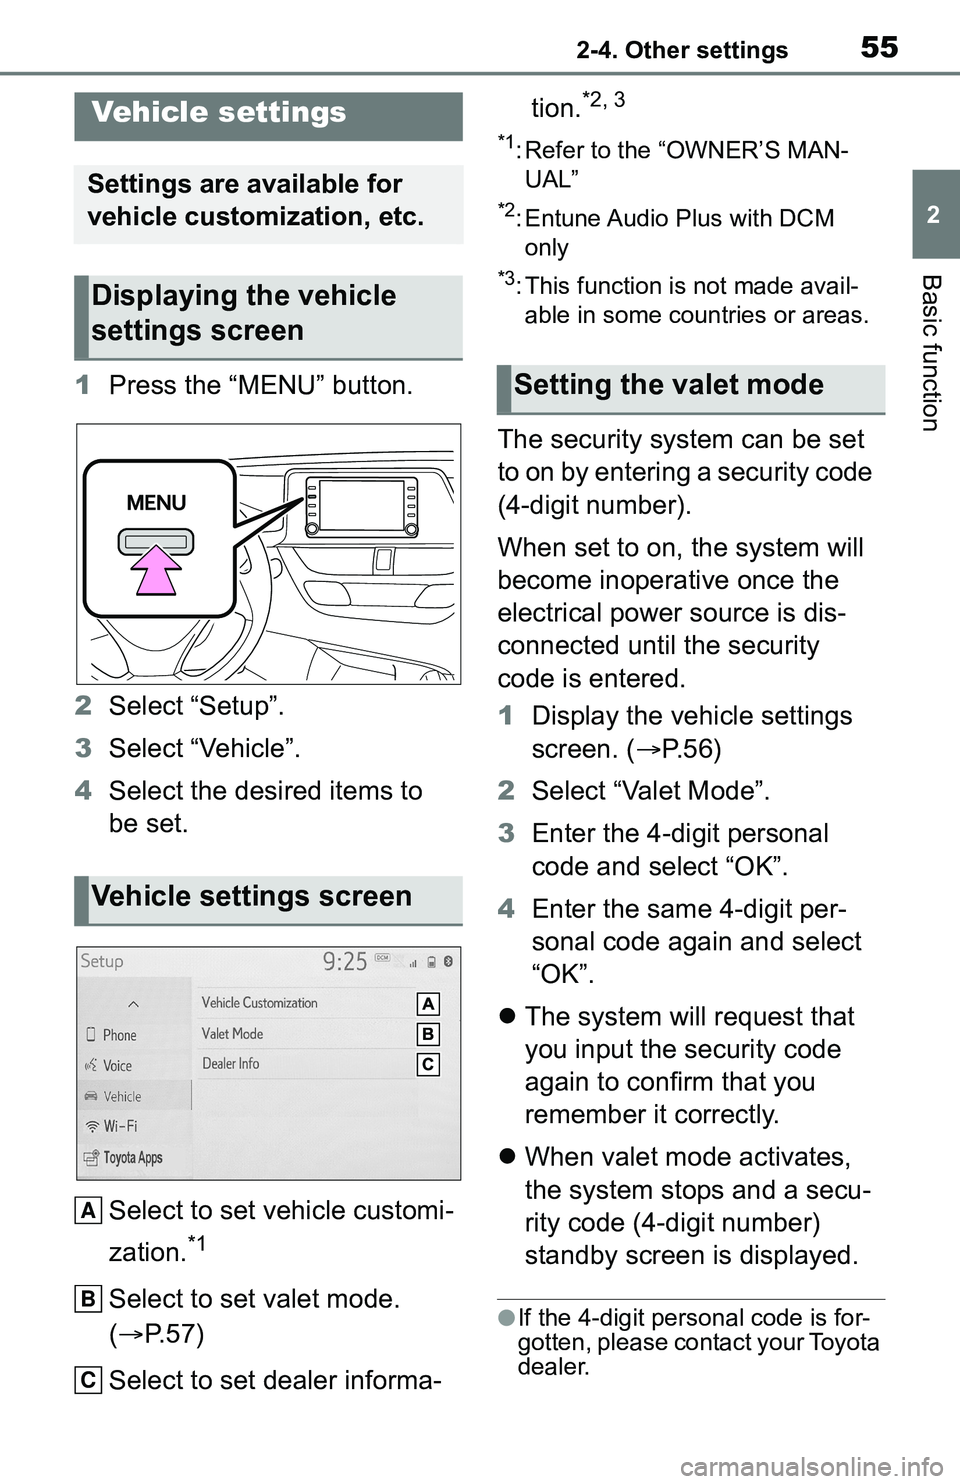
1Press the “MENU” button.
2 Select “Setup”.
3 Select “Vehicle”.
4 Select the desired items to
be set.
Select to set vehicle customi-
zation.
*1
Select to set valet mode.
( P. 5 7 )
Select to set dealer informa- tion.
*2, 3
*1: Refer to the “OWNER’S MAN-
UAL”
*2: Entune Audio Plus with DCM only
*3: This function is not made avail-able in some countries or areas.
The security system can be set
to on by entering a security code
(4-digit number).
When set to on, the system will
become inoperative once the
electrical power source is dis-
connected until the security
code is entered.
1 Display the vehicle settings
screen. ( P. 5 6 )
2 Select “Valet Mode”.
3 Enter the 4-digit personal
code and select “OK”.
4 Enter the same 4-digit per-
sonal code again and select
“OK”.
The system will request that
you input the security code
again to confirm that you
remember it correctly.
When valet mode activates,
the system stops and a secu-
rity code (4-digit number)
standby screen is displayed.
●If the 4-digit personal code is for-
gotten, please contact your Toyota
dealer.
Vehicle settings
Settings are available for
vehicle customization, etc.
Displaying the vehicle
settings screen
Vehicle settings screen
A
B
C
�6�H�W�W�L�Q�J���W�K�H���Y�\
D�O�H�W���P�R�G�H
Page 56 of 172
562-4. Other settings
1Enter the 4-digit personal
code and select “OK”.
●If an incorrect security code (4-
digit number) is entered 6 times,
the system will not accept another
security code (4-digit number) for
10 minutes.
*: Entune Audio Plus with DCM
only. This function is not made
available in some countries or
areas.
Dealer information can be regis-
tered in the system. If the vehi-
cle alert screen is displayed,
selecting the call dealer button
on the screen will call the phone
number registered in the dealer
information.
1 Display the vehicle settings
screen. ( P.56)
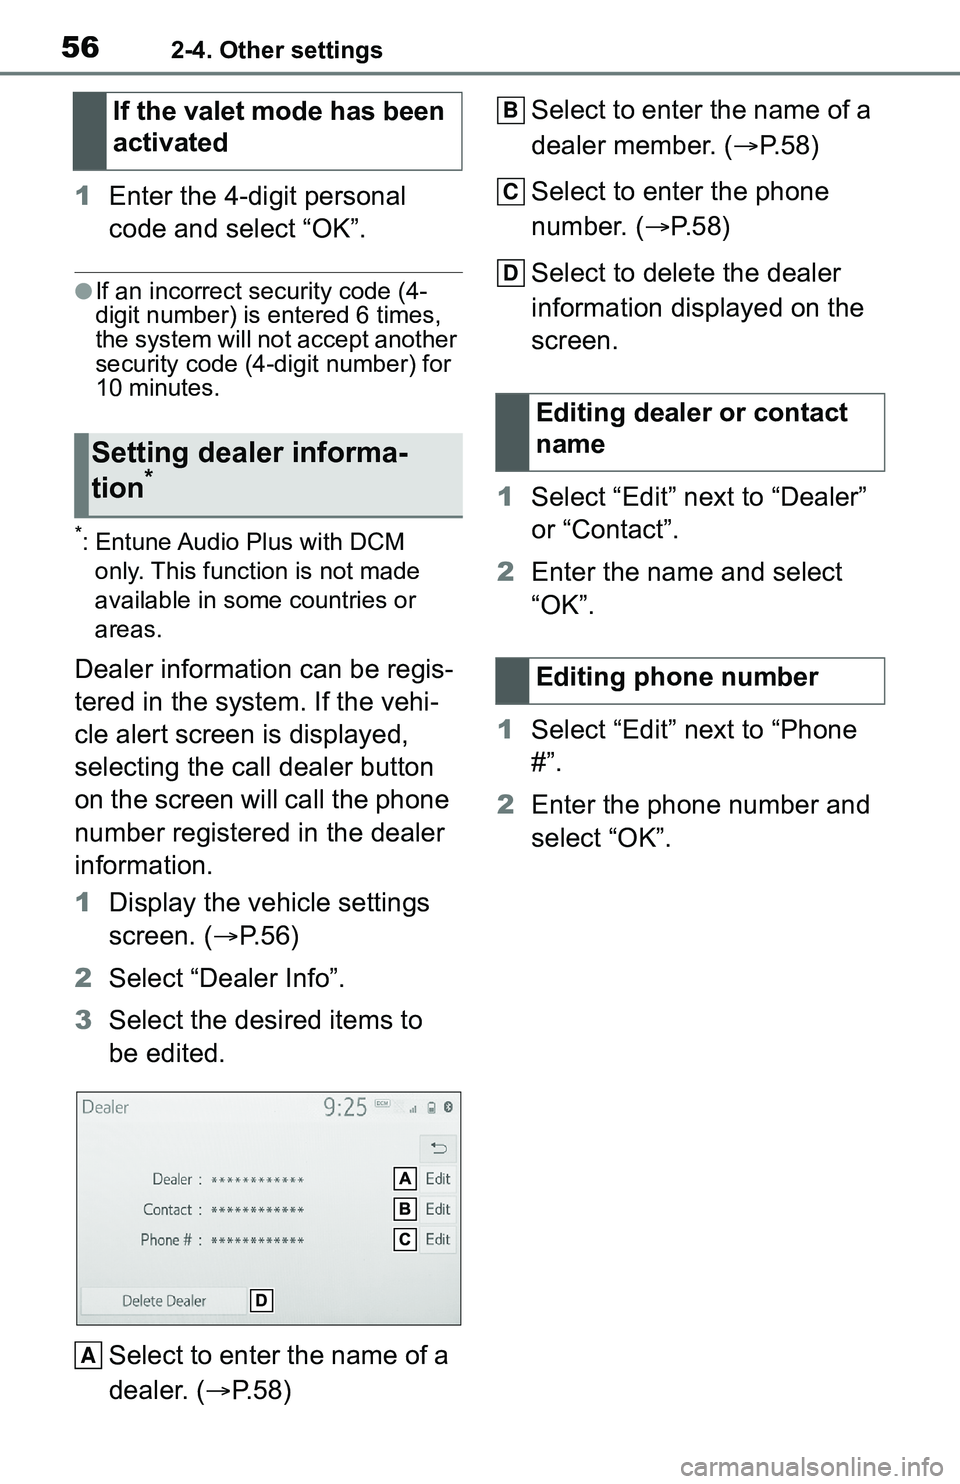
2 Select “Dealer Info”.
3 Select the desired items to
be edited.
Select to enter the name of a
dealer. ( P.58) Select to enter the name of a
dealer member. (
P.58)
Select to enter the phone
number. ( P.58)
Select to delete the dealer
information displayed on the
screen.
1 Select “Edit” next to “Dealer”
or “Contact”.
2 Enter the name and select
“OK”.
1 Select “Edit” next to “Phone
#”.
2 Enter the phone number and
select “OK”.
If the valet mode has been
activated
Setting dealer informa-
tion*
A
�(�G�L�W�L�Q�J���G�H�D�O�H�U���R�U���F�R�Q�W�D�F�W��
�Q�D�P�H
�(�G�L�W�L�Q�J���S�K�R�Q�H���Q�X�P�E�H�U
B
C
D
Page 59 of 172
59
3
3
Audio/visual system
Audio/visual system
3-1. Basic operationQuick reference.............. 60
Some basics .................. 61
3-2. Radio operation
AM/FM/SiriusXM
® Satellite
Radio ............................ 65
3-3. Media operation USB memory.................. 73
iPod/iPhone (Apple Car- Play) ............................. 75
Android Auto .................. 78
Bluetooth
® audio ............ 79
3-4. Audio/visual remote con- trols
Steering switches ........... 83
3-5. Setup Audio settings ................ 84
3-6. Tips for operating the audio/visual system
Operating information .... 86
Page 60 of 172
603-1. Basic operation
3-1.Basic operation
The audio control screen can be reached by the following methods:
From the “AUDIO” button
1 Press the “AUDIO” button.
From the “MENU” button
1 Press the “MENU” button, then select “Audio”.
Using the radio ( P. 6 5 )
Playing a USB memory ( P.73)
Playing an iPod/iPhone (Apple CarPlay
*) ( P. 7 5 )
Using the Android Auto
* ( P.78)
Playing a Bluetooth
® device ( P.79)
Using the steering wheel audio switches ( P.83)
Audio system settings ( P.84)
*: This function is not made availa ble in some countries or areas.
Quick reference
Functional overview
Page 61 of 172
613-1. Basic operation
3
Audio/visual system
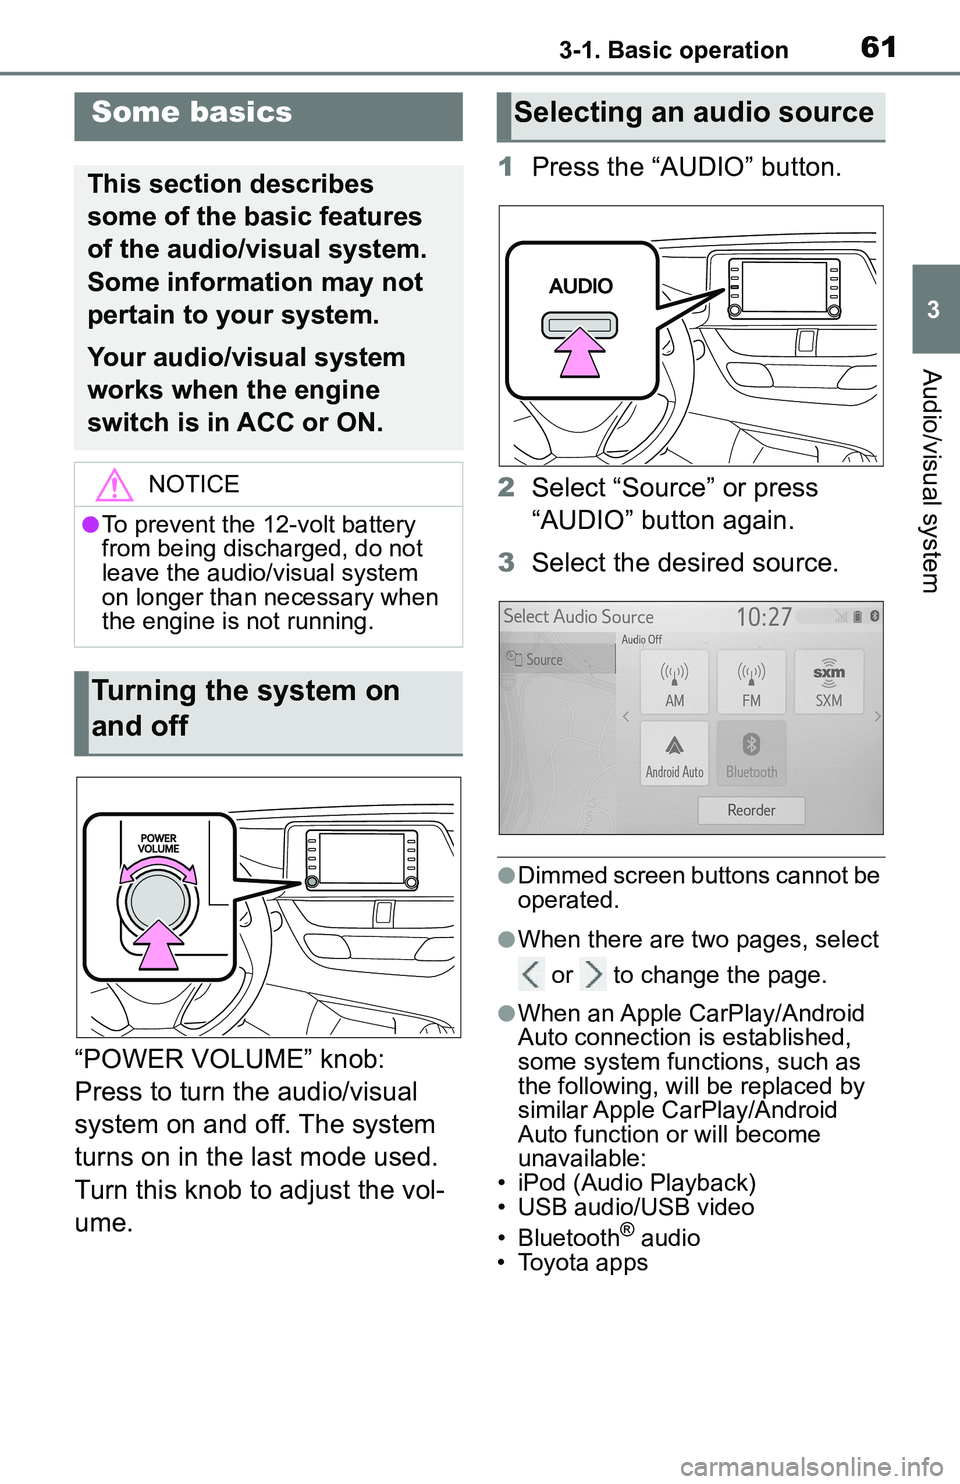
“POWER VOLUME” knob:
Press to turn the audio/visual
system on and off. The system
turns on in the last mode used.
Turn this knob to adjust the vol-
ume.1
Press the “AUDIO” button.
2 Select “Source” or press
“AUDIO” button again.
3 Select the desired source.
●Dimmed screen buttons cannot be
operated.
●When there are tw o pages, select
or to change the page.
●When an Apple CarPlay/Android
Auto connection is established,
some system functions, such as
the following, will be replaced by
similar Apple CarPlay/Android
Auto function or will become
unavailable:
• iPod (Audio Playback)
• USB audio/USB video
• Bluetooth
® audio
• Toyota apps
Some basics
This section describes
some of the basic features
of the audio/visual system.
Some information may not
pertain to your system.
Your audio/visual system
works when the engine
switch is in ACC or ON.
NOTICE
●To prevent the 12-volt battery
from being discharged, do not
leave the audio/visual system
on longer than necessary when
the engine is not running.
Turning the system on
and off
Selecting an audio source
Page 62 of 172
623-1. Basic operation
1Display the audio source
selection screen. ( P. 6 1 )
2 Select “Reorder”.
3 Select the desired audio
source then or to reor-
der.
4 Select “OK”.
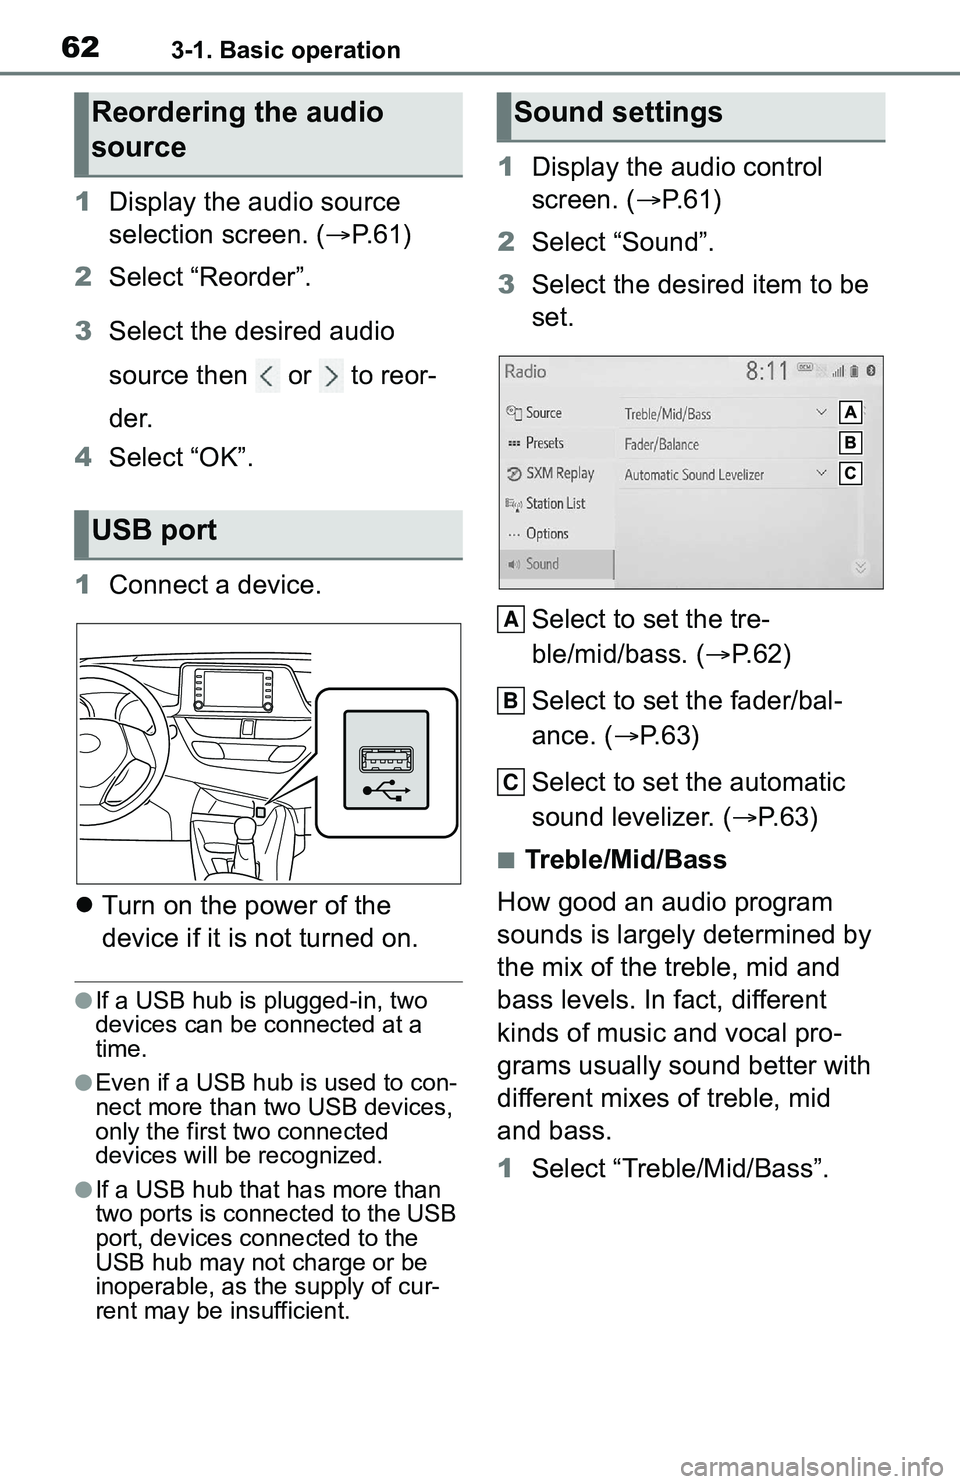
1 Connect a device.
Turn on the power of the
device if it is not turned on.
●If a USB hub is plugged-in, two
devices can be connected at a
time.
●Even if a USB hub is used to con-
nect more than two USB devices,
only the first two connected
devices will be recognized.
●If a USB hub that has more than
two ports is connected to the USB
port, devices connected to the
USB hub may not charge or be
inoperable, as the supply of cur-
rent may be insufficient.
1 Display the audio control
screen. ( P. 6 1 )
2 Select “Sound”.
3 Select the desired item to be
set.
Select to set the tre-
ble/mid/bass. ( P.62)
Select to set the fader/bal-
ance. ( P.63)
Select to set the automatic
sound levelizer. ( P.63)
■Treble/Mid/Bass
How good an audio program
sounds is largely determined by
the mix of the treble, mid and
bass levels. In fact, different
kinds of music and vocal pro-
grams usually sound better with
different mixes of treble, mid
and bass.
1 Select “Treble/Mid/Bass”.
Reordering the audio
source
USB port
Sound settings
A
B
C