Page 17 of 248

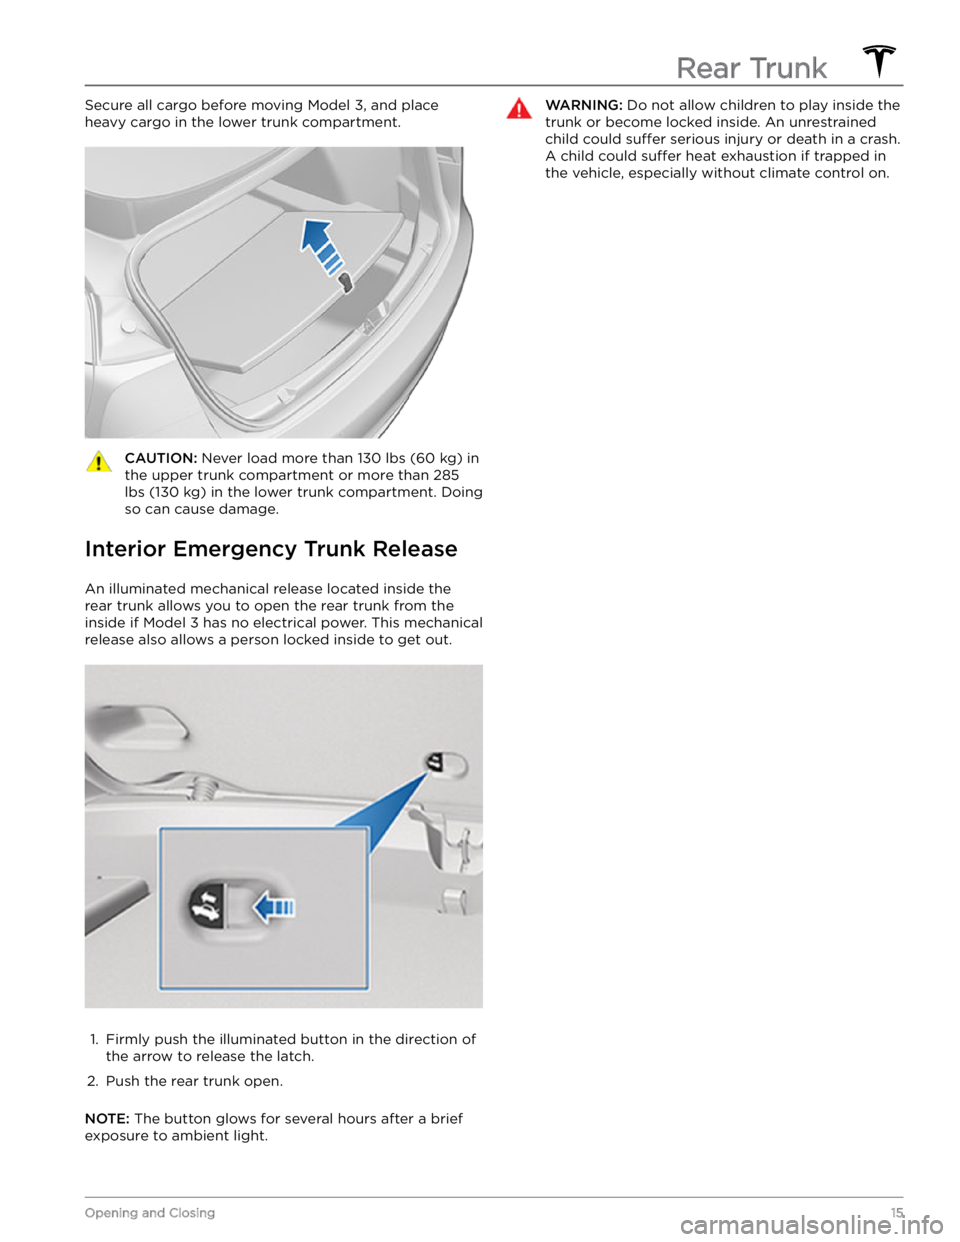
Secure all cargo before moving Model 3, and place
heavy cargo in the lower trunk compartment.CAUTION: Never load more than 130 lbs (60 kg) in
the upper trunk compartment or more than 285
lbs (130 kg) in the lower trunk compartment. Doing
so can cause damage.
Interior Emergency Trunk Release
An illuminated mechanical release located inside the rear trunk allows you to open the rear trunk from the inside if
Model 3 has no electrical power. This mechanical
release also allows a person locked inside to get out.
1.
Firmly push the illuminated button in the direction of the arrow to release the latch.
2.
Push the rear trunk open.
NOTE: The button glows for several hours after a brief
exposure to ambient light.
WARNING: Do not allow children to play inside the
trunk or become locked inside. An unrestrained
child could suffer serious injury or death in a crash.
A child could suffer heat exhaustion if trapped in
the vehicle, especially without climate control on.Rear Trunk
15Opening and Closing
Page 18 of 248
Opening
To open the front trunk, ensure the vehicle is in Park, and
then do one of the following before pulling the hood open:
Page 19 of 248

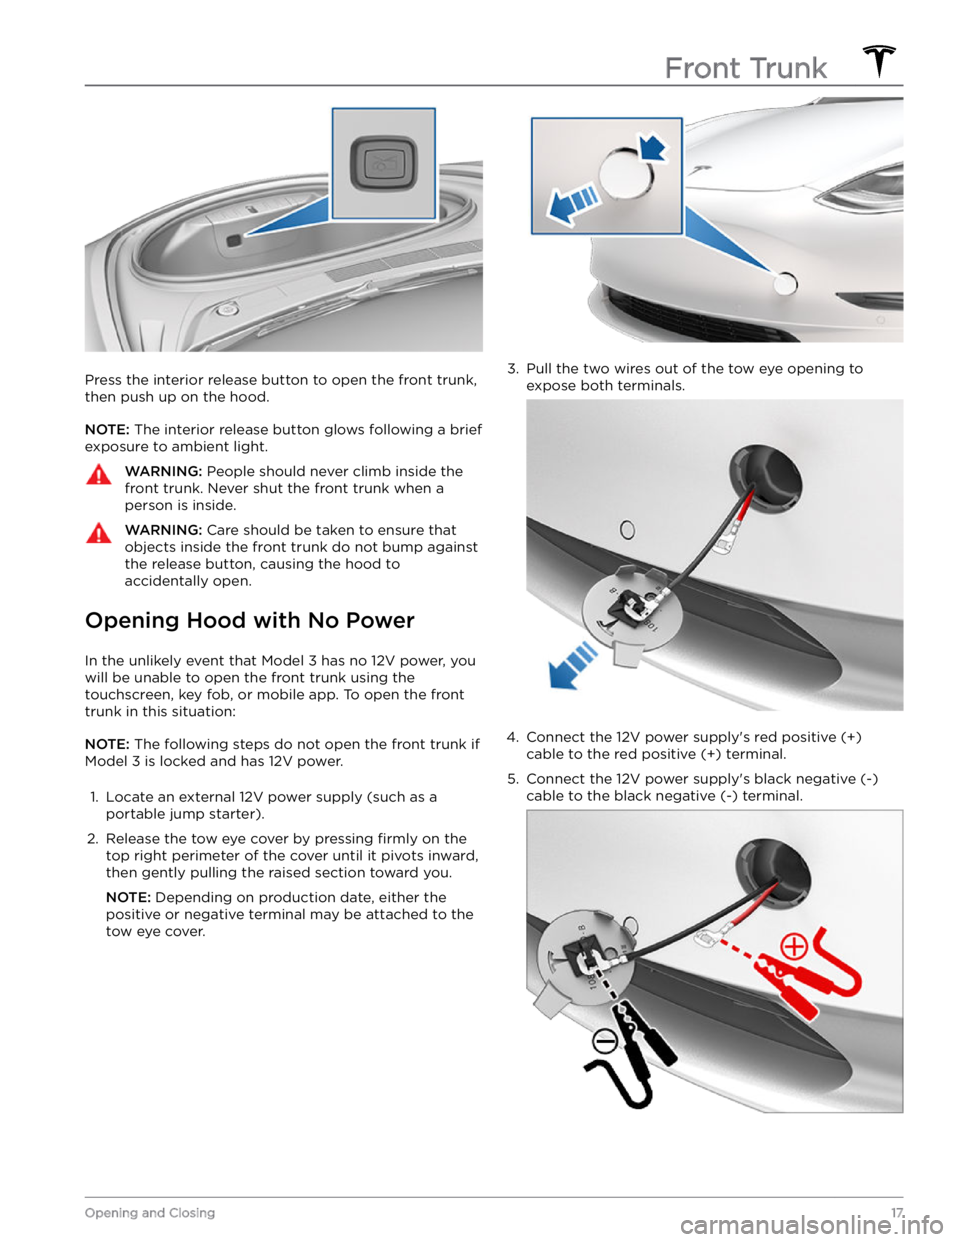
Press the interior release button to open the front trunk, then push up on the hood.
NOTE: The interior release button glows following a brief
exposure to ambient light.
WARNING: People should never climb inside the
front trunk. Never shut the front trunk when a
person is inside.
WARNING: Care should be taken to ensure that
objects inside the front trunk do not bump against
the release button, causing the hood to
accidentally open.
Opening Hood with No Power
In the unlikely event that Model 3 has no 12V power, you
will be unable to open the front trunk using the touchscreen, key fob, or mobile app. To open the front
trunk in this situation:
NOTE: The following steps do not open the front trunk if
Model 3 is locked and has 12V power.
1.
Locate an external 12V power supply (such as a
portable jump starter).
2.
Release the tow eye cover by pressing firmly on the
top right perimeter of the cover until it pivots inward, then gently pulling the raised section toward you.
NOTE: Depending on production date, either the
positive or negative terminal may be attached to the tow eye cover.
3.
Pull the two wires out of the tow eye opening to
expose both terminals.
4.
Connect the 12V power supply
Page 20 of 248
NOTE: Applying external 12V power to these
terminals only releases the hood latches. You cannot
charge the 12V battery using these terminals.6.
Turn on the external power supply (refer to the manufacturer
Page 21 of 248

Center Console
In addition to housing an RFID transmitter that reads key fobs and key cards (see
Key Card on page 7), the center
console includes cup holders, two storage
compartments, and
a wireless phone charger.
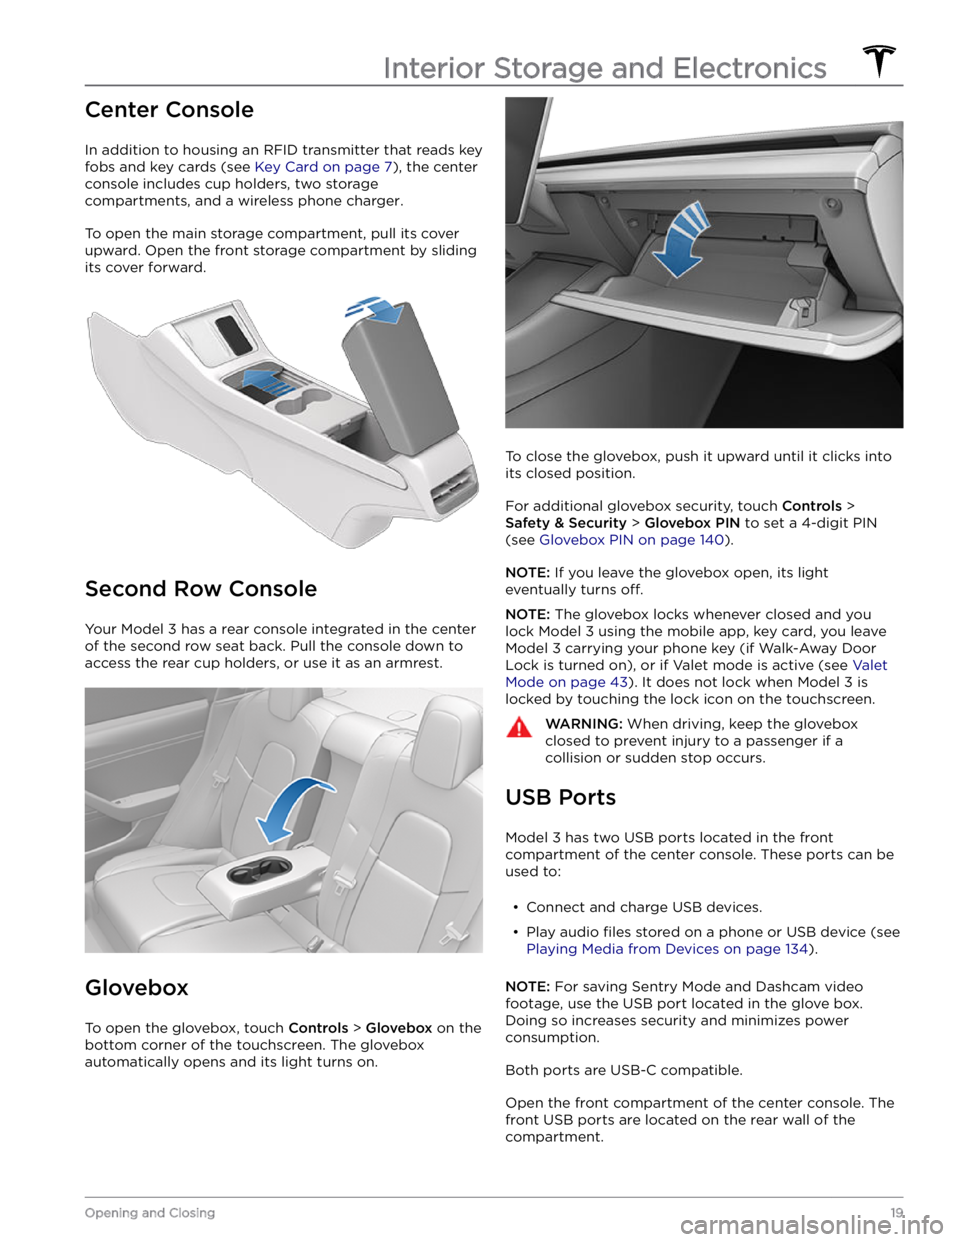
To open the main storage compartment, pull its cover upward. Open the front storage compartment by sliding its cover forward.
Second Row Console
Your Model 3 has a rear console integrated in the center
of the second row seat back. Pull the console down to
access the rear cup holders, or use it as an armrest.
Glovebox
To open the glovebox, touch Controls > Glovebox on the
bottom corner of the touchscreen. The glovebox automatically opens and its light turns on.
To close the glovebox, push it upward until it clicks into its closed position.
For additional glovebox security, touch Controls >
Safety & Security > Glovebox PIN to set a 4-digit PIN
(see
Glovebox PIN on page 140).
NOTE: If you leave the glovebox open, its light
eventually turns
off.
NOTE: The glovebox locks whenever closed and you
lock
Model 3 using the mobile app, key card, you leave
Model 3 carrying your phone key (if Walk-Away Door
Lock is turned on), or if Valet mode is active (see
Valet
Mode on page 43). It does not lock when Model 3 is
locked by touching the lock icon on the touchscreen.
WARNING: When driving, keep the glovebox
closed to prevent injury to a passenger if a
collision or sudden stop occurs.
USB Ports
Model 3 has two USB ports located in the front
compartment of the center console. These ports can be used to:
Page 22 of 248

A USB port is also located at the rear of the glovebox.
This USB-A port is equipped with a pre-formatted
flash
drive, ready to save videos when using features such as
Sentry Mode and Dashcam. Although not its primary
purpose, this port can also communicate with the
vehicle and can be used to charge a USB-connected device.
Two additional USB ports are located in the rear of the center console (on vehicles manufactured since approximately June 2020, these ports are USB-C). These
ports charge USB-connected devices but do not communicate with the vehicle.
NOTE: Power is available whenever the vehicle is
considered "awake". The vehicle may be awake for many
reasons. For example, when using features such as
Summon, or when features such as Preconditioning,
Keep Climate On, Dog Mode, Camp Mode,
Sentry Mode,
etc. are enabled. The vehicle is also awake whenever the 12V battery is being charged or is in use, during HV charging, when the vehicle is communicating with the mobile app, etc. Leaving an accessory plugged in does not deplete the 12V battery.
NOTE: Use USB 3.0 compliant cables to connect a
device to a USB port. Using non-compliant cables can result in slower charging, potential connection problems or degraded performance.
NOTE: Do not connect multiple devices using a USB
hub. This can prevent connected devices from charging or from being recognized by Media Player
, Sentry Mode,
Dashcam, etc.
Wireless Phone Charger
A wireless phone charger is integrated into the front
console to provide up to 15W of power to charge a Qi- enabled phone. Simply place your phone on the charger. Your device may feel warm while charging, but this is a normal
effect of inductive charging.
When placed on the wireless charger, your phone
charges whenever the vehicle is powered on (the
touchscreen is on and you are in the vehicle). Your phone will not charge after exiting the vehicle
unless a
feature (such as Sentry mode) is enabled and therefore
providing power to the USB ports (see Sentry Mode on
page 140). Model 3 will also not charge a phone if the
vehicle
Page 23 of 248
12V Power Socket
Your Model 3 has a power socket located in the center
console
Page 24 of 248
NOTE: Keep the camera lens clean and free of
obstructions. Remove any buildup of dirt or dust by occasionally wiping the camera lens with a soft damp
cloth.
CAUTION: Do not use chemical-based or abrasive
cleaners. Doing so can damage the surface of the
camera lens.
Interior Storage and Electronics
22MODEL 3 Owner