2021 RAM PROMASTER CITY key
[x] Cancel search: keyPage 123 of 280
MULTIMEDIA121
Siri® Eyes Free — If Equipped
When used with your Apple® iPhone®
connected to your vehicle, Siri lets you use your
voice to send text messages, select media,
place phone calls and much more. Siri uses
your natural language to understand what you
mean and responds back to confirm your
requests. The system is designed to keep your
eyes on the road and your hands on the wheel
by letting Siri help you perform useful tasks.
To enable Siri, push and hold, then release the
Uconnect Voice Recognition (VR) button on the
steering wheel. After you hear a double beep,
you can ask Siri to play podcasts and music, get
directions, read text messages, and many other
useful requests.
Bluetooth® Communication Link
Mobile phones may lose connection to the
Uconnect Phone. When this happens, the
connection can generally be re-established by
restarting the mobile phone. Your mobile phone
is recommended to remain in Bluetooth® ON
mode. Power-Up
After switching the ignition key from OFF to
either the ON/RUN or ACC position, or after a
language change, you must wait at least
15 seconds prior to using the system
Ú
page 265.
NAVIGATION MODE — IF EQUIPPED
Operating Navigation Mode — If Equipped
Planning A Route
Using the search bar provides a wide range of
ways to find places and then navigate to them.
You can search for your destination in different
ways:
A specific address
A partial address
A type of place
A zip code
A city to navigate to a city center
A Point of Interest (POI) near your current
location
Latitude and longitude coordinates Using Search
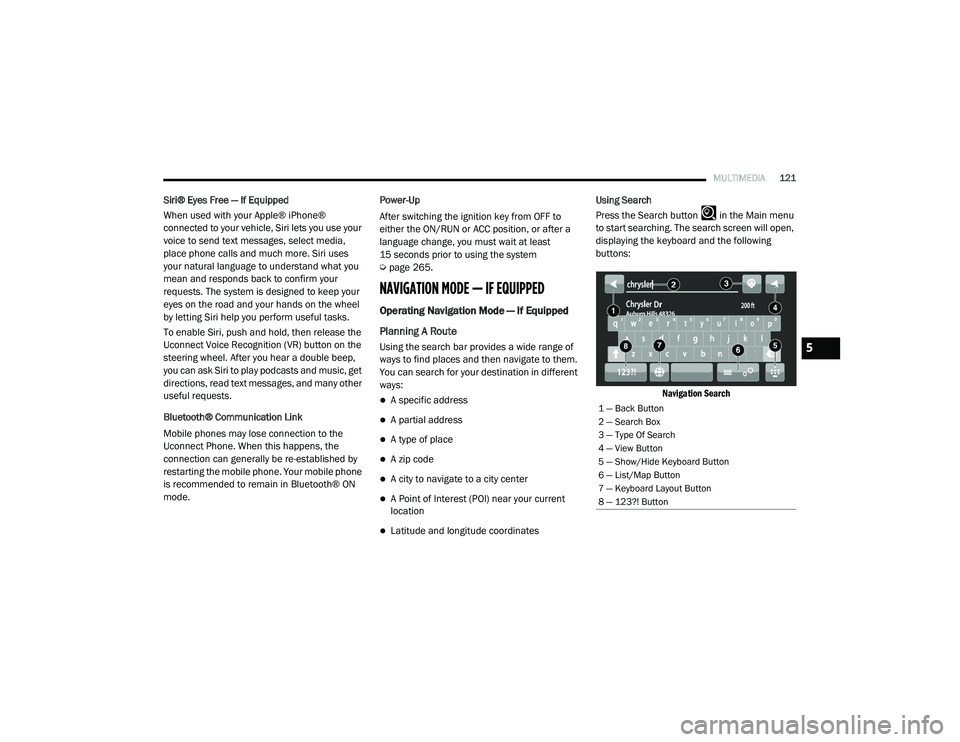
Press the Search button in the Main menu
to start searching. The search screen will open,
displaying the keyboard and the following
buttons:
Navigation Search
1 — Back Button
2 — Search Box
3 — Type Of Search
4 — View Button
5 — Show/Hide Keyboard Button
6 — List/Map Button
7 — Keyboard Layout Button
8 — 123?! Button
5
21_VM_OM_EN_USC_t.book Page 121
Page 124 of 280
122MULTIMEDIA
Feature Description
Back Button Press the Back button to return to the previous screen.
Search Box Enter your search term in the search input box. As you type, matching
addresses and Points of Interests (POI) are shown.
Type Of Search Press this button to change the type of search to any of the following:
Whole Map: Select this option to search your current map with no limit
to the search radius. Your current location is the center of the search.
The results are ranked by exact match.
Near Me: Select this option to search with your current GPS location as
the search center. The results are ranked by distance.
In Town or City: Select this option to use a town or city as the center of
your search. Enter the town or city name using the keyboard on the
touchscreen. When you have selected the town or city from the results
list, you can search for an address or POI in that city.
Along Route: When a route has been planned, you can select this option
to search along your route for a specific type of location, such as a POI
category. When prompted, enter the type of location and then select it
in the right-hand column to carry out the search.
Near Destination: When a route has been planned, you can select this
option to use your destination as the center of your search.
Latitude Longitude: Select this option to enter a pair of latitude and
longitude coordinates.
NOTE:
By default, the current map is searched. Once you have used search, the
last search type you selected is used.
21_VM_OM_EN_USC_t.book Page 122
Page 125 of 280
MULTIMEDIA123
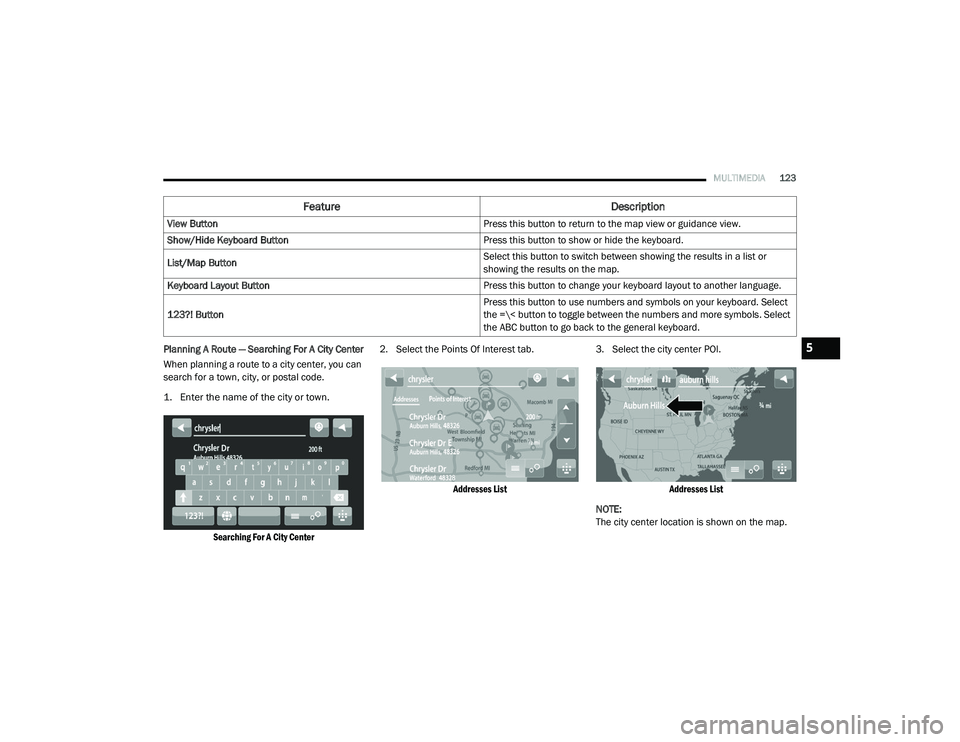
Planning A Route — Searching For A City Center
When planning a route to a city center, you can
search for a town, city, or postal code.
1. Enter the name of the city or town.
Searching For A City Center
2. Select the Points Of Interest tab.
Addresses List
3. Select the city center POI.
Addresses List
NOTE:
The city center location is shown on the map.
View Button
Press this button to return to the map view or guidance view.
Show/Hide Keyboard Button Press this button to show or hide the keyboard.
List/Map Button Select this button to switch between showing the results in a list or
showing the results on the map.
Keyboard Layout Button Press this button to change your keyboard layout to another language.
123?! Button Press this button to use numbers and symbols on your keyboard. Select
the =\< button to toggle between the numbers and more symbols. Select
the ABC button to go back to the general keyboard.
Feature
Description
5
21_VM_OM_EN_USC_t.book Page 123
Page 126 of 280
124MULTIMEDIA
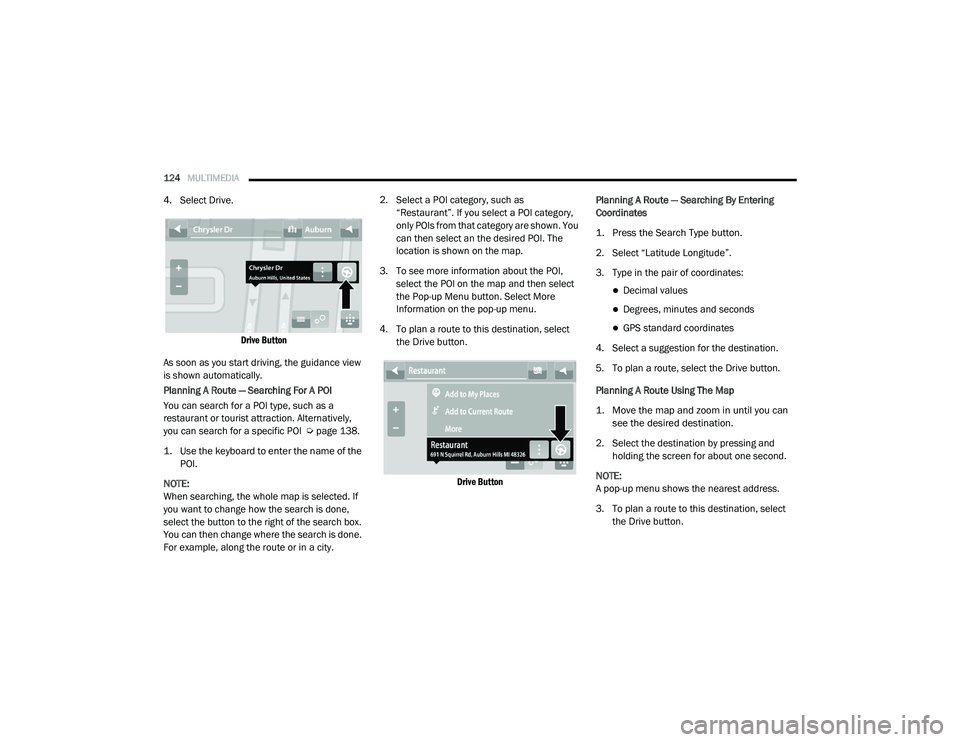
4. Select Drive.
Drive Button
As soon as you start driving, the guidance view
is shown automatically.
Planning A Route — Searching For A POI
You can search for a POI type, such as a
restaurant or tourist attraction. Alternatively,
you can search for a specific POI Ú page 138.
1. Use the keyboard to enter the name of the POI.
NOTE:
When searching, the whole map is selected. If
you want to change how the search is done,
select the button to the right of the search box.
You can then change where the search is done.
For example, along the route or in a city. 2. Select a POI category, such as
“Restaurant”. If you select a POI category,
only POIs from that category are shown. You
can then select an the desired POI. The
location is shown on the map.
3. To see more information about the POI, select the POI on the map and then select
the Pop-up Menu button. Select More
Information on the pop-up menu.
4. To plan a route to this destination, select the Drive button.
Drive Button
Planning A Route — Searching By Entering
Coordinates
1. Press the Search Type button.
2. Select “Latitude Longitude”.
3. Type in the pair of coordinates:
Decimal values
Degrees, minutes and seconds
GPS standard coordinates
4. Select a suggestion for the destination.
5. To plan a route, select the Drive button.
Planning A Route Using The Map
1. Move the map and zoom in until you can see the desired destination.
2. Select the destination by pressing and holding the screen for about one second.
NOTE:
A pop-up menu shows the nearest address.
3. To plan a route to this destination, select the Drive button.
21_VM_OM_EN_USC_t.book Page 124
Page 140 of 280
138MULTIMEDIA
Points Of Interest
About Points Of Interest
Points Of Interest (POI) are useful places on the
map.
Here are some examples:
Restaurants
Hotels
Museums
Parking lots
Gas stations
Emergency Services
Using POIs To Plan A Route
When you plan a route, you can use a POI for the
destination or as a stop along the route.
Using Search
1. Select “Search” on the Main Menu to begin a search. The search screen will open,
displaying the keyboard. Enter the name of
your desired destination. Your search
results will be displayed in two lists.
Addresses and city matches are shown in the list called “Addresses.” POIs, types of
POIs, and Places are shown in the list
called “Points of Interest.” You can also
select a POI category to only see POI
search results from that category.
2. Select the desired POI. The location will appear on the map. From here, you can
save the POI to “My Places,” use this POI as
a starting point, begin navigation to this
destination, or view more details about this
POI. By pressing “More Information,” you
can view the phone number and full
address of the POI.
3. If a route is already planned, you can add the location to your current route. To plan a
route to this destination, press the Drive
button on the touchscreen.
NOTE:
Your navigation system will calculate a route,
and guidance to your destination will begin.
Guidance view will begin as soon as you start
driving.
My Places
About My Places My Places provides an easy way to
select a location without the need to
enter the address or search for the
location. You can use My Places to
create a collection of useful or favorite
addresses.
The following items are always in My Places:
Home : Your home location can be your home
address or somewhere you often visit. This
feature provides an easy way to navigate
there.
Recent Destinations: Select this button to
select your destination from a list of locations
you have recently navigated to.
21_VM_OM_EN_USC_t.book Page 138
Page 142 of 280
140MULTIMEDIA
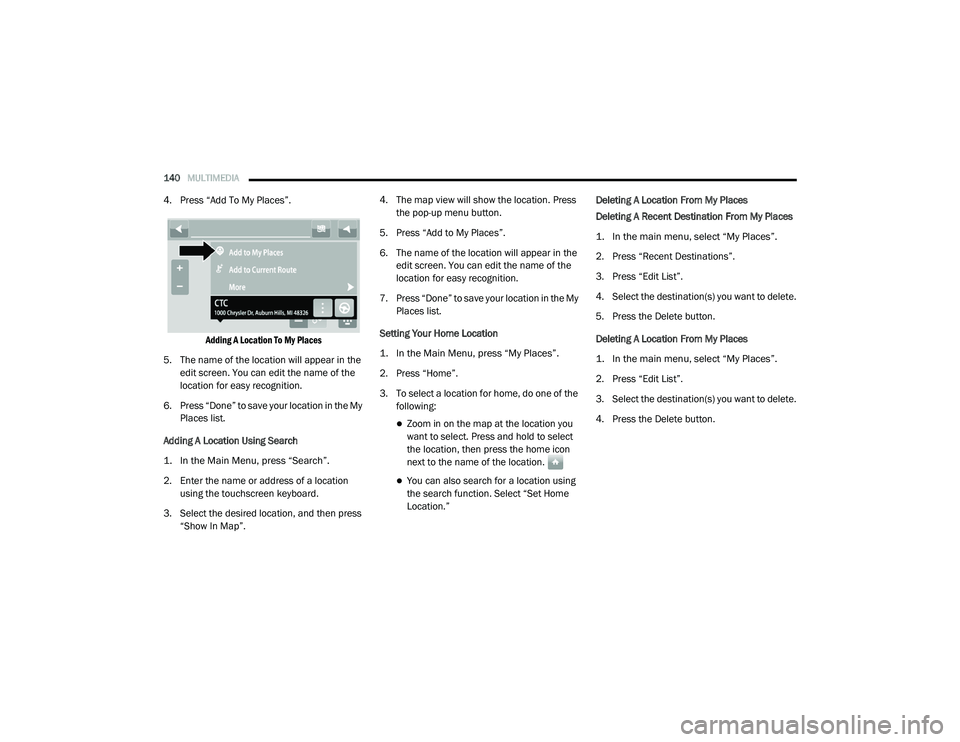
4. Press “Add To My Places”.
Adding A Location To My Places
5. The name of the location will appear in the edit screen. You can edit the name of the
location for easy recognition.
6. Press “Done” to save your location in the My Places list.
Adding A Location Using Search
1. In the Main Menu, press “Search”.
2. Enter the name or address of a location using the touchscreen keyboard.
3. Select the desired location, and then press “Show In Map”. 4. The map view will show the location. Press
the pop-up menu button.
5. Press “Add to My Places”.
6. The name of the location will appear in the edit screen. You can edit the name of the
location for easy recognition.
7. Press “Done” to save your location in the My Places list.
Setting Your Home Location
1. In the Main Menu, press “My Places”.
2. Press “Home”.
3. To select a location for home, do one of the following:
Zoom in on the map at the location you
want to select. Press and hold to select
the location, then press the home icon
next to the name of the location.
You can also search for a location using
the search function. Select “Set Home
Location.” Deleting A Location From My Places
Deleting A Recent Destination From My Places
1. In the main menu, select “My Places”.
2. Press “Recent Destinations”.
3. Press “Edit List”.
4. Select the destination(s) you want to delete.
5. Press the Delete button.
Deleting A Location From My Places
1. In the main menu, select “My Places”.
2. Press “Edit List”.
3. Select the destination(s) you want to delete.
4. Press the Delete button.
21_VM_OM_EN_USC_t.book Page 140
Page 154 of 280

152SAFETY
Check TPMS Warnings
The Tire Pressure Monitoring Warning Light will
flash on and off for 75 seconds and remain on
solid when a system fault is detected, an
audible chime will be activated and a proper
text message will be displayed. If the ignition
key is cycled, this sequence will repeat
providing the system fault still exists. The Tire
Pressure Monitoring Warning Light will turn off
when the fault condition no longer exists. A
system fault can occur with any of the following
scenarios:
1. Jamming due to electronic devices or
driving next to facilities emitting the same
radio frequencies as the TPM sensors.
2. Installing some form of aftermarket window tinting that affects radio wave signals.
3. Snow or ice around the wheels or wheel housings. 4. Using tire chains on the vehicle.
5. Using wheels/tires not equipped with TPM
sensors.
NOTE:
Your vehicle can be equipped with either a Tire
Service Kit, a compact spare tire or a regular
size spare tire (with or without original TPMS
sensor).
1. Tire Service Kit (original tire sealant – if equipped): After fixing the punctured tire
with original tire sealant, the original
situation will be restored, so system will
turn off the telltale during the normal drive.
2. Compact Spare Tire – if equipped: The compact spare wheel is not equipped with a
TPMS sensor. So when mounted, during the
normal drive the system will turn on the
telltale (flashing for approximately
75 seconds then remains solid). This
condition persists until a wheel equipped
with original TPMS sensor has been
mounted on the vehicle. 3. Regular size spare tire (not equipped with
TPMS sensor): When mounted, during the
normal drive the system will turn on the
telltale (flashing for approximately
75 seconds then remains solid). This
condition persists until a wheel equipped
with original TPMS sensor has been
mounted on the vehicle. Then the system
will be restored and the telltale will turn off
during the normal drive.
4. Regular size spare tire (equipped with TPMS sensor): When mounted, the telltale will
turn off during the normal drive.
5. In all the above cases, please check the replacement tire inflation pressure before
driving your vehicle.
6. In case of tire replacement, if the vehicle is driven for short periods of time, then the
system can take a while to be restored.
NOTE:
For a correct Tire Pressure Monitoring behavior,
please wait for about 20 minutes in key-off
during each tire substitution.
21_VM_OM_EN_USC_t.book Page 152
Page 170 of 280

168SAFETY
Enhanced Accident Response System
In the event of an impact, if the communication
network remains intact, and the power remains
intact, depending on the nature of the event,
the Occupant Restraint Controller (ORC) will
determine whether to have the Enhanced
Accident Response System perform the
following functions:
Cut off fuel to the engine (if equipped)
Cut off battery power to the electric motor (if
equipped)
Flash hazard lights as long as the battery has
power
Turn on the interior lights, which remain on
as long as the battery has power or for
15 minutes from the intervention of the
Enhanced Accident Response System
Unlock the power door locks
Your vehicle may also be designed to perform
any of these other functions in response to the
Enhanced Accident Response System:
Turn off the Fuel Filter Heater, Turn off the
HVAC Blower Motor, Close the HVAC Circula -
tion Door
Cut off battery power to the:
Engine
Electric Motor (if equipped)
Electric Power Steering
Brake booster
Electric park brake
Automatic transmission gear selector
Horn
Front wiper
Headlamp washer pump
NOTE:
After an accident, remember to cycle the igni -
tion to the STOP/OFF position and remove the
key from the ignition switch to avoid draining
the battery. Carefully check the vehicle for fuel
leaks in the engine compartment and on the
ground near the engine compartment and fuel
tank before resetting the system and starting
the engine. If there are no fuel leaks or damage
to the vehicle electrical devices (e.g. headlights)
after an accident, reset the system by following
the procedure described below. If you have any
doubt, contact an authorized dealer.
Enhanced Accident Response System Reset
Procedure
In order to reset the Enhanced Accident
Response System functions after an event, the
ignition switch must be changed from ignition
AVV/START or MAR/RUN to ignition STOP/OFF.
Carefully check the vehicle for fuel leaks in the
engine compartment and on the ground near
the engine compartment and fuel tank before
resetting the system and starting the engine.
After a crash, if the vehicle will not start after
performing the reset procedure, the vehicle
must be towed to an authorized dealer to be
inspected and to have the Enhanced Accident
Response System reset.
21_VM_OM_EN_USC_t.book Page 168