2021 RAM PROMASTER CITY spare wheel
[x] Cancel search: spare wheelPage 199 of 280
IN CASE OF EMERGENCY197
(Continued)
Jacking Instructions
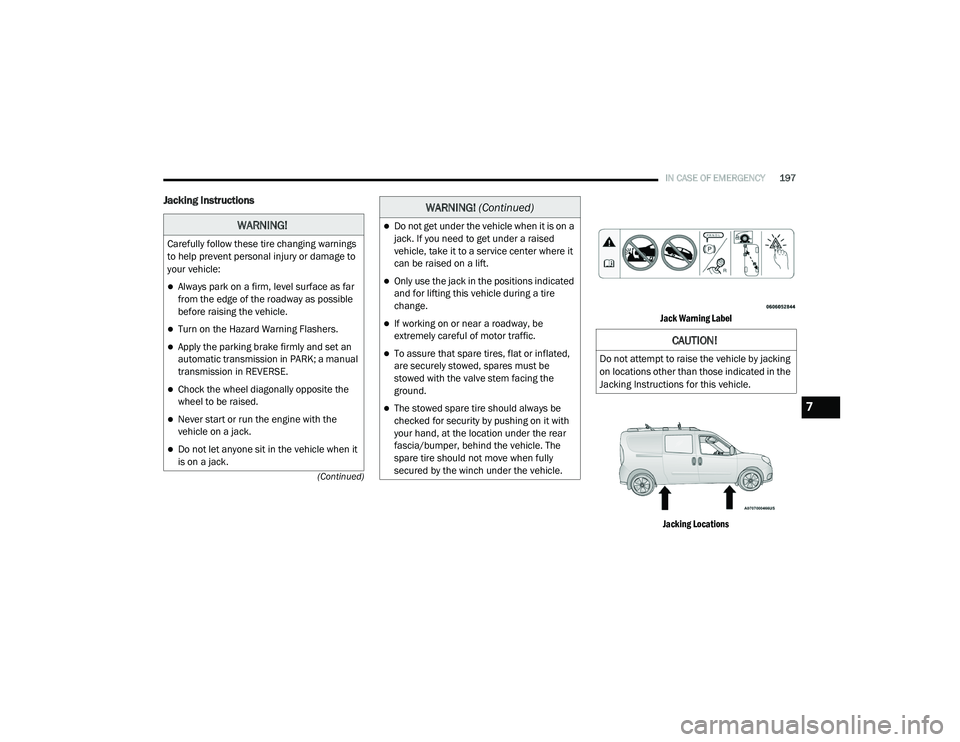
Jack Warning Label Jacking Locations
WARNING!
Carefully follow these tire changing warnings
to help prevent personal injury or damage to
your vehicle:
Always park on a firm, level surface as far
from the edge of the roadway as possible
before raising the vehicle.
Turn on the Hazard Warning Flashers.
Apply the parking brake firmly and set an
automatic transmission in PARK; a manual
transmission in REVERSE.
Chock the wheel diagonally opposite the
wheel to be raised.
Never start or run the engine with the
vehicle on a jack.
Do not let anyone sit in the vehicle when it
is on a jack.
Do not get under the vehicle when it is on a
jack. If you need to get under a raised
vehicle, take it to a service center where it
can be raised on a lift.
Only use the jack in the positions indicated
and for lifting this vehicle during a tire
change.
If working on or near a roadway, be
extremely careful of motor traffic.
To assure that spare tires, flat or inflated,
are securely stowed, spares must be
stowed with the valve stem facing the
ground.
The stowed spare tire should always be
checked for security by pushing on it with
your hand, at the location under the rear
fascia/bumper, behind the vehicle. The
spare tire should not move when fully
secured by the winch under the vehicle.
WARNING! (Continued)
CAUTION!
Do not attempt to raise the vehicle by jacking
on locations other than those indicated in the
Jacking Instructions for this vehicle.
7
21_VM_OM_EN_USC_t.book Page 197
Page 201 of 280
IN CASE OF EMERGENCY199
3. Turn the handle on the jack screw to the
right until the jack head is properly engaged
in the described location. Do not raise the
vehicle until you are sure the jack is
securely engaged.
4. Raise the vehicle by turning the jack screw to the right until the tire just clears the
surface and enough clearance is obtained
to install the spare tire. Minimum tire lift
provides maximum stability.
5. Remove the wheel lug bolts. For vehicles with wheel covers, remove the cover from
the wheel by hand. Do not pry the wheel
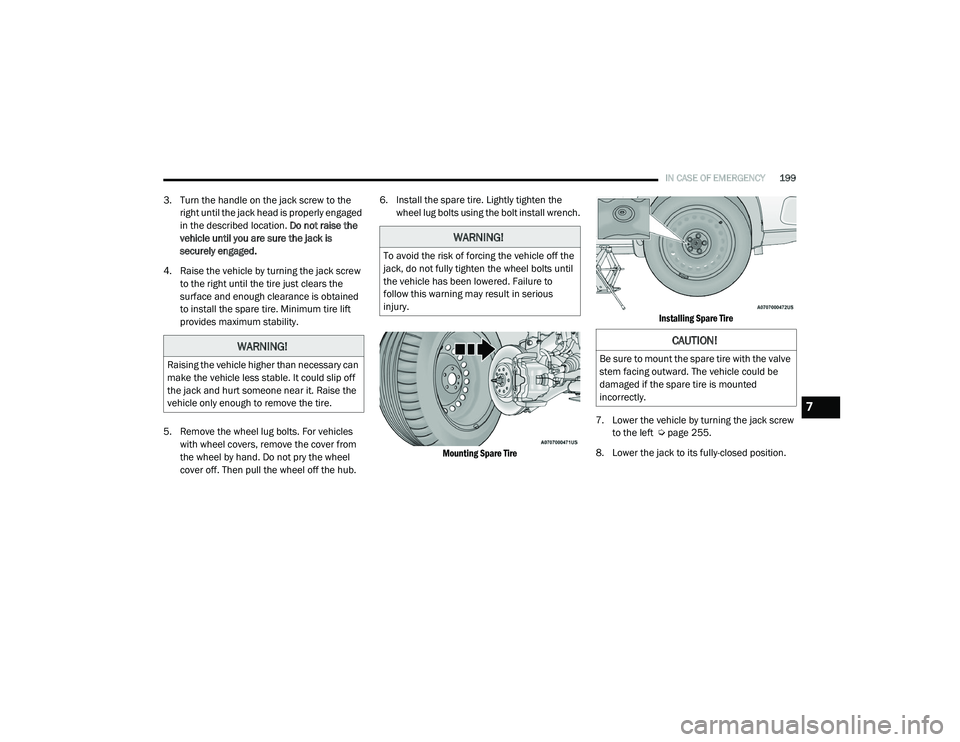
cover off. Then pull the wheel off the hub. 6. Install the spare tire. Lightly tighten the
wheel lug bolts using the bolt install wrench.
Mounting Spare Tire Installing Spare Tire
7. Lower the vehicle by turning the jack screw to the left Ú page 255.
8. Lower the jack to its fully-closed position.
WARNING!
Raising the vehicle higher than necessary can
make the vehicle less stable. It could slip off
the jack and hurt someone near it. Raise the
vehicle only enough to remove the tire.
WARNING!
To avoid the risk of forcing the vehicle off the
jack, do not fully tighten the wheel bolts until
the vehicle has been lowered. Failure to
follow this warning may result in serious
injury.
CAUTION!
Be sure to mount the spare tire with the valve
stem facing outward. The vehicle could be
damaged if the spare tire is mounted
incorrectly.
7
21_VM_OM_EN_USC_t.book Page 199
Page 202 of 280
200IN CASE OF EMERGENCY
9. Stow the cable and wheel spacer before
driving the vehicle Ú page 200.
10. Stow the jack and tools under the driver’s seat.
11. Check the spare tire pressure as soon as possible. Correct the tire pressure, as
required.
12. When you place the spare tire back on the winch or if you carry the tire in need of repair
on the winch, always check that the tire is
properly secured under the vehicle by
pushing on the stowed tire under the rear
fascia/bumper at the back of the vehicle. If
the tire has motion when pushed, use the
tools to re-tighten the winch until a loud
click is heard.
Vehicles With Alloy Wheels
For stowing a damaged tire on vehicles with
alloy wheels, remove the adapter bracket and
bolts from the storage bag in the glove
compartment and follow the steps below:
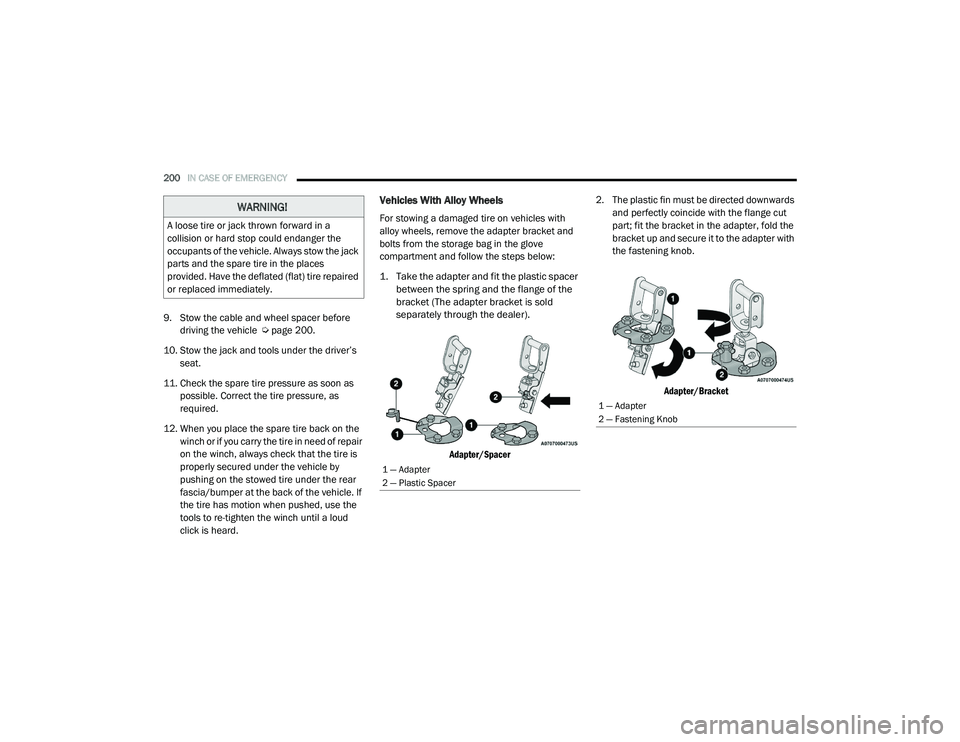
1. Take the adapter and fit the plastic spacer between the spring and the flange of the
bracket (The adapter bracket is sold
separately through the dealer).
Adapter/Spacer
2. The plastic fin must be directed downwards
and perfectly coincide with the flange cut
part; fit the bracket in the adapter, fold the
bracket up and secure it to the adapter with
the fastening knob.
Adapter/Bracket
WARNING!
A loose tire or jack thrown forward in a
collision or hard stop could endanger the
occupants of the vehicle. Always stow the jack
parts and the spare tire in the places
provided. Have the deflated (flat) tire repaired
or replaced immediately.
1 — Adapter
2 — Plastic Spacer
1 — Adapter
2 — Fastening Knob
21_VM_OM_EN_USC_t.book Page 200
Page 247 of 280
SERVICING AND MAINTENANCE245
(Continued)
Life Of Tire
The service life of a tire is dependent upon
varying factors including, but not limited to:
Driving style.
Tire pressure - Improper cold tire inflation
pressures can cause uneven wear patterns
to develop across the tire tread. These
abnormal wear patterns will reduce tread life,
resulting in the need for earlier tire replace -
ment.
Distance driven.
Performance tires, tires with a speed rating of
V or higher, and Summer tires typically have
a reduced tread life. Rotation of these tires
per the vehicle scheduled maintenance is
highly recommended. NOTE:
Wheel valve stem must be replaced as well
when installing new tires due to wear and tear
in existing tires.
Keep dismounted tires in a cool, dry place with
as little exposure to light as possible. Protect
tires from contact with oil, grease, and gasoline.
Replacement Tires
The tires on your new vehicle provide a balance
of many characteristics. They should be
inspected regularly for wear and correct cold
tire inflation pressures. FCA strongly
recommends that you use tires equivalent to
the originals in size, quality and performance
when replacement is needed Ú
page 244.
Refer to the Tire and Loading Information
placard or the Vehicle Certification Label for the
size designation of your tire. The Load Index and
Speed Symbol for your tire will be found on the
original equipment tire sidewall.
For more information relating to the Load Index
and Speed Symbol of a tire Ú page 235.
It is recommended to replace the two front tires
or two rear tires as a pair. Replacing just one tire
can seriously affect your vehicle’s handling. If you ever replace a wheel, make sure that the
wheel’s specifications match those of the
original wheels.
It is recommended you contact an authorized
tire dealer or original equipment dealer with any
questions you may have on tire specifications or
capability. Failure to use equivalent
replacement tires may adversely affect the
safety, handling, and ride of your vehicle.
WARNING!
Tires and the spare tire should be replaced
after six years, regardless of the remaining
tread. Failure to follow this warning can result
in sudden tire failure. You could lose control
and have a collision resulting in serious injury
or death.
WARNING!
Do not use a tire, wheel size, load rating, or
speed rating other than that specified for
your vehicle. Some combinations of unap
-
proved tires and wheels may change
suspension dimensions and performance
characteristics, resulting in changes to
steering, handling, and braking of your
vehicle. This can cause unpredictable
handling and stress to steering and
suspension components. You could lose
control and have a collision resulting in
serious injury or death. Use only the tire and
wheel sizes with load ratings approved for
your vehicle.
8
21_VM_OM_EN_USC_t.book Page 245
Page 249 of 280
SERVICING AND MAINTENANCE247
Spare Tires — If Equipped
NOTE:
For vehicles equipped with Tire Service Kit
instead of a spare tire Úpage 202.
For restrictions when towing with a spare tire
designated for temporary emergency use
Ú page 80.
Spare Tire Matching Original Equipped Tire
And Wheel — If Equipped
Your vehicle may be equipped with a spare tire
and wheel equivalent in look and function to the
original equipment tire and wheel found on the
front or rear axle of your vehicle. This spare tire
may be used in the tire rotation for your vehicle.
If your vehicle has this option, refer to an
authorized tire dealer for the recommended tire
rotation pattern.
Compact Spare Tire — If Equipped
The compact spare is for temporary emergency
use only. You can identify if your vehicle is
equipped with a compact spare by looking at
the spare tire description on the Tire and
Loading Information Placard located on the
driver’s side door opening or on the sidewall of
the tire. Compact spare tire descriptions begin
with the letter “T” or “S” preceding the size
designation. Example: T145/80D18 103M.
T, S = Temporary Spare Tire
Since this tire has limited tread life, the original
equipment tire should be repaired (or replaced)
and reinstalled on your vehicle at the first
opportunity.
Do not install a wheel cover or attempt to mount
a conventional tire on the compact spare wheel,
since the wheel is designed specifically for the
compact spare tire. Do not install more than
one compact spare tire and wheel on the
vehicle at any given time.
Collapsible Spare Tire — If Equipped
The collapsible spare is for temporary
emergency use only. You can identify if your
vehicle is equipped with a collapsible spare by
looking at the spare tire description on the Tire
and Loading Information Placard located on the
driver’s side door opening or on the sidewall of
the tire.
Collapsible spare tire description example:
165/80-17 101P.
CAUTION!
Because of the reduced ground clearance, do
not take your vehicle through an automatic
car wash with a compact or limited use
temporary spare installed. Damage to the
vehicle may result.
WARNING!
Compact and collapsible spares are for
temporary emergency use only. With these
spares, do not drive more than 50 mph
(80 km/h). Temporary use spares have
limited tread life. When the tread is worn to
the tread wear indicators, the temporary use
spare tire needs to be replaced. Be sure to
follow the warnings, which apply to your
spare. Failure to do so could result in spare
tire failure and loss of vehicle control.
8
21_VM_OM_EN_USC_t.book Page 247
Page 250 of 280
248SERVICING AND MAINTENANCE
Since this tire has limited tread life, the original
equipment tire should be repaired (or replaced)
and reinstalled on your vehicle at the first
opportunity.
Inflate collapsible tire only after the wheel is
properly installed to the vehicle. Inflate the
collapsible tire using the electric air pump
before lowering the vehicle.
Do not install a wheel cover or attempt to mount
a conventional tire on the collapsible spare
wheel, since the wheel is designed specifically
for the collapsible spare tire.Full Size Spare — If Equipped
The full size spare is for temporary emergency
use only. This tire may look like the originally
equipped tire on the front or rear axle of your
vehicle, but it is not. This spare tire may have
limited tread life. When the tread is worn to the
tread wear indicators, the temporary use full
size spare tire needs to be replaced. Since it is
not the same as your original equipment tire,
replace (or repair) the original equipment tire
and reinstall on the vehicle at the first
opportunity.
Limited Use Spare — If Equipped
The limited use spare tire is for temporary
emergency use only. This tire is identified by a
label located on the limited use spare wheel.
This label contains the driving limitations for
this spare. This tire may look like the original
equipped tire on the front or rear axle of your
vehicle, but it is not. Installation of this limited
use spare tire affects vehicle handling. Since it
is not the same as your original equipment tire,
replace (or repair) the original equipment tire
and reinstall on the vehicle at the first
opportunity.
Wheel And Wheel Trim Care
All wheels and wheel trim, especially aluminum
and chrome plated wheels, should be cleaned
regularly using mild (neutral Ph) soap and water
to maintain their luster and to prevent
corrosion. Wash wheels with the same soap
solution recommended for the body of the
vehicle and remember to always wash when the
surfaces are not hot to the touch.
WARNING!
Compact and Collapsible spares are for
temporary emergency use only. With these
spares, do not drive more than 50 mph
(80 km/h). Temporary use spares have
limited tread life. When the tread is worn to
the tread wear indicators, the temporary use
spare tire needs to be replaced. Be sure to
follow the warnings, which apply to your
spare. Failure to do so could result in spare
tire failure and loss of vehicle control.
WARNING!
Limited use spares are for emergency use
only. Installation of this limited use spare tire
affects vehicle handling. With this tire, do not
drive more than the speed listed on the
limited use spare wheel. Keep inflated to the
cold tire inflation pressures listed on your Tire
and Loading Information Placard located on
the driver’s side B-Pillar or the rear edge of
the driver’s side door. Replace (or repair) the
original equipment tire at the first opportunity
and reinstall it on your vehicle. Failure to do
so could result in loss of vehicle control.
21_VM_OM_EN_USC_t.book Page 248
Page 269 of 280

267
C
Camera, Rear
.................................................. 73Capacities, Fluid............................................ 259Caps, Filler Fuel............................................................. 74Oil (Engine)................................................ 221Power Steering............................................ 68Radiator (Coolant Pressure)...................... 229Car Washes................................................... 252Carbon Monoxide Warning.................. 185, 258Cargo Area Cover............................................. 38Cargo Compartment........................................ 38Cargo Tie-Downs.............................................. 38Cellular Phone............................................... 143Certification Label........................................... 75Chains, Tire.................................................... 249Changing A Flat Tire....................................... 194Chart, Tire Sizing............................................ 235Check Engine Light (Malfunction Indicator
Light)............................................................... 57Checking Your Vehicle For Safety.................. 185Checks, Safety............................................... 185Child Restraint............................................... 170Child RestraintsBooster Seats............................................ 173Child Seat Installation..................... 180, 183How To Stow An unused ALR Seat Belt..... 178Infant And Child Restraints....................... 171
Locating The LATCH Anchorages.............. 177Lower Anchors And Tethers For Children.. 175Older Children And Child Restraints......... 172Seating Positions...................................... 174Clean Air Gasoline......................................... 256CleaningWheels..................................................... 248Climate Control................................................ 31Cold Weather Operation.................................. 58Compact Spare Tire...................................... 247Contract, Service.......................................... 263Cooling Pressure Cap (Radiator Cap)............ 229Cooling System............................................. 227Adding Coolant (Antifreeze)...................... 228Coolant Level............................................ 230Cooling Capacity....................................... 259Disposal Of Used Coolant......................... 229Drain, Flush, And Refill............................. 228Inspection........................................ 228, 230Points To Remember................................ 230Pressure Cap............................................ 229Radiator Cap............................................ 229Selection Of Coolant (Antifreeze)..... 228, 259Corrosion Protection..................................... 252Cruise Light...................................................... 55Customer Assistance.................................... 262Customer Programmable Features.................. 87Cybersecurity................................................... 86
D
Dealer Service............................................... 223Defroster, Windshield................................... 186Deleting A Phone........................................... 114Diagnostic System, Onboard............................56DipsticksOil (Engine)............................................... 222Power Steering............................................68Disable Vehicle Towing................................. 211Disconnecting............................................... 114DisposalAntifreeze (Engine Coolant)...................... 229Disturb.......................................................... 117Door Ajar..........................................................51Door Ajar Light.................................................51Door Locks.......................................................14Doors...............................................................14Driver’s Seat Back Tilt......................................17DrivingThrough Flowing, Rising, Or Shallow Standing Water
.......................................84
E
Electric Brake Control System....................... 146Electric Remote Mirrors...................................26Electrical Outlet, Auxiliary (Power Outlet).........40Electronic Range Select (ERS).........................67Electronic Stability Control (ESC)................... 14611
21_VM_OM_EN_USC_t.book Page 267
Page 273 of 280

271
Replacement Keys
........................................... 11Replacement Tires......................................... 245Reporting Safety Defects............................... 264Restraints, Child............................................ 170Restraints, Head.............................................. 21Rotation, Tires............................................... 250
S
Safety Checks Inside Vehicle......................... 185Safety Checks Outside Vehicle...................... 187Safety Defects, Reporting.............................. 264Safety Information, Tire................................. 234Safety Tips..................................................... 185Safety, Exhaust Gas....................................... 185Satellite Radio............................................... 101Schedule, Maintenance................................. 217Seat Belts............................................ 154, 185Adjustable Shoulder Belt........................... 157Adjustable Upper Shoulder Anchorage...... 157Adjustable Upper Shoulder Belt Anchorage............................................. 157Child Restraints......................................... 170Energy Management Feature.................... 159Front Seat.............................. 154, 155, 156Inspection................................................. 185Lap/Shoulder Belt Operation.................... 156Lap/Shoulder Belt Untwisting...................157Lap/Shoulder Belts................................... 155Operating Instructions............................... 156Pregnant Women...................................... 159
Pretensioners........................................... 159Rear Seat................................................. 155Reminder............................................52, 154Seat Belt Pretensioner............................. 159Untwisting Procedure............................... 157Seats............................................................... 17Adjustment.................................................. 17Heated......................................................... 20Rear Folding................................................ 17Tilting........................................................... 17Security System............................................... 13Selection Of Coolant (Antifreeze).................. 259Sentry Key (Immobilizer).................................. 12Service Assistance........................................ 262Service Contract........................................... 263Service Manuals........................................... 264Settings, Audio.............................................. 105Shift Lever Override...................................... 209ShiftingAutomatic Transmission.............................. 63Shoulder Belts.............................................. 155Signals, Turn...........................................55, 187Sirius Satellite Radio..................................... 101Favorites................................................... 104Replay...................................................... 102SiriusXM Satellite RadioBrowse in SXM......................................... 104Favorites................................................... 104Replay...................................................... 102Snow Chains (Tire Chains)............................ 249
Snow Tires.................................................... 246Spare Tires........................................... 247, 248Spark Plugs................................................... 259SpecificationsFuel (Gasoline).......................................... 259Oil............................................................. 259Speed ControlCancel..........................................................70Speed Control (Cruise Control).........................68Starting............................................................58Automatic Transmission..............................58Cold Weather...............................................58Engine Fails To Start....................................59Steering...........................................................23Power....................................................67, 68Tilt Column...................................................23Wheel, Tilt....................................................23Steering Wheel Audio Controls...................... 142Steering Wheel Mounted Sound System
Controls........................................................ 142Storage............................................................38Storage, Vehicle..................................... 33, 251Storing Your Vehicle...................................... 251Sun Visor Extension.........................................27Sway Control, Trailer..................................... 149Synthetic Engine Oil...................................... 224
11
21_VM_OM_EN_USC_t.book Page 271