2021 PEUGEOT PARTNER wheel
[x] Cancel search: wheelPage 157 of 260

155
In the event of a breakdown
8► With a steel wheel, remove the wheel trim
using tool 7
.
►
With an alloy wheel, remove the cap from
each of the bolts using tool 7
.
►
If the vehicle is so equipped, fit security bolt
socket
8 to wheelbrace 5 to slacken the security
bolt.
►
Slacken
(without removing) the other wheel
bolts using just wheelbrace 5.
Wheel with wheel trim
When removing the wheel, first remove
the wheel trim by pulling at the valve aperture
using the wheelbrace.
► Place the foot of the jack on the ground and
ensure that it is directly below the A
or B jacking
point provided on the underbody, whichever is
closest to the wheel to be changed.
► Extend jack 6 until its head comes into
contact with jacking point A or B, whichever is
used; the contact surface A or B of the vehicle
must be correctly engaged with the central part
of the head of the jack.
►
Raise the vehicle until there is sufficient
space between the wheel and the ground to
admit the spare (not punctured) wheel easily
.
Risk of injury!
Ensure that the jack is stable. If the
ground is slippery or loose, the jack may slip
or collapse.
Ensure that the jack is positioned strictly at
one of the jacking points A or B under the
vehicle, making sure that the vehicle's contact
surface is correctly centred on the head of the
jack. Otherwise, there is a risk of damage to
the vehicle and/or of the jack collapsing.
► Remove the bolts and store them in a clean
place.
►
Remove the wheel.
Page 158 of 260

156
In the event of a breakdown
Fitting a wheel
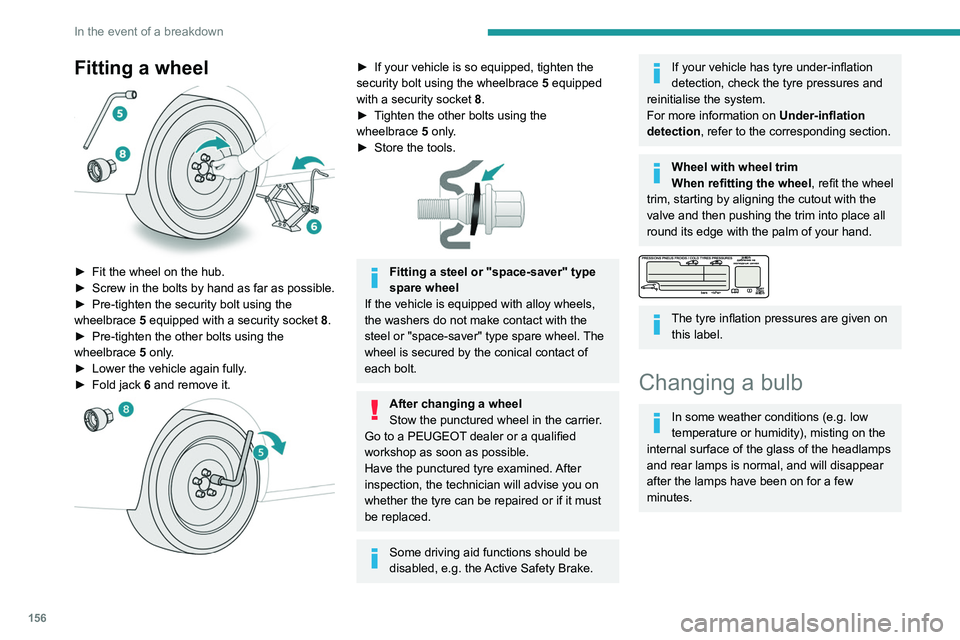
► Fit the wheel on the hub.
► Screw in the bolts by hand as far as possible.
►
Pre-tighten the security bolt using the
wheelbrace
5
equipped with a security socket
8
.
►
Pre-tighten the other bolts using the
wheelbrace
5
only.
►
Lower the vehicle again fully
.
►
Fold jack
6 and remove it.
► If your vehicle is so equipped, tighten the
security bolt using the wheelbrace 5 equipped
with a security socket
8.
►
T
ighten the other bolts using the
wheelbrace
5
only.
►
Store the tools.
Fitting a steel or "space-saver" type
spare wheel
If the vehicle is equipped with alloy wheels,
the washers do not make contact with the
steel or "space-saver" type spare wheel. The
wheel is secured by the conical contact of
each bolt.
After changing a wheel
Stow the punctured wheel in the carrier.
Go to a PEUGEOT dealer or a qualified
workshop as soon as possible.
Have the punctured tyre examined. After
inspection, the technician will advise you on
whether the tyre can be repaired or if it must
be replaced.
Some driving aid functions should be
disabled, e.g. the Active Safety Brake.
If your vehicle has tyre under-inflation
detection, check the tyre pressures and
reinitialise the system.
For more information on Under-inflation
detection, refer to the corresponding section.
Wheel with wheel trim
When refitting the wheel, refit the wheel
trim, starting by aligning the cutout with the
valve and then pushing the trim into place all
round its edge with the palm of your hand.
The tyre inflation pressures are given on this label.
Changing a bulb
In some weather conditions (e.g. low
temperature or humidity), misting on the
internal surface of the glass of the headlamps
and rear lamps is normal, and will disappear
after the lamps have been on for a few
minutes.
The headlamps have polycarbonate lenses with a protective coating:
► do not clean them with a dry or
abrasive cloth, nor with detergent or
solvent products,
► use a sponge and soapy water or a pH
neutral product,
► when using a high-pressure washer on
persistent marks, do not keep the lance
directed towards the lamps or their edges for
too long, so as not to damage their protective
coating and seals.
Changing a bulb must only be done with
the ignition off and after the lamp has
been switched off for several minutes - risk of
serious burns!
Do not touch the bulb directly with your
fingers, use a lint-free cloth.
It is essential only to use anti-ultraviolet
(UV) type bulbs, so as not to damage the
headlamp.
Always replace a failed bulb with a new bulb
of the same type and specification.
Opening the bonnet / Accessing the
bulbs
With the engine warm, proceed with caution -
risk of burns!
Page 168 of 260

166
In the event of a breakdown
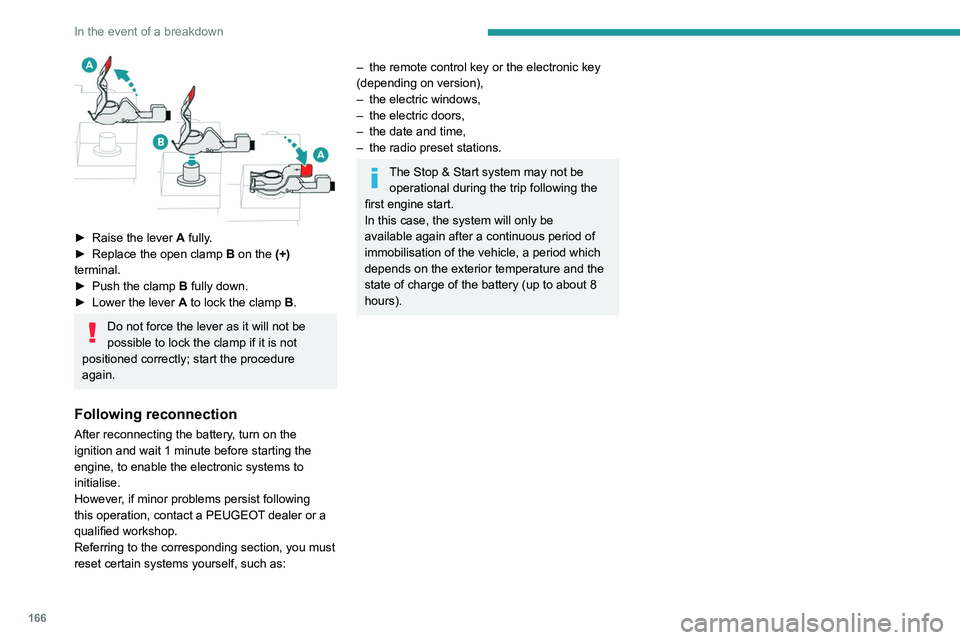
► Raise the lever A fully.
► Replace the open clamp B
on the (+)
terminal.
►
Push the clamp
B fully down.
►
Lower the lever A
to lock the clamp B.
Do not force the lever as it will not be
possible to lock the clamp if it is not
positioned correctly; start the procedure
again.
Following reconnection
After reconnecting the battery, turn on the
ignition and wait 1 minute before starting the
engine, to enable the electronic systems to
initialise.
However, if minor problems persist following
this operation, contact a PEUGEOT dealer or a
qualified workshop.
Referring to the corresponding section, you must
reset certain systems yourself, such as:
– the remote control key or the electronic key
(depending on version),
–
the electric windows,
–
the electric doors,
–
the date and time,
–
the radio preset stations.
The Stop & Start system may not be operational during the trip following the
first engine start.
In this case, the system will only be
available again after a continuous period of
immobilisation of the vehicle, a period which
depends on the exterior temperature and the
state of charge of the battery (up to about 8
hours).
Towing
Procedure for having your vehicle towed or for towing another vehicle us\
ing the towing eye.
General recommendations
Observe the legislation in force in the country where you are driving.
Ensure that the weight of the towing vehicle is higher than that of the \
towed vehicle.
The driver must remain at the wheel of the towed vehicle and must have a\
valid driving licence.
When towing a vehicle with all four wheels on the ground, always use an \
approved towbar; ropes and straps are prohibited.
The towing vehicle must move off gently.
When the vehicle is towed with its engine off, there is no longer braking and steering assistance.
A professional recovery service must be called if:
– broken down on a motorway or main road;
– not possible to put the gearbox into neutral, unlock the steering, or re\
lease the parking brake;
– not possible to tow a vehicle with an automatic gearbox, with the engine\
running;
– towing with only two wheels on the ground;
– four-wheel drive vehicle;
– no approved towbar available.
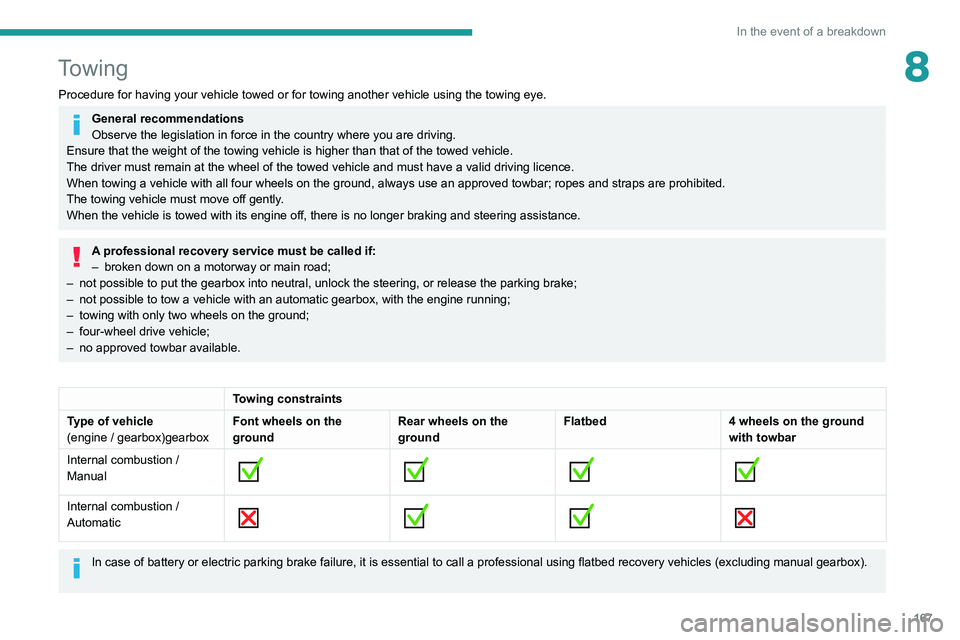
Towing constraints
Type of vehicle
(engine / gearbox)gearbox Font wheels on the
groundRear wheels on the
groundFlatbed
4 wheels on the ground
with towbar
Internal combustion /
Manual
Internal combustion /
Automatic
In case of battery or electric parking brake failure, it is essential to call a p
rofessional using flatbed recovery vehicles (excluding manual gearbox).
Page 169 of 260

167
In the event of a breakdown
8Towing
Procedure for having your vehicle towed or for towing another vehicle us\
ing the towing eye.
General recommendations
Observe the legislation in force in the country where you are driving.
Ensure that the weight of the towing vehicle is higher than that of the \
towed vehicle.
The driver must remain at the wheel of the towed vehicle and must have a\
valid driving licence.
When towing a vehicle with all four wheels on the ground, always use an \
approved towbar; ropes and straps are prohibited.
The towing vehicle must move off gently.
When the vehicle is towed with its engine off, there is no longer braking and steering assistance.
A professional recovery service must be called if:
– broken down on a motorway or main road;
–
not possible to put the gearbox into neutral, unlock the steering, or re\
lease the parking brake;
–
not possible to tow a vehicle with an automatic gearbox, with the engine\
running;
–
towing with only two wheels on the ground;
–
four-wheel drive vehicle;
–
no approved towbar available.
Towing constraints
Type of vehicle
(engine / gearbox)gearbox Font wheels on the
groundRear wheels on the
groundFlatbed
4 wheels on the ground
with towbar
Internal combustion /
Manual
Internal combustion /
Automatic
In case of battery or electric parking brake failure, it is essential to call a p
rofessional using flatbed recovery vehicles (excluding manual gearbox).
Page 171 of 260

169
Technical data
9Dimensions (mm)
These dimensions have been measured on an unladen vehicle.The vehicle is available in two lengths (Standard and Long).
Actual values may vary, depending on wheel diameters, loads, engine, etc.
Vehicle length
Standard (L1) Long (L2)
A Overall length 4,4034,753
Page 172 of 260

170
Technical data
Vehicle length
J Maximum interior width Without sliding side door 1,733
With 1 sliding side door 1,630
With 2 sliding side doors 1,527
K Clear opening height With side-hinged doors 1,137
With tailgate 1,197
L Clear opening width 1 242
Vehicle length
Standard (L1) Long (L2)
M Clear opening height 1,072
N Interior load height
(varies depending on the angle of the floor and the curve
of the roof) 1,200 to 1,270
W Loading sill heightStandard version 548 to 588X
Standard version with
increased payload 568 to 578
561 to 565
Worksite version 602 to 610605 to 610
Vehicle length
B Overall height Standard version 1,796 to 1,8251,812 to 1,820
Worksite version 1,840 to 1,8601,849 to 1,860
C Wheelbase 2,7852,975
D Front overhang 892
E Rear overhang 726886
F Width inc. mirrors Folded 1,921
Unfolded 2,107
G Front track width 1,553/1,5631,553
H Rear track width 1,569/1,5771,549/1,568
Vehicle length
Standard (L1) Long (L2)
I Interior width between wheel arches 1,229
Page 178 of 260

176
Technical data
Identification markings
Various visible markings for the identification and
research of your vehicle.
A. Vehicle identification number (VIN), under
the bonnet.
Stamped on the chassis, near the right-hand
front wheel arch.
B. Vehicle identification number (VIN), on the
dashboard.
On a label, visible through the windscreen.
C. Manufacturer's label.
Fixed on the centre pillar, left-hand side or right-
hand side.
Bears the following information:
–
Manufacturer
’s name.
–
European whole vehicle type approval
number
.
–
V
ehicle identification number (VIN).
– Gross vehicle weight (GVW).
– Gross train weight (GTW).
–
Maximum weight on the front axle.
–
Maximum weight on the rear axle.
D. T
yres / paint code label.
Fixed at the driver-side door.
Bears the following information about the tyres:
–
tyre pressures, unladen and laden.
–
tyre specification, made up of the dimensions
and type as well as the load and speed indices.
–
spare tyre inflation pressure.
Also indicates the paint colour code.
The vehicle may be originally equipped with tyres with higher load and speed
indices than those indicated on the label,
without affecting tyre pressure (on cold tyres).
Page 180 of 260

178
Bluetooth® audio system
"Connections": Manage connections,
search for devices.
"Personalisation-configuration": Define
the vehicle parameters, Choice of
language, Display configuration, Choice of units,
Date and time adjustment.
Press the "MENU" button.
Move from one menu to another.
Enter a menu.
Radio
Selecting a station
Press the SOURCE button repeatedly
and select the radio.
Press this button to select a waveband
(FM / AM / DAB).
Press one of the buttons for an automatic
search for radio stations.
Press one of the buttons to carry out a
manual search up / down for radio
frequencies.
Press this button to display the list of
stations received locally.
To update this list, press for more than two
seconds. The sound is cut while updating.
Radio:
Select the previous / next preset radio
station.
Select the previous / next item in a menu or a
list.
Media:
Select the previous / next track.
Select the previous / next item in a menu or a
list.
Radio:
Short press: display the list of radio
stations.
Long press: update the list.
Media:
Short press: display the list of folders.
Long press: display the available sorting options.
Other than telephone call:
Short press: changing audio source
(radio; USB; AUX (if equipment connected); CD;
streaming), confirmation if the "Telephone"
menu is open.
Long press: open the " Telephone" menu.
In the event of a telephone call:
Short press: accept the call.
Long press: reject the call.
During a telephone call:
Short press: open the contextual telephone
menu.
Long press: end the call.
Confirm a selection.
Increase volume.
Decrease volume.
Mute / Restore sound by simultaneously
pressing the increase and decrease
volume buttons.
Steering mounted controls -
Type 2
Access to the main menu.
Increase volume.
Mute / Restore the sound.
Decrease volume.
Other than telephone call:
Short press: changing audio source
(radio; USB; AUX (if equipment connected); CD;
streaming), confirmation if the "Telephone"
menu is open.
Long press: open the " Telephone" menu.
In the event of a telephone call:
Short press: accept the call.
Long press: reject the call.
During a telephone call:
Short press: open the contextual telephone
menu. Long press: end the call.
Start voice recognition on your
smartphone via the system.
Radio:
Short press: display the list of radio
stations.
Long press: update the list.
Media:
Short press: display the list of folders.
Long press: display the available sorting options.
Radio:
Select the previous / next preset radio
station.
Select the previous / next item in a menu or a
list.
Media:
Select the previous / next track.
Select the previous / next item in a menu or a
list.
Press the thumbwheel: confirm.
Menus
Depending on version."Multimedia": Media settings, Radio
settings.
"Telephone": Call, Directory
management, Telephone management,
Hang up.
"Trip computer".
"Maintenance": Diagnosis, Warning log,
etc.