2021 Peugeot Landtrek check engine
[x] Cancel search: check enginePage 119 of 176
11 7
In the event of a breakdown
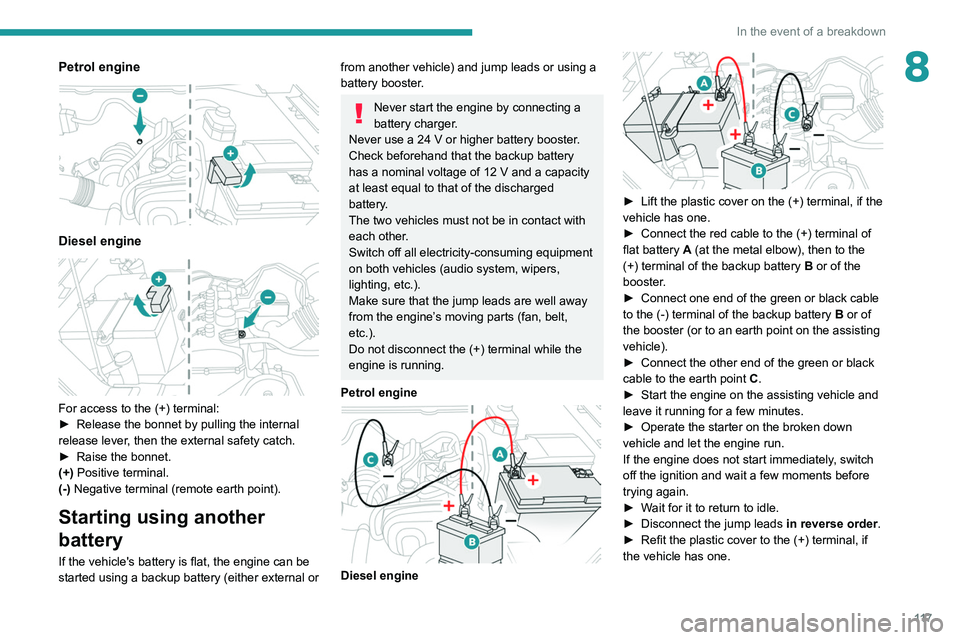
8Petrol engine
Diesel engine
For access to the (+) terminal:
► Release the bonnet by pulling the internal
release lever
, then the external safety catch.
►
Raise the bonnet.
(+)
Positive terminal.
(-) Negative terminal (remote earth point).
Starting using another
battery
If the vehicle's battery is flat, the engine can be
started using a backup battery (either external or
from another vehicle) and jump leads or using a
battery booster.
Never start the engine by connecting a
battery charger.
Never use a 24
V or higher battery booster.
Check beforehand that the backup battery
has a nominal voltage of 12
V and a capacity
at least equal to that of the discharged
battery.
The two vehicles must not be in contact with
each other.
Switch off all electricity-consuming equipment
on both vehicles (audio system, wipers,
lighting, etc.).
Make sure that the jump leads are well away
from the engine’s moving parts (fan, belt,
etc.).
Do not disconnect the (+) terminal while the
engine is running.
Petrol engine
Diesel engine
► Lift the plastic cover on the (+) terminal, if the
vehicle has one.
►
Connect the red cable to the (+) terminal of
flat battery
A (at the metal elbow), then to the
(+) terminal of the backup battery
B or of the
booster.
►
Connect one end of the green or black cable
to the (-) terminal of the backup battery
B or of
the booster (or to an earth point on the assisting
vehicle).
►
Connect the other end of the green or black
cable to the earth point
C
.
►
Start the engine on the assisting vehicle and
leave it running for a few minutes.
►
Operate the starter on the broken down
vehicle and let the engine run.
If the engine does not start immediately
, switch
off the ignition and wait a few moments before
trying again.
►
W
ait for it to return to idle.
►
Disconnect the jump leads in reverse order.
►
Refit the plastic cover to the (+) terminal, if
the vehicle has one.
Page 120 of 176
11 8
In the event of a breakdown
► Allow the engine to run for at least
30 minutes, with the vehicle stationary, so that
the battery reaches an adequate state of charge.
Driving immediately without having
reached a sufficient level of charge may
affect some of the vehicle's functionalities.
With an automatic gearbox, never try to
start the engine by pushing the vehicle.
Charging the battery using a
battery charger
For optimum service life of the battery, it is
essential to maintain an adequate state of
charge.
In some circumstances, it may be necessary to
charge the battery:
–
When using the vehicle mainly for short
journeys.
–
If the vehicle is to be taken off the road for
several weeks.
Contact a PEUGEOT
dealer or a qualified
workshop.
To charge the vehicle's battery yourself, use only a charger compatible with
lead-acid batteries with a nominal voltage of
12
V.
Follow the instructions provided by the
manufacturer of the charger.
Never reverse polarities.
It is not necessary to disconnect the
battery.
►
Switch the ignition off.
►
Switch off all electrical consumers (audio
system, lighting, wipers, etc.).
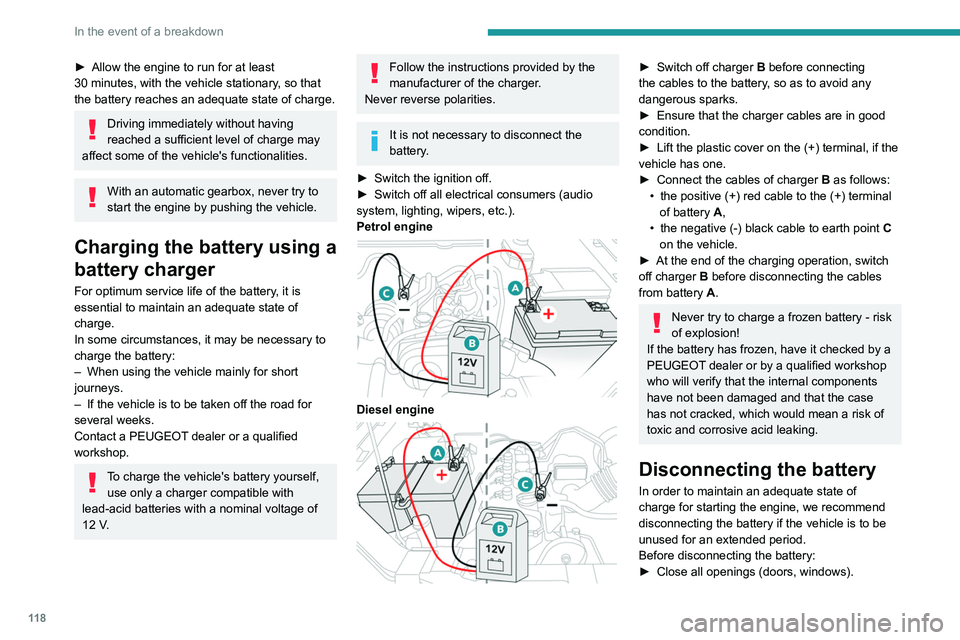
Petrol engine
Diesel engine
► Switch off charger B before connecting
the cables to the battery, so as to avoid any
dangerous sparks.
►
Ensure that the charger cables are in good
condition.
►
Lift the plastic cover on the (+) terminal, if the
vehicle has one.
►
Connect the cables of charger B
as follows:
•
the positive (+) red cable to the (+) terminal
of battery
A,
•
the negative (-) black cable to earth point C
on the vehicle.
►
At the end of the charging operation, switch
off charger B
before disconnecting the cables
from battery A.
Never try to charge a frozen battery - risk
of explosion!
If the battery has frozen, have it checked by a
PEUGEOT dealer or by a qualified workshop
who will verify that the internal components
have not been damaged and that the case
has not cracked, which would mean a risk of
toxic and corrosive acid leaking.
Disconnecting the battery
In order to maintain an adequate state of
charge for starting the engine, we recommend
disconnecting the battery if the vehicle is to be
unused for an extended period.
Before disconnecting the battery:
►
Close all openings (doors, windows).
► Switch off all electricity-consuming devices
(audio system, wipers, lamps, etc.).
► Switch off the ignition and wait for 4 minutes.
After accessing the battery, it is only necessary
to disconnect the (+) terminal.
Screwed terminal
Disconnecting the (+) terminal
► Depending on equipment, lift the plastic cover
on the (+) terminal.
► Loosen the nut A as much as possible to
unlock the clamp B.
► Remove clamp B by lifting it off.
Reconnecting the (+) terminal
► Loosen the nut A as much as possible.
► Refit the clamp B on the (+) terminal.
► Tighten the nut A to lock the clamp B.
► Depending on equipment, lower the plastic
cover on the (+) terminal.
Do not use force when tightening nut A
as the clamp may be damaged.
Page 140 of 176

138
Alphabetical index
4x4 transmission selector 67
360° camera
82
A
ABS 49
Accessories
48
Additive, Diesel
95
Adjusting headlamp beam height
44
Adjusting headlamps
44
Adjusting head restraints
25
Adjusting seat
26
Adjusting the air distribution
34
Adjusting the air flow
34
Adjusting the date
13, 136
Adjusting the height and reach of
the steering wheel
27
Adjusting the seat angle
26
Adjusting the seat belt height
53
Adjusting the temperature
34
Adjusting the time
13, 136
Advice on care and maintenance
102
Advice on driving
6, 61–62
Airbags
54–56, 58
Airbags, curtain
55–56
Airbags, front
55–56, 58
Airbags, lateral
55–56
Air conditioning
31, 33, 34
Air conditioning, automatic
35
Air conditioning, dual-zone automatic
33–35
Air conditioning, manual
32, 35
Air intake 34
Air vents
31
Alarm
22–23
Android Auto connection
136
Anti-lock braking system (ABS)
49
Antitheft / Immobiliser
17
Apple CarPlay connection
135
Area, loading
40
Armrest, front
36–37
Armrest, rear
38
Assistance, emergency braking
49
Audible warning
49
Audio streaming (Bluetooth)
129
B
Battery 98
Battery, 12 V
94, 98, 116–119
Battery, charging
11 8
Battery, remote control
20–21
Bluetooth (hands-free)
129–130, 134
Bluetooth (telephone)
134
Bodywork
103
Bonnet
90–91
Brake discs
95
Brake lamps
11 2
Brakes
95
Braking assistance system
49
Bulbs
111
Bulbs (changing)
110, 112
C
Capacity, fuel tank 88
Cap, fuel filler
88
Care of the bodywork
103
Central locking
17, 19
Changing a bulb
110, 112
Changing a fuse
113–115
Changing a wheel
105–107
Changing a wiper blade
46
Changing the engine oil
99
Changing the remote control battery
20
Checking the levels
92–94
Checks
91, 94–96
Checks, routine
94–95, 97
Child lock
60
Children
54, 59
Children (safety)
60
Child seats
54, 56–58
Child seats, ISOFIX
59
Cigar lighter
36
Cleaning (advice)
101–103
Cleaning the engine throttle housing
101
Closing the boot
18, 22
Closing the doors
18–19, 21
Configuration, vehicle
13–15
Connection, Bluetooth
130, 134
Connection, MirrorLink
136
Connectivity
135
Control, emergency door
20
Control stalk, lighting
42, 44
Control stalk, wipers
45, 47
Page 142 of 176
140
Alphabetical index
H
Hazard warning lamps 48, 104
headlamp adjustment
44
Headlamp adjustment
44
Headlamp beam height
44
Headlamps, automatic illumination
44
Headlamps, dipped beam
11 0 – 111
Headlamps, halogen
11 0 – 111
Headlamps, main beam
11 0 – 111
Head restraints, front
25
Head restraints, rear
27, 29–30
Heating
31–33, 35
Hill Assist Descent Control (HADC)
51
Hill start assist
72–73
Hooks
38
Horn
49
I
Ignition 66
Ignition on
66
Ignition switch
63–64
Immobiliser, electronic
63
Indicator, coolant temperature
11
Indicators, direction
43, 111
Inflating tyres
95, 126
Infrared camera
75
Instrument panel
7, 12, 75
ISOFIX mountings
59
J
Jack 106–107
Jump starting
11 7
K
Key 16–17, 20
Key, electronic
18–19
Keyless Entry and Starting
18, 65
Key not recognised
66
Key with remote control
16–17, 63
Kit, hands-free
129–130, 134
L
Labels, identification 125
Lamps, parking
44
Lamps, rear
11 2
Lams with Full LED technology
43
Lane Departure Warning System
(LDWS)
78, 80
Leather (care)
103
LEDs - Light-emitting diodes
43, 110, 112
Level, brake fluid
93
Level, Diesel additive
95
Level, engine coolant
11, 93
Level, engine oil
92
Level, power steering fluid
93
Levels and checks
91–94
Level, screenwash fluid 46, 94
Light-emitting diodes - LEDs
43, 110, 112
Lighting
40
Lighting, cornering
43
Lighting dimmer
12
Lighting, exterior
42
Lighting, guide-me home
45
Lighting, interior
38
Lighting, mood
12
Lighting, welcome
45
Loading
40, 90
Load restraint
40
Locating your vehicle
17
Locking
17–18
Locking from the inside
19
Locking the doors
19
Low fuel level
88
M
Maintenance 96
Maintenance (advice)
102
Maintenance, routine
75, 94, 96
Manoeuvring aids (recommendations)
74
Map reading lamps
38
Markings, identification
125
Mat
37, 75
Mirror, rear view
28
Mirrors, door
28, 35
Mirror, vanity
36
Mode, driving
71
Page 169 of 176
3
Driving
6Driving recommendations
► Observe the driving regulations and remain vigilant whatever the traffic conditions.► Monitor your surroundings and keep your hands on the wheel to be able to react to
anything that may happen any time.
► Drive smoothly, anticipate the need for braking and maintain a longer safety distance,
especially in bad weather.
► Stop the vehicle to carry out operations that require close attention (such as adjustments).► During long trips, take a break every 2 hours.
On flooded roads
We strongly advise against driving on flooded
roads, as this could cause serious damage to the
engine or gearbox, as well as to your vehicle's
electrical systems.
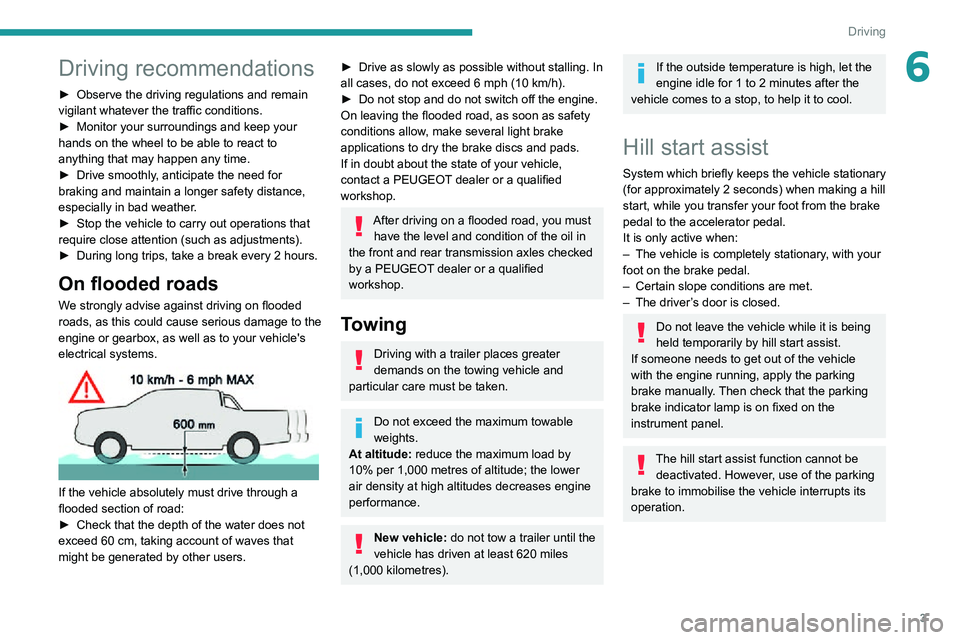
If the vehicle absolutely must drive through a
flooded section of road:
► Check that the depth of the water does not exceed 60 cm, taking account of waves that might be generated by other users.
► Drive as slowly as possible without stalling. In all cases, do not exceed 6 mph (10 km/h).► Do not stop and do not switch off the engine.On leaving the flooded road, as soon as safety
conditions allow, make several light brake
applications to dry the brake discs and pads.
If in doubt about the state of your vehicle,
contact a PEUGEOT dealer or a qualified
workshop.
After driving on a flooded road, you must
have the level and condition of the oil in
the front and rear transmission axles checked
by a PEUGEOT dealer or a qualified
workshop.
Towing
Driving with a trailer places greater
demands on the towing vehicle and
particular care must be taken.
Do not exceed the maximum towable
weights.
At altitude: reduce the maximum load by
10% per 1,000 metres of altitude; the lower
air density at high altitudes decreases engine
performance.
New vehicle: do not tow a trailer until the
vehicle has driven at least 620 miles
(1,000 kilometres).
If the outside temperature is high, let the
engine idle for 1 to 2 minutes after the
vehicle comes to a stop, to help it to cool.
Hill start assist
System which briefly keeps the vehicle stationary (for approximately 2 seconds) when making a hill start, while you transfer your foot from the brake
pedal to the accelerator pedal.
It is only active when:
– The vehicle is completely stationary , with your foot on the brake pedal.– Certain slope conditions are met.– The driver’s door is closed.
Do not leave the vehicle while it is being
held temporarily by hill start assist.
If someone needs to get out of the vehicle
with the engine running, apply the parking
brake manually. Then check that the parking
brake indicator lamp is on fixed on the
instrument panel.
The hill start assist function cannot be deactivated. However, use of the parking
brake to immobilise the vehicle interrupts its
operation.
Page 171 of 176
5
Practical information
7Checks
Unless otherwise indicated, check these
components in accordance with the
manufacturer's service schedule and according
to your engine.
Otherwise, have them checked by a PEUGEOT
dealer or a qualified workshop.
Only use products recommended by
PEUGEOT or products of equivalent
quality and specification.
In order to optimise the operation of
components as important as those in the
braking system, PEUGEOT selects and offers
very specific products.
Automatic gearbox
For any information on gearbox
maintenance, contact a PEUGEOT dealer
or a qualified workshop.