2021 Peugeot Landtrek ignition
[x] Cancel search: ignitionPage 56 of 176

54
Safety
1 minute, the warning lamp remains on as long
as the driver’s or front passenger’s (depending
on version) seat belt remains unfastened.
Advice
The driver must ensure that passengers use the seat belts correctly and that they
are all fastened before setting off.
Wherever seated in the vehicle, you must
always fasten the seat belt, even for short
journeys.
Do not invert the seat belt buckles, as they
will not fulfil their role properly.
To ensure the proper functioning of the belt
buckles, make sure that there are no foreign
bodies present (e.g.
a coin) before fastening.
Before and after use, ensure that the seat belt
is reeled in correctly.
After folding or moving a seat or rear bench
seat, ensure that the seat belt is positioned
and reeled in correctly.
Installation
The lower part of the strap must be
positioned as low as possible over the pelvis.
The upper part must be positioned in the
hollow of the shoulder.
In order to be effective, a seat belt must:
–
be tightened as close to the body as
possible.
–
be pulled in front of you with a smooth
movement, ensuring that it is not twisted.
– only be used to secure one person.
– not show signs of tearing or fraying.
–
not be changed or modified, in order to
avoid affecting its performance.
Recommendations for children
Use a suitable child seat if the passenger
is less than 12 years old or shorter than 1.5
metres.
Never use the same seat belt to secure more
than one child.
Never carry a child on your lap.
For more information on Child seats, refer to
the corresponding section.
Maintenance
In accordance with current safety
regulations, for all work on your vehicle's
seat belts, contact a qualified workshop with
the skills and equipment needed, which a
PEUGEOT dealer is able to provide.
Have the seat belts checked regularly by a
PEUGEOT dealer or a qualified workshop,
particularly if the straps show signs of
damage.
Clean the seat belt straps with soapy water or
a textile cleaning product, sold by PEUGEOT
dealers.
Airbags
General information
The airbags have been designed to optimise the
safety of the occupants in the event of a violent
collision; they supplement the action of the seat
belts equipped with a force limiting system.
Electronic detectors record and analyse the
front and side impacts sustained in the impact
detection zones:
–
In the event of violent impact, the airbags
deploy instantly and help better protect the
occupants of the vehicle; immediately after the
impact, the airbags deflate rapidly in order not
to hinder the visibility or the possible exit of the
occupants.
–
In the event of a slight impact, a rear impact
and under certain rollover conditions, the airbags
may not deploy; only the seat belt helps to
protect you in these situations.
The seriousness of the impact depends on the
nature of the obstacle and the speed of the
vehicle at the moment of collision.
The airbags do not operate when the
ignition is switched off.
This equipment will only deploy once. If a
second impact occurs (during the same or a
subsequent accident), the airbag will not be
deployed again.
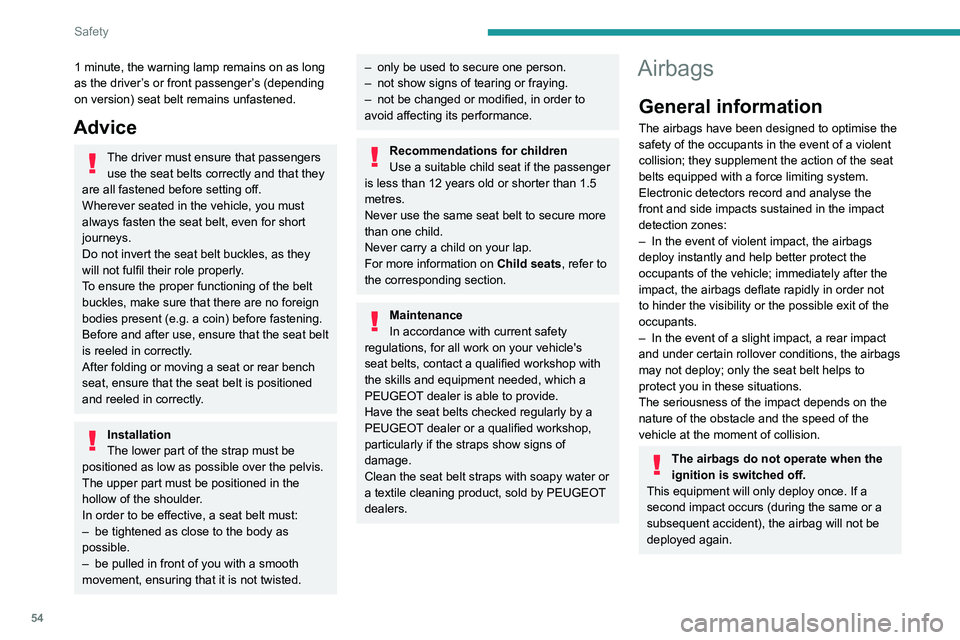
Impact detection zones
A. Front impact zone
B. Side impact zone
When one or more airbags are deployed,
the detonation of the pyrotechnic charge
incorporated in the system makes a noise and
releases a small quantity of smoke.
This smoke is not harmful, but sensitive
individuals may experience irritation.
The detonation noise associated with the
deployment of one or more airbags may result
in a slight loss of hearing for a short time.
Front airbags
This system protects the driver and front
passenger in the event of a serious front impact,
* For more information on Deactivating the front passenger airbag, refer t\
o the corresponding section.
Page 60 of 176

58
Safety
child seat itself do not touch the vehicle's front
seat.
►
Check that the backrest of the forward-facing
child seat is as close as possible to the backrest
of the vehicle's rear seat, and ideally in contact
with it.
Centre rear seat
A child seat with a support leg must never be
installed on the centre rear passenger seat .
Child seat at the front
► Adjust the front passenger seat to the
highest and fully back longitudinal position ,
with the backrest straightened.
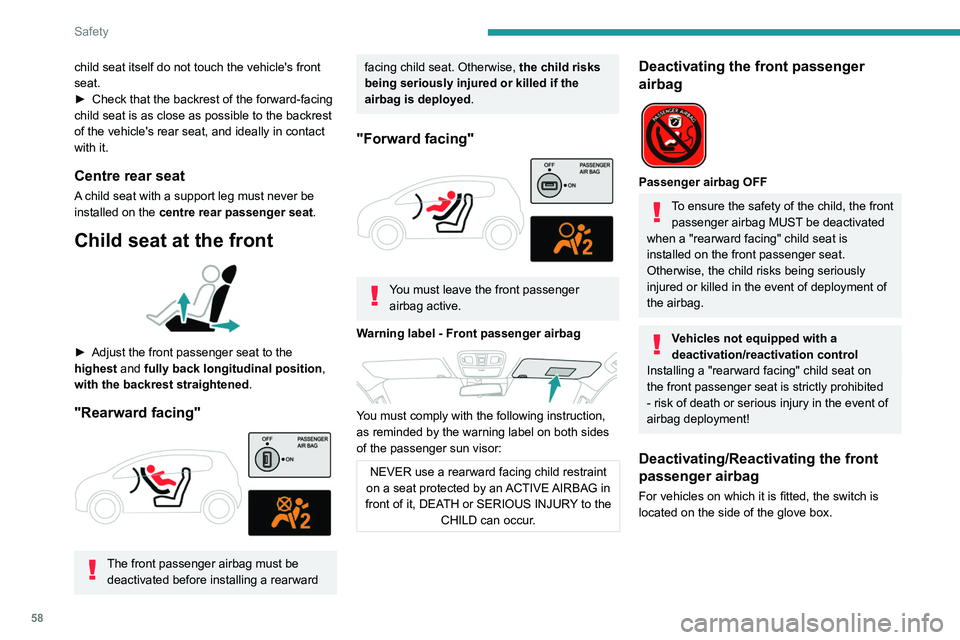
"Rearward facing"
The front passenger airbag must be deactivated before installing a rearward
facing child seat. Otherwise, the child risks
being seriously injured or killed if the
airbag is deployed .
"Forward facing"
You must leave the front passenger
airbag active.
Warning label - Front passenger airbag
You must comply with the following instruction,
as reminded by the warning label on both sides
of the passenger sun visor:
NEVER use a rearward facing child restraint
on a seat protected by an ACTIVE AIRBAG in
front of it, DEATH or SERIOUS INJURY to the CHILD can occur.
Deactivating the front passenger
airbag
Passenger airbag OFF
To ensure the safety of the child, the front passenger airbag MUST be deactivated
when a "rearward facing" child seat is
installed on the front passenger seat.
Otherwise, the child risks being seriously
injured or killed in the event of deployment of
the
airbag.
Vehicles not equipped with a
deactivation/reactivation control
Installing a "rearward
facing" child seat on
the front passenger seat is strictly prohibited
- risk of death or serious injury in the event of
airbag deployment!
Deactivating/Reactivating the front
passenger airbag
For vehicles on which it is fitted, the switch is
located on the side of the glove box.
With the ignition off:
► To deactivate the airbag, turn the key in the
switch to the "OFF " position.
► To reactivate it, turn the key to the "ON"
position.
When the ignition is switched on:
This warning lamp comes on and remains lit to signal deactivation.
Or
This warning lamp comes on for about 1 minute to signal activation.
“ISOFIX" mountings
The seats shown below are fitted with ISOFIX
compliant mountings:
Page 61 of 176

59
Safety
5
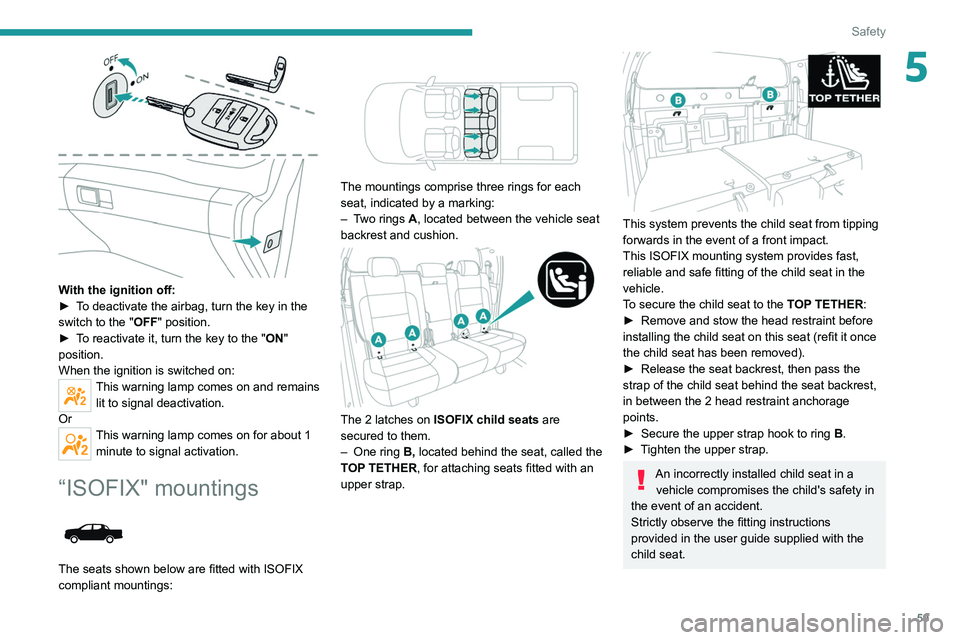
With the ignition off:
► T o deactivate the airbag, turn the key in the
switch to the "OFF " position.
►
T
o reactivate it, turn the key to the "ON"
position.
When the ignition is switched on:
This warning lamp comes on and remains lit to signal deactivation.
Or
This warning lamp comes on for about 1 minute to signal activation.
“ISOFIX" mountings
The seats shown below are fitted with ISOFIX
compliant mountings:
The mountings comprise three rings for each
seat, indicated by a marking:
–
T
wo rings A, located between the vehicle seat
backrest and cushion.
The 2 latches on ISOFIX child seats are
secured to them.
–
One ring
B, located behind the seat, called the
TOP TETHER, for attaching seats fitted with an
upper strap.
This system prevents the child seat from tipping
forwards in the event of a front impact.
This ISOFIX mounting system provides fast,
reliable and safe fitting of the child seat in the
vehicle.
To secure the child seat to the TOP TETHER:
►
Remove and stow the head restraint before
installing the child seat on this seat (refit it once
the child seat has been removed).
►
Release the seat backrest, then pass the
strap of the child seat behind the seat backrest,
in between the 2 head restraint anchorage
points.
►
Secure the upper strap hook to ring
B
.
►
T
ighten the upper strap.
An incorrectly installed child seat in a vehicle compromises the child's safety in
the event of an accident.
Strictly observe the fitting instructions
provided in the user guide supplied with the
child seat.
Page 65 of 176

63
Driving
6joins your vehicle) approaches the maximum
permitted without exceeding it.
Tyres
► Check the tyre pressures of the towing
vehicle and of the trailer , observing the
recommended pressures.
Lighting
► Check the electrical signalling on the trailer
and the headlamp beam height of your vehicle.
If a genuine PEUGEOT towing device is
used, the rear parking sensors will be
deactivated automatically to avoid the audible
signal.
When driving
Cooling
Towing a trailer uphill causes the coolant
temperature to increase. The maximum towable
load depends on the gradient and the exterior
temperature. The fan’s cooling capacity does not
increase with engine speed.
►
Reduce speed and lower the engine speed to
limit heating up.
In all cases, pay attention to the coolant
temperature.
If this warning lamp and the STOP
warning lamp come on, stop the vehicle
and switch off the engine as soon as possible.
Brakes
Braking distances are increased when towing a
trailer. To avoid overheating the brakes, the use
of engine braking is recommended.
Side wind
Bear in mind that the vehicle will be more
susceptible to wind when towing.
Anti-theft protection
Electronic immobiliser
The keys include an electronic engine
immobiliser system, with a code that must be
recognised in order for starting to be possible.
If the system malfunctions, indicated by the
display of a message, the engine will not start.
Contact a PEUGEOT dealer.
Starting / Switching off the
engine with the key
Key ignition switch
It has 4 positions:
– 1.Stop : inserting and removing the key,
steering column locked.
–
2.Accessories : audio system and
accessories.
–
3.Ignition : steering column unlocked, ignition
on, ventilation, Diesel preheating, engine
running.
–
4.Starting
.
Avoid attaching heavy objects to the key or the remote control, which would weigh
down on its blade in the ignition switch and
could cause a malfunction.
Ignition on position
It allows the use of the vehicle's electric
equipment or portable devices to be charged.
Page 66 of 176

64
Driving
To switch the ignition back on, turn the key to
position 1, then back to position 3.
Starting/Switching off the
engine with Keyless Entry
and Starting
The electronic key must be present in the
passenger compartment.
If it is not detected, a message is displayed.
Move the electronic key so that the engine
can be started or switched off.
If there is still a problem, refer to the "Key
not detected - Back-up starting or Back-up
switch-off" section.
Starting
► With a manual gearbox, place the gear lever
in neutral and fully depress the clutch pedal.
Once the state of charge of the battery drops to
the reserve level, the system switches to energy
economy mode : the power supply is cut off
automatically to preserve the remaining battery
charge.
Starting the engine
With the parking brake applied:
► With a manual gearbox, place the gear lever
in neutral then fully depress the clutch pedal.
►
With an
automatic gearbox, place the gear
selector in mode N or P then depress the brake
pedal.
►
Insert the key into the ignition switch; the
system recognises the code.
►
Unlock
the steering column by simultaneously
turning the steering wheel and the key.
In certain cases, you may have to apply
significant force to move the steering
wheel (wheels on full lock, for example).
►
With a
petrol engine , operate the starter
motor by turning the key to position 4 without
pressing the accelerator pedal, until the engine
starts. As soon as the engine starts, release the
key.
With petrol engines , after a cold start,
preheating the catalytic converter can
cause
noticeable engine vibrations for
anything up to 2 minutes while stationary with
the engine running (accelerated idle speed).
► With a Diesel engine, turn the key to position
3, to activate the engine preheating system.
Wait until this warning lamp goes off on
the instrument panel, then turn the key to
position 4 without pressing the accelerator pedal,
to operate the starter motor. As soon as the
engine starts, release the key.
In wintry conditions, the warning lamp
may stay on for a longer period. When
the engine is hot, the warning lamp does not
come on.
In mild conditions, do not leave the engine
to warm up while stationary, but move off
straight away and drive at moderate speed.
If the engine does not start straight away,
switch off the ignition. Wait a few
seconds before operating the starter motor
again. If the engine does not start after a few
attempts, do not keep trying - risk of
damaging the starter motor and the engine.
Contact a PEUGEOT dealer or a qualified
workshop.
If the wheels are not straight, a message
appears prompting the driver to
straighten the wheels by turning the steering
wheel.
Switching off the engine
► Immobilise the vehicle.
► With the engine at idle, turn the key to
position 2
.
►
Press the key against the ignition switch and
turn it to position
1, then remove the key from the
ignition switch.
►
T
o lock the steering column, turn the steering
wheel until it locks.
To facilitate unlocking of the steering column, it is recommended that the
wheels be returned to the straight ahead
position before switching off the engine.
Never switch off the ignition before the
complete immobilisation of the vehicle.
With the engine off, the braking and steering
assistance systems are also cut off - risk of
loss of control of the vehicle!
Check that the parking brake is correctly
applied, particularly on sloping ground.
When leaving the vehicle, keep the key in
your possession and lock the vehicle.
Key left in
When the driver's door is opened, a
message is displayed, accompanied by an
audible signal, if the key has been left in the
ignition switch in position 1.
If the key has been left in the ignition switch
in position 3, the ignition will be switched off
automatically after one hour.
Page 67 of 176

65
Driving
6To switch the ignition back on, turn the key to
position 1, then back to position 3.
Starting/Switching off the
engine with Keyless Entry
and Starting
The electronic key must be present in the
passenger compartment.
If it is not detected, a message is displayed.
Move the electronic key so that the engine
can be started or switched off.
If there is still a problem, refer to the "Key
not detected - Back-up starting or Back-up
switch-off" section.
Starting
► With a manual gearbox, place the gear lever
in neutral and fully depress the clutch pedal.
► With an automatic gearbox, select mode P
or N and press the brake pedal.
►
Press the "
START/STOP" button while
maintaining pressure on the pedal until the
engine starts.
For Diesel engines, when the temperature is
below zero and/or the engine is cold, starting will
only occur once the preheating warning lamp is
off.
If this warning lamp comes on after
pressing the " START/STOP" button:
►
Keep the pedal fully depressed and do not
press the "
START/STOP" button again until the
engine is running.
If one of the starting conditions is not met, a
message is displayed and the indicator lamp of
the "START/STOP” button comes on orange.
In some circumstances, a message indicates
that it is necessary to turn the steering wheel
while pressing the " START/STOP" button to
assist unlocking of the steering column.
With petrol engines , after a cold start,
preheating the catalytic converter can
cause noticeable engine vibrations for
anything up to 2 minutes while stationary with
the engine running (accelerated idle speed).
If the engine stalls, release the clutch
pedal and fully depress it again, the
engine will restart automatically.
If the wheels are not straight, a message
appears prompting the driver to
straighten the wheels by turning the steering
wheel.
Switching off
► Immobilise the vehicle, with the engine at
idle.
►
With a
manual gearbox, ideally put the gear
lever into neutral.
►
With an
automatic gearbox, ideally select
mode
P or N.
►
Press the "
START/STOP" button..
In some circumstances, it is necessary to turn
the steering wheel to lock the steering column.
If the vehicle is not immobilised, the
engine will not switch off.
With the engine off, the braking and
steering assistance systems are also cut
off - risk of loss of control of the vehicle!
Never leave your vehicle with the
electronic key still inside.
Page 68 of 176

66
Driving
When parking on a slope, turn the
wheels against the kerb, apply the
parking brake, engage a gear and switch off
the ignition.
Locking the rear
differential
When the rear differential is locked, torque is
transmitted to both rear wheels equally, thereby
improving the vehicle's traction.
Locking the rear differential is especially useful
when the rear wheels are skidding (in a ditch or
on a slippery road, for example).
Operating conditions
The differential lock is activated manually (speed
below approximately 5 mph (8 km/h)).
The vehicle's wheels must not be skidding (wait
until they have stopped).
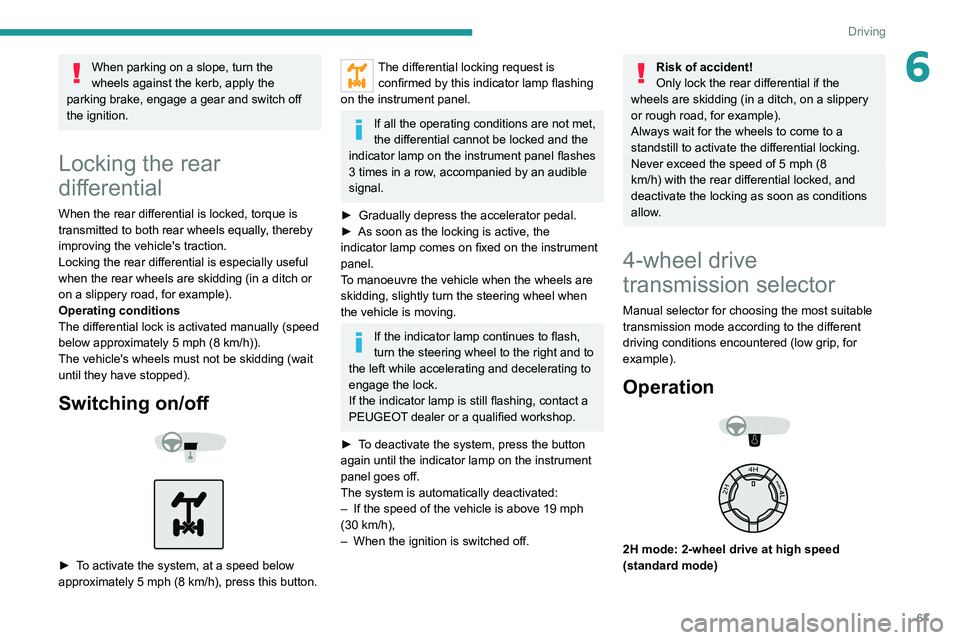
Switching on/off
► To activate the system, at a speed below
approximately 5 mph (8 km/h), press this button.
Switching on the ignition
without starting the engine
With the electronic key in the passenger
compartment, the first two presses on the
“START/STOP” button, without pressing any
of the pedals , allow the accessories to be
switched on, then the ignition, without starting
the engine (turning on accessories such as the
audio system and the lighting, then turning on
the instrument panel).
►
Press this button
again to switch off the
ignition and allow the vehicle to be locked.
Key not detected
Back-up starting
A back-up reader is fitted in the front armrest, to
enable the engine to be started if the system fails
to detect the key in the recognition zone, or if the
battery in the electronic key is flat.
► Place and hold the remote control against the
reader .
►
W
ith a manual gearbox, place the gear lever
in neutral, then fully depress the clutch pedal.
►
W
ith an automatic gearbox, select mode P,
then depress the brake pedal.
►
Press the "
START/STOP" button.
The engine starts.
Back-up switch-off
If the electronic key is not detected or is no
longer in the recognition zone, a message
appears in the instrument panel when closing a
door or trying to switch off the engine.
►
T
o confirm the instruction to switch off the
engine, press the " START/STOP" button for
approximately 5
seconds.
In the event of a fault with the electronic key,
contact a PEUGEOT dealer or a qualified
workshop.
Emergency switch-off
In the event of an emergency only, the engine
can be switched off without conditions (even
when driving).
►
Press the "
START/STOP" button for about
5
seconds.
In this case, the steering column locks as soon
as the vehicle stops.
Manual parking brake
Release
► Pull the parking brake lever up slightly , press
the release button, then lower the lever fully.
When driving the vehicle, if this warning
lamp and the STOP warning lamp come
on, accompanied by the display of a message,
this means that the parking brake is still applied
or has not been fully released.
Application
► Pull the parking brake lever up to immobilise
the vehicle.
Page 69 of 176

67
Driving
6When parking on a slope, turn the
wheels against the kerb, apply the
parking brake, engage a gear and switch off
the ignition.
Locking the rear
differential
When the rear differential is locked, torque is
transmitted to both rear wheels equally, thereby
improving the vehicle's traction.
Locking the rear differential is especially useful
when the rear wheels are skidding (in a ditch or
on a slippery road, for example).
Operating conditions
The differential lock is activated manually (speed
below approximately 5 mph (8 km/h)).
The vehicle's wheels must not be skidding (wait
until they have stopped).
Switching on/off
► To activate the system, at a speed below
approximately 5 mph (8 km/h), press this button.
The differential locking request is confirmed by this indicator lamp flashing
on the instrument panel.
If all the operating conditions are not met,
the differential cannot be locked and the
indicator lamp on the instrument panel
flashes
3 times in a row, accompanied by an audible
signal.
►
Gradually depress the accelerator pedal.
►
As soon as the locking is active, the
indicator
lamp comes on fixed on the instrument
panel.
To manoeuvre the vehicle when the wheels are
skidding, slightly turn the steering wheel when
the vehicle is moving.
If the indicator lamp continues to flash,
turn the steering wheel to the right and to
the left while accelerating and decelerating to
engage the lock.
If the indicator
lamp is still flashing, contact a
PEUGEOT dealer or a qualified workshop.
►
T
o deactivate the system, press the button
again until the indicator
lamp on the instrument
panel goes off.
The system is automatically deactivated:
–
If the speed of the vehicle is above 19 mph
(30
km/h),
–
When the ignition is switched off.
Risk of accident!
Only lock the rear differential if the
wheels are skidding (in a ditch, on a slippery
or rough road, for example).
Always wait for the wheels to come to a
standstill to activate the differential locking.
Never exceed the speed of 5 mph (8
km/h) with the rear differential locked, and
deactivate the locking as soon as conditions
allow.
4-wheel drive
transmission selector
Manual selector for choosing the most suitable
transmission mode according to the different
driving conditions encountered (low grip, for
example).
Operation
��
��
2H mode: 2-wheel drive at high speed
(standard mode)