2021 Peugeot Landtrek rear view mirror
[x] Cancel search: rear view mirrorPage 84 of 176
82
Driving
lines 3 represent 2 m, and the small green lines
4 represent 3 m.
It is possible to deactivate the display of the
guiding
lines on the image at any time.
The display of the guiding lines is
configured in the Settings
menu of the
Reversing camera function.
They are represented as lines marked
"on the ground" and do not indicate the
position of the vehicle in relation to tall
obstacles (e.g. other vehicles).
Some distortion of the image is normal.
Opening the tailgate may disturb the
display.
Off-Road camera
Refer to the General recommendations on the
use of driving and manoeuvring aids .
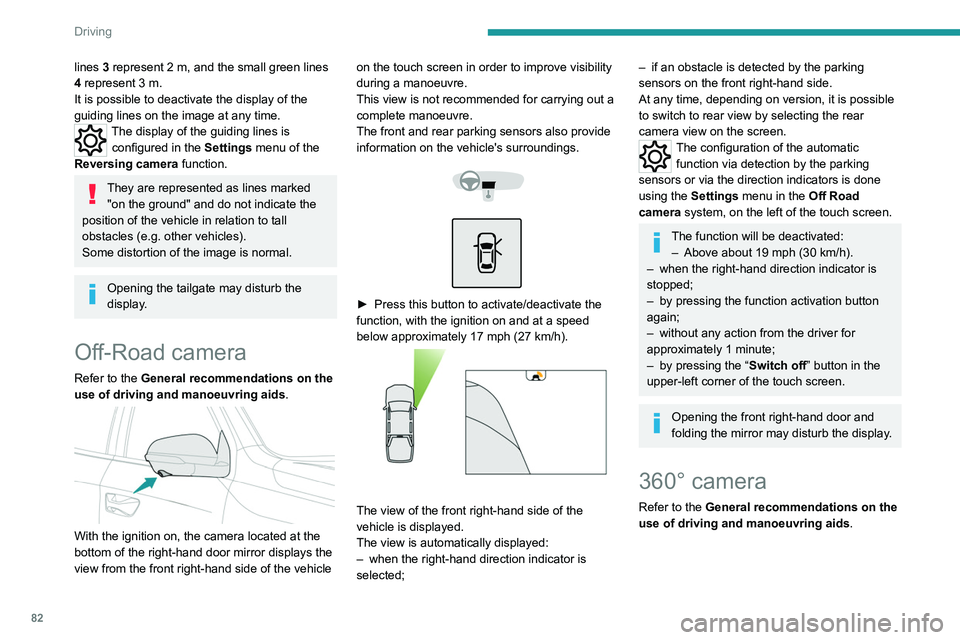
With the ignition on, the camera located at the
bottom of the right-hand door mirror displays the
view from the front right-hand side of the vehicle on the touch screen in order to improve visibility
during a manoeuvre.
This view is not recommended for carrying out a
complete manoeuvre.
The front and rear parking sensors also provide
information on the vehicle's surroundings.
► Press this button to activate/deactivate the
function, with the ignition on and at a speed
below approximately 17 mph (27
km/h).
The view of the front right-hand side of the
vehicle is displayed.
The view is automatically displayed:
–
when the right-hand direction indicator is
selected;
– if an obstacle is detected by the parking
sensors on the front right-hand side.
At any time, depending on version, it is possible
to switch to rear view by selecting the rear
camera view on the screen.
The configuration of the automatic
function via detection by the parking
sensors or via the direction indicators is done
using the
Settings menu in the Off Road
camera system, on the left of the touch screen.
The function will be deactivated:
– Above about 19 mph (30 km/h).
–
when the right-hand direction indicator is
stopped;
–
by pressing the function activation button
again;
–
without any action from the driver for
approximately 1 minute;
–
by pressing the “ Switch off” button in the
upper-left corner of the touch screen.
Opening the front right-hand door and
folding the mirror may disturb the display.
360° camera
Refer to the General recommendations on the
use of driving and manoeuvring aids .
Page 85 of 176
83
Driving
6
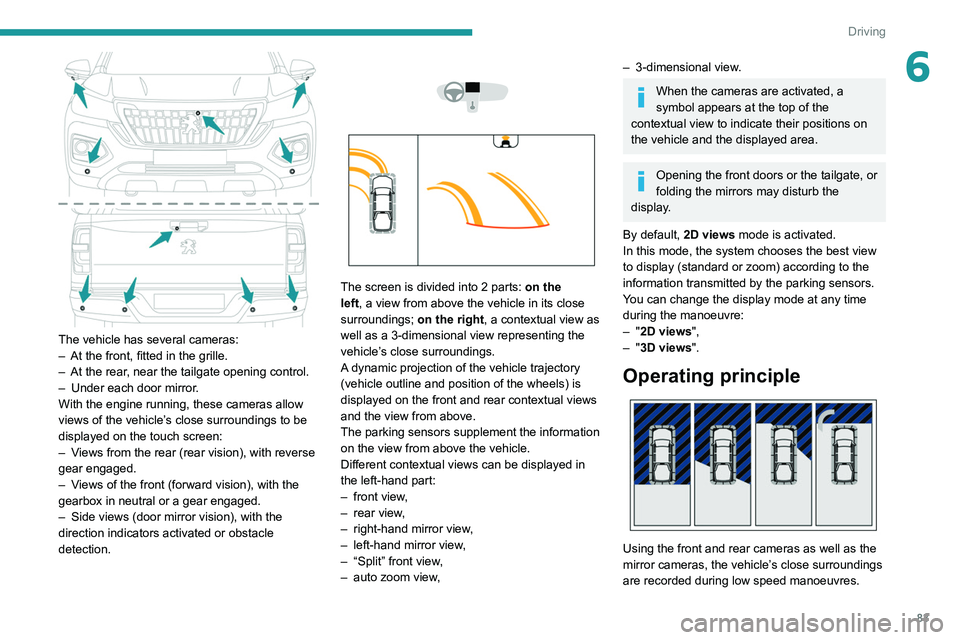
The vehicle has several cameras:
– At the front, fitted in the grille.
–
At the rear
, near the tailgate opening control.
–
Under each door mirror
.
With the engine running, these cameras allow
views of the vehicle’s close surroundings to be
displayed on the touch screen:
–
V
iews from the rear (rear vision), with reverse
gear engaged.
–
V
iews of the front (forward vision), with the
gearbox in neutral or a gear engaged.
–
Side views (door mirror vision), with the
direction indicators activated or obstacle
detection.
The screen is divided into 2 parts: on the
left, a view from above the vehicle in its close
surroundings; on the right, a contextual view as
well as a 3-dimensional view representing the
vehicle’s close surroundings.
A dynamic projection of the vehicle trajectory
(vehicle outline and position of the wheels) is
displayed on the front and rear contextual views
and the view from above.
The parking sensors supplement the information
on the view from above the vehicle.
Different contextual views can be displayed in
the left-hand part:
–
front view
,
–
rear view
,
–
right-hand mirror view
,
–
left-hand mirror view
,
–
“Split” front view
,
–
auto zoom view
,
– 3-dimensional view .
When the cameras are activated, a
symbol appears at the top of the
contextual view to indicate their positions on
the vehicle and the displayed area.
Opening the front doors or the tailgate, or
folding the mirrors may disturb the
display.
By default, 2D views mode is activated.
In this mode, the system chooses the best view
to display (standard or zoom) according to the
information transmitted by the parking sensors.
You can change the display mode at any time
during the manoeuvre:
–
"2D views",
–
"3D views".
Operating principle
Using the front and rear cameras as well as the
mirror cameras, the vehicle’s close surroundings
are recorded during low speed manoeuvres.
Page 86 of 176
84
Driving
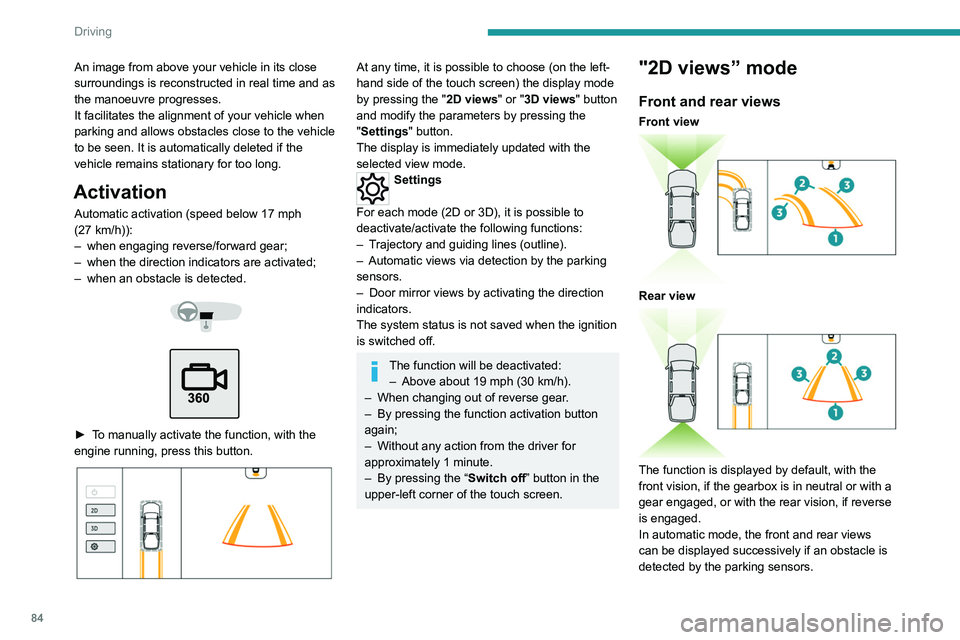
The guiding line 1 (in red) represents the end of
the bumper.
From the bumper, the thin orange guiding lines
2 represent the width of the vehicle, with
the mirrors unfolded and the wide orange
guiding lines 3 represent the trajectory of the
vehicle.
Lines 2 and 3 are oriented according to the
position of the steering wheel.
The system is deactivated:
– Automatically above about 19 mph (30 km/h)
(the image disappears temporarily from 12 mph
(20 km/h)).
– By pressing the function activation button
again.
Door mirror views
The door mirror views make it possible to
visualise the areas located under each mirror as
well as all of the front lateral sides of the vehicle
in order to manoeuvre the vehicle with the
surrounding obstacles.
An image from above your vehicle in its close
surroundings is reconstructed in real time and as
the manoeuvre progresses.
It facilitates the alignment of your vehicle when
parking and allows obstacles close to the vehicle
to be seen. It is automatically deleted if the
vehicle remains stationary for too long.
Activation
Automatic activation (speed below 17 mph
(27 km/h)):
–
when engaging reverse/forward gear;
–
when the direction indicators are activated;
–
when an obstacle is detected.
► To manually activate the function, with the
engine running, press this button.
At any time, it is possible to choose (on the left-
hand side of the touch screen) the display mode
by pressing the " 2D views" or "3D views" button
and modify the parameters by pressing the
"Settings" button.
The display is immediately updated with the
selected view mode.
Settings
For each mode (2D or 3D), it is possible to
deactivate/activate the following functions:
–
T
rajectory and guiding lines (outline).
–
Automatic views via detection by the parking
sensors.
–
Door mirror views by activating the direction
indicators.
The system status is not saved when the ignition
is switched off.
The function will be deactivated: – Above about 19 mph (30 km/h).
–
When changing out of reverse gear
.
–
By pressing the function activation button
again;
–
Without any action from the driver for
approximately 1 minute.
–
By pressing the “
Switch off” button in the
upper-left corner of the touch screen.
"2D views” mode
Front and rear views
Front view
Rear view
The function is displayed by default, with the
front vision, if the gearbox is in neutral or with a
gear engaged, or with the rear vision, if reverse
is engaged.
In automatic mode, the front and rear views
can be displayed successively if an obstacle is
detected by the parking sensors.
Page 87 of 176
85
Driving
6The guiding line 1 (in red) represents the end of
the bumper.
From the bumper, the thin orange guiding
lines
2 represent the width of the vehicle, with
the mirrors unfolded and the wide orange
guiding
lines 3 represent the trajectory of the
vehicle.
Lines 2 and 3 are oriented according to the
position of the steering wheel.
The system is deactivated:
–
Automatically above about 19 mph (30
km/h)
(the image disappears temporarily from 12 mph
(20
km/h)).
–
By pressing the function activation button
again.
Door mirror views
The door mirror views make it possible to
visualise the areas located under each mirror as
well as all of the front lateral sides of the vehicle
in order to manoeuvre the vehicle with the
surrounding obstacles. This view is not recommended for carrying out a
complete manoeuvre.
This view is automatically available via detection
by the parking sensors or by selecting the
direction indicators (the view of the side
concerned is displayed).
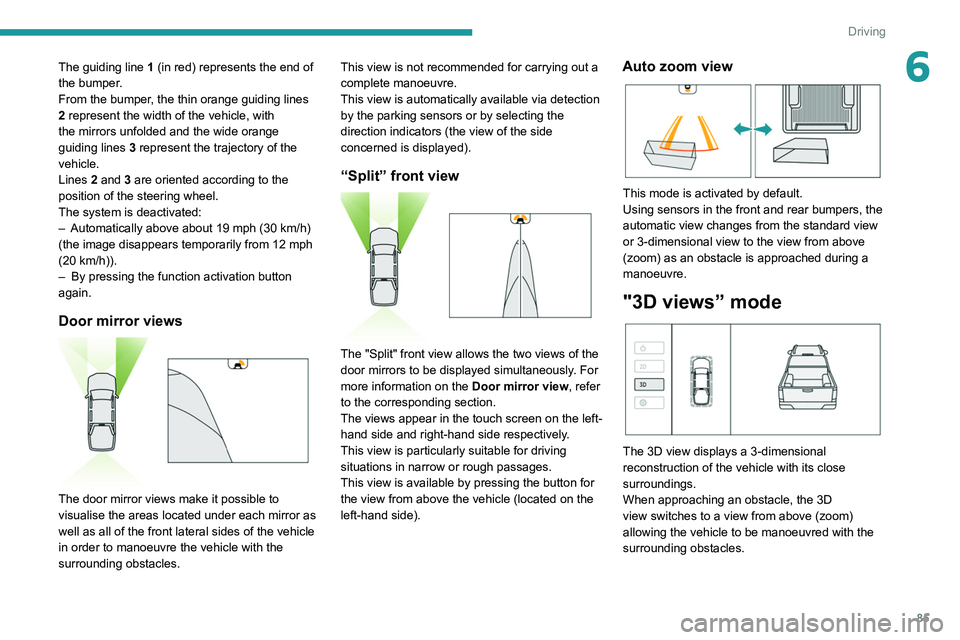
“Split” front view
The "Split" front view allows the two views of the
door mirrors to be displayed simultaneously. For
more information on the
Door mirror view, refer
to the corresponding section.
The views appear in the touch screen on the left-
hand side and right-hand side respectively.
This view is particularly suitable for driving
situations in narrow or rough passages.
This view is available by pressing the button for
the view from above the vehicle (located on the
left-hand side).
Auto zoom view
This mode is activated by default.
Using sensors in the front and rear bumpers, the
automatic view changes from the standard view
or 3-dimensional view to the view from above
(zoom) as an obstacle is approached during a
manoeuvre.
"3D views” mode
The 3D view displays a 3-dimensional
reconstruction of the vehicle with its close
surroundings.
When approaching an obstacle, the 3D
view switches to a view from above (zoom)
allowing the vehicle to be manoeuvred with the
surrounding obstacles.
Page 142 of 176
140
Alphabetical index
H
Hazard warning lamps 48, 104
headlamp adjustment
44
Headlamp adjustment
44
Headlamp beam height
44
Headlamps, automatic illumination
44
Headlamps, dipped beam
11 0 – 111
Headlamps, halogen
11 0 – 111
Headlamps, main beam
11 0 – 111
Head restraints, front
25
Head restraints, rear
27, 29–30
Heating
31–33, 35
Hill Assist Descent Control (HADC)
51
Hill start assist
72–73
Hooks
38
Horn
49
I
Ignition 66
Ignition on
66
Ignition switch
63–64
Immobiliser, electronic
63
Indicator, coolant temperature
11
Indicators, direction
43, 111
Inflating tyres
95, 126
Infrared camera
75
Instrument panel
7, 12, 75
ISOFIX mountings
59
J
Jack 106–107
Jump starting
11 7
K
Key 16–17, 20
Key, electronic
18–19
Keyless Entry and Starting
18, 65
Key not recognised
66
Key with remote control
16–17, 63
Kit, hands-free
129–130, 134
L
Labels, identification 125
Lamps, parking
44
Lamps, rear
11 2
Lams with Full LED technology
43
Lane Departure Warning System
(LDWS)
78, 80
Leather (care)
103
LEDs - Light-emitting diodes
43, 110, 112
Level, brake fluid
93
Level, Diesel additive
95
Level, engine coolant
11, 93
Level, engine oil
92
Level, power steering fluid
93
Levels and checks
91–94
Level, screenwash fluid 46, 94
Light-emitting diodes - LEDs
43, 110, 112
Lighting
40
Lighting, cornering
43
Lighting dimmer
12
Lighting, exterior
42
Lighting, guide-me home
45
Lighting, interior
38
Lighting, mood
12
Lighting, welcome
45
Loading
40, 90
Load restraint
40
Locating your vehicle
17
Locking
17–18
Locking from the inside
19
Locking the doors
19
Low fuel level
88
M
Maintenance 96
Maintenance (advice)
102
Maintenance, routine
75, 94, 96
Manoeuvring aids (recommendations)
74
Map reading lamps
38
Markings, identification
125
Mat
37, 75
Mirror, rear view
28
Mirrors, door
28, 35
Mirror, vanity
36
Mode, driving
71
Page 167 of 176

1
Overview
Instruments and controls
These illustrations and descriptions are intended
as a guide. The presence and location of some
elements vary depending on the version or trim
level.
1.Electric windows
Central locking/unlocking
2. Side switch panel
3. Horn
Driver front airbag
4. Instrument panel
5. Front courtesy/map reading lamps
6. Glasses holder
7. Interior rear view mirror
8. Monochrome screen or touch screen
9. Heating/air conditioning controls
10. Central switch panel (lower and upper)
11 . Audio USB socket/Charger USB socket
12. Key ignition switch or button START/STOP 13.
2H, 4H and 4L transmission mode selector
14. Gearbox
15. Sport/Eco button
16. Parking brake
Cigarette lighter/12 V (120 W) accessory socket
17. Front passenger airbag
18. Glove box
19. Deactivate front passenger airbag (on the
side of the dashboard)