2021 Peugeot Landtrek parking sensors
[x] Cancel search: parking sensorsPage 86 of 176

84
Driving
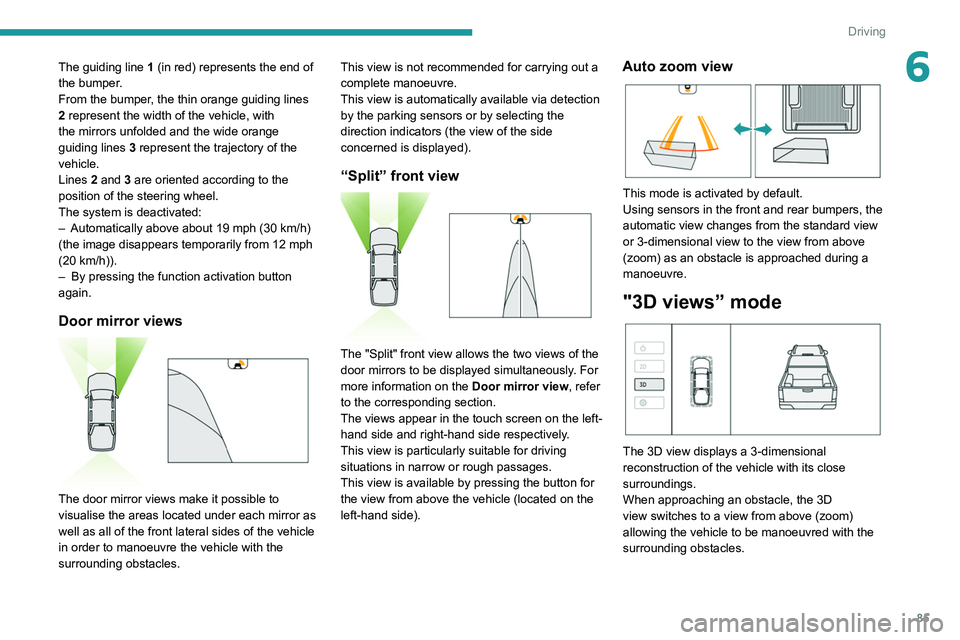
The guiding line 1 (in red) represents the end of
the bumper.
From the bumper, the thin orange guiding lines
2 represent the width of the vehicle, with
the mirrors unfolded and the wide orange
guiding lines 3 represent the trajectory of the
vehicle.
Lines 2 and 3 are oriented according to the
position of the steering wheel.
The system is deactivated:
– Automatically above about 19 mph (30 km/h)
(the image disappears temporarily from 12 mph
(20 km/h)).
– By pressing the function activation button
again.
Door mirror views
The door mirror views make it possible to
visualise the areas located under each mirror as
well as all of the front lateral sides of the vehicle
in order to manoeuvre the vehicle with the
surrounding obstacles.
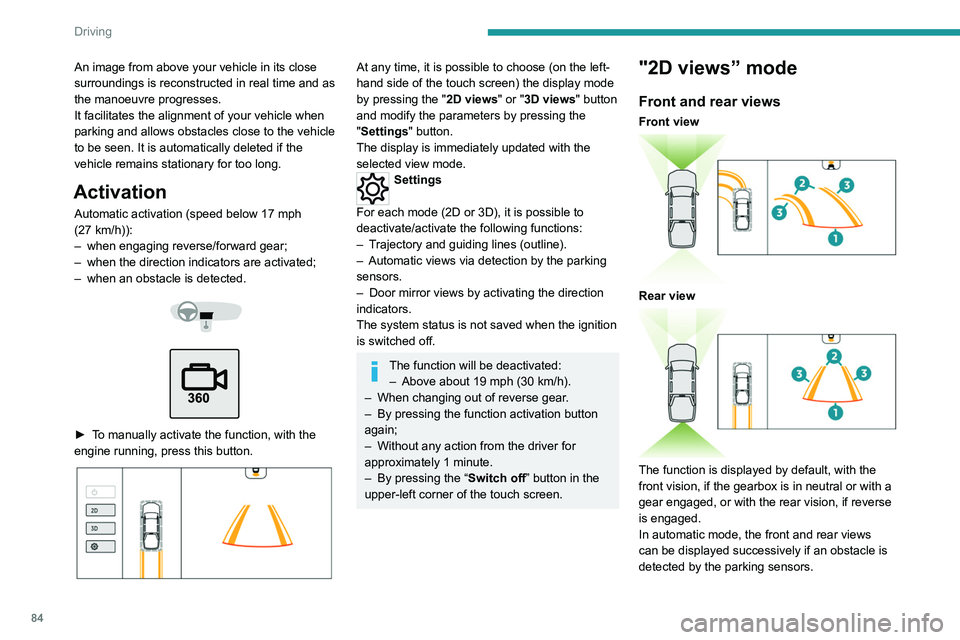
An image from above your vehicle in its close
surroundings is reconstructed in real time and as
the manoeuvre progresses.
It facilitates the alignment of your vehicle when
parking and allows obstacles close to the vehicle
to be seen. It is automatically deleted if the
vehicle remains stationary for too long.
Activation
Automatic activation (speed below 17 mph
(27 km/h)):
–
when engaging reverse/forward gear;
–
when the direction indicators are activated;
–
when an obstacle is detected.
► To manually activate the function, with the
engine running, press this button.
At any time, it is possible to choose (on the left-
hand side of the touch screen) the display mode
by pressing the " 2D views" or "3D views" button
and modify the parameters by pressing the
"Settings" button.
The display is immediately updated with the
selected view mode.
Settings
For each mode (2D or 3D), it is possible to
deactivate/activate the following functions:
–
T
rajectory and guiding lines (outline).
–
Automatic views via detection by the parking
sensors.
–
Door mirror views by activating the direction
indicators.
The system status is not saved when the ignition
is switched off.
The function will be deactivated: – Above about 19 mph (30 km/h).
–
When changing out of reverse gear
.
–
By pressing the function activation button
again;
–
Without any action from the driver for
approximately 1 minute.
–
By pressing the “
Switch off” button in the
upper-left corner of the touch screen.
"2D views” mode
Front and rear views
Front view
Rear view
The function is displayed by default, with the
front vision, if the gearbox is in neutral or with a
gear engaged, or with the rear vision, if reverse
is engaged.
In automatic mode, the front and rear views
can be displayed successively if an obstacle is
detected by the parking sensors.
Page 87 of 176

85
Driving
6The guiding line 1 (in red) represents the end of
the bumper.
From the bumper, the thin orange guiding
lines
2 represent the width of the vehicle, with
the mirrors unfolded and the wide orange
guiding
lines 3 represent the trajectory of the
vehicle.
Lines 2 and 3 are oriented according to the
position of the steering wheel.
The system is deactivated:
–
Automatically above about 19 mph (30
km/h)
(the image disappears temporarily from 12 mph
(20
km/h)).
–
By pressing the function activation button
again.
Door mirror views
The door mirror views make it possible to
visualise the areas located under each mirror as
well as all of the front lateral sides of the vehicle
in order to manoeuvre the vehicle with the
surrounding obstacles. This view is not recommended for carrying out a
complete manoeuvre.
This view is automatically available via detection
by the parking sensors or by selecting the
direction indicators (the view of the side
concerned is displayed).
“Split” front view
The "Split" front view allows the two views of the
door mirrors to be displayed simultaneously. For
more information on the
Door mirror view, refer
to the corresponding section.
The views appear in the touch screen on the left-
hand side and right-hand side respectively.
This view is particularly suitable for driving
situations in narrow or rough passages.
This view is available by pressing the button for
the view from above the vehicle (located on the
left-hand side).
Auto zoom view
This mode is activated by default.
Using sensors in the front and rear bumpers, the
automatic view changes from the standard view
or 3-dimensional view to the view from above
(zoom) as an obstacle is approached during a
manoeuvre.
"3D views” mode
The 3D view displays a 3-dimensional
reconstruction of the vehicle with its close
surroundings.
When approaching an obstacle, the 3D
view switches to a view from above (zoom)
allowing the vehicle to be manoeuvred with the
surrounding obstacles.
Page 104 of 176

102
Practical information
Bodywork
High-gloss paint
Do not use abrasive products, solvents,
petrol or oil to clean the bodywork.
Never use an abrasive sponge to clean
stubborn stains - risk of scratching the
paintwork!
Do not apply polish in strong sunshine, or to
plastic or rubber parts.
Use a soft cloth and soapy water or a pH
neutral product.
Gently wipe the bodywork with a clean
microfibre cloth.
Apply polish with the vehicle clean and dry.
Comply with the instructions for use stated on
the product.
Decals
(Depending on version)
Do not use a high-pressure washer to
clean the vehicle - risk of damaging or
detaching the decals!
Use a high-flow hose (temperature
between 25°C and 40°C).
Place the jet of water perpendicular to the
surface to be cleaned.
Rinse the vehicle with demineralised water.
► Install the seal on the intake manifold and fit
the throttle body B, making sure that the seal
does not fall.
For reassembly, carry out the operations in the
reverse order to those for removal. Tighten the
screws to the correct tightening torque.
Changing to free-wheeling
In certain situations, you must allow the vehicle
to free-wheel (while being towed, on a rolling
road, in an automatic car wash, or being
transported by rail or sea freight, etc.).
The procedure differs depending on the type of
gearbox and transmission.
/
To release them
► With the vehicle stationary and the engine
running, depress the brake pedal and release
the parking brake.
►
With a manual gearbox, move the gear lever
into neutral.
►
With an automatic gearbox, select position N
.
►
For 4-wheel drive vehicles (4x4), put the
transmission selector in 2H
mode.
►
Switch the ignition off.
Advice on care and maintenance
General recommendations
Observe the following recommendations to avoid
damaging the vehicle.
Exterior
Never use a high-pressure jet wash in
the engine compartment - risk of
damaging the electrical components!
Do not wash the vehicle in bright sunshine or
extremely cold conditions.
When washing the vehicle in an
automatic roller-brush car wash, be sure
to lock the doors and, depending on version,
move the electronic key away.
When using a pressure washer, hold the
lance at least 30 cm from the vehicle
(particularly when cleaning areas containing
chipped paint, sensors or seals).
Promptly clean up any stains containing
chemicals liable to damage the vehicle's
paintwork (including tree resin, bird
droppings, insect secretions, pollen and tar).
Depending on the environment, clean the
vehicle frequently to remove salty deposits
(in coastal areas), soot (in industrial areas)
and mud/salts (in wet or cold areas). These
substances can be highly corrosive.
Contact a PEUGEOT dealer or a qualified
workshop for advice on removing stubborn
stains requiring special products (such as tar
or insect removers).
Apply silicone oil to the door and window
seals every year and regularly lubricate the
door hinges and the locks.
To avoid damaging the seals when the vehicle
is parked for a long time, apply silicone-based
lubricant to the door seals and wax on the
bodywork in contact with the seals.
Preferably, have paint touch-ups performed
by a PEUGEOT dealer or a qualified
workshop.
Interior
When washing the vehicle, never use a
water hose or high-pressure jet to clean
the interior.
Liquids carried in cups or other open
containers can spill, presenting a risk of
damage to the instruments and controls and
the controls located on the centre console. Be
vigilant!
When cleaning the windows, never use glass
cleaner on the heated rear screen.
Do not use corrosive cleaning products to
clean the surface of the vehicle windows.
Clean plastic components with a damp cotton
cloth dipped in a neutral pH and non-abrasive
solution. Clean oily or difficult stains with a
solvent-free product.
Page 116 of 176

11 4
In the event of a breakdown
PEUGEOT accepts no responsibility for
the cost incurred in repairing the vehicle
or for rectifying malfunctions resulting from
the installation of accessories not supplied or
not recommended by PEUGEOT and not
installed in accordance with its recommendations, in particular when the
combined power consumption of all of the
additional equipment connected exceeds 10
milliamperes.Fuses in the dashboard
The fusebox is located in the lower dashboard
(left-hand side).
To access the fuses, follow the same procedure
as described for accessing the fuse replacement
tools.
Table of fuses
Fuse N° Rating
(Amps) Functions
F6 30 ARear screen defrosting.
F9 20 AFolding door mirrors.
F17 10 AGlove box lighting.
F21 15 AElectric passenger seat.
F22 15 AAlarm (retrofit).
F25 or F45 25 A or 10 AReversing lamps.
F26 10 AElectric driver’s seat.
F31 10 ACigarette lighter/12
V socket.
F34 15 ARain sensor (automatic wipers).
F36 10 AReversing radar (parking sensors).
F39 7.5 ABrake lamps.
F41 7.5 ADoor mirror defrosting.
F42 20 A12
V socket (in the loading bay).
F43/F44 10 AFront/Rear sidelamps.
Engine compartment fuses
The fusebox is placed in the engine
compartment near the battery.
Accessing the fuses
Petrol engine
Table of fuses
Diesel engine box
Fuse N° Rating
(Amps) Functions
F3 25 AHeating and ventilation.
F38 30 AElectric windows.
F46 25 AWipers.
F52/F53 10 ARight-hand/Left-hand sidelamps.
F54/F55 10 ARight-hand/Left-hand front foglamp.
F56/F57 10 ARight-hand/Left-hand dipped beam headlamp.
Page 143 of 176

141
Alphabetical index
Mountings, ISOFIX 59
N
Normal mode 71
O
Obstacle detection 80
Off-road camera
82
Oil change
92, 99
Oil consumption
92
OIl, engine
92, 99
On-board tools
105–106
Opening the bonnet
90–91
Opening the boot
18
Opening the doors
18, 21
Opening the windows
17
Over-speed buzzer
76
P
Pads, brake 95
Paint
103, 125
Paint colour code
125
Parking brake
66, 95
Parking sensors, audible and visual
80
Parking sensors, front
81
Parking sensors, rear
80
Plates, identification 125
Player, Apple®
129
Player, USB
129, 133–134
Port, USB
36, 129, 133–135
Pressures, tyres
95, 126
Pre-tensioning seat belts
54
Priming pump
105
Priming the fuel system
105
Protecting children
55–59
Puncture
106
R
Radio 128, 133
Reading lamps
38
Rear differential locking
67
Rear screen, demisting
35
Recharging the battery
11 8
Recirculation, air
34
Recovery
119, 121
Regeneration of the particle filter
95
Reinitialisation of the under-inflation
detection system
74
Reinitialising the remote control
21
Reminder, key in ignition
64
Reminder, lighting on
43
Remote control
16–20
Removing a wheel
107–109
Removing the mat
37
Replacing bulbs
110, 112
Replacing fuses
113–114
Replacing the air filter 94, 99
Replacing the battery
98
Replacing the Diesel filter
100
Replacing the oil filter
94, 100
Replacing the passenger compartment
filter
94, 98
Reservoir, screenwash
94
Reset trip
12
Rev counter
7
Reversing camera
75, 81
Reversing lamps
11 2
Roof bars
90
Running out of fuel (Diesel)
105
S
Safety, children 55–59
Saturation of the particle filter (Diesel)
95
Screen, monochrome
13
Screenwash
46
Screenwash, front
46
Seat angle
26
Seat belts
52–54
Seat belts, rear
53
Seat, bench front, 2-seat
26–27, 53
Seat, rear bench
29–30
Seats, electric
26
Seats, front
25–26
Seats, rear
29–30, 57
Selector, gear
70
Sensors (warnings)
75