2021 PEUGEOT EXPERT Touch screen
[x] Cancel search: Touch screenPage 4 of 324
2
Contents
■
OverviewOverview 4
Labels 6
■
Eco-driving
1InstrumentsInstrument Panel 10
Warning and indicator lamps 12
Indicators 18
Distance recorders 23
Lighting dimmer 23
Trip computer 24
Touch screen 25
Remotely operable functions (Electric) 27
Setting the date and time 27
2AccessElectronic key with remote control function and
built-in key, 29
Unlocking/Complete or selective unlocking 31
Back-up procedures 35
Central locking 38
Electric sliding side door(s) 39
General recommendations for the sliding
side doors
40
Hands-free sliding side door(s) 43
Side-hinged rear doors 44
Tailgate 45
Tailgate rear screen 45
Alarm 46
Electric windows 48
3Ease of use and comfortCorrect driving position 49
Front seats 49
2-seat front bench seat 51
Steering wheel adjustment 53
Mirrors 53
Moduwork 54
Precautions for the seats and bench seats 57
Fixed one-piece bench seat 58
Fixed rear seat and bench seat 60
Rear seat and bench seat on rails 62
Individual rear seat(s) on rails 64
Crew cab, fixed 66
Crew cab, folding 68
Interior fittings 69
Loading area fittings 72
Seating area fittings 73
Panoramic sunroof 75
Retractable sliding table 75
Heating and Ventilation 79
Heating 80
Manual air conditioning 80
Dual-zone automatic air conditioning 80
Front demisting - defrosting 82
Rear screen and/or door mirror
demisting/de-icing
83
Rear heating - air conditioning 83
Additional heating/ventilation system 84
A/C preconditioning (Electric) 86
Courtesy lamp(s) 87
4Lighting and visibilityLighting control stalk 89
Direction indicators 90
Daytime running lamps/Sidelamps 90
Automatic illumination of headlamps 90
Guide-me-home and welcome lighting 91
Cornering lighting 92
Automatic headlamp dipping 92
Headlamp beam height adjustment 93
Interior ambient lighting 93
Wiper control stalk 94
Automatic wipers 95
Changing a wiper blade 96
5SafetyGeneral safety recommendations 98
Hazard warning lamps 98
Emergency or assistance 99
Horn 100
Pedestrian horn (Electric) 100
Electronic stability control (ESC) 101
Advanced Grip Control 103
Seat belts 104
Airbags 107
Child seats 11 0
Deactivating the front passenger airbag 11 2
ISOFIX and i-Size child seats 120
Manual child lock 134
Electric child lock 135
Child lock on rear windows 135
6DrivingDriving recommendations 136
Starting/switching off the engine 138
Manual parking brake 141
Electric parking brake 142
Hill start assist 144
6-speed manual gearbox 145
Gear shift indicator 145
Automatic gearbox 146
Drive selector (Electric) 149
Driving modes (Electric) 150
Stop & Start 150
Tyre under-inflation detection 152
Driving and manoeuvring aids - General
recommendations
154
Page 6 of 324
4
Overview
Presentation
Instruments and controls
These illustrations and descriptions are intended as a guide. The presence and
location of some components varies
according to the version, trim level and
country of sale.
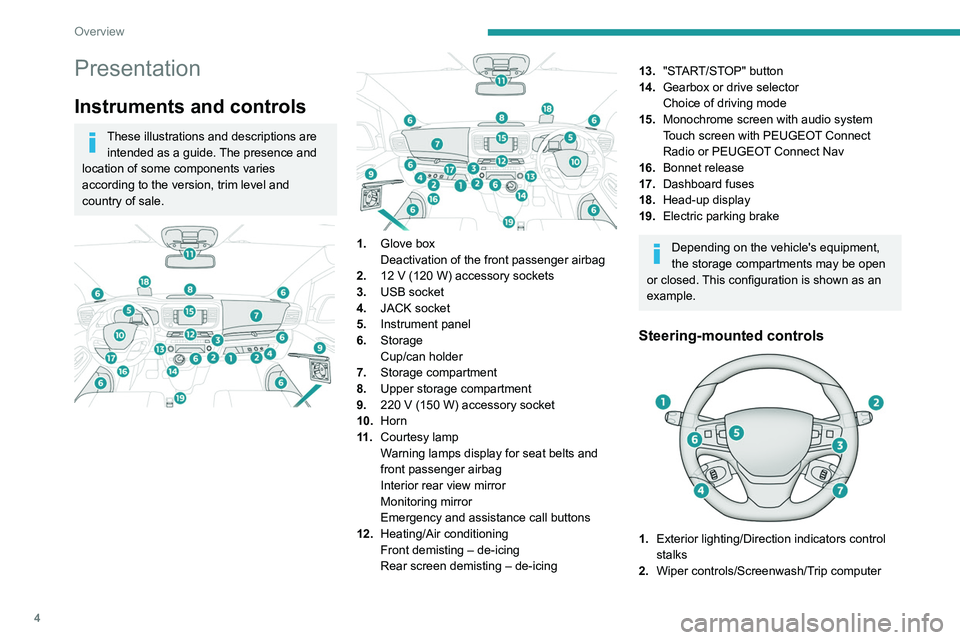
1. Glove box
Deactivation of the front passenger airbag
2. 12
V (120 W) accessory sockets
3. USB socket
4. JACK socket
5. Instrument panel
6. Storage
Cup/can holder
7. Storage compartment
8. Upper storage compartment
9. 220
V (150 W) accessory socket
10.Horn
11
.Courtesy lamp
Warning lamps display for seat belts and
front passenger airbag
Interior rear view mirror
Monitoring mirror
Emergency and assistance call buttons
12. Heating/Air conditioning
Front demisting – de-icing
Rear screen demisting – de-icing
13."START/STOP" button
14. Gearbox or drive selector
Choice of driving mode
15. Monochrome screen with audio system
Touch screen with PEUGEOT Connect
Radio or PEUGEOT Connect Nav
16. Bonnet release
17. Dashboard fuses
18. Head-up display
19. Electric parking brake
Depending on the vehicle's equipment,
the storage compartments may be open
or closed. This configuration is shown as an
example.
Steering-mounted controls
1. Exterior lighting/Direction indicators control
stalks
2. Wiper controls/Screenwash/Trip computer
3.Audio system setting controls
4. Controls for Cruise control/Speed limiter/
Adaptive Cruise Control
5. Instrument panel display mode selection
wheel
6. Voice synthesis control
Volume adjustment
7. Audio system setting controls
Central control bar
1. Locking/unlocking from the inside
2. Left-hand electric sliding side door
3. Electric child lock
4. Right-hand electric sliding side door
5. Cab/loading area selectivity
6. Hazard warning lamps
7. DSC/ASR system
8. Tyre under-inflation detection
9. Stop & Start (Diesel)
Page 13 of 324
11
Instruments
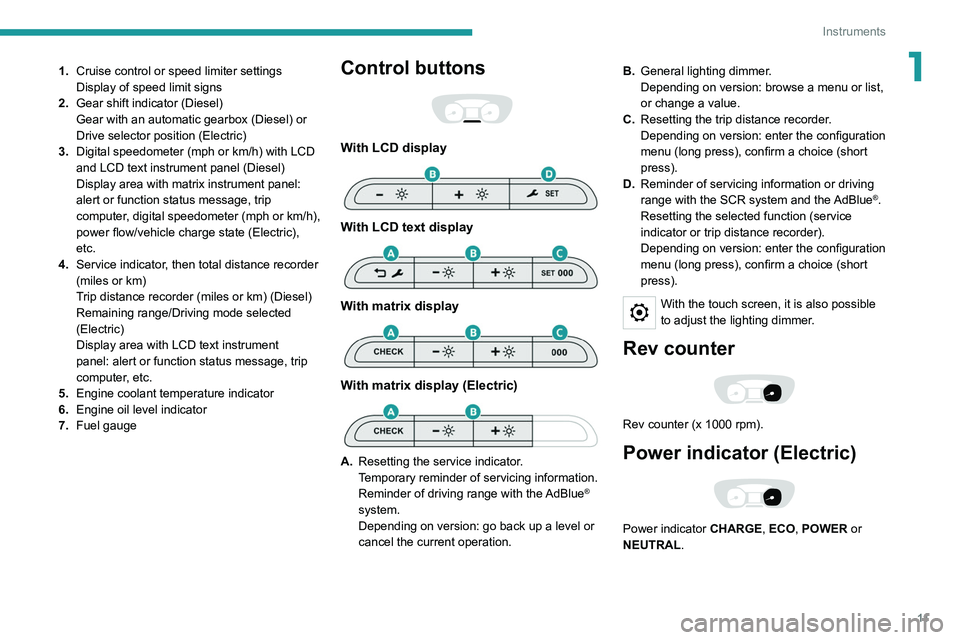
11.Cruise control or speed limiter settings
Display of speed limit signs
2. Gear shift indicator (Diesel)
Gear with an automatic gearbox (Diesel) or
Drive selector position (Electric)
3. Digital speedometer (mph or km/h) with LCD
and LCD text instrument panel (Diesel)
Display area with matrix instrument panel:
alert or function status message, trip
computer, digital speedometer (mph or km/h),
power flow/vehicle charge state (Electric),
etc.
4. Service indicator, then total distance recorder
(miles or km)
Trip distance recorder (miles or km) (Diesel)
Remaining range/Driving mode selected
(Electric)
Display area with LCD text instrument
panel: alert or function status message, trip
computer, etc.
5. Engine coolant temperature indicator
6. Engine oil level indicator
7. Fuel gaugeControl buttons
With LCD display
With LCD text display
With matrix display
With matrix display (Electric)
A.Resetting the service indicator.
Temporary reminder of servicing information.
Reminder of driving range with the AdBlue
®
system.
Depending on version: go back up a level or
cancel the current operation. B.
General lighting dimmer.
Depending on version: browse a menu or list,
or change a value.
C. Resetting the trip distance recorder.
Depending on version: enter the configuration
menu (long press), confirm a choice (short
press).
D. Reminder of servicing information or driving
range with the SCR system and the
AdBlue®.
Resetting the selected function (service
indicator or trip distance recorder).
Depending on version: enter the configuration
menu (long press), confirm a choice (short
press).
With the touch screen, it is also possible
to adjust the lighting dimmer.
Rev counter
Rev counter (x 1000 rpm).
Power indicator (Electric)
Power indicator CHARGE, ECO, POWER or
NEUTRAL.
Page 22 of 324
20
Instruments
With BlueHDi (Euro 6.2/6.3) engines
Warning/indicator
lamps on Action Remaining
range
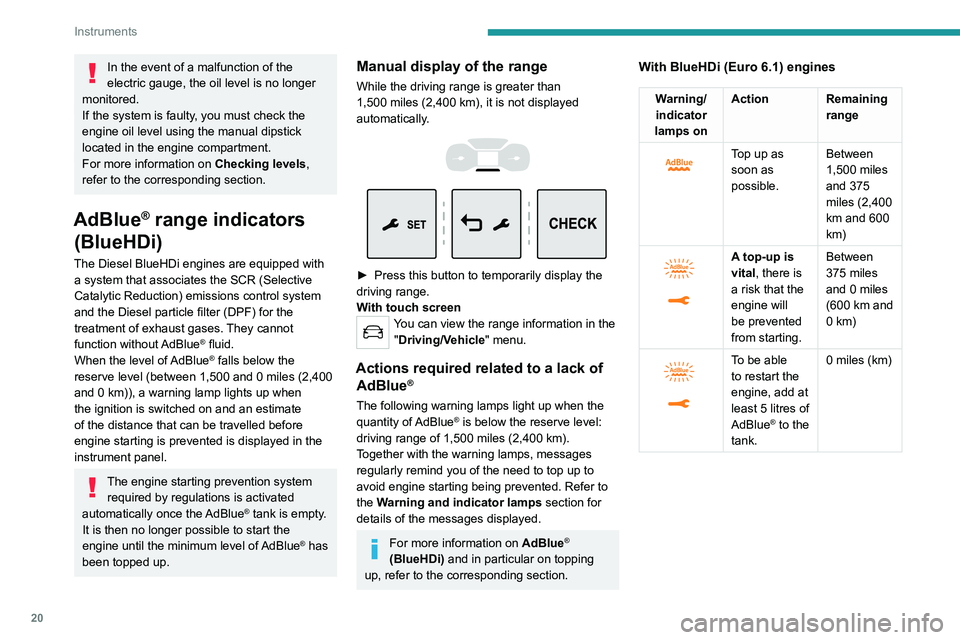
Top up. Between 1,500 miles
and 500
miles (2,400
km and 800
km)
Top up as
soon as
possible.Between
500 miles
and 62
miles (800
km and
100 km)
A top-up is
vital, there is
a risk that the
engine will
be prevented
from starting.Between 62
miles and 0
miles (100
km and 0
km)
To be able
to restart the
engine, add at
least 5 litres of
AdBlue
® to the
tank. 0 miles (km)
In the event of a malfunction of the
electric gauge, the oil level is no longer
monitored.
If the system is faulty, you must check the
engine oil level using the manual dipstick
located in the engine compartment.
For more information on Checking levels,
refer to the corresponding section.
AdBlue® range indicators
(BlueHDi)
The Diesel BlueHDi engines are equipped with
a system that associates the SCR (Selective
Catalytic Reduction) emissions control system
and the Diesel particle filter (DPF) for the
treatment of exhaust gases. They cannot
function without AdBlue
® fluid.
When the level of AdBlue® falls below the
reserve level (between 1,500 and 0 miles (2,400
and 0
km)), a warning lamp lights up when
the ignition is switched on and an estimate
of the distance that can be travelled before
engine starting is prevented is displayed in the
instrument panel.
The engine starting prevention system required by regulations is activated
automatically once the AdBlue
® tank is empty.
It is then no longer possible to start the
engine until the minimum level of AdBlue
® has
been topped up.
Manual display of the range
While the driving range is greater than
1,500 miles (2,400 km), it is not displayed
automatically.
► Press this button to temporarily display the
driving range.
W
ith touch screen
You can view the range information in the "Driving/Vehicle" menu.
Actions required related to a lack of AdBlue®
The following warning lamps light up when the
quantity of AdBlue® is below the reserve level:
driving range of 1,500 miles (2,400 km).
Together with the warning lamps, messages
regularly remind you of the need to top up to
avoid engine starting being prevented. Refer to
the Warning and indicator lamps section for
details of the messages displayed.
For more information on AdBlue®
(BlueHDi) and in particular on topping
up, refer to the corresponding section.
With BlueHDi (Euro 6.1) engines
Warning/ indicator
lamps on Action Remaining
range
Top up as
soon as
possible.Between
1,500 miles
and 375
miles (2,400
km and 600
km)
A top-up is
vital, there is
a risk that the
engine will
be prevented
from starting.Between
375 miles
and 0 miles
(600 km and
0 km)
To be able
to restart the
engine, add at
least 5 litres of
AdBlue
® to the
tank. 0 miles (km)
Page 26 of 324
24
Instruments
► Press this button for more than 2 seconds.
Definitions
Range
(miles or km)Distance that can still be travelled with the
fuel remaining in the tank (based on the
average fuel consumption over the last few miles
(kilometres) travelled).
This value may vary following a change in driving
style or terrain, leading to a significant change in
current fuel consumption.
When the range falls below 19 miles (30 km),
dashes are displayed.
After filling with at least 5 litres of fuel, the range
is recalculated and is displayed if it exceeds 62
miles (100 km).
If dashes instead of figures continue to be
displayed while driving, contact a PEUGEOT
dealer or a qualified workshop.
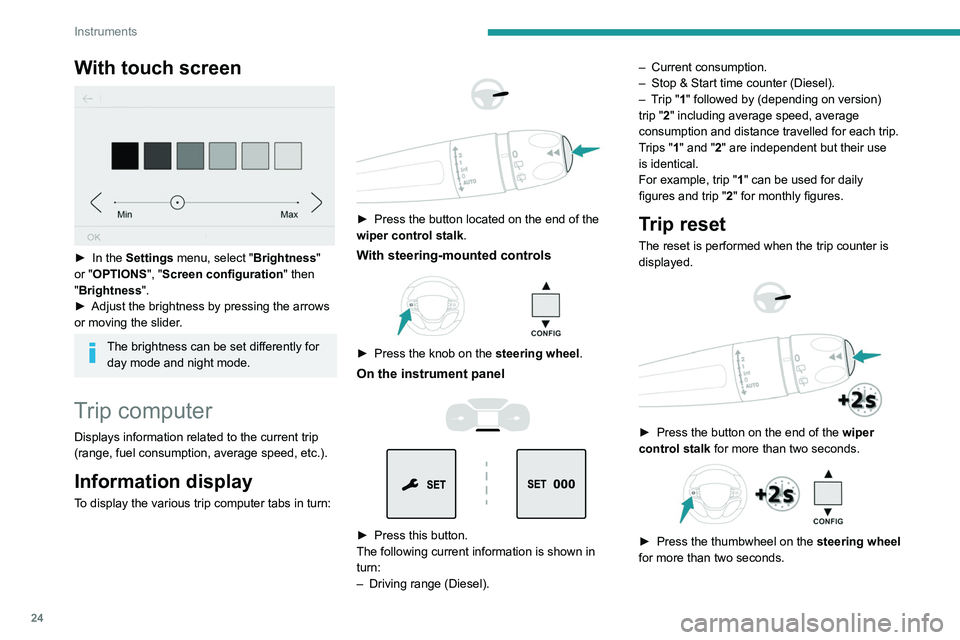
With touch screen
► In the Settings menu, select "Brightness"
or "OPTIONS ", "Screen configuration " then
"Brightness".
►
Adjust the brightness by pressing the arrows
or moving the slider
.
The brightness can be set differently for day mode and night mode.
Trip computer
Displays information related to the current trip
(range, fuel consumption, average speed, etc.).
Information display
To display the various trip computer tabs in turn:
► Press the button located on the end of the
wiper control stalk .
With steering-mounted controls
► Press the knob on the steering wheel.
On the instrument panel
► Press this button.
The following current information is shown in
turn:
–
Driving range (Diesel). –
Current consumption.
–
Stop & Start time counter (Diesel).
–
T
rip "1" followed by (depending on version)
trip "2" including average speed, average
consumption and distance travelled for each trip.
Trips "1" and "2" are independent but their use
is identical.
For example, trip "1" can be used for daily
figures and trip " 2" for monthly figures.
Trip reset
The reset is performed when the trip counter is
displayed.
► Press the button on the end of the wiper
control stalk for more than two seconds.
► Press the thumbwheel on the steering wheel
for more than two seconds.
Page 27 of 324
25
Instruments
1
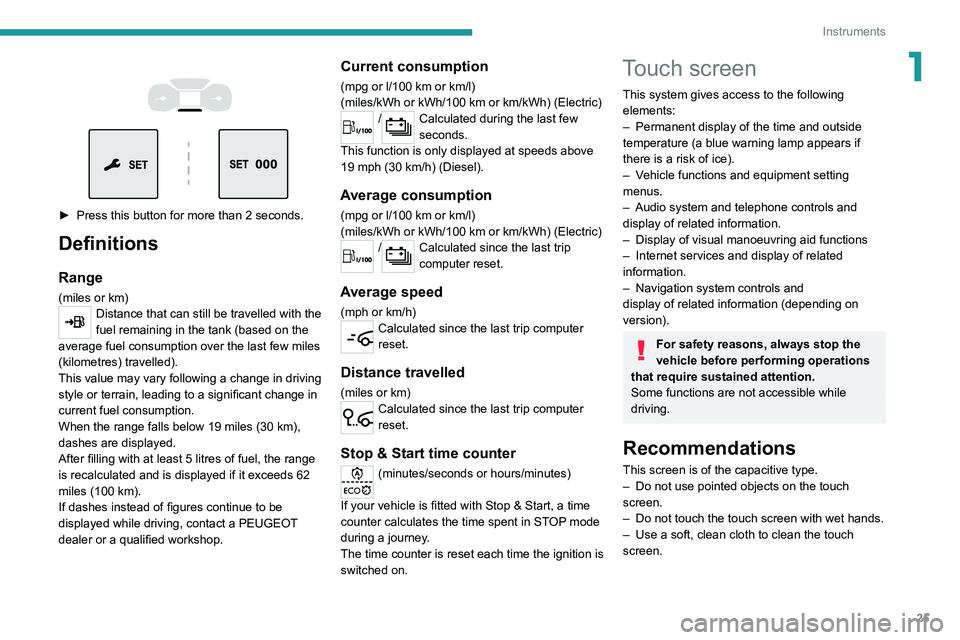
► Press this button for more than 2 seconds.
Definitions
Range
(miles or km)Distance that can still be travelled with the
fuel remaining in the tank (based on the
average fuel consumption over the last few miles
(kilometres) travelled).
This value may vary following a change in driving
style or terrain, leading to a significant change in
current fuel consumption.
When the range falls below 19 miles (30
km),
dashes are displayed.
After filling with at least 5 litres of fuel, the range
is recalculated and is displayed if it exceeds 62
miles (100
km).
If dashes instead of figures continue to be
displayed while driving, contact a PEUGEOT
dealer or a qualified workshop.
Current consumption
(mpg or l/100 km or km/l)
(miles/kWh or kWh/100 km or km/kWh) (Electric)
/Calculated during the last few
seconds.
This function is only displayed at speeds above
19 mph (30
km/h) (Diesel).
Average consumption
(mpg or l/100 km or km/l)
(miles/kWh or kWh/100 km or km/kWh) (Electric)
/Calculated since the last trip
computer reset.
Average speed
(mph or km/h)Calculated since the last trip computer
reset.
Distance travelled
(miles or km)Calculated since the last trip computer
reset.
Stop & Start time counter
(minutes/seconds or hours/minutes)
If your vehicle is fitted with Stop & Start, a time
counter calculates the time spent in STOP mode
during a journey.
The time counter is reset each time the ignition is
switched on.
Touch screen
This system gives access to the following elements:
–
Permanent display of the time and outside
temperature (a blue warning lamp appears if
there is a risk of ice).
–
V
ehicle functions and equipment setting
menus.
–
Audio system and telephone controls and
display of related information.
–
Display of visual manoeuvring aid functions
–
Internet services and display of
related
information.
–
Navigation system controls and
display
of related information (depending on
version).
For safety reasons, always stop the
vehicle before performing operations
that require sustained attention.
Some functions are not accessible while
driving.
Recommendations
This screen is of the capacitive type.
– Do not use pointed objects on the touch
screen.
–
Do not touch the touch screen with wet hands.
–
Use a soft, clean cloth to clean the touch
screen.
Page 28 of 324
26
Instruments
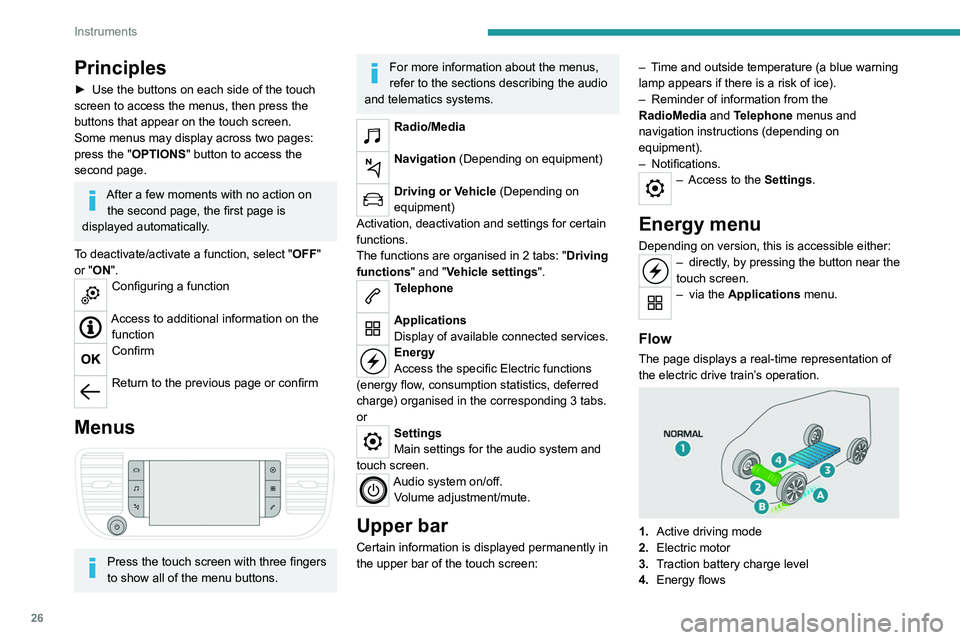
The energy flows have a specific colour for each
type of driving:
A.Blue: energy consumption
B. Green: energy recovery
Statistics
This page shows electrical energy consumption
statistics.
– Blue bar chart: directly consumed energy
supplied by the traction battery.
– Green bar chart: energy recovered during
deceleration and braking, used to recharge the
battery.
The average result for the current trip is stated in
kWh/100 km.
► You can change the displayed time scale by
pressing the - or + buttons.
A current trip is any trip of more than 20
minutes without switching off the ignition.
Charging
This page allows you to programme deferred
charging.
Principles
► Use the buttons on each side of the touch
screen to access the menus, then press the
buttons that appear on the touch screen.
Some menus may display across two pages:
press the "
OPTIONS" button to access the
second page.
After a few moments with no action on the second page, the first page is
displayed automatically.
To deactivate/activate a function, select " OFF"
or "ON".
Configuring a function
Access to additional information on the function
Confirm
Return to the previous page or confirm
Menus
Press the touch screen with three fingers
to show all of the menu buttons.
For more information about the menus,
refer to the sections describing the audio
and telematics systems.
Radio/Media
Navigation (Depending on equipment)
Driving or Vehicle (Depending on
equipment)
Activation, deactivation and settings for certain
functions.
The functions are organised in 2 tabs: " Driving
functions" and "Vehicle settings".
Telephone
Applications
Display of available connected services.
Energy
Access the specific Electric functions
(energy flow, consumption statistics, deferred
charge) organised in the corresponding 3 tabs.
or
Settings
Main settings for the audio system and
touch screen.
Audio system on/off. Volume adjustment/mute.
Upper bar
Certain information is displayed permanently in
the upper bar of the touch screen: –
T
ime and outside temperature (a blue warning
lamp appears if there is a risk of ice).
–
Reminder of information from the
RadioMedia
and Telephone menus and
navigation instructions (depending on
equipment).
–
Notifications.
– Access to the
Settings.
Energy menu
Depending on version, this is accessible either:– directly, by pressing the button near the
touch screen.
– via the Applications menu.
Flow
The page displays a real-time representation of
the electric drive train’s operation.
1.Active driving mode
2. Electric motor
3. Traction battery charge level
4. Energy flows
Page 30 of 324
28
Instruments
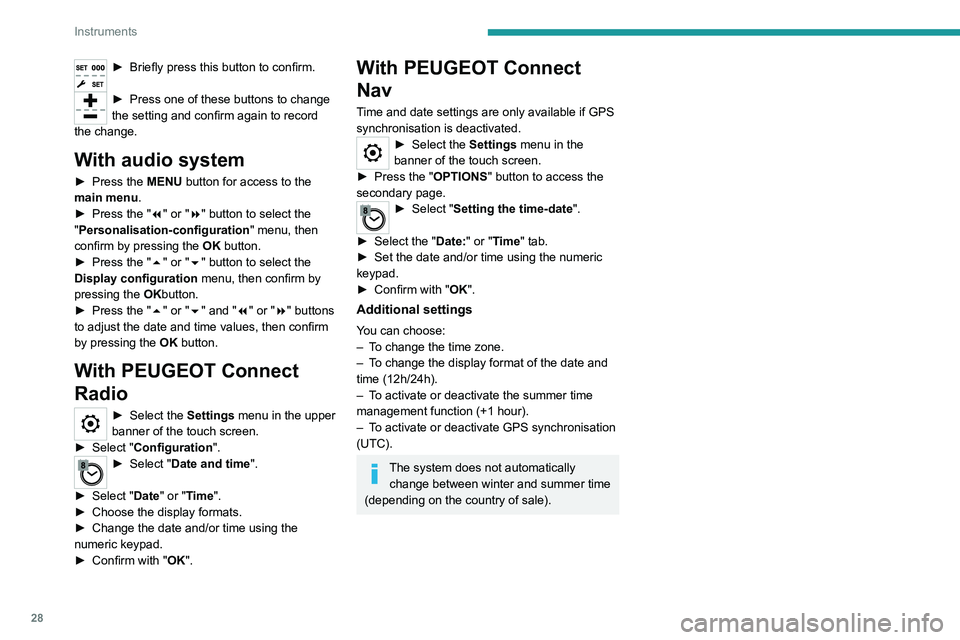
► Briefly press this button to confirm.
► Press one of these buttons to change
the setting and confirm again to record
the change.
With audio system
► Press the MENU button for access to the
main menu.
►
Press the "
7" or "8" button to select the
"Personalisation-configuration " menu, then
confirm by pressing the OK button.
►
Press the "
5" or "6" button to select the
Display configuration menu, then confirm by
pressing the OKbutton.
►
Press the "
5" or "6" and "7" or "8" buttons
to adjust the date and time values, then confirm
by pressing the OK button.
With PEUGEOT Connect
Radio
► Select the Settings menu in the upper
banner of the touch screen.
►
Select "
Configuration ".
► Select "Date and time".
►
Select "
Date" or "Time".
►
Choose the display formats.
►
Change the date and/or time using the
numeric keypad.
►
Confirm with "
OK".
With PEUGEOT Connect
Nav
Time and date settings are only available if GPS
synchronisation is deactivated.
► Select the Settings menu in the
banner of the touch screen.
►
Press the "
OPTIONS " button to access the
secondary page.
► Select " Setting the time-date".
►
Select the "
Date:" or "Time" tab.
►
Set the date and/or time using the numeric
keypad.
►
Confirm with "
OK".
Additional settings
You can choose:
– T o change the time zone.
–
T
o change the display format of the date and
time (12h/24h).
–
T
o activate or deactivate the summer time
management function (+1 hour).
–
T
o activate or deactivate GPS synchronisation
(UTC).
The system does not automatically change between winter and summer time
(depending on the country of sale).