2021 PEUGEOT EXPERT Front seats
[x] Cancel search: Front seatsPage 4 of 324
2
Contents
■
OverviewOverview 4
Labels 6
■
Eco-driving
1InstrumentsInstrument Panel 10
Warning and indicator lamps 12
Indicators 18
Distance recorders 23
Lighting dimmer 23
Trip computer 24
Touch screen 25
Remotely operable functions (Electric) 27
Setting the date and time 27
2AccessElectronic key with remote control function and
built-in key, 29
Unlocking/Complete or selective unlocking 31
Back-up procedures 35
Central locking 38
Electric sliding side door(s) 39
General recommendations for the sliding
side doors
40
Hands-free sliding side door(s) 43
Side-hinged rear doors 44
Tailgate 45
Tailgate rear screen 45
Alarm 46
Electric windows 48
3Ease of use and comfortCorrect driving position 49
Front seats 49
2-seat front bench seat 51
Steering wheel adjustment 53
Mirrors 53
Moduwork 54
Precautions for the seats and bench seats 57
Fixed one-piece bench seat 58
Fixed rear seat and bench seat 60
Rear seat and bench seat on rails 62
Individual rear seat(s) on rails 64
Crew cab, fixed 66
Crew cab, folding 68
Interior fittings 69
Loading area fittings 72
Seating area fittings 73
Panoramic sunroof 75
Retractable sliding table 75
Heating and Ventilation 79
Heating 80
Manual air conditioning 80
Dual-zone automatic air conditioning 80
Front demisting - defrosting 82
Rear screen and/or door mirror
demisting/de-icing
83
Rear heating - air conditioning 83
Additional heating/ventilation system 84
A/C preconditioning (Electric) 86
Courtesy lamp(s) 87
4Lighting and visibilityLighting control stalk 89
Direction indicators 90
Daytime running lamps/Sidelamps 90
Automatic illumination of headlamps 90
Guide-me-home and welcome lighting 91
Cornering lighting 92
Automatic headlamp dipping 92
Headlamp beam height adjustment 93
Interior ambient lighting 93
Wiper control stalk 94
Automatic wipers 95
Changing a wiper blade 96
5SafetyGeneral safety recommendations 98
Hazard warning lamps 98
Emergency or assistance 99
Horn 100
Pedestrian horn (Electric) 100
Electronic stability control (ESC) 101
Advanced Grip Control 103
Seat belts 104
Airbags 107
Child seats 11 0
Deactivating the front passenger airbag 11 2
ISOFIX and i-Size child seats 120
Manual child lock 134
Electric child lock 135
Child lock on rear windows 135
6DrivingDriving recommendations 136
Starting/switching off the engine 138
Manual parking brake 141
Electric parking brake 142
Hill start assist 144
6-speed manual gearbox 145
Gear shift indicator 145
Automatic gearbox 146
Drive selector (Electric) 149
Driving modes (Electric) 150
Stop & Start 150
Tyre under-inflation detection 152
Driving and manoeuvring aids - General
recommendations
154
Page 9 of 324
7
Overview
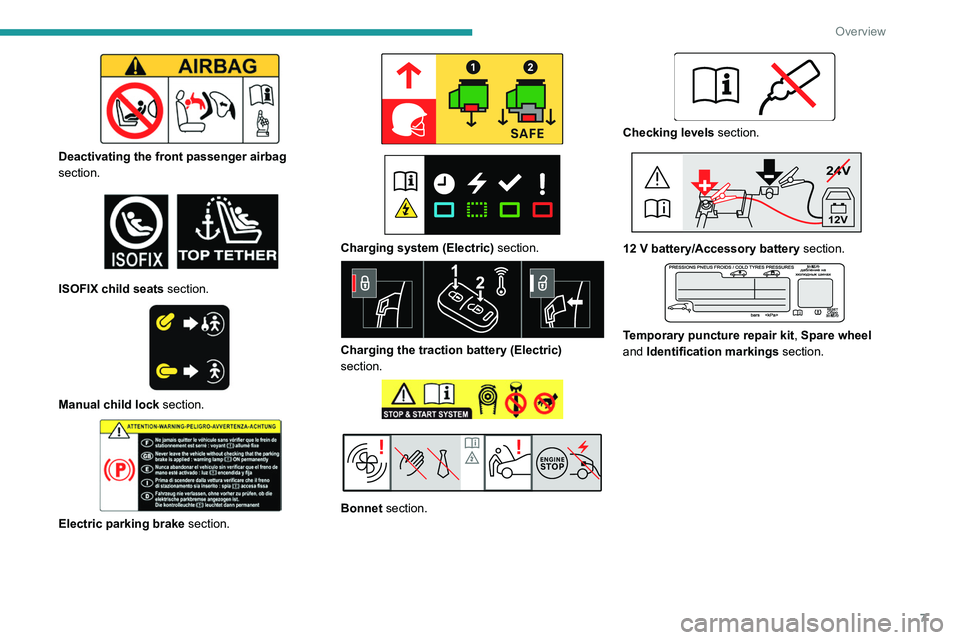
Deactivating the front passenger airbag
section.
ISOFIX child seats section.
Manual child lock section.
Electric parking brake section.
Charging system (Electric) section.
Charging the traction battery (Electric)
section.
Bonnet section.
Checking levels section.
24V
12V
12 V battery/Accessory battery section.
Temporary puncture repair kit, Spare wheel
and Identification markings section.
Page 51 of 324
49
Ease of use and comfort
3Correct driving position
Before taking to the road and to make the most
of the ergonomic layout of the instruments and
controls, carry out these adjustments in the
following order:
–
the height of the head restraint,
–
the seat backrest angle,
–
the seat cushion height,
–
the longitudinal position of the seat,
–
the height and reach of the steering wheel,
–
the rear view mirror and door mirrors.
Once these adjustments have been
made, check the instrument panel can be
viewed correctly from your driving position.
Manually-adjusted front
seats
For more information on the Seat belts,
refer to the corresponding section.
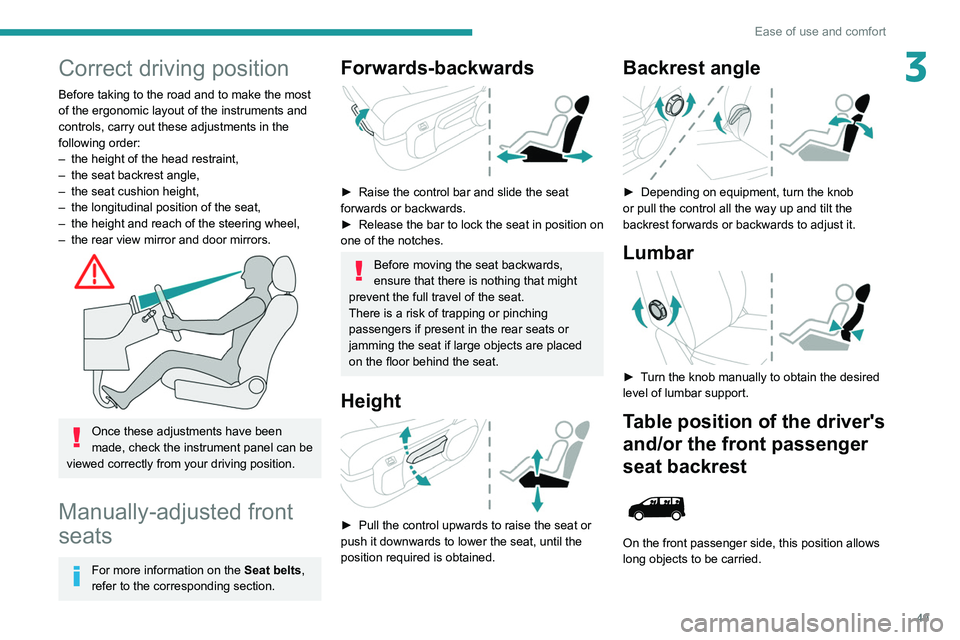
Forwards-backwards
► Raise the control bar and slide the seat
forwards or backwards.
►
Release the bar to lock the seat in position on
one of the notches.
Before moving the seat backwards,
ensure that there is nothing that might
prevent the full travel of the seat.
There is a risk of trapping or pinching
passengers if present in the rear seats or
jamming the seat if large objects are placed
on the floor behind the seat.
Height
► Pull the control upwards to raise the seat or
push it downwards to lower the seat, until the
position required is obtained.
Backrest angle
► Depending on equipment, turn the knob
or pull the control all the way up and tilt the
backrest forwards or backwards to adjust it.
Lumbar
► Turn the knob manually to obtain the desired
level of lumbar support.
Table position of the driver's
and/or the front passenger
seat backrest
On the front passenger side, this position allows
long objects to be carried.
Page 52 of 324
50
Ease of use and comfort
Head restraint height
adjustment
If fitted to your vehicle.
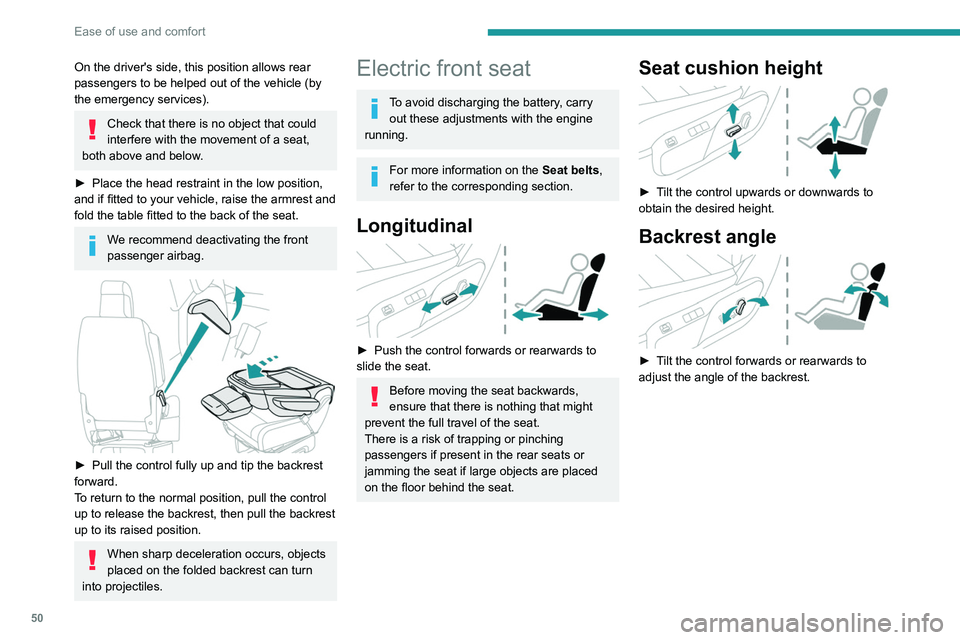
► To raise it, pull it upwards as far as possible
(notch).
► To remove it, press the lug A and pull it
upwards.
► To put it back in place, engage the head
restraint rods in the openings keeping them in
line with the seat backrest.
► To lower it, press the lug A and push down on
the head restraint at the same time.
The head restraint has a frame with notches which prevents it from lowering;
this is a safety device in case of impact.
The adjustment is correct when the upper
edge of the head restraint is level with the
top of the head.
On the driver's side, this position allows rear
passengers to be helped out of the vehicle (by
the emergency services).
Check that there is no object that could
interfere with the movement of a seat,
both above and below.
►
Place the head restraint in the low position,
and if fitted to your vehicle, raise the armrest and
fold the table fitted to the back of the seat.
We recommend deactivating the front
passenger airbag.
► Pull the control fully up and tip the backrest
forward.
T
o return to the normal position, pull the control
up to release the backrest, then pull the backrest
up to its raised position.
When sharp deceleration occurs, objects
placed on the folded backrest can turn
into projectiles.
Electric front seat
To avoid discharging the battery, carry out these adjustments with the engine
running.
For more information on the Seat belts,
refer to the corresponding section.
Longitudinal
► Push the control forwards or rearwards to
slide the seat.
Before moving the seat backwards,
ensure that there is nothing that might
prevent the full travel of the seat.
There is a risk of trapping or pinching
passengers if present in the rear seats or
jamming the seat if large objects are placed
on the floor behind the seat.
Seat cushion height
► Tilt the control upwards or downwards to
obtain the desired height.
Backrest angle
► Tilt the control forwards or rearwards to
adjust the angle of the backrest.
Page 53 of 324
51
Ease of use and comfort
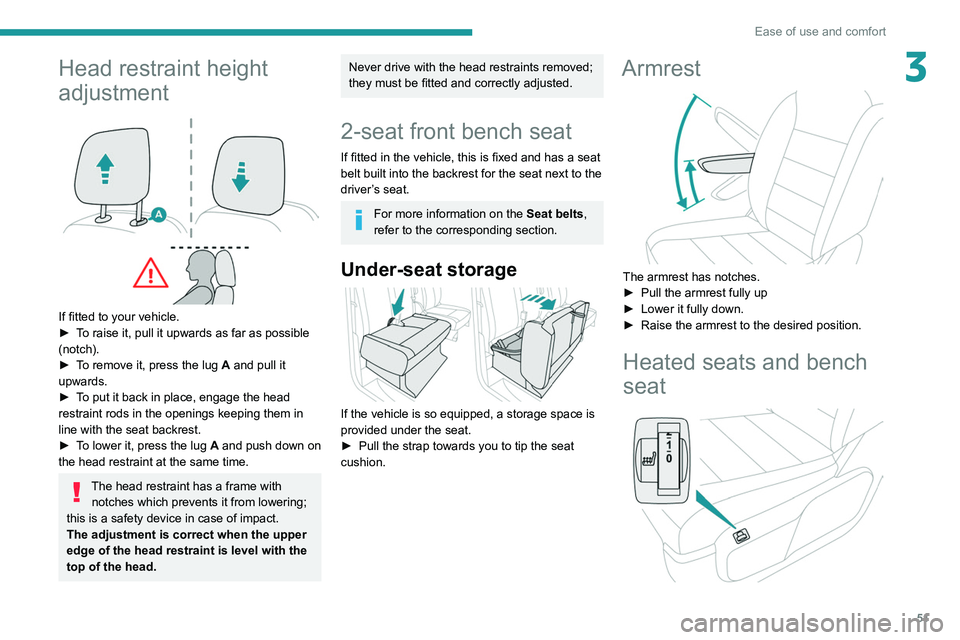
3Head restraint height
adjustment
If fitted to your vehicle.
► T o raise it, pull it upwards as far as possible
(notch).
►
T
o remove it, press the lug A and pull it
upwards.
►
T
o put it back in place, engage the head
restraint rods in the openings keeping them in
line with the seat backrest.
►
T
o lower it, press the lug A and push down on
the head restraint at the same time.
The head restraint has a frame with notches which prevents it from lowering;
this is a safety device in case of impact.
The adjustment is correct when the upper
edge of the head restraint is level with the
top of the head.
Never drive with the head restraints removed;
they must be fitted and correctly adjusted.
2-seat front bench seat
If fitted in the vehicle, this is fixed and has a seat
belt built into the backrest for the seat next to the
driver’s seat.
For more information on the Seat belts,
refer to the corresponding section.
Under-seat storage
If the vehicle is so equipped, a storage space is
provided under the seat.
►
Pull the strap towards you to tip the seat
cushion.
Armrest
The armrest has notches.
► Pull the armrest fully up
►
Lower it fully down.
►
Raise the armrest to the desired position.
Heated seats and bench
seat
Page 60 of 324
58
Ease of use and comfort
► To return the seat, tip the bench towards the
rear until the feet lock into place..
It is not necessary to fold the backrest
(table position) to tip the bench seat for
access to row 3.
Folding the backrest to the
table position
► Put the head restraints in the low position.
► From the rear, lower the handle to release the
backrest.
► From the front, raise the handle to release
the backrest.
► Fold the backrest onto the cushion.
► To return the backrest to its normal position,
raise the handle and pull the backrest up.
Do not leave objects (such as a bag or
toys) on the cushion when folding the
backrest.
introducing any foreign bodies into the
mechanisms.
The seats and bench seats are not designed for any other use than in the
vehicle. They are equipped with mechanisms
and features that may be damaged if used
improperly or if dropped.
Loading luggage or objects
behind the row 3 seat and
bench seat
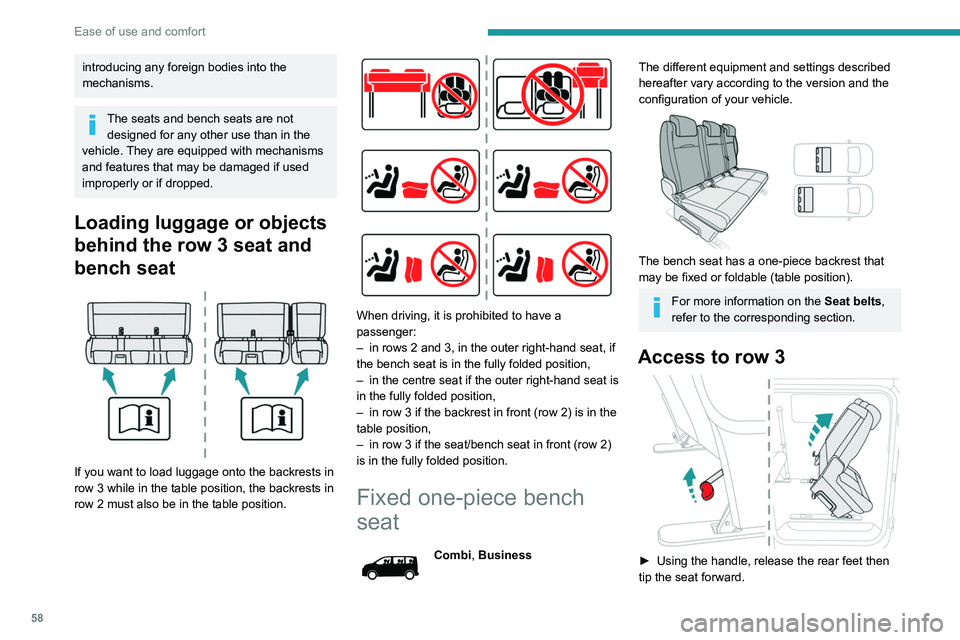
If you want to load luggage onto the backrests in
row 3 while in the table position, the backrests in
row 2 must also be in the table position.
When driving, it is prohibited to have a
passenger:
–
in rows 2 and 3, in the outer right-hand seat, if
the bench seat is in the fully folded position,
–
in the centre seat if the outer right-hand seat is
in the fully folded position,
–
in row 3 if the backrest in front (row 2) is in the
table position,
–
in row 3 if the seat/bench seat in front (row 2)
is in the fully folded position.
Fixed one-piece bench
seat
Combi, Business
The different equipment and settings described
hereafter vary according to the version and the
configuration of your vehicle.
The bench seat has a one-piece backrest that
may be fixed or foldable (table position).
For more information on the Seat belts,
refer to the corresponding section.
Access to row 3
► Using the handle, release the rear feet then
tip the seat forward.
Page 66 of 324
64
Ease of use and comfort
► Pull the armrest fully up.
► Lower it fully.
► Raise the armrest to the desired notched
position.
Adjusting the angle of the backrest
The backrest can be adjusted to several
positions.
► To recline the backrest, pull the control
upwards (from the rear, lower the handle).
► Release the control when the desired position
is reached.
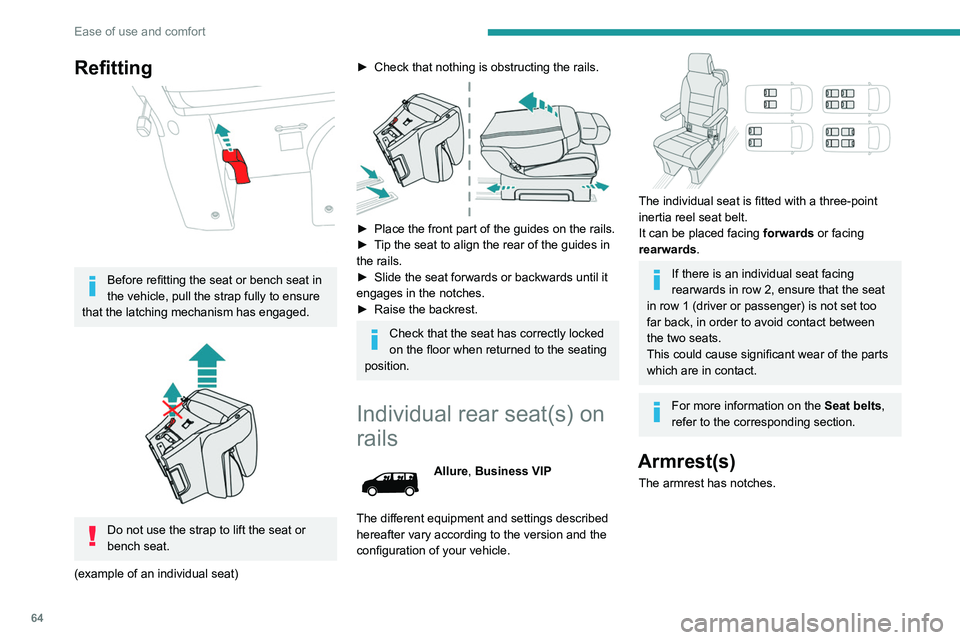
Refitting
Before refitting the seat or bench seat in
the vehicle, pull the strap fully to ensure
that the latching mechanism has engaged.
Do not use the strap to lift the seat or
bench seat.
(example of an individual seat)
► Check that nothing is obstructing the rails.
► Place the front part of the guides on the rails.
► T ip the seat to align the rear of the guides in
the rails.
►
Slide the seat forwards or backwards until it
engages in the notches.
►
Raise the backrest.
Check that the seat has correctly locked
on the floor when returned to the seating
position.
Individual rear seat(s) on
rails
Allure, Business VIP
The different equipment and settings described
hereafter vary according to the version and the
configuration of your vehicle.
The individual seat is fitted with a three-point
inertia reel seat belt.
It can be placed facing forwards or facing
rearwards .
If there is an individual seat facing
rearwards in row 2, ensure that the seat
in row 1 (driver or passenger) is not set too
far back, in order to avoid contact between
the two seats.
This could cause significant wear of the parts
which are in contact.
For more information on the Seat belts,
refer to the corresponding section.
Armrest(s)
The armrest has notches.
Page 68 of 324
66
Ease of use and comfort
The two outer seats are fitted with ISOFIX
mountings.
For more information on the ISOFIX
mountings , refer to the corresponding
section.
Storage compartment
If applicable, a storage compartment is available
at the front, underneath the bench seat.
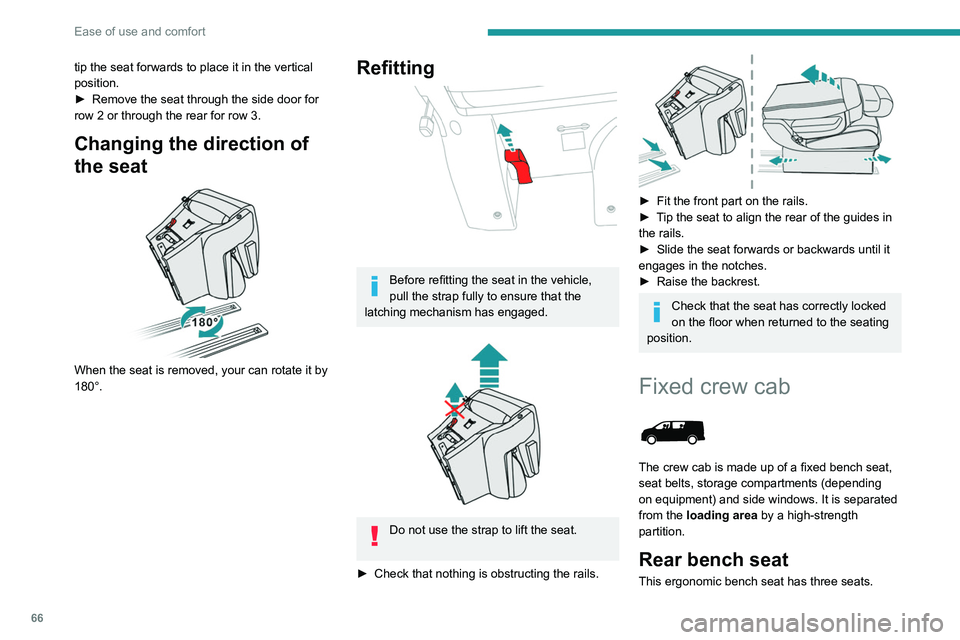
tip the seat forwards to place it in the vertical
position.
►
Remove the seat through the side door for
row 2 or through the rear for row 3.
Changing the direction of
the seat
When the seat is removed, your can rotate it by
180°.
Refitting
Before refitting the seat in the vehicle,
pull the strap fully to ensure that the
latching mechanism has engaged.
Do not use the strap to lift the seat.
►
Check that nothing is obstructing the rails.
► Fit the front part on the rails.
► T ip the seat to align the rear of the guides in
the rails.
►
Slide the seat forwards or backwards until it
engages in the notches.
►
Raise the backrest.
Check that the seat has correctly locked
on the floor when returned to the seating
position.
Fixed crew cab
The crew cab is made up of a fixed bench seat,
seat belts, storage compartments (depending
on equipment) and side windows. It is separated
from the loading area by a high-strength
partition.
Rear bench seat
This ergonomic bench seat has three seats.