2021 PEUGEOT EXPERT towing
[x] Cancel search: towingPage 210 of 324
208
In the event of a breakdown
These tools are specific to the vehicle and may vary according to the level of
equipment.
Do not use them for any other purpose.
The jack must only be used to change a wheel with a damaged or punctured tyre.
Do not use any jack other than the one
supplied with the vehicle.
If the vehicle does not have its original jack,
contact a PEUGEOT dealer or a qualified
workshop to obtain the one that was intended
by the manufacturer.
The jack meets European standards, as
defined in the Machinery Directive 2006/42/
CE.
The jack does not require any maintenance.
Access to the spare wheel
► Access to the spare wheel is from the rear.
► Depending on version, open the side-hinged
doors or the tailgate.
To avoid any unwanted opening of the electric side door(s), deactivate the
Hands-Free Access function in the vehicle
configuration menu.
For more information on the Hands-Free
Sliding Side Door , refer to the corresponding
section.
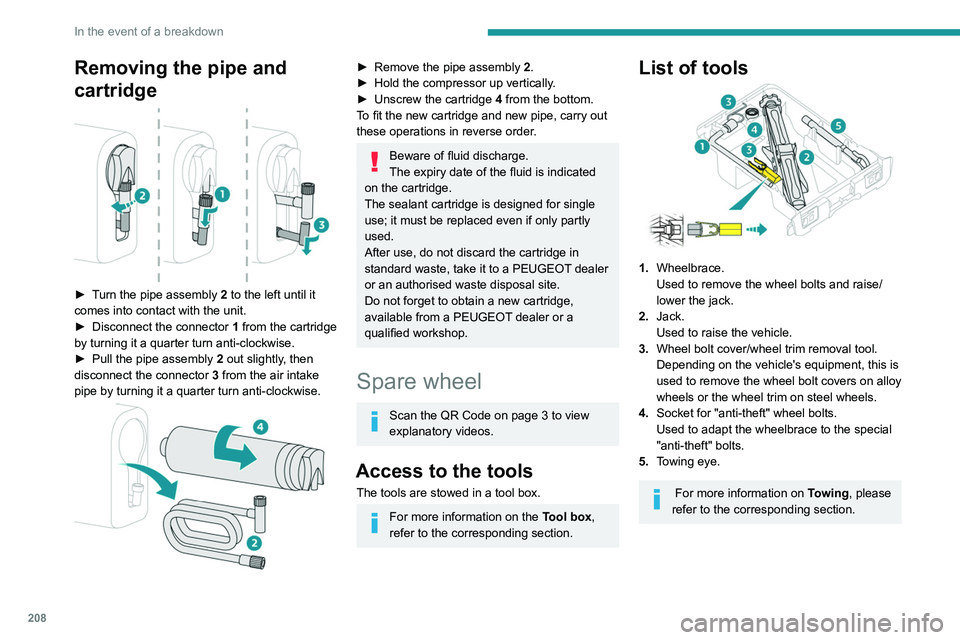
Removing the pipe and
cartridge
► Turn the pipe assembly 2 to the left until it
comes into contact with the unit.
►
Disconnect the connector 1
from the cartridge
by turning it a quarter turn anti-clockwise.
►
Pull the pipe assembly 2
out slightly, then
disconnect the connector 3 from the air intake
pipe by turning it a quarter turn anti-clockwise.
► Remove the pipe assembly 2 .
► Hold the compressor up vertically .
►
Unscrew the cartridge 4
from the bottom.
To fit the new cartridge and new pipe, carry out
these operations in reverse order.
Beware of fluid discharge.
The expiry date of the fluid is indicated
on the cartridge.
The sealant cartridge is designed for single
use; it must be replaced even if only partly
used.
After use, do not discard the cartridge in
standard waste, take it to a PEUGEOT dealer
or an authorised waste disposal site.
Do not forget to obtain a new cartridge,
available from a PEUGEOT dealer or a
qualified workshop.
Spare wheel
Scan the QR Code on page 3 to view
explanatory videos.
Access to the tools
The tools are stowed in a tool box.
For more information on the Tool box,
refer to the corresponding section.
List of tools
1. Wheelbrace.
Used to remove the wheel bolts and raise/
lower the jack.
2. Jack.
Used to raise the vehicle.
3. Wheel bolt cover/wheel trim removal tool.
Depending on the vehicle's equipment, this is
used to remove the wheel bolt covers on alloy
wheels or the wheel trim on steel wheels.
4. Socket for "anti-theft" wheel bolts.
Used to adapt the wheelbrace to the special
"anti-theft" bolts.
5. Towing eye.
For more information on Towing, please
refer to the corresponding section.
Page 211 of 324
209
In the event of a breakdown
8These tools are specific to the vehicle and may vary according to the level of
equipment.
Do not use them for any other purpose.
The jack must only be used to change a wheel with a damaged or punctured tyre.
Do not use any jack other than the one
supplied with the vehicle.
If the vehicle does not have its original jack,
contact a PEUGEOT dealer or a qualified
workshop to obtain the one that was intended
by the manufacturer.
The jack meets European standards, as
defined in the Machinery Directive 2006/42/
CE.
The jack does not require any maintenance.
Access to the spare wheel
► Access to the spare wheel is from the rear .
► Depending on version, open the side-hinged
doors or the tailgate.
To avoid any unwanted opening of the electric side door(s), deactivate the
Hands-Free Access function in the vehicle
configuration menu.
For more information on the Hands-Free
Sliding Side Door , refer to the corresponding
section.
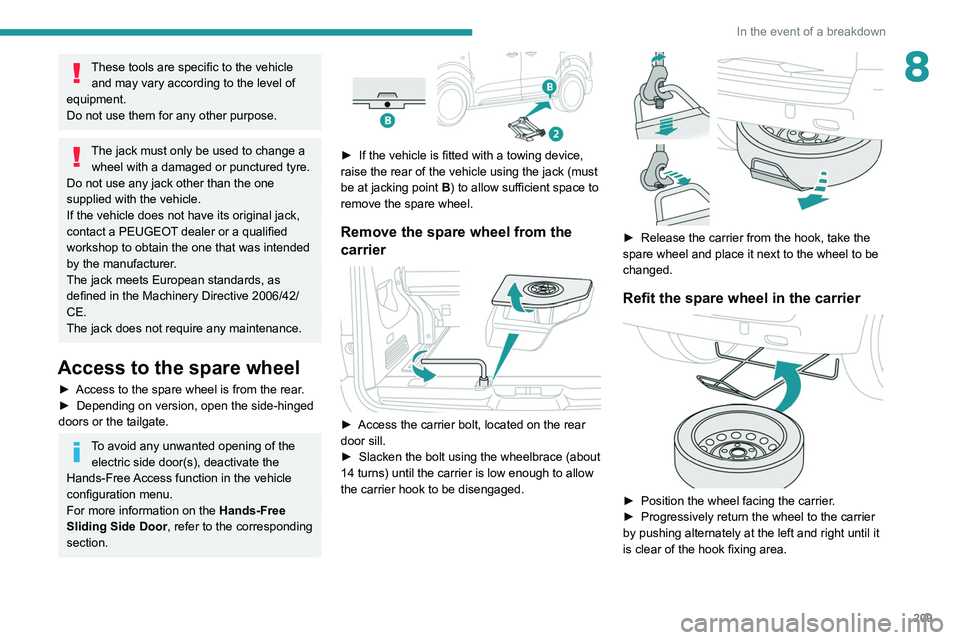
► If the vehicle is fitted with a towing device,
raise the rear of the vehicle using the jack (must
be at jacking point B
) to allow sufficient space to
remove the spare wheel.
Remove the spare wheel from the
carrier
► Access the carrier bolt, located on the rear
door sill.
►
Slacken the bolt using the wheelbrace (about
14 turns) until the carrier is low enough to allow
the carrier hook to be disengaged.
► Release the carrier from the hook, take the
spare wheel and place it next to the wheel to be
changed.
Refit the spare wheel in the carrier
► Position the wheel facing the carrier .
► Progressively return the wheel to the carrier
by pushing alternately at the left and right until it
is clear of the hook fixing area.
Page 224 of 324
222
In the event of a breakdown
state of charge of the battery (up to about 8
hours).
Towing
Procedure for having your vehicle towed or
for towing another vehicle using a removable
mechanical device.
General recommendations
Observe the legislation in force in the
country where you are driving.
Ensure that the weight of the towing vehicle is
higher than that of the towed vehicle.
The driver must remain at the wheel of the
towed vehicle and must have a valid driving
licence.
When towing a vehicle with all four wheels on
the ground, always use an approved towing
arm; rope and straps are prohibited.
Towing constraints
Type of vehicle
(engine/gearbox) Front wheels on the
ground Rear wheels on the
ground Flatbed
4 wheels on the ground
with towbar
Internal combustion/Manual
Internal combustion/Automatic
If this label is present, use only a 12 V
charger to avoid causing irreversible
damage to the electrical components.
24V
12V
Never try to charge a frozen battery - risk
of explosion!
If the battery has frozen, have it checked by a
PEUGEOT dealer or by a qualified workshop
who will verify that the internal components
have not been damaged and that the case
has not cracked, which would mean a risk of
toxic and corrosive acid leaking.
Disconnecting the battery
In order to maintain an adequate state of
charge for starting the engine, we recommend
disconnecting the battery if the vehicle is to be
unused for an extended period.
Before disconnecting the battery:
►
Close all openings (doors, tailgate, windows).
►
Switch off all electricity-consuming devices
(audio system, wipers, lamps, etc.).
►
Switch off the ignition and wait for 4
minutes.
After accessing the battery, it is only necessary
to disconnect the (+) terminal.
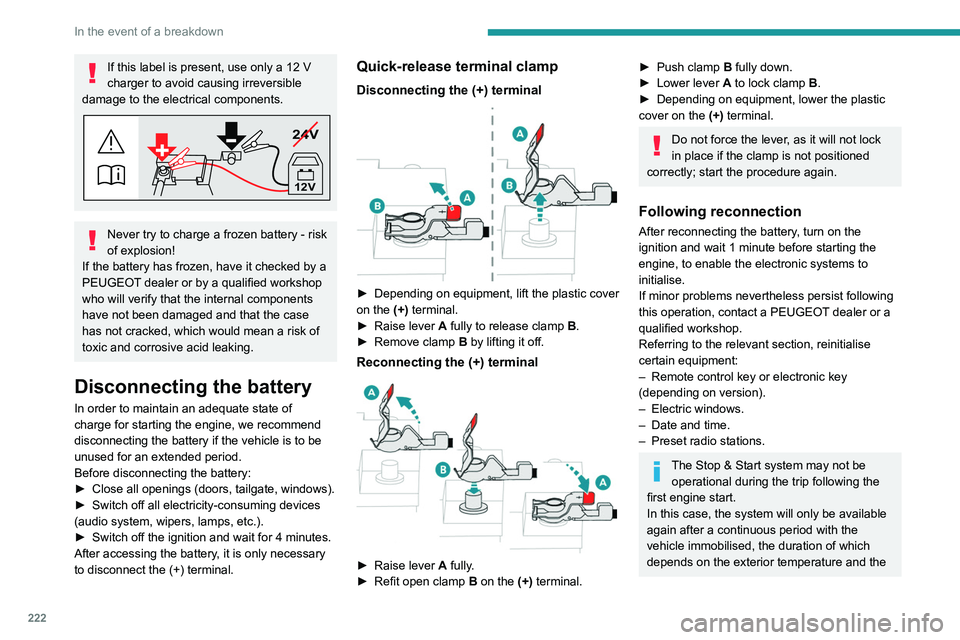
Quick-release terminal clamp
Disconnecting the (+) terminal
► Depending on equipment, lift the plastic cover
on the (+) terminal.
►
Raise lever
A
fully to release clamp
B
.
►
Remove clamp
B
by lifting it off.
Reconnecting the (+) terminal
► Raise lever A fully.
► Refit open clamp B on the (+) terminal.
► Push clamp B fully down.
► Lower lever A to lock clamp B.
►
Depending on equipment, lower the plastic
cover on the
(+) terminal.
Do not force the lever, as it will not lock
in place if the clamp is not positioned
correctly; start the procedure again.
Following reconnection
After reconnecting the battery, turn on the
ignition and wait 1 minute before starting the
engine, to enable the electronic systems to
initialise.
If minor problems nevertheless persist following
this operation, contact a PEUGEOT dealer or a
qualified workshop.
Referring to the relevant section, reinitialise
certain equipment:
–
Remote control key or electronic key
(depending on version).
–
Electric windows.
–
Date and time.
–
Preset radio stations.
The Stop & Start system may not be operational during the trip following the
first engine start.
In this case, the system will only be available
again after a continuous period with the
vehicle immobilised, the duration of which
depends on the exterior temperature and the
Page 225 of 324
223
In the event of a breakdown
8state of charge of the battery (up to about 8
hours).
Towing
Procedure for having your vehicle towed or
for towing another vehicle using a removable
mechanical device.
General recommendations
Observe the legislation in force in the
country where you are driving.
Ensure that the weight of the towing vehicle is
higher than that of the towed vehicle.
The driver must remain at the wheel of the
towed vehicle and must have a valid driving
licence.
When towing a vehicle with all four wheels on
the ground, always use an approved towing
arm; rope and straps are prohibited.
The towing vehicle must move off gently.
When the vehicle is towed with its engine
off, there is no longer braking and steering
assistance.
A professional towing service must be
called if:
–
Broken down on a motorway or main road.
–
Not possible to put
the gearbox into neutral,
unlock the steering, or release the parking
brake.
–
Not possible to tow a vehicle with an
automatic gearbox, with the engine running.
–
T
owing with only two wheels on the ground.
–
Four-wheel drive vehicle.
–
No approved towbar available.
Before towing the vehicle, it is essential
to put the vehicle in free-wheeling mode.
For more information on Free-wheeling, refer
to the corresponding section.
Electric motor
An electric vehicle cannot under any
circumstances be used to tow another
vehicle.
However, it may be used, for example, to exit
a rut.
With a manual gearbox, place the gear
lever in neutral.
With an automatic gearbox, place the gear
selector in position N.
Failure to adhere to this instruction may lead
to damage to some braking components and
the lack of braking assistance on restarting
the engine.
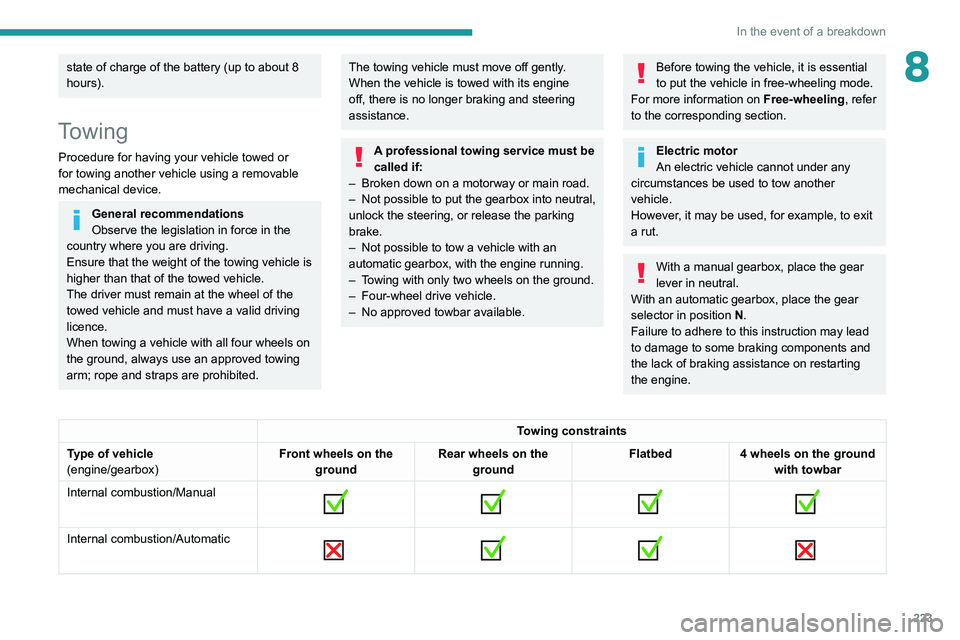
Towing constraints
Type of vehicle
(engine/gearbox) Front wheels on the
ground Rear wheels on the
ground Flatbed
4 wheels on the ground
with towbar
Internal combustion/Manual
Internal combustion/Automatic
Page 226 of 324
224
In the event of a breakdown
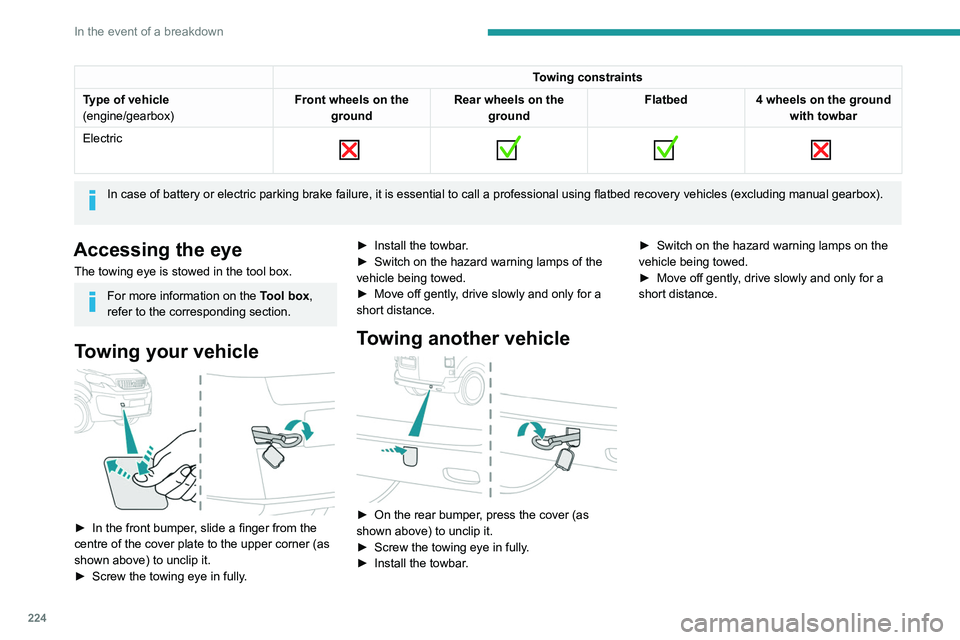
Towing constraints
Type of vehicle
(engine/gearbox) Front wheels on the
ground Rear wheels on the
ground Flatbed
4 wheels on the ground
with towbar
Electric
In case of battery or electric parking brake failure, it is essential to call a p
rofessional using flatbed recovery vehicles (excluding manual gearbox).
Accessing the eye
The towing eye is stowed in the tool box.
For more information on the Tool box,
refer to the corresponding section.
Towing your vehicle
► In the front bumper , slide a finger from the
centre of the cover plate to the upper corner (as
shown above) to unclip it.
►
Screw the towing eye in fully
.►
Install the towbar
.
►
Switch on the hazard warning lamps of the
vehicle being towed.
►
Move off gently
, drive slowly and only for a
short distance.
Towing another vehicle
► On the rear bumper , press the cover (as
shown above) to unclip it.
►
Screw the towing eye in fully
.
►
Install the towbar
. ►
Switch on the hazard warning lamps on the
vehicle being towed.
►
Move off gently
, drive slowly and only for a
short distance.
Page 227 of 324
225
Technical data
9Engine technical data and
towed loads
Engines
The engine characteristics are given in the
vehicle's registration document, as well as in
sales brochures.
Only the values available at the time of
publication are presented in the tables.
Contact a PEUGEOT dealer or a qualified
workshop to obtain missing values.
The maximum power corresponds to the value type-approved on a test bed, under
conditions defined by European legislation
(Directive 1999/99/EC).
For more information, contact a PEUGEOT
dealer or a qualified workshop.
Weights and towed loads
The weights and towed loads relating to
the vehicle are indicated on the registration
document, as well as in sales brochures.
These values are also indicated on the
manufacturer's plate or label.
For more information, contact a PEUGEOT
dealer or a qualified workshop.
The GTW (Gross Train Weight) and towed load
values indicated are valid up to a maximum
altitude of 1,000 metres. The towed load value
must be reduced by 10% for each additional
1,000 metres of altitude.
The maximum authorised nose weight
corresponds to the weight permitted on the
towball.
When exterior temperatures are high, the
vehicle performance may be limited in
order to protect the engine. When the exterior
temperature is higher than 37°C, reduce the
towed weight.
Towing even with a lightly loaded vehicle can adversely affect its road holding.
Braking distances are increased when towing
a trailer.
When using a vehicle to tow, never exceed
a speed of 62 mph (100
km/h) (observe the
local legislation in force).
Page 294 of 324

292
Alphabetical index
Remote control 29–35, 138
Remote functions
188
Remotely operable functions (Electric)
27, 86
Removing a wheel
210–212
Removing the mat
69
Replacing bulbs
212–213, 215, 217
Replacing fuses
217–218
Replacing the air filter
196
Replacing the oil filter
196
Replacing the passenger compartment
filter
196
Reservoir, screenwash
195
Resetting the trip recorder
23
Reversing camera
154, 174, 176
Reversing lamp
215, 217
Roof bars
191
Roof rack
191
Running out of fuel (Diesel)
203
S
Safety, children 108, 110–113, 122–124,
130, 131–132, 131–133
Saturation of the particle filter (Diesel)
196
Screen, instrument panel
24
Screen menu map
256
Screen, multifunction (with audio system)
238
Screenwash
94
Screenwash, front
94
Screenwash, rear
95
SCR (Selective Catalytic Reduction)
21, 197
Seat and bench seat, rear, fixed
57–58, 60–61
Seat and bench seat, rear, on rails 57–58,
62–64
Seat angle
49
Seat belts
104–107, 112
Seat belts, rear
106
Seat, bench front, 2-seat
51, 105
Seat, rear bench
57–58
Seats, electric
50
Seats, front
49–50
Seats, heated
51–52
Seat(s), individual, rear, on rails
64–66, 106
Seats, rear
58–64, 111
Selector, gear
146
Sensors (warnings)
154
Serial number, vehicle
235
Service indicator
18
Servicing
18, 195, 197
Settings, equipment
26
Settings, system
259, 282
Sidelamps
89, 213–215, 217
Side repeater
214
Silent vehicle warning sound
(Electric)
100, 137
Sliding side door, electric
34–35, 39–42
Sliding side door, hands-free
43–44
Sliding side window
74
Smartphone
27
Snow chains
153, 190, 210
Snow chains, link
190, 210
Socket, 12 V accessory
70
Socket, 220 V
71
Socket, auxiliary
242, 255, 277
Socket, Jack
242, 277Speed limiter 156, 158–161
Speed limit recognition
157, 160,
162, 165–166
Speedometer
155
Sport mode
150
Stability control (ESC)
101, 103–104
Starting a Diesel engine
178
Starting the engine
138, 140
Starting the vehicle
139, 141, 145–148
Starting using another battery
141, 220
Station, radio
239, 252–253, 276
Stay, bonnet
192
Steering mounted controls,
audio
238, 250, 263
Steering wheel, adjustment
53
Stickers, customising ~ Stickers,
expressive
202
Stopping the vehicle
140–141, 146–148
Stop & Start
25, 79, 150–152,
178, 192, 196, 222
Storage
51, 57, 66–69
Storage compartments
69–70
Storage wells
66–68, 70
Stowing rings
72
Sunshine sensor
79
Super-fast charging (Electric)
187–188, 231
Suspension
197
Switching off the engine
138–140
Synchronising the remote control
37
Page 295 of 324
293
Alphabetical index
T
Table of weights 226
Table position
49
Table, retractable sliding
75–78
Tables, aircraft
70
Tables of engines
231
Tables of fuses
217–219
Table top, working
57
Tailgate rear screen
45
Tank, fuel
178–179
Technical data
226, 231
Telephone
243–246, 257–258, 279–281
Telephone, Bluetooth with voice
recognition
246
Temperature, coolant
19
Textured Paint
201
Thermal comfort consumption indicator
(Electric)
22
Thermal comfort equipment
22
Third brake lamp
215
Time (setting)
28, 259, 283
TMC (Traffic info)
270
Tool box
204
Tools
205, 208
Topping-up AdBlue®
198
Total distance recorder
23
Touch screen
25–27, 86
Towbar
103, 190
Towed loads
225–226, 231
Towing another vehicle
223–224
Towing eye
224
Traction battery charge
183
Traction battery (Electric) 22, 26,
180–181, 231
Traction control (ASR)
101, 103–104
Traffic information (TA)
239
Traffic information (TMC)
270
Trailer
103, 190
Trailer stability assist (TSA)
103
Trajectory control systems
101
Triangle, warning
203
Trip computer
24–25
Trip distance recorder
23
Tyres
197, 236
Tyre under-inflation detection
152–153, 207, 212
U
Under-inflation (detection) 152
Unlocking
29–33
Unlocking from the inside
38–39
Unlocking, selective
31–33
Unlocking the doors
38
Unlocking, total
31–33
Updating the date
28, 260, 282
Updating the time
28, 259, 283
USB
241, 254, 256, 273, 277
V
Ventilation 79–80, 84–86
Video
278
Visiopark 1 174
Voice commands
265–268
W
Wallbox (Electric) 182
Warning and indicator lamps
12
Warning lamp, driver''s seat belt
not fastened
106
Warning lamps
12
Warning lamp, seat belts
106
Warnings and indicators
12
Washing
155
Washing (advice)
180, 201–202
Weights
225–226, 231
Welcome lighting
30
Wheel, spare
153, 197, 208–209, 212
Windows, rear
74
Windscreen wipers
94–95
Wiper blades (changing)
96
Wiper, rear
95
Wipers
94–95
Wipers, automatic rain sensitive
95