2021 PEUGEOT EXPERT tow
[x] Cancel search: towPage 82 of 324
80
Ease of use and comfort
The active mode appears in the display screen,
as described below:
Ensures soft, quiet operation by limiting
air flow.
Offers the best compromise between a
comfortable temperature and quiet
operation.
Provides dynamic, effective air flow.
When the engine is cold, the air flow will
only increase to its optimum level
gradually, to avoid distributing too much cold
air.
In cold weather, it prioritises the distribution of
warm air to the windscreen, the side windows
and the footwells only.
Manual mode
It is possible to make a different choice from
that offered by the system by changing a
setting. The other functions will still be managed
automatically.
As soon as a setting is changed, the " AUTO"
symbol disappears.
Deactivating the system
► Press button 2 "-" until the fan symbol
disappears.
This action switches off all of the functions of the
system.
conditioning systems, although it does not
deactivate them.
Heating
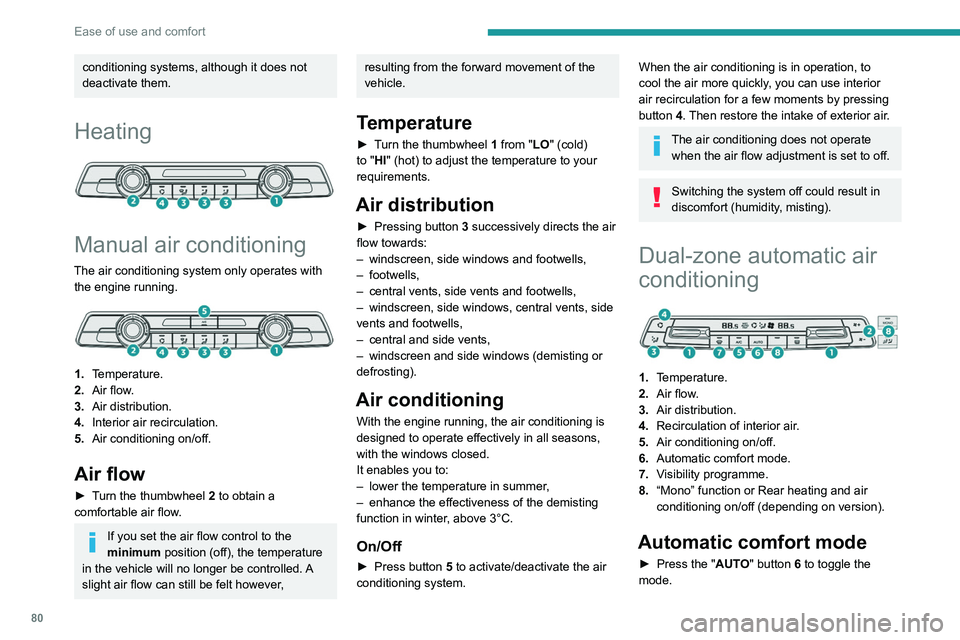
Manual air conditioning
The air conditioning system only operates with the engine running.
1. Temperature.
2. Air flow.
3. Air distribution.
4. Interior air recirculation.
5. Air conditioning on/off.
Air flow
► Turn the thumbwheel 2 to obtain a
comfortable air flow.
If you set the air flow control to the
minimum position (off), the temperature
in the vehicle will no longer be controlled. A
slight air flow can still be felt however,
resulting from the forward movement of the
vehicle.
Temperature
► Turn the thumbwheel 1 from "LO" (cold)
to "HI" (hot) to adjust the temperature to your
requirements.
Air distribution
► Pressing button 3 successively directs the air
flow towards:
–
windscreen, side windows and footwells,
–
footwells,
–
central vents, side vents and footwells,
–
windscreen, side windows, central vents, side
vents and footwells,
–
central and side vents,
–
windscreen and side windows (demisting or
defrosting).
Air conditioning
With the engine running, the air conditioning is
designed to operate effectively in all seasons,
with the windows closed.
It enables you to:
–
lower the temperature in summer
,
–
enhance the effectiveness of the demisting
function in winter
, above 3°C.
On/Off
► Press button 5 to activate/deactivate the air
conditioning system.
When the air conditioning is in operation, to
cool the air more quickly, you can use interior
air recirculation for a few moments by pressing
button 4. Then restore the intake of exterior air.
The air conditioning does not operate when the air flow adjustment is set to off.
Switching the system off could result in
discomfort (humidity, misting).
Dual-zone automatic air
conditioning
1. Temperature.
2. Air flow.
3. Air distribution.
4. Recirculation of interior air.
5. Air conditioning on/off.
6. Automatic comfort mode.
7. Visibility programme.
8. “Mono” function or Rear heating and air
conditioning on/off (depending on version).
Automatic comfort mode
► Press the " AUTO" button 6 to toggle the
mode.
Page 84 of 324
82
Ease of use and comfort
► For air conditioning, press this button;
its indicator lamp comes on.
Dual-zone automatic air
conditioning
► Press this button to demist or defrost
the windscreen and side windows more
quickly.
The system automatically manages the air
conditioning, air flow and air intake, and provides
optimum distribution towards the windscreen and
side windows.
► To turn it off, press this button
again or press " AUTO".
The system restarts with the values in use before
it was deactivated.
Visibility programme
► Press button 7 "Visibility" to demist or
defrost the windscreen and side windows more
quickly.
The system automatically manages the air
conditioning, air flow and air intake, and provides
optimum distribution towards the windscreen and
side windows.
►
Press button
7 "Visibility" again to stop the
programme.
Or
►
Press button
6 "AUTO" to return to the
automatic comfort programme.
Air conditioning
With the engine running, the air conditioning is
designed to operate effectively in all seasons,
with the windows closed.
It is used to:
–
lower the temperature in summer
,
–
increase the effectiveness of the demisting in
winter
, above 3°C.
On/Off
► Press button 5 to activate/deactivate the air
conditioning system.
When the air conditioning is in operation, to
cool the air more quickly, you can use interior
air recirculation for a few moments by pressing
button 4. Then restore the intake of exterior air.
The air conditioning does not operate when the air flow adjustment is set to off.
Switching the system off could result in
discomfort (humidity, misting).
Air distribution
► Pressing button 3 successively directs the air
flow towards:
–
windscreen, side windows and footwells,
–
footwells,
–
central vents, side vents and footwells,
–
windscreen, side windows, central vents, side
vents and footwells,
–
central and side vents,
–
windscreen and side windows (demisting or
defrosting).
Air flow
► Press the buttons 2 to increase/decrease the
air flow.
The air flow symbol (a fan) appears. It is filled in
or emptied gradually, according to the value set.
Interior air recirculation
The intake of exterior air prevents the formation
of mist on the windscreen and side windows.
Recirculating the interior air isolates the
passenger compartment from outside odours
and fumes and allows the desired passenger
compartment temperature to be achieved more
rapidly.
► Press this button to activate/deactivate
the function (confirmed by the
illumination/extinction of the indicator lamp).
Front demisting
- defrosting
These markings on the control panel indicate the positioning of the controls for
rapid demisting or defrosting of the windscreen
and side windows.
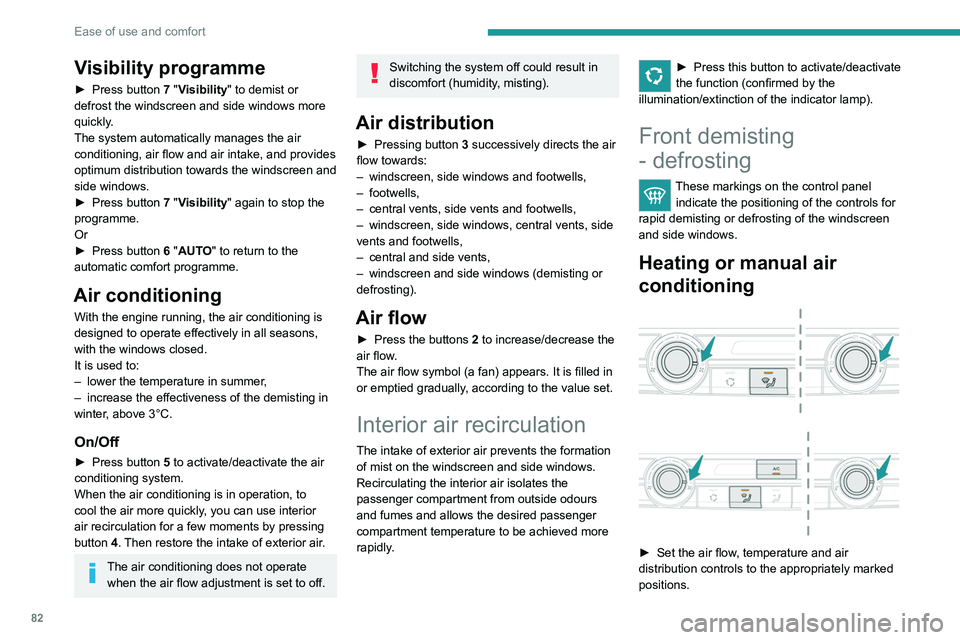
Heating or manual air
conditioning
► Set the air flow , temperature and air
distribution controls to the appropriately marked
positions.
Page 85 of 324
83
Ease of use and comfort
3► For air conditioning, press this button;
its indicator lamp comes on.
Dual-zone automatic air
conditioning
► Press this button to demist or defrost
the windscreen and side windows more
quickly
.
The system automatically manages the air
conditioning, air flow and air intake, and provides
optimum distribution towards the windscreen and
side windows.
► To turn it off, press this button
again or press " AUTO".
The system restarts with the values in use before
it was deactivated.
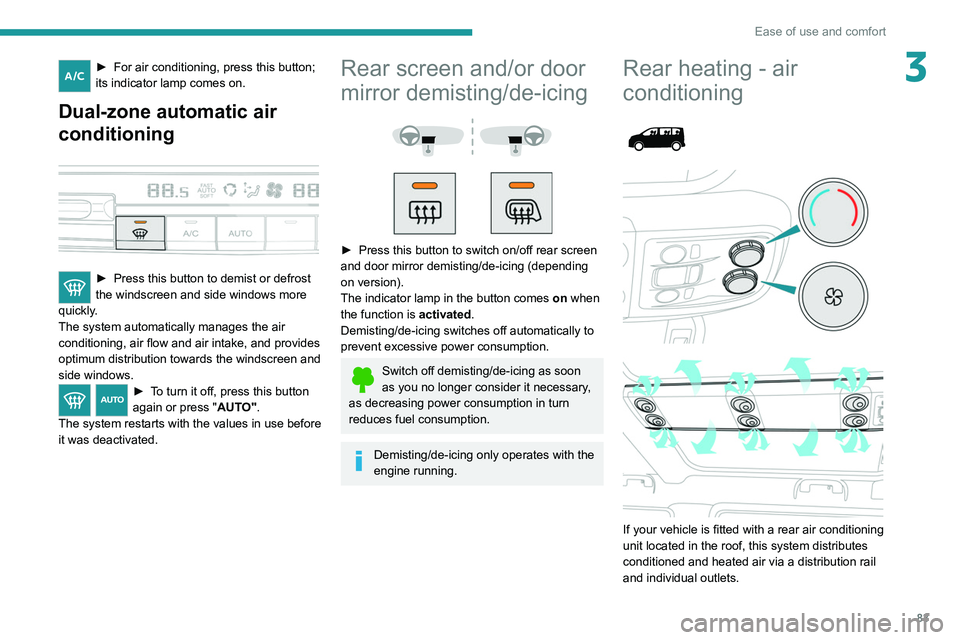
Rear screen and/or door
mirror demisting/de-icing
► Press this button to switch on/off rear screen
and door mirror demisting/de-icing (depending
on version).
The indicator lamp in the button comes on
when
the function is activated.
Demisting/de-icing switches off automatically to
prevent excessive power consumption.
Switch off demisting/de-icing as soon
as you no longer consider it necessary,
as decreasing power consumption in turn
reduces fuel consumption.
Demisting/de-icing only operates with the
engine running.
Rear heating - air
conditioning
If your vehicle is fitted with a rear air conditioning
unit located in the roof, this system distributes
conditioned and heated air via a distribution rail
and individual outlets.
Page 96 of 324

94
Lighting and visibility
Never top up with water.
Low screenwash fluid level
When the low level of the reservoir is
reached, this warning lamp lights up on
the instrument panel, accompanied by an
audible signal and a message.
It comes on when the ignition is switched on,
or every time the stalk is operated, until the
reservoir is refilled.
Refill the screenwash reservoir (or have it
refilled) the next time you stop.
Automatic windscreen wipers
In AUTO mode, the windscreen wipers work
automatically and adapt to the intensity of the
rain.
The rainfall detection function uses a rain/
sunshine sensor located at the top centre of the
windscreen, behind the rear view mirror.
Switching on
► Give a short downwards push to the control
stalk.
automatically when the sidelamps are switched
on.
The ambient lighting switches off automatically
when the sidelamps are switched off.
Programming
With audio system or touch screen
The activation, deactivation and the choice of brightness of the
ambience lighting can be set via the vehicle
configuration menu.
Wiper control stalk
Before operating the wipers in wintry
conditions, clear any snow, ice or frost
from the windscreen, and from around the
wiper arms and blades.
Do not operate the wipers on a dry
windscreen. In extremely hot or cold
weather, check that the wiper blades are not
stuck to the windscreen before operating the
wipers.
After using an automatic car wash, you may temporarily notice abnormal noises
and poorer wiping performance.
You do not
need to replace the wiper blades.
Without AUTO wiping
With AUTO wiping
Windscreen wipers
► To select the wiping speed: raise or lower the
stalk to the desired position.
Fast wiping (heavy rain)
Normal wiping (moderate rain)
Intermittent wiping (proportional to the
vehicle’s speed)
Off
Single wipe (press down and release).
or
Automatic wiping
Refer to the corresponding section.
After switching off the ignition, a slight movement of the windscreen wipers to
store them under the bonnet may occur.
If the ignition has been switched off with
the windscreen wiper active, it is
necessary to operate the control stalk to
reactivate the wiping when the ignition is
switched on (unless the ignition is off for less
than 1
minute).
Windscreen wash
► Pull the wiper control stalk towards you and
hold.
The screenwash then the windscreen wipers
operate for a pre-determined time.
With automatic air conditioning, any
action on the screenwash control results
in temporary closure of the air intake to avoid
odours inside the passenger compartment.
To avoid damaging the wiper blades, do not operate the screenwash if the
screenwash reservoir is empty.
Only operate the screenwash if there is no
risk of the fluid freezing on the windscreen
and hindering visibility. During the winter
period, use "very cold climate" rated products.
Page 98 of 324
96
Lighting and visibility
► Unclip the worn wiper blade closest to you
and remove it.
► Install the new wiper blade and clip it to the
arm.
► Repeat the procedure for the other wiper
blade.
► Starting with the wiper blade closest to you,
once again hold each arm by the rigid section,
then guide it carefully onto the windscreen.
Removing/refitting at the rear
► Hold the arm by the rigid section and raise it
as far as possible.
► Clean the rear screen using screenwash
fluid.
► Unclip the worn wiper blade and remove it.
► Install the new wiper blade and clip it to the
arm.
► Once again hold the arm by the rigid section,
then guide it carefully onto the rear screen.
Rear screenwash
► Turn the ring all the way towards the
dashboard and hold.
The screenwash and the wiper operate for as
long as the ring remains turned.
A final wiping cycle is performed when
screenwashing ends.
Special position of the
windscreen wipers
This maintenance position is used while cleaning
or replacing the wiper blades. It can also be
useful, in wintry weather (ice, snow), to release
the wiper blades from the windscreen.
To maintain the effectiveness of the flat wiper blades, it is advisable to:
–
handle them with care.
–
clean them regularly using soapy water
.
–
avoid using them to hold cardboard on the
windscreen.
–
replace them at the first signs of wear
.
Before removing a windscreen wiper blade
► Operating the wiper control stalk within one
minute after switching off the ignition will place
the wiper blades in a vertical position.
►
Proceed with the desired operation or the
replacement of the wiper blades.
After refitting a windscreen wiper blade
► To return the wiper blades to their initial
position, switch on the ignition and operate the
wiper control stalk.
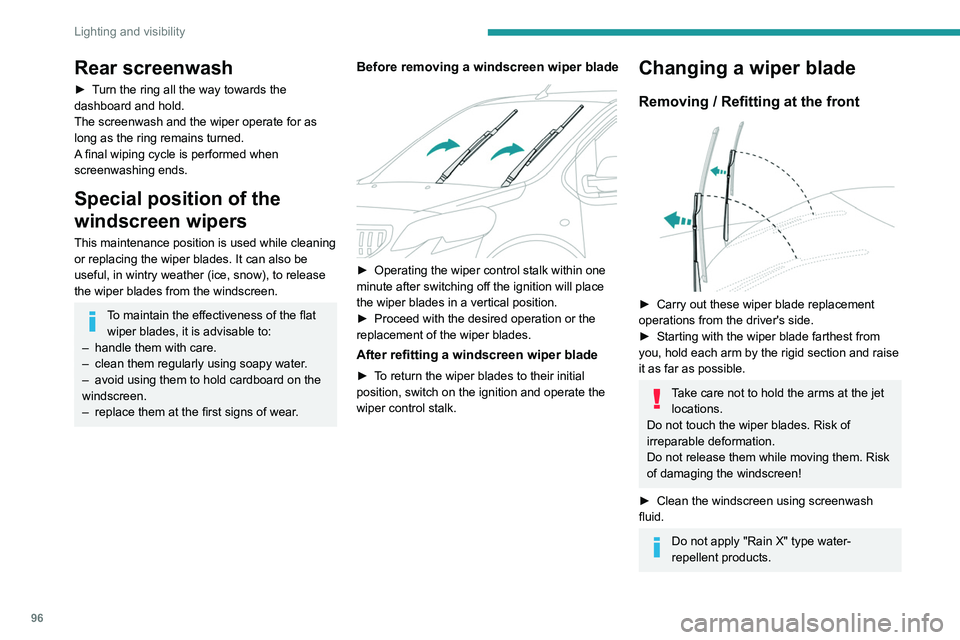
Changing a wiper blade
Removing / Refitting at the front
► Carry out these wiper blade replacement
operations from the driver's side.
►
Starting with the wiper blade farthest from
you, hold each arm by the rigid section and raise
it as far as possible.
Take care not to hold the arms at the jet locations.
Do not touch the wiper blades. Risk of
irreparable deformation.
Do not release them while moving them. Risk
of damaging the windscreen!
►
Clean the windscreen using screenwash
fluid.
Do not apply "Rain X" type water-
repellent products.
Page 105 of 324
103
Sécurité
5Trailer stability assist (TSA)
When towing, this system reduces the risk of the
vehicle or trailer snaking.
Operation
The system is activated automatically when the
ignition is switched on.
The electronic stability control system (ESC)
must not have any faults.
The vehicle speed must be between 37 and 99
mph (60 and 160 km/h).
If the system detects that the trailer is
snaking, it applies the brakes to stabilise
the trailer and reduces engine power, if
necessary, to slow the vehicle (indicated by the
flashing of this warning lamp on the instrument
panel and the brake lamps coming on).
For information on weights and towed loads,
refer to the Engine technical data and towed
loads section or your vehicle’s registration
certificate.
To ensure safe driving with a Towing device,
refer to the corresponding section.
Malfunction
If a fault occurs, this warning lamp lights
up on the instrument panel, accompanied
by a message and an audible signal.
To continue towing a trailer, reduce speed and
drive carefully!
Have it checked by a PEUGEOT dealer or a
qualified workshop.
The trailer stability control system provides an extra safety feature under
normal driving conditions, when following the
recommendations for use of trailers and
current legislation in force in your country. It
must not encourage the driver to take extra
risks, such as using a trailer in unsuitable
conditions of operation (e.g.
excessive load,
exceeded nose weight, worn or under-inflated
tyres, faulty braking system) or driving at
excessive speed.
In certain cases, the system may not detect
trailer snaking, particularly with a light trailer.
When driving on slippery or poor surfaces, the
system may not be able to prevent sudden
trailer snaking.
Advanced Grip Control
(Depending on version)
A special, patented traction control system,
which improves driveability on snow, mud and
sand.
This system, optimised for operation in a range
of conditions, enables you to manoeuvre in most
slippery conditions (encountered during normal
passenger car use).
When combined with all-season Peak Mountain
Snow Flake tyres, this system offers a
compromise between safety, grip and driveability.
The accelerator pedal should be pressed
sufficiently to allow the system to harness the
power of the engine. Operation at high engine
speeds is completely normal.
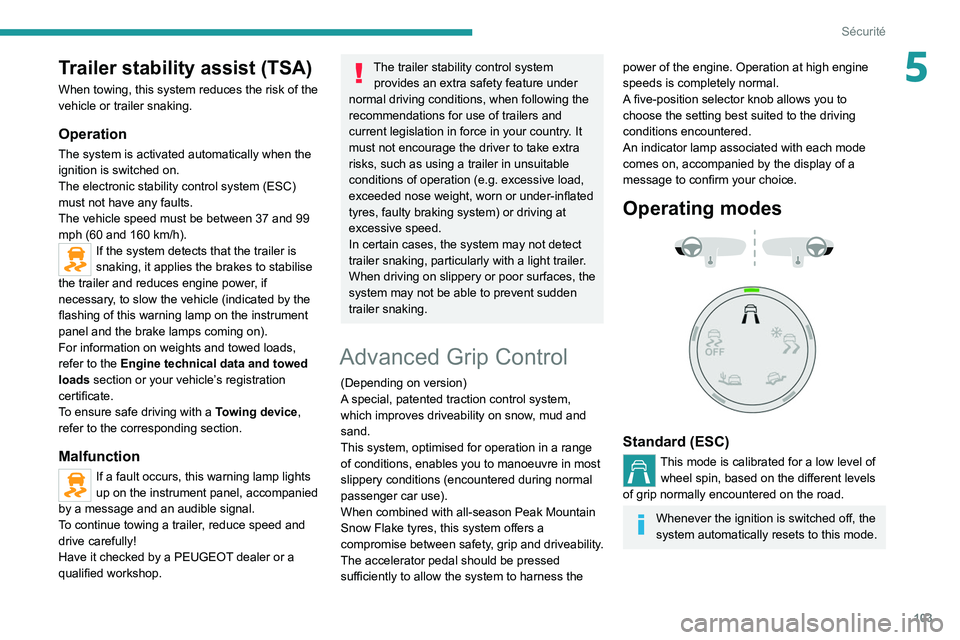
A five-position selector knob allows you to
choose the setting best suited to the driving
conditions encountered.
An indicator lamp associated with each mode
comes on, accompanied by the display of a
message to confirm your choice.
Operating modes
Standard (ESC)
This mode is calibrated for a low level of wheel spin, based on the different levels
of grip normally encountered on the road.
Whenever the ignition is switched off, the
system automatically resets to this mode.
Page 111 of 324
109
Sécurité
5If fitted to your vehicle, this is a system that
protects the driver and front passenger in the
event of a serious side impact, in order to limit
the risk of injury to the chest, between the
abdomen and head.
Each lateral airbag is fitted in the seat backrest
frame, door side.
Deployment
They are deployed on one side in the event
of a serious side impact applied to all or part
of the side impact zone, perpendicular to the
longitudinal centreline of the vehicle on a
horizontal plane and directed from the outside
towards the inside of the vehicle.
The lateral airbag inflates between the front
occupant's abdomen and head and the
associated door trim panel.
Curtain airbags (Row 2 & 3)
Active, Allure, Business VIP
If fitted to your vehicle, this is a system that
contributes towards greater protection for
passengers (with the exception of the centre
seats) in the event of a serious side impact, in
order to limit the risk of injury to the side of the
head.
Each curtain airbag is built into the pillars and
the upper passenger compartment area.
Deployment
They are deployed on one side in the event
of a serious side impact applied to all or part
of the side impact zone, perpendicular to the
longitudinal centreline of the vehicle on a
horizontal plane and directed from the outside
towards the inside of the vehicle.
The curtain airbag inflates between the outer
rear passenger and the windows.
Malfunction
In the event of a malfunction, this warning
lamp lights up on the instrument panel.
Contact a PEUGEOT dealer or a qualified
workshop to have the system checked.
The airbags may not be deployed in the event of
a serious impact.
In the event of a minor impact or bump at
the side of the vehicle or if the vehicle
rolls over, the airbags may not be deployed.
In the event of a rear or front collision, none of
the lateral airbags are deployed.
Advice
For the airbags to be fully effective,
observe the safety recommendations
below.
Adopt a normal and upright sitting position.
Fasten your seat belt and position it correctly.
Do not place anything between the occupants
and the airbags (e.g.
child, animal, object), do
not fix or attach anything near or in the path of
the airbags, as this could cause injuries when
they are deployed.
Never modify the original definition of the
vehicle, particularly in the area directly around
the airbags.
Even if all of the precautions mentioned are
observed, a risk of injury or of minor burns to
the head, chest or arms cannot be ruled out
when an airbag is deployed. The bag inflates
almost instantly (within a few milliseconds)
then deflates within the same time,
discharging the hot gas via openings provided
for this purpose.
After an accident or if the vehicle has been
stolen, have the airbag systems checked.
All work must be carried out only by a
PEUGEOT dealer or a qualified workshop.
Front airbags
Do not drive holding the steering wheel
by its spokes or resting your hands on the
centre part of the wheel.
Passengers must not place their feet on the
dashboard.
Do not smoke as deployment of the airbags
can cause burns or the risk of injury from a
cigarette or pipe.
Never remove or pierce the steering wheel or
hit it violently.
Do not fix or attach anything to the steering
wheel or dashboard, as this could cause
injuries when the airbags are deployed.
Page 122 of 324
120
Sécurité
(c)Refer to the current legislation in the country
in which you are driving before placing a
child in this seat position.
(d) To install a "rearward facing" or "forward
facing" child seat on a rear seat, move the
seats in front of it forward, then straighten
their backrests to allow sufficient room for
the child seat and the child's legs.
(e) The seat can be installed centrally in the
vehicle; it then prevents the use of the outer
seats.
(f) When a "rearward facing" child seat is
installed on the front passenger seat, the
front passenger airbag must be deactivated.
Otherwise, the child risks being severely
injured or killed if the airbag is deployed.
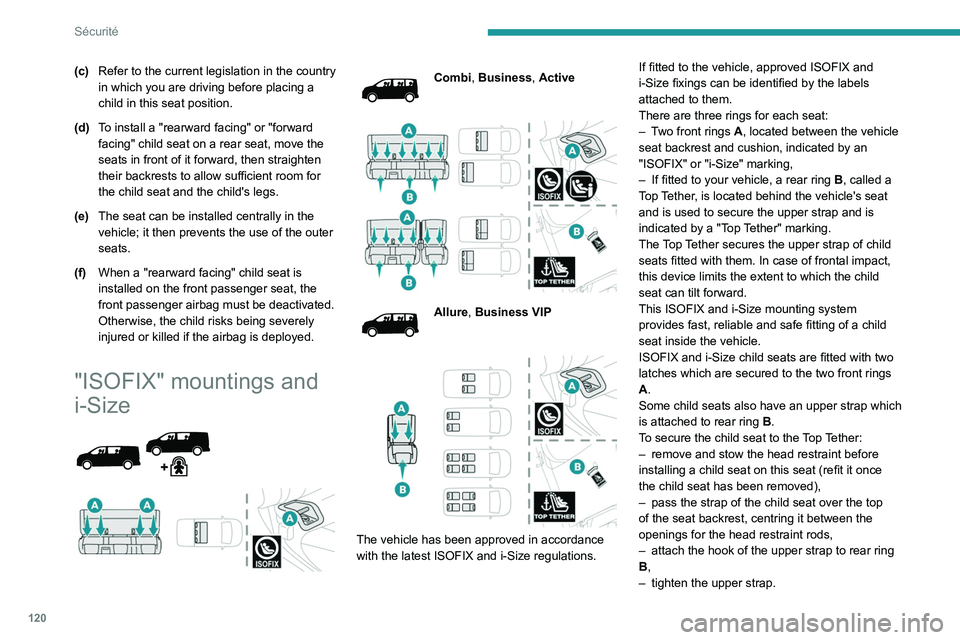
"ISOFIX" mountings and
i-Size
Combi, Business, Active
Allure, Business VIP
The vehicle has been approved in accordance
with the latest ISOFIX and i-Size regulations. If fitted to the vehicle, approved ISOFIX and
i-Size fixings can be identified by the labels
attached to them.
There are three rings for each seat:
–
T
wo front rings A, located between the vehicle
seat backrest and cushion, indicated by an
"ISOFIX" or "i-Size" marking,
–
If fitted to your vehicle, a rear ring
B, called a
Top Tether, is located behind the vehicle's seat
and is used to secure the upper strap and is
indicated by a "Top Tether" marking.
The Top Tether secures the upper strap of child
seats fitted with them. In case of frontal impact,
this device limits the extent to which the child
seat can tilt forward.
This ISOFIX and i-Size mounting system
provides fast, reliable and safe fitting of a child
seat inside the vehicle.
ISOFIX and i-Size child seats are fitted with two
latches which are secured to the two front rings
A.
Some child seats also have an upper strap which
is attached to rear ring B.
To secure the child seat to the Top Tether:
–
remove and stow the head restraint before
installing a child seat on this seat (refit it once
the child seat has been removed),
–
pass the strap
of the child seat over the top
of the seat backrest, centring it between the
openings for the head restraint rods,
– attach the hook of the upper strap to rear ring
B
,
–
tighten the upper strap.