2021 PEUGEOT BOXER engine
[x] Cancel search: enginePage 135 of 212
133
In the event of a breakdown
8Ensure that the weight of the towing vehicle is
higher than that of the towed vehicle.
The driver must remain at the wheel of the
towed vehicle and must have a valid driving
licence.
When towing a vehicle with all four wheels on
the ground, always use an approved towing
arm; rope and straps are prohibited.
The towing vehicle must move off gently.
When the vehicle is towed with its engine
off, there is no longer braking and steering
assistance.A professional towing service must be
called if:
–
Broken down on a motorway or main road.
–
Not possible to put
the gearbox into neutral,
unlock the steering, or release the parking
brake.
–
Not possible to tow a vehicle with an
automatic gearbox, with the engine running.
–
T
owing with only two wheels on the ground.
–
Four-wheel drive vehicle.
–
No approved towbar available.
Before towing the vehicle, it is essential
to put the vehicle in free-wheeling mode.
Electric motor
An electric vehicle cannot under any
circumstances be used to tow another
vehicle.
However, it may be used, for example, to exit
a rut.
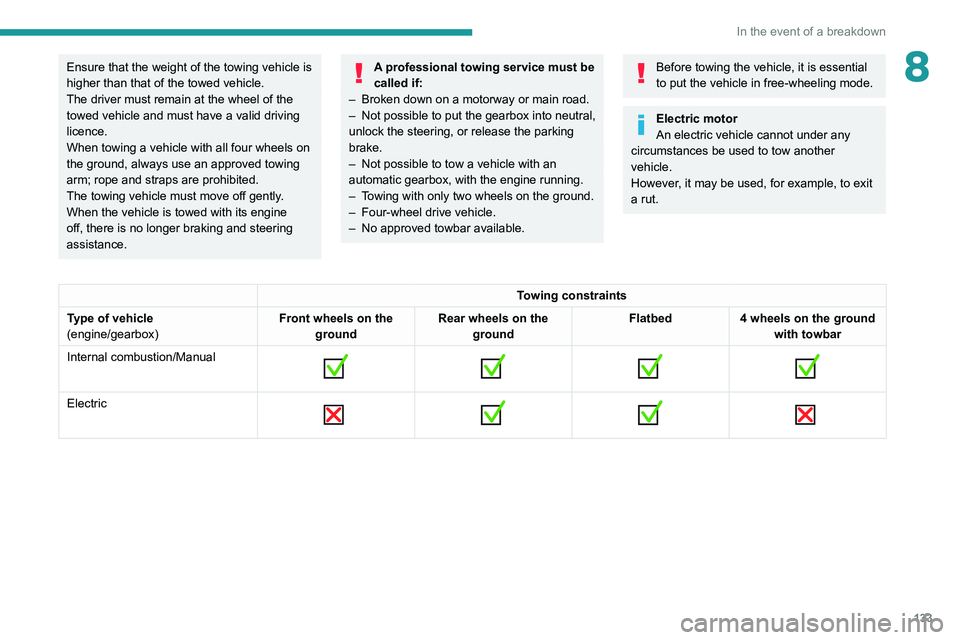
Towing constraints
Type of vehicle
(engine/gearbox) Front wheels on the
ground Rear wheels on the
ground Flatbed
4 wheels on the ground
with towbar
Internal combustion/Manual
Electric
Page 136 of 212
134
In the event of a breakdown
Towing your vehicle
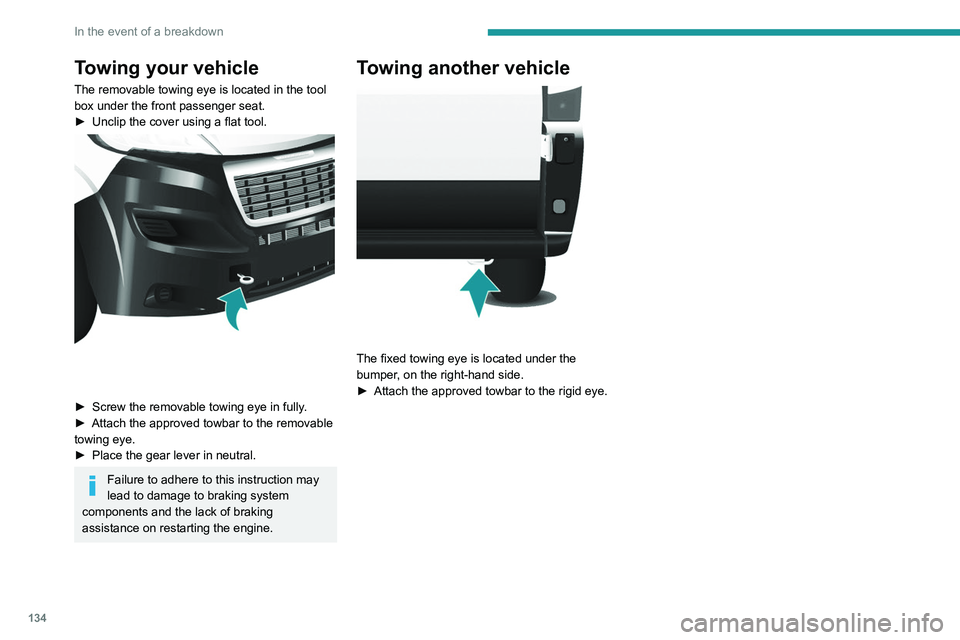
The removable towing eye is located in the tool
box under the front passenger seat.
►
Unclip the cover using a flat tool.
► Screw the removable towing eye in fully .
► Attach the approved towbar to the removable
towing eye.
►
Place the gear lever in neutral.
Failure to adhere to this instruction may
lead to damage to braking system
components and the lack of braking
assistance on restarting the engine.
Towing another vehicle
The fixed towing eye is located under the
bumper, on the right-hand side.
►
Attach the approved towbar to the rigid eye.
Page 137 of 212
135
Technical data
9Engine technical data and
towed loads
Engines
The engine characteristics are given in the
vehicle's registration document, as well as in
sales brochures.
Only the values available at the time of
publication are presented in the tables.
Contact a PEUGEOT dealer or a qualified
workshop to obtain missing values.
The maximum power corresponds to the value type-approved on a test bed, under
conditions defined by European legislation
(Directive 1999/99/EC).
For more information, contact a PEUGEOT
dealer or a qualified workshop.
Weights and towed loads
The weights and towed loads relating to
the vehicle are indicated on the registration
document, as well as in sales brochures.
These values are also indicated on the
manufacturer's plate or label.
For more information, contact a PEUGEOT
dealer or a qualified workshop.
The GTW (Gross Train Weight) and towed load
values indicated are valid up to a maximum
altitude of 1,000 metres. The towed load value
must be reduced by 10% for each additional
1,000 metres of altitude.
The maximum authorised nose weight
corresponds to the weight permitted on the
towball.
When exterior temperatures are high, the
vehicle performance may be limited in
order to protect the engine. When the exterior
temperature is higher than 37°C, reduce the
towed weight.
Towing even with a lightly loaded vehicle can adversely affect its road holding.
Braking distances are increased when towing
a trailer.
When using a vehicle to tow, never exceed
a speed of 62 mph (100
km/h) (observe the
local legislation in force).
Page 138 of 212
136
Technical data
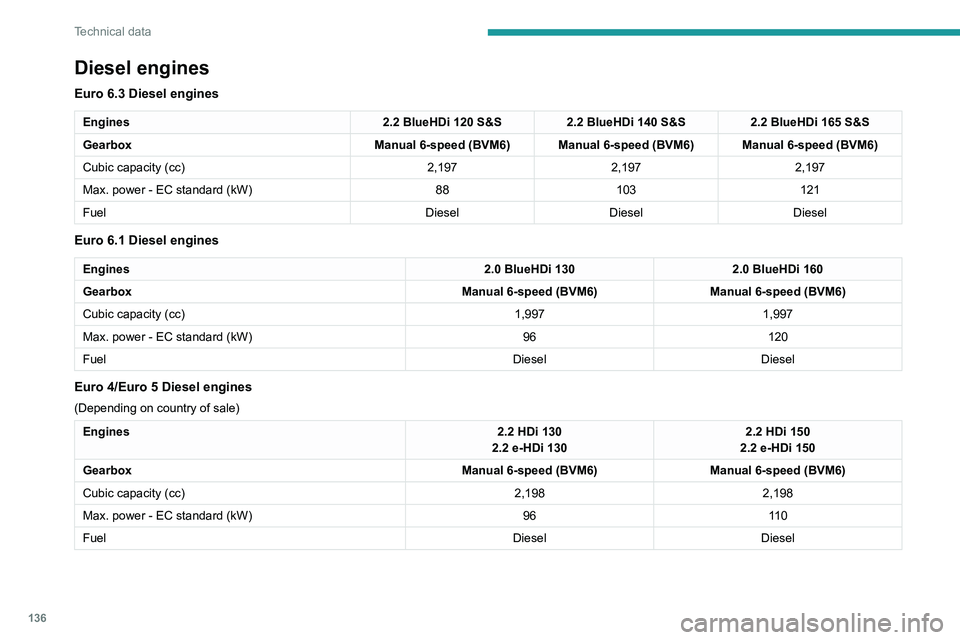
Diesel engines
Euro 6.3 Diesel engines
Engines2.2 BlueHDi 120 S&S2.2 BlueHDi 140 S&S2.2 BlueHDi 165 S&S
Gearbox Manual 6-speed (BVM6) Manual 6-speed (BVM6) Manual 6-speed (BVM6)
Cubic capacity (cc) 2,1972,1972,197
Max. power - EC standard (kW) 88103 121
Fuel DieselDieselDiesel
Euro 6.1 Diesel engines
Engines 2.0 BlueHDi 1302.0 BlueHDi 160
Gearbox Manual 6-speed (BVM6)Manual 6-speed (BVM6)
Cubic capacity (cc) 1,9971,997
Max. power - EC standard (kW) 96120
Fuel DieselDiesel
Euro 4/Euro 5 Diesel engines
(Depending on country of sale)
Engines 2.2 HDi 130
2.2 e-HDi 130 2.2 HDi 150
2.2 e-HDi 150
Gearbox Manual 6-speed (BVM6)Manual 6-speed (BVM6)
Cubic capacity (cc) 2,1982,198
Max. power - EC standard (kW) 9611 0
Fuel DieselDiesel
Page 148 of 212

146
Technical data
Glossary of labels
This section contains all of the text written on the
labels present in the vehicle.
For the Identification markings, refer to
the corresponding section.
In the engine compartment
A
Original paintwork
Colour
Code
Varnish
B
FOR TROUBLESHOOTING ONLY.
C
DANGER
AUTOMATIC ENGINE STARTING. REMOVE
THE IGNITION KEY WHEN THE BONNET IS
OPEN. D
1 - WARNING
GENUINE LUBRICANTS AND FLUIDS
Engine oil
Transmission
Radiator Brakes
Screenwash Power steering
CONSULT THE
MAINTENANCE
AND WARRANTY
GUIDE. PROTECT YOUR
EYES.
2 - SAFETY
The use of genuine replacement parts, fluids
and lubricants, as well as observing the servicing
schedules, guarantees the reliability and safety
of your vehicle over time, so maintaining it in its
original condition. 3 - DANGER
KEEP OUT
OF THE
REACH OF
CHILDREN.
DO NOT
APPROACH
FLAMES.
DO NOT
TOUCH.
DO NOT
REMOVE
THE CAP
WHEN THE
ENGINE IS
HOT. EXPLOSION. CORROSIVE
LIQUID.
MAY START
AUTOMATICALLY EVEN
WITH THE ENGINE
SWITCHED OFF. DO NOT
OPEN GAS
UNDER HIGH
PRESSURE.
AUTOMATIC ENGINE
STARTING. REMOVE THE
IGNITION KEY WHEN THE
BONNET IS OPEN. HIGH
VOLTAGE
Page 162 of 212
160
Special features
– Never work under a tipper body that is not
supported,
–
Switch off the power supply to the electro-
hydraulic unit using the circuit breaker
,
–
V
ehicle stationary, engine off.
For safety reasons, we very strongly
advise against doing anything under the
tipper body while it is being operated or while
it is being serviced.
Maintenance
Reservoir
Regularly check and top up the engine oil level.
Change the oil once a year. If the oil contains
water, change it.
Regularly check the condition of the hose and
ensure the hydraulic system is properly sealed.
Pump and motor
No servicing required. The rolling elements are
permanently lubricated and the bearings are
lubricated by the pumped oil.
Lubrication
The pins of the tipper truck and the ram do not
contain lubricant. Regularly lubricate the hinges
and the grab handles of the side boards as well
as the retaining hooks of the rear board.
Sub-frame and tipper truck
For maximum service life, you are advised to
maintain your tipper truck by regularly washing it
using a power washer.
Carry out any required paint touch-ups quickly to
prevent the spread of rust.
After 8 months of use, check the tightening torque of the connection
between the chassis and the underbody (in
accordance with the manufacturer's
bodybuilding recommendations).
Cleaning the slide valve
► Loosen cap 244A, taking care with the ball
and retrieving it.
►
Using a wide screwdriver
, unscrew the banjo
bolt/piston assembly.
►
Check that the piston slides freely and
remove any foreign bodies. Use a magnet to
remove any metal filings.
►
Refit the assembly and make sure that the
piston slides freely
. Retain the ball with a little
grease on the cap for refitting.
►
Bleed the hydraulic unit.
Bleeding the hydraulic unit
► Unscrew hexagonal cap 257 .
► Loosen internal screw 587
by half a turn,
using a 6 mm hex key.
►
Operate the unit for a few seconds by
pressing the raise button.
The tipper does not rise or rises very slowly
.
When the oil exits through this opening, the unit
is bled.
►
Retighten screw 587
and refit cap 257. Check
that the tipper lowers correctly.
Detailed diagram of the UD2386 hydraulic
unit
Diagnostics
Electrical faults
Page 164 of 212
162
Audio system
Audio system
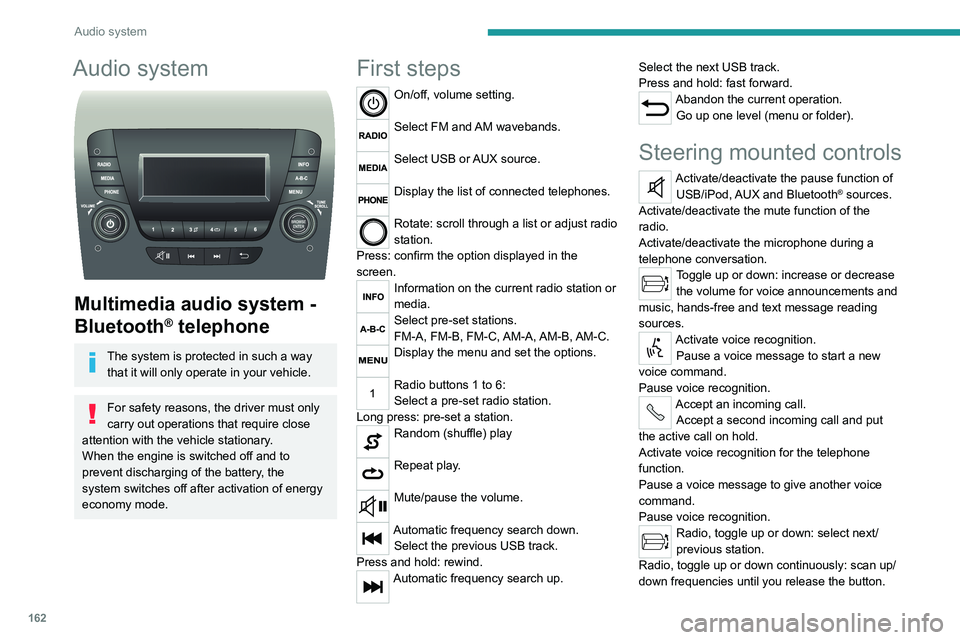
Multimedia audio system -
Bluetooth
® telephone
The system is protected in such a way that it will only operate in your vehicle.
For safety reasons, the driver must only
carry out operations that require close
attention with the
vehicle stationary.
When the engine is switched off and to
prevent discharging of the battery, the
system switches off after activation of energy
economy mode.
First steps
On/off, volume setting.
Select FM and AM wavebands.
Select USB or AUX source.
Display the list of connected telephones.
Rotate: scroll through a list or adjust radio
station.
Press: confirm the option displayed in the
screen.
Information on the current radio station or
media.
Select pre-set stations.
FM-A, FM-B, FM-C, AM-A, AM-B, AM-C.
Display the menu and set the options.
Radio buttons 1 to 6:
Select a pre-set radio station.
Long press: pre-set a station.
Random (shuffle) play
Repeat play.
Mute/pause the volume.
Automatic frequency search down. Select the previous USB track.
Press and hold: rewind.
Automatic frequency search up. Select the next USB track.
Press and hold: fast forward.
Abandon the current operation.
Go up one level (menu or folder).
Steering mounted controls
Activate/deactivate the pause function of USB/iPod, AUX and Bluetooth® sources.
Activate/deactivate the mute function of the
radio.
Activate/deactivate the microphone during a
telephone conversation.
Toggle up or down: increase or decrease the volume for voice announcements and
music, hands-free and text message reading
sources.
Activate voice recognition. Pause a voice message to start a new
voice command.
Pause voice recognition.
Accept an incoming call. Accept a second incoming call and put
the active call on hold.
Activate voice recognition for the telephone
function.
Pause a voice message to give another voice
command.
Pause voice recognition.
Radio, toggle up or down: select next/
previous station.
Radio, toggle up or down continuously: scan up/
down frequencies until you release the button.
Page 171 of 212
169
Touch screen audio and telematics system
12Touch screen audio and telematics system
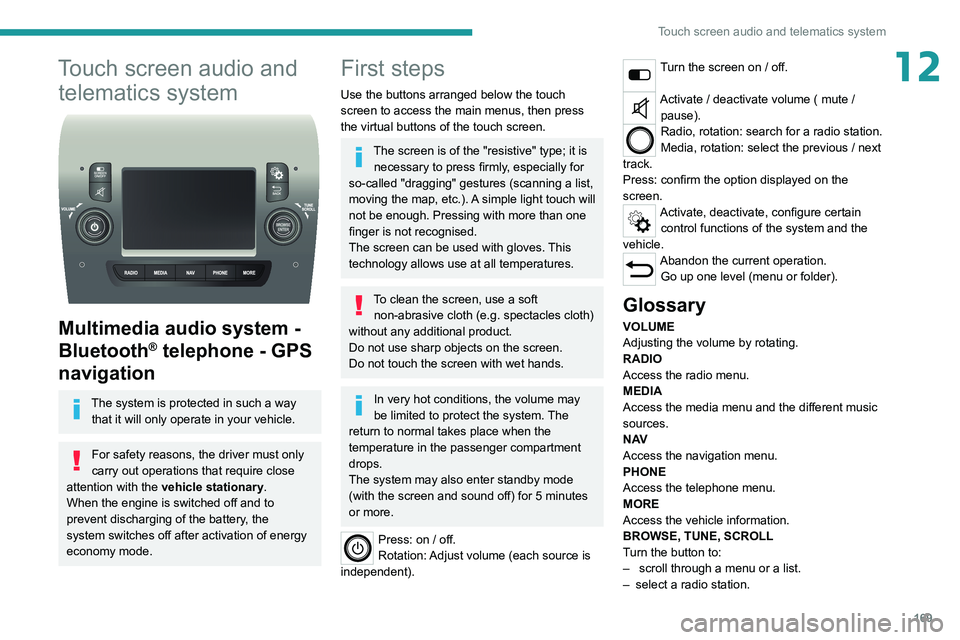
Multimedia audio system -
Bluetooth
® telephone - GPS
navigation
The system is protected in such a way
that it will only operate in your vehicle.
For safety reasons, the driver must only
carry out operations that require close
attention with the
vehicle stationary.
When the engine is switched off and to
prevent discharging of the battery, the
system switches off after activation of energy
economy mode.
First steps
Use the buttons arranged below the touch
screen to access the main menus, then press
the virtual buttons of the touch screen.
The screen is of the "resistive" type; it is necessary to press firmly, especially for
so-called "dragging" gestures (scanning a list,
moving the map, etc.). A simple light touch will
not be enough. Pressing with more than one
finger is not recognised.
The screen can be used with gloves. This
technology allows use at all temperatures.
To clean the screen, use a soft non-abrasive cloth (e.g. spectacles cloth)
without any additional product.
Do not use sharp objects on the screen.
Do not touch the screen with wet hands.
In very hot conditions, the volume may
be limited to protect the system. The
return to normal takes place when the
temperature in the passenger compartment
drops.
The system may also enter standby mode
(with the screen and sound off) for 5 minutes
or more.
Press: on / off.
Rotation: Adjust volume (each source is
independent).
Turn the screen on / off.
Activate / deactivate volume ( mute / pause).
Radio, rotation: search for a radio station.
Media, rotation: select the previous / next
track.
Press: confirm the option displayed on the
screen.
Activate, deactivate, configure certain control functions of the system and the
vehicle.
Abandon the current operation. Go up one level (menu or folder).
Glossary
VOLUME
Adjusting the volume by rotating.
RADIO
Access the radio menu.
MEDIA
Access the media menu and the different music
sources.
N AV
Access the navigation menu.
PHONE
Access the telephone menu.
MORE
Access the vehicle information.
BROWSE, TUNE, SCROLL
Turn the button to:
–
scroll through a menu or a list.
–
select a radio station.