2021 PEUGEOT BOXER check engine
[x] Cancel search: check enginePage 118 of 212
11 6
Practical information
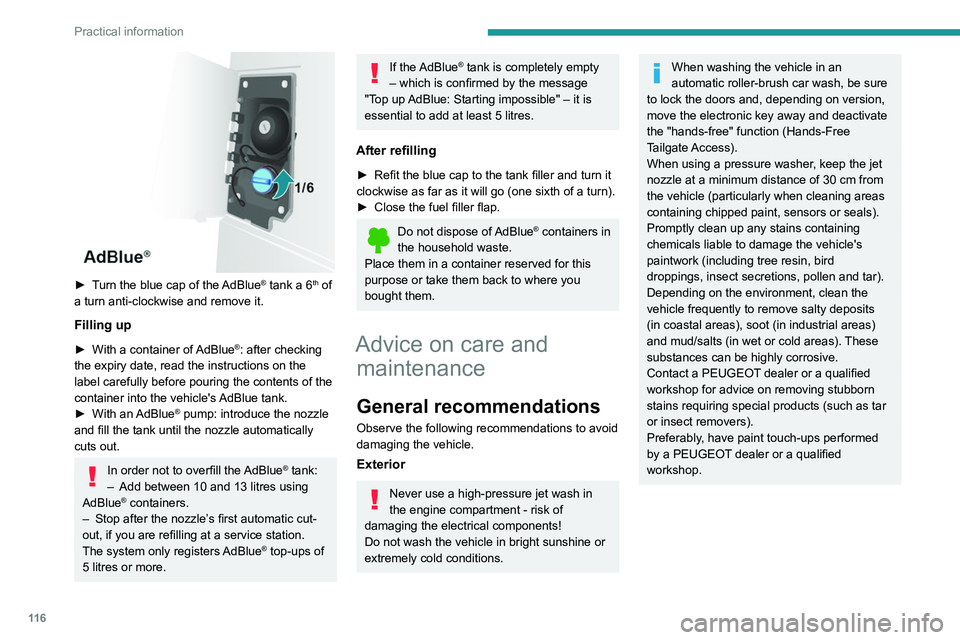
► Turn the blue cap of the AdBlue® tank a 6th of
a turn anti-clockwise and remove it.
Filling up
► With a container of AdBlue®: after checking
the expiry date, read the instructions on the
label carefully before pouring the contents of the
container
into the vehicle's AdBlue tank.
►
With an
AdBlue® pump: introduce the nozzle
and fill the tank until the nozzle automatically
cuts out.
In order not to overfill the AdBlue® tank:
–
Add between 10 and 13 litres using
AdBlue® containers.
–
Stop after the nozzle’ s first automatic cut-
out, if you are refilling at a service station.
The system only registers AdBlue
® top-ups of
5
litres or more.
If the AdBlue® tank is completely empty
– which is confirmed by the message
"Top up
AdBlue: Starting impossible" – it is
essential to add at least 5 litres.
After refilling
► Refit the blue cap to the tank filler and turn it
clockwise as far as it will go (one sixth of a turn).
►
Close the fuel filler flap.
Do not dispose of AdBlue® containers in
the household waste.
Place them in a container reserved for this
purpose or take them back to where you
bought them.
Advice on care and maintenance
General recommendations
Observe the following recommendations to avoid
damaging the vehicle.
Exterior
Never use a high-pressure jet wash in
the engine compartment - risk of
damaging the electrical components!
Do not wash the vehicle in bright sunshine or
extremely cold conditions.
When washing the vehicle in an
automatic roller-brush car wash, be sure
to lock the doors and, depending on version,
move the electronic key away and deactivate
the "hands-free" function (Hands-Free
Tailgate Access).
When using a pressure washer, keep the jet
nozzle at a minimum distance of 30 cm from
the vehicle (particularly when cleaning areas
containing chipped paint, sensors or seals).
Promptly clean up any stains containing
chemicals liable to damage the vehicle's
paintwork (including tree resin, bird
droppings, insect secretions, pollen and tar).
Depending on the environment, clean the
vehicle frequently to remove salty deposits
(in coastal areas), soot (in industrial areas)
and mud/salts (in wet or cold areas). These
substances can be highly corrosive.
Contact a PEUGEOT dealer or a qualified
workshop for advice on removing stubborn
stains requiring special products (such as tar
or insect removers).
Preferably, have paint touch-ups performed
by a PEUGEOT dealer or a qualified
workshop.
Page 120 of 212
11 8
In the event of a breakdown
Temporary puncture repair kit
This temporary puncture repair kit is stored in a
bag, placed in one of the front doors.
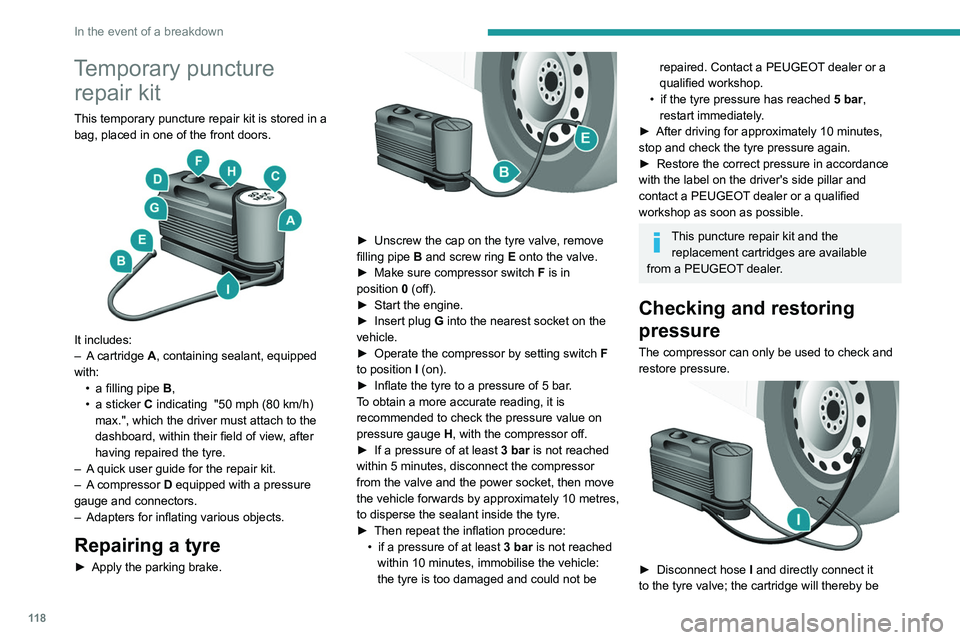
It includes:
–
A cartridge A, containing sealant, equipped
with: •
a filling pipe B
,
•
a sticker
C indicating "50 mph (80 km/h)
max.", which the driver must attach to the
dashboard, within their field of view, after
having repaired the tyre.
–
A
quick user guide for the repair kit.
–
A
compressor D equipped with a pressure
gauge and connectors.
–
Adapters for inflating various objects.
Repairing a tyre
► Apply the parking brake.
► Unscrew the cap on the tyre valve, remove
filling pipe B and screw ring E onto the valve.
►
Make sure compressor switch F
is in
position
0
(off).
►
Start the engine.
►
Insert plug
G into the nearest socket on the
vehicle.
►
Operate the compressor by setting switch F
to position I (on).
►
Inflate the tyre to a pressure of 5 bar
.
To obtain a more accurate reading, it is
recommended to check the pressure value on
pressure gauge H, with the compressor off.
►
If a pressure
of at least 3 bar is not reached
within 5 minutes, disconnect the compressor
from the valve and the power socket, then move
the vehicle forwards by approximately 10 metres,
to disperse the sealant inside the tyre.
►
Then repeat the inflation procedure:
•
if a pressure of at least
3 bar is not reached
within 10 minutes, immobilise the vehicle:
the tyre is too damaged and could not be
repaired. Contact a PEUGEOT dealer or a
qualified workshop.
•
if the tyre pressure has reached 5 bar
,
restart immediately.
►
After driving for approximately 10 minutes,
stop and check the tyre pressure again.
►
Restore the correct pressure in accordance
with the label on the driver's side pillar and
contact a PEUGEOT
dealer or a qualified
workshop as soon as possible.
This puncture repair kit and the replacement cartridges are available
from a PEUGEOT dealer.
Checking and restoring
pressure
The compressor can only be used to check and
restore pressure.
► Disconnect hose I and directly connect it
to the tyre valve; the cartridge will thereby be
Page 132 of 212
130
In the event of a breakdown
PEUGEOT accepts no responsibility for
the cost incurred in repairing the vehicle
or for rectifying malfunctions resulting from
the installation of accessories not supplied or
not recommended by PEUGEOT and not
installed in accordance with its
recommendations, in particular when the
combined power consumption of all of the
additional equipment connected exceeds 10
milliamperes.
12 V battery / Accessory
battery
Procedure for starting the engine using another
battery or for charging a discharged battery.
These batteries contain harmful
substances (sulphuric acid and lead).
They must be disposed of in accordance
with regulations and must never under any
circumstances be discarded with household
waste.
Dispose of used batteries at a designated
collection point.
Protect your eyes and face before
handling the battery.
All operations on the battery must be carried
out in a well ventilated area and away from
naked flames and sources of sparks, to avoid
any risk of explosion or fire.
Wash your hands afterwards.
Electric motor
Flat accessory battery
It is no longer possible to start the motor
or recharge the traction battery.
Precautions before working on the
accessory battery
Switch off the ignition and check that the
vehicle is not being charged.
Jump-starting another vehicle
Do not use the accessory battery to
jump-start another vehicle or to charge
another vehicle's battery.
Accessing the battery
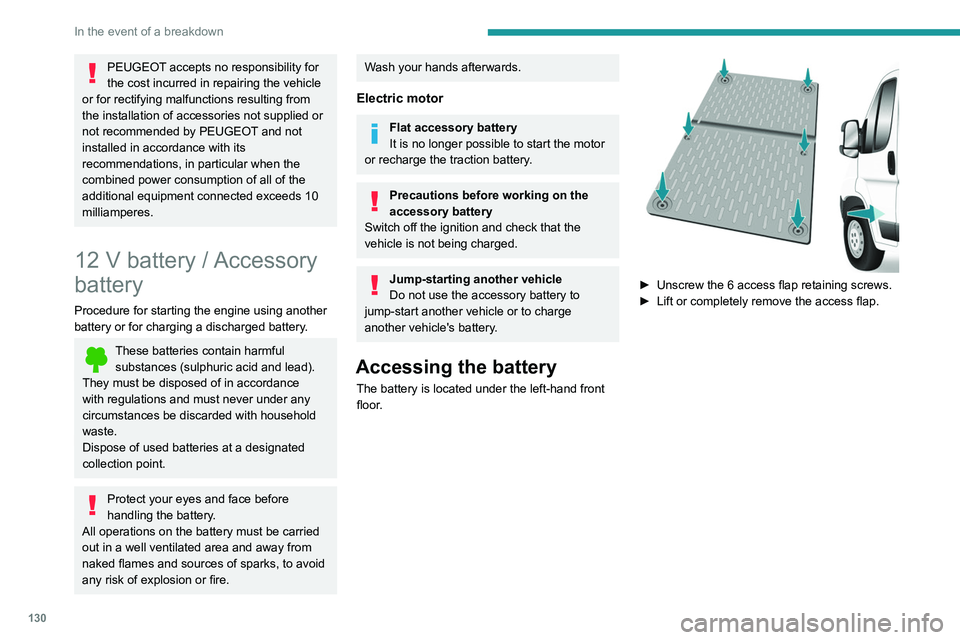
The battery is located under the left-hand front
floor.
► Unscrew the 6 access flap retaining screws.
► Lift or completely remove the access flap.
Page 133 of 212

131
In the event of a breakdown
8Disconnecting the battery
► Tilt lever 1 downwards to release the
terminals.
►
Remove terminals
2
from the negative (-)
terminal.
Wait approximately 6 minutes after
switching off the ignition before
disconnecting the battery.
Do not disconnect the terminals while the
engine is running.
Do not charge a battery without disconnecting
the terminals first.
Close the windows and the doors before
disconnecting the battery.
After reconnecting the battery, turn on the
ignition and wait 1 minute before starting the
engine, to enable the electronic systems to
initialise. If minor problems nevertheless persist
following this operation, contact a PEUGEOT
dealer or a qualified workshop.
It is recommended to disconnect the (-)
terminal of the battery if the vehicle is to
be left unused for more than one month.
The description of the battery charging
procedure is only indicative.
After prolonged battery disconnection, it may be
necessary to reinitialise the following functions:
–
the display parameters (date, time, language,
distance and temperature units),
–
the stations of the audio system,
–
the central locking.
Some settings are cancelled and must be
entered once again; contact a PEUGEOT
dealer.
If the vehicle is equipped with a tachograph or
an alarm,
it is recommended that the (-) terminal
of the battery (located under the floor on the
left-hand side, in the cab) be disconnected if the
vehicle is not going to be used for more than 5
days.
Starting using another
battery
Never start the engine by connecting a
battery charger.
Never use a 24 V or higher battery booster.
Check beforehand that the backup battery
has a nominal voltage of 12 V and a capacity
at least equal to that of the discharged
battery.
The two vehicles must not be in contact with
each other.
Switch off all electricity-consuming equipment
on both vehicles (audio system, wipers,
lighting, etc.).
Make sure that the jump leads are well away
from the engine’s moving parts (fan, belt,
etc.).
Do not disconnect the (+) terminal while the
engine is running.
Starting the engine using another battery is to be
performed inside the engine compartment.
►
Open the bonnet.
A. Positive metallic terminal on the vehicle
B. Backup battery
C. Vehicle earth point
The positive metallic terminal A is accessible
through a flap located on the side of the fuse
box.
Page 134 of 212
132
In the event of a breakdown
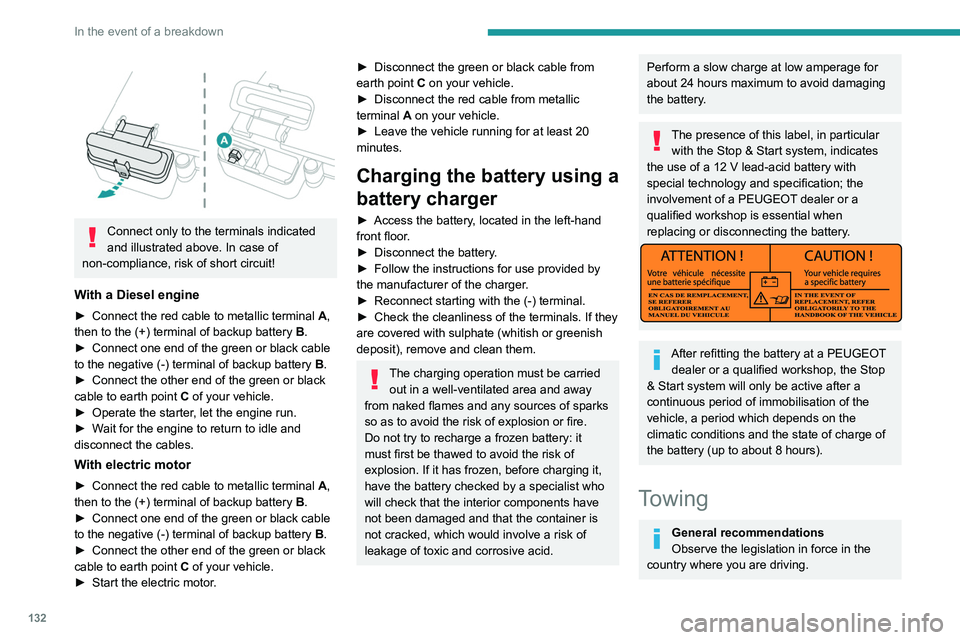
Connect only to the terminals indicated
and illustrated above. In case of
non-compliance, risk of short circuit!
With a Diesel engine
► Connect the red cable to metallic terminal A,
then to the (+) terminal of backup battery B.
►
Connect one end of the green or black cable
to the negative (-) terminal of backup battery B
.
►
Connect the other end of the green or black
cable to earth point C
of your vehicle.
►
Operate the starter
, let the engine run.
►
W
ait for the engine to return to idle and
disconnect the cables.
With electric motor
► Connect the red cable to metallic terminal A,
then to the (+) terminal of backup battery B.
►
Connect one end of the green or black cable
to the negative (-) terminal of backup battery B
.
►
Connect the other end of the green or black
cable to earth point C
of your vehicle.
►
Start the electric motor
.
► Disconnect the green or black cable from
earth point C on your vehicle.
►
Disconnect the red cable from metallic
terminal
A on your vehicle.
►
Leave the vehicle running for at least 20
minutes.
Charging the battery using a
battery charger
► Access the battery , located in the left-hand
front floor.
►
Disconnect the battery
.
►
Follow the instructions for use provided by
the manufacturer of the charger
.
►
Reconnect starting with the (-) terminal.
►
Check the cleanliness of the terminals. If they
are covered with sulphate (whitish or greenish
deposit), remove and clean them.
The charging operation must be carried out in a well-ventilated area and away
from naked flames and any sources of sparks
so as to avoid the risk of explosion or fire.
Do not try to recharge a frozen battery: it
must first be thawed to avoid the risk of
explosion. If it has frozen, before charging it,
have the battery checked by a specialist who
will check that the interior components have
not been damaged and that the container is
not cracked, which would involve a risk of
leakage of toxic and corrosive acid.
Perform a slow charge at low amperage for
about 24 hours maximum to avoid damaging
the battery.
The presence of this label, in particular with the Stop & Start system, indicates
the use of a 12 V lead-acid battery with
special technology and specification; the
involvement of a PEUGEOT dealer or a
qualified workshop is essential when
replacing or disconnecting the battery.
After refitting the battery at a PEUGEOT dealer or a qualified workshop, the Stop
& Start system will only be active after a
continuous period of immobilisation of the
vehicle, a period which depends on the
climatic conditions and the state of charge of
the battery (up to about 8 hours).
Towing
General recommendations
Observe the legislation in force in the
country where you are driving.
Page 162 of 212
160
Special features
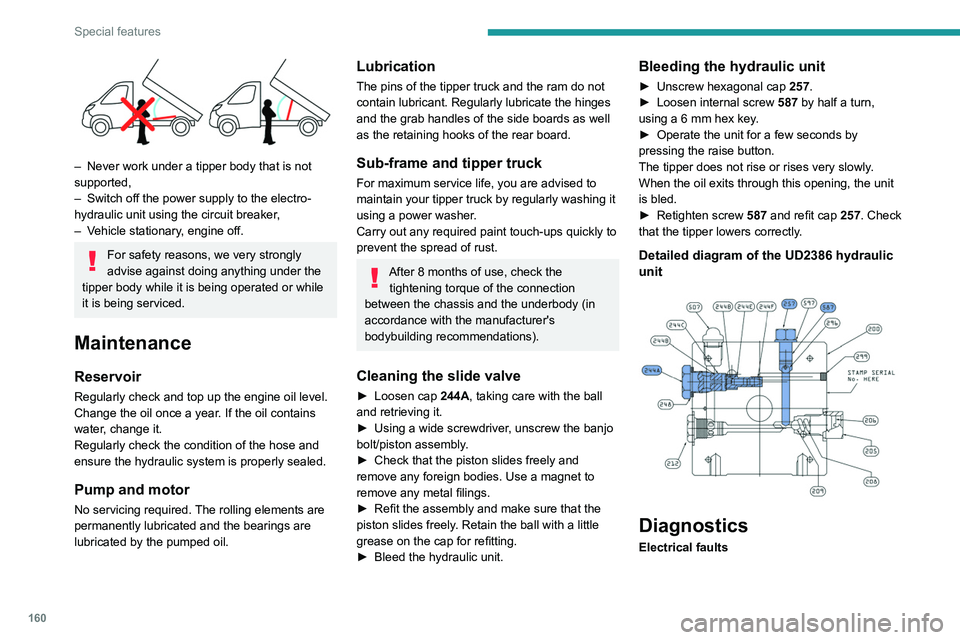
– Never work under a tipper body that is not
supported,
–
Switch off the power supply to the electro-
hydraulic unit using the circuit breaker
,
–
V
ehicle stationary, engine off.
For safety reasons, we very strongly
advise against doing anything under the
tipper body while it is being operated or while
it is being serviced.
Maintenance
Reservoir
Regularly check and top up the engine oil level.
Change the oil once a year. If the oil contains
water, change it.
Regularly check the condition of the hose and
ensure the hydraulic system is properly sealed.
Pump and motor
No servicing required. The rolling elements are
permanently lubricated and the bearings are
lubricated by the pumped oil.
Lubrication
The pins of the tipper truck and the ram do not
contain lubricant. Regularly lubricate the hinges
and the grab handles of the side boards as well
as the retaining hooks of the rear board.
Sub-frame and tipper truck
For maximum service life, you are advised to
maintain your tipper truck by regularly washing it
using a power washer.
Carry out any required paint touch-ups quickly to
prevent the spread of rust.
After 8 months of use, check the tightening torque of the connection
between the chassis and the underbody (in
accordance with the manufacturer's
bodybuilding recommendations).
Cleaning the slide valve
► Loosen cap 244A, taking care with the ball
and retrieving it.
►
Using a wide screwdriver
, unscrew the banjo
bolt/piston assembly.
►
Check that the piston slides freely and
remove any foreign bodies. Use a magnet to
remove any metal filings.
►
Refit the assembly and make sure that the
piston slides freely
. Retain the ball with a little
grease on the cap for refitting.
►
Bleed the hydraulic unit.
Bleeding the hydraulic unit
► Unscrew hexagonal cap 257 .
► Loosen internal screw 587
by half a turn,
using a 6 mm hex key.
►
Operate the unit for a few seconds by
pressing the raise button.
The tipper does not rise or rises very slowly
.
When the oil exits through this opening, the unit
is bled.
►
Retighten screw 587
and refit cap 257. Check
that the tipper lowers correctly.
Detailed diagram of the UD2386 hydraulic
unit
Diagnostics
Electrical faults
Page 177 of 212
175
Touch screen audio and telematics system
12Help
Access information about assistance services
and other specialised services.
Finish
Validate the settings.
Limitation
Speed limitation (if known).
To see the difference between the desired arrival
time and the estimated arrival time.
Switch between a 3D map and a 2D map.
Go to..., Display the map, Plan a route,
Services, Settings, Help, Finish.
When the navigation system starts for the first
time, the "Driving mode" as well as detailed
information on the current position is displayed.
Touch the centre of the screen to open the main
menu.
Details
The route summary provides an overview of the
route, the remaining distance to the destination
and an estimate of the remaining travel time.
With the RDS-TMC data, the route summary
also shows the traffic information concerning
delays along the route.
Modify route
The navigation system helps you to get to your
destination as quickly as possible by displaying a
faster alternative route when it is available.
Finish
Validate the settings.
Instructions
Navigation instructions for the next part of the
trip and the distance to the next instruction. If the second instruction is less than 150 metres from
the first one, it is immediately displayed instead
of the distance.
Touch this part of the status bar to repeat the last
voice instruction.
Updating maps
To get a map update, proceed as follows: – Map refresh guarantee: if a new map
becomes available within 90 days of the first
use of the system, you can download it once
for free.
–
Map update: you can purchase a new
version of the map loaded on the system.
T
o install a map update on the system, perform
the following four steps:
–
Prepare a USB device.
–
Install TomTom HOME and create a
MyTomTom account.
–
Download the map.
–
Install the new map.
Use a USB device and not a mass
storage device (telephone or media
player).
To protect the system, do not use a USB hub.
Prepare a USB device
The preparation of the USB device
must be done with the engine running
and the vehicle stationary.
In order to update the map, you must have
a USB device that meets the following
requirements:
–
The USB device must be empty
.
–
The USB device has 16 GB of available
space.
–
Use only USB devices formatted to F
AT32
(File Allocation Table).
–
Do not lock the USB device and check that
files can be saved to it.
T
o prepare the USB device, proceed as follows:
►
Make sure that the map to be updated is
active on the vehicle's navigation system.
If the navigation system has multiple maps and
you want to update a map that is not currently
active, you will need to activate it.
►
Select "
Change map" in the "Settings" menu
of the navigation application.
►
Select "
Navigation updates" in the
"Settings" menu.
►
Y
ou must indicate whether you want to
prepare a USB device to download updates.
►
Select "
Ye s".
►
Insert the USB device into the USB socket
located in the central storage space
and
which is dedicated to data transfer.
The system starts preparing the USB device.
Page 178 of 212
176
Touch screen audio and telematics system
– If the system continues to ask you to
insert a USB device, make sure that the
USB device meets the above requirements,
and then try again.
–
If you connect multiple USB devices, the
system prompts you to remove devices
so that only the device to be prepared is
connected.
–
If there is not enough space on the USB
device, you are prompted to use another USB
device.
–
If you connect a USB device that contains
files, the system warns you that files on the
USB device may be deleted.
When the USB device is ready
, the message
below appears:
"Navigation updates"
The preparation of the USB device is
finished.
You can now safely remove the USB device.
►
Remove the USB device.
You are now ready
to download the new map to your USB device.
Install TomTom HOME
To install "TomTom HOME" and create a
"MyTomTom" account, perform the following
steps:
►
Download and install the T
omTom HOME
application on a computer via this link:
tomtom.com/getstarted
►
Select and download T
omTom HOME, then
follow the on-screen instructions.
Choose a secure Wi-Fi network rather
than a 3G/4G network to download the
application to a computer.
►
Connect the USB device to the computer
.
"TomTomHome" starts automatically.
►
Select "
Log in " in the upper right corner of
"TomTom HOME".
►
Select "
Create an account" and enter your
information to create a "MyTomTom" account.
To receive map updates, you must have a "MyTomTom" account.
Once the account is created, you must indicate
whether you want to link your system to your
account. The prepared USB device represents
your system.
►
Select "
Link device", then "Close".
You are now ready to download a map to your
USB device.
Download a map
Connect the USB device to the computer.
Select a map to download
–
T
o check if you can download a map for free
with the map refresh guarantee, select " Tools"
and then "Map refresh guarantee " in "TomTom
HOME".
–
T
o purchase a map update, select " Buy
maps" in "TomTom HOME".
–
If you have already purchased an update,
select "
Update my device" in "TomTomHOME".
Download a map
If a map update is available for your system, it is
listed as an available update.
If your system already has the most
recent map, no updates are available.
►
Select the map to download, then select
"
Update and install "; the map will be
downloaded and installed on your USB device.
►
Select "
Done" once the process is finished.
Install the map
The new map must be downloaded
with the engine running and the
vehicle stationary.
Once you have downloaded a map to your USB
device, you can install it on your system.
►
Insert the USB device containing the new
map into the USB socket
located in the central
storage space and which is dedicated to data
transfer to the system.
The system detects the presence of a new
map on the USB device. It may also contain
an update of the navigation software if it is
necessary for the new map.
►
Y
ou must indicate whether you want to
update the system.
►
Select "
Start".
If the USB device contains new software,
the system starts by updating the navigation
software. Once the software is updated, the
system must restart.
►
Select "
OK".