2021 PEUGEOT BOXER USB
[x] Cancel search: USBPage 6 of 212

4
Overview
Presentation
These illustrations and descriptions are intended
as a guide. The presence and location of certain
elements may vary, depending on the version or
trim level.
Instruments and controls
1. Instrument panel with display screen
2. Lighting control and direction indicator stalk
3. Wiper/Screenwash
control stalk
Trip computer (Diesel)
4. Vehicle configuration/Headlamps beam
height/Front/rear foglamps 5.
Steering mounted controls for the audio
system
6. Driver's front airbag/Horn
7. Ignition switch
8. Additional programmable heating (Diesel)
Heating (Electric)
9. Fusebox
10. Cruise control/speed limiter controls (Diesel)
11 . Pneumatic suspension/Reading spotlamps/
Additional rear ventilation (Diesel)
Centre console
1. Audio system/Navigation
2. Heating/Air conditioning
3. Storage compartment/Removable ashtray
4. 12 volt accessory socket (180
W max)
5. USB socket/Cigarette lighter
6. Dynamic stability control (DSC/ASR)
Intelligent traction control (Diesel)
7. Hill Assist Descent Control
8. Lane departure warning system
9. Hazard warning lamps
10. Central locking
11 . De-icing/Demisting
12. Gear lever (Diesel)
Drive selector (Electric)
Page 45 of 212
43
Ease of use and comfort
3With Stop & Start, when the rear screen
demisting is switched on, the STOP
mode is not available.
Cab layout
Make sure you do not leave any item in
the passenger compartment which could
act like a magnifying glass under the effect of
the sun's rays and cause a fire - risk of fire or
damage to interior surfaces!
Sun visor
► To avoid glare from ahead, fold the sun visor
down.
Pockets are provided
in the sun visors for storing
toll cards, tickets, etc.
Central storage
compartment
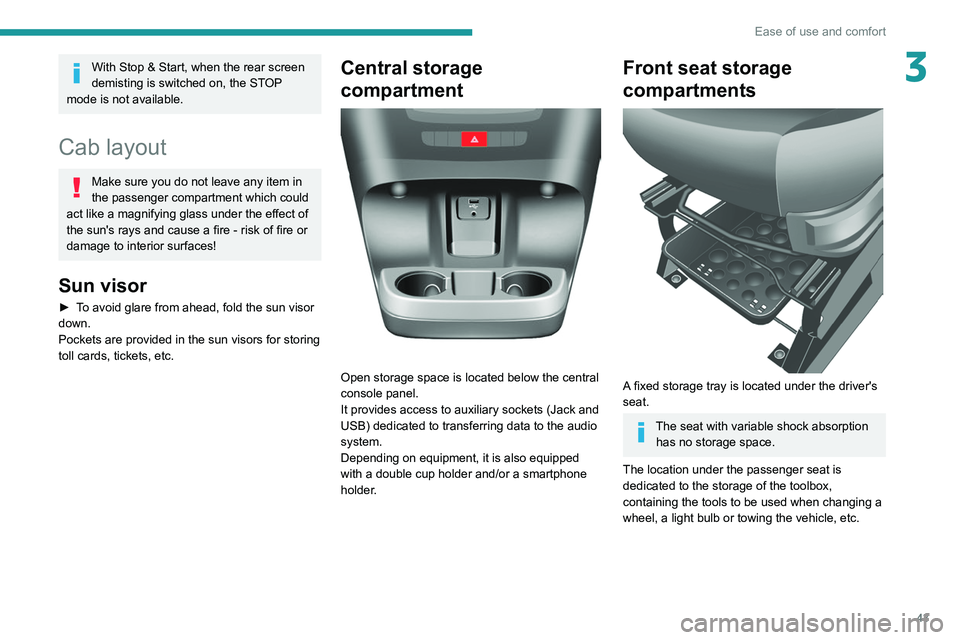
Open storage space is located below the central
console panel.
It provides access to auxiliary sockets (Jack and
USB) dedicated to transferring data to the audio
system.
Depending on equipment, it is also equipped
with a double cup holder and/or a smartphone
holder.
Front seat storage
compartments
A fixed storage tray is located under the driver's
seat.
The seat with variable shock absorption has no storage space.
The location under the passenger seat is
dedicated to the storage of the toolbox,
containing the tools to be used when changing a
wheel, a light bulb or towing the vehicle, etc.
Page 47 of 212
45
Ease of use and comfort
3Front door pockets
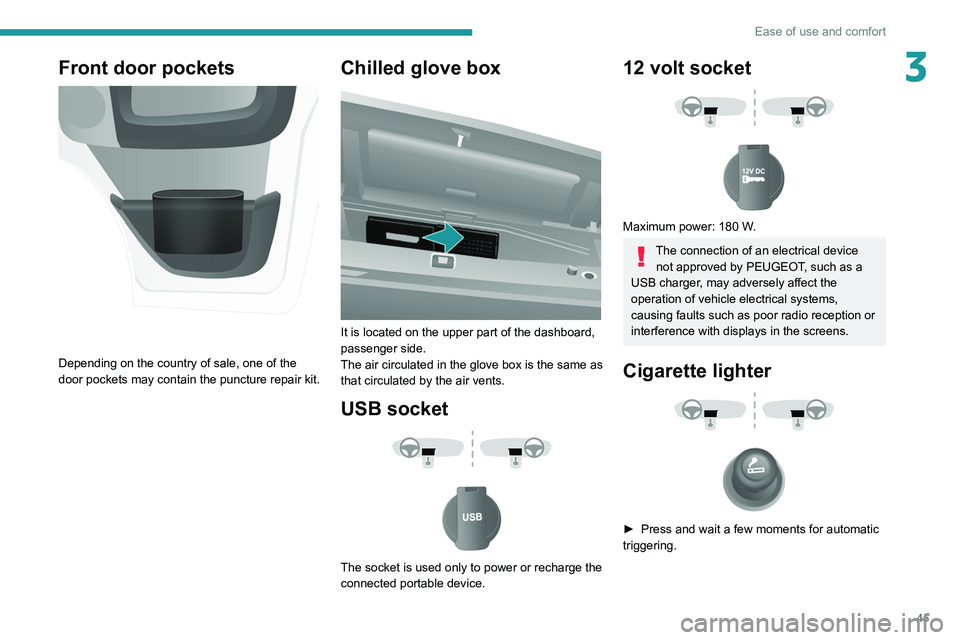
Depending on the country of sale, one of the
door pockets may contain the puncture repair kit.
Chilled glove box
It is located on the upper part of the dashboard,
passenger side.
The air circulated in the glove box is the same as
that circulated by the air vents.
USB socket
The socket is used only to power or recharge the
connected portable device.
12 volt socket
Maximum power: 180 W.
The connection of an electrical device not approved by PEUGEOT, such as a
USB charger, may adversely affect the
operation of vehicle electrical systems,
causing faults such as poor radio reception or
interference with displays in the screens.
Cigarette lighter
► Press and wait a few moments for automatic
triggering.
Page 49 of 212
47
Ease of use and comfort
3Rear fittings
Stowing rings
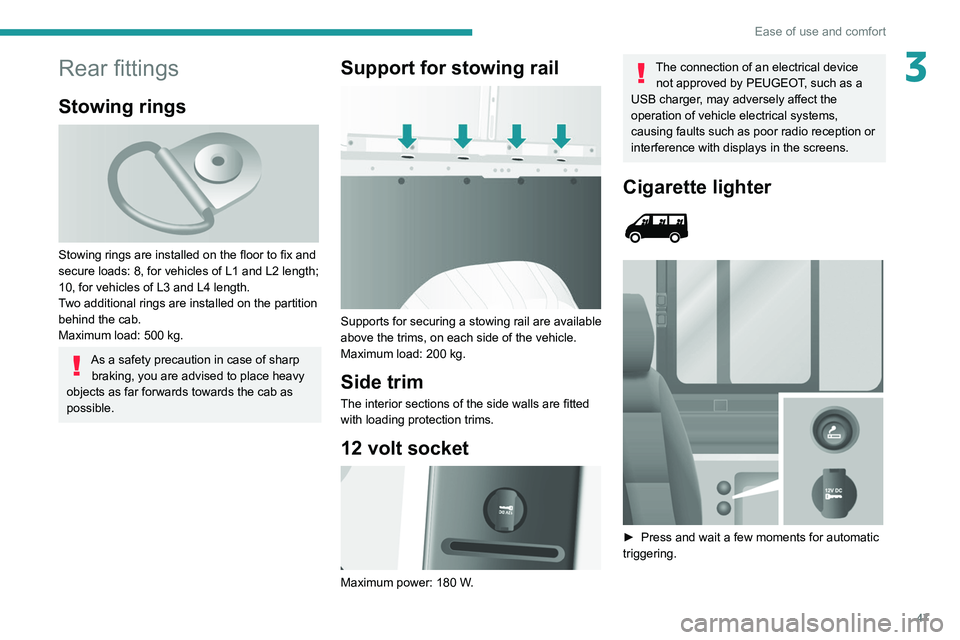
Stowing rings are installed on the floor to fix and
secure loads: 8, for vehicles of L1 and L2 length;
10, for vehicles of L3 and L4 length.
Two additional rings are installed on the partition
behind the cab.
Maximum load: 500 kg.
As a safety precaution in case of sharp braking, you are advised to place heavy
objects as far forwards towards the cab as
possible.
Support for stowing rail
Supports for securing a stowing rail are available
above the trims, on each side of the vehicle.
Maximum load: 200 kg.
Side trim
The interior sections of the side walls are fitted
with loading protection trims.
12 volt socket
Maximum power: 180 W.
The connection of an electrical device not approved by PEUGEOT, such as a
USB charger, may adversely affect the
operation of vehicle electrical systems,
causing faults such as poor radio reception or
interference with displays in the screens.
Cigarette lighter
► Press and wait a few moments for automatic
triggering.
Page 164 of 212
162
Audio system
Audio system
Multimedia audio system -
Bluetooth
® telephone
The system is protected in such a way that it will only operate in your vehicle.
For safety reasons, the driver must only
carry out operations that require close
attention with the
vehicle stationary.
When the engine is switched off and to
prevent discharging of the battery, the
system switches off after activation of energy
economy mode.
First steps
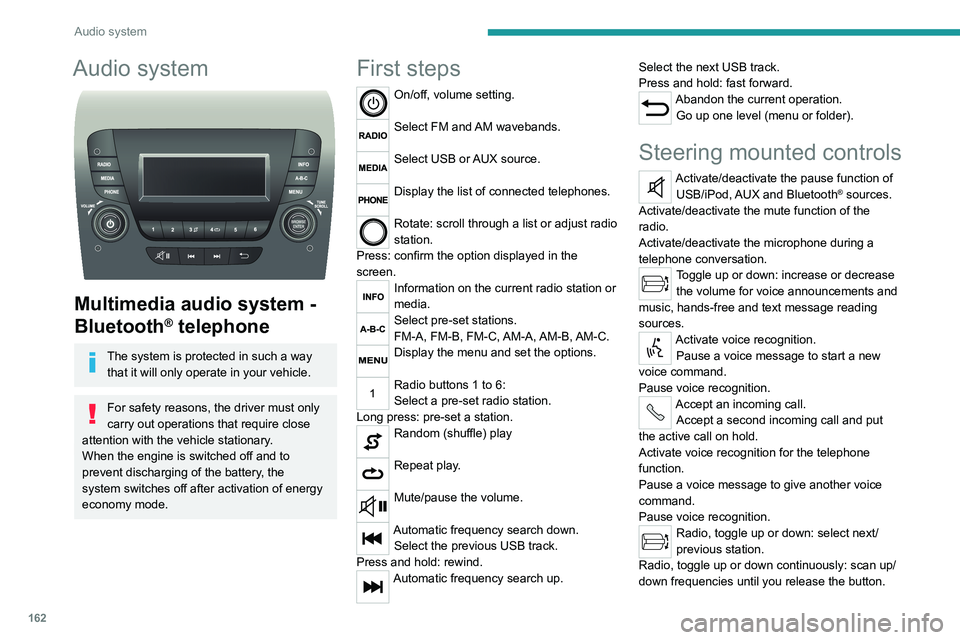
On/off, volume setting.
Select FM and AM wavebands.
Select USB or AUX source.
Display the list of connected telephones.
Rotate: scroll through a list or adjust radio
station.
Press: confirm the option displayed in the
screen.
Information on the current radio station or
media.
Select pre-set stations.
FM-A, FM-B, FM-C, AM-A, AM-B, AM-C.
Display the menu and set the options.
Radio buttons 1 to 6:
Select a pre-set radio station.
Long press: pre-set a station.
Random (shuffle) play
Repeat play.
Mute/pause the volume.
Automatic frequency search down. Select the previous USB track.
Press and hold: rewind.
Automatic frequency search up. Select the next USB track.
Press and hold: fast forward.
Abandon the current operation.
Go up one level (menu or folder).
Steering mounted controls
Activate/deactivate the pause function of USB/iPod, AUX and Bluetooth® sources.
Activate/deactivate the mute function of the
radio.
Activate/deactivate the microphone during a
telephone conversation.
Toggle up or down: increase or decrease the volume for voice announcements and
music, hands-free and text message reading
sources.
Activate voice recognition. Pause a voice message to start a new
voice command.
Pause voice recognition.
Accept an incoming call. Accept a second incoming call and put
the active call on hold.
Activate voice recognition for the telephone
function.
Pause a voice message to give another voice
command.
Pause voice recognition.
Radio, toggle up or down: select next/
previous station.
Radio, toggle up or down continuously: scan up/
down frequencies until you release the button.
Page 165 of 212
163
Audio system
11Media, toggle up or down: select next/previous
track.
Media, toggle up or down continuously: fast
forward/rewind until you release the button.
Refuse an incoming call.
End the call in progress.
Radio
Selecting a station
The exterior environment (hills, buildings, tunnels, car parks, underground location,
etc.) may block reception, including in RDS
mode.
This behaviour is normal in the propagation of
radio waves and does not indicate any fault
with the audio system.
Press the "RADIO" button to select the
FM or AM waveband.
Briefly press one of the buttons to
automatically search for a lower/
higher frequency.
Turn the knob to manually search for a lower/higher frequency.
Press the knob to display the list of
stations received locally.
Turn the knob to select a station and press to
select it.
Memorising a station
Press the "RADIO" button to select the
FM or AM waveband.
Press the "A-B-C" button to select one of
the three memorised station levels.
Press and hold a button to memorise the
station being listened to.
The name of the station is displayed and an
audible signal confirms the memorisation.
Press "INFO" to display the information of
the station being listened to.
RDS
RDS, if displayed, allows you to continue
listening to the same station by
automatically retuning to alternative
frequencies. However, in certain conditions,
following this RDS station is not guaranteed
over the whole country, because radio
stations do not cover 100% of the area. When
the reception is weak, the frequency switches
to a regional station.
Press the "MENU" button.
Select "Regional" then press to activate
or deactivate RDS.
Alternative frequency (AF)
Select "Alternative frequency (AF)" then
press to activate or deactivate the
frequency.
When the "Regional” function is
activated, the system is therefore able to
search at any time
for the best available
frequency.
Playing TA messages
The TA (Traffic Announcement) function gives priority to TA alert messages. To
operate, this function needs good reception of
a radio station that carries this type of
message. While traffic information is being
broadcast, the current media is automatically
interrupted so that the TA message can be
heard. Normal play of the previously playing
media resumes at the end of the message.
Press the "MENU" button.
Select "Traffic announcement (TA)" then
press to activate or deactivate the
reception of traffic announcements.
Media
USB socket
Insert the USB memory stick or connect
the device to the USB socket in the
central storage space , provided for transferring
data to the system, using a suitable cable (not
supplied).
Page 166 of 212
164
Audio system
To protect the system, do not use a USB hub.
The system builds playlists (in temporary
memory); this operation can take from a
few seconds to several minutes at the first
connection.
Reduce the number of non-music files and the
number of folders to reduce the waiting time.
The playlists are updated every time the ignition
is switched off or a USB memory stick is
connected. The lists are memorised: if they are
not modified, the subsequent loading time will
be shorter.
USB socket
Located on the central console, this
socket is used only to power and
recharge the connected portable device.
Auxiliary socket (AUX)
Connect the portable device (e.g. MP3
player) to the auxiliary jack socket using
an audio cable (not supplied).
First adjust the volume on the portable device
(to a high level). Then adjust the volume of the
audio system.
Controls are managed via the portable device.
The functions of the device connected to the
"AUX" socket are managed directly by this
device: it is therefore not possible to change the
track/folder/playlist or control the start/ending/
pausing of playback using the controls on the
control panel or the steering-mounted controls.
Do not leave the cable of the portable
device plugged into the "AUX" socket after
disconnecting it, in order to avoid possible noise
from the speakers.
Information and advice
The system supports USB Mass Storage
devices, BlackBerry® devices or Apple® players
via the USB sockets. The adapter cable is not
supplied.
Other devices, not recognised by the system
during connection, must be connected to
the auxiliary socket using a Jack cable (not
supplied).
It is advisable to restrict file names to 20
characters, without using special characters (e.g.
" " ? . ; ù) so as to avoid any reading or display
problems.
Only use USB memory sticks formatted to FAT
32 (File Allocation Table).
To protect the system, do not use a USB hub.
The system does not support the simultaneous connection of two identical
devices (two memory sticks or two
Apple
® players) but it is possible to connect
one memory stick and one Apple® player at
the same time.
It is recommended that you use genuine
Apple® USB cables to guarantee correct
operation.
Connecting Apple® players
Connect the Apple® player to the USB
socket using a suitable cable (not
supplied).
Play starts automatically.
Control is via the audio system.
The classifications available are those of the portable device connected (artists/
albums/types/tracks/playlists/audio books/
podcasts).
The default classification is sorting by artist.
To change the classification used, return to
the first level of the menu and then select the
desired classification (playlists for example)
and confirm to browse the tree to the desired
track.
The audio system software version may
not be compatible with the generation of
your Apple
® player.
Page 168 of 212
166
Audio system
Voice commands
Information - Using the
system
Instead of touching the screen, you can
use your voice to control the system.
To ensure that voice commands are always recognised by the system, please
observe the following recommendations:
–
speak in a normal tone of voice,
–
before speaking, always wait for the "beep"
(acoustic signal),
–
the system is able to recognise the voice
commands provided, regardless of gender
,
tone and inflection of the voice of the speaker,
–
if possible, minimise the noise inside the
passenger compartment,
–
before issuing a voice command, ask any
other passengers to refrain from speaking.
Since the system recognises commands
regardless of who is speaking, when several
people are speaking simultaneously
, it
is possible for the system to recognise
commands that are different or additional to
what has been requested,
–
for optimal operation, you are advised to
close the windows and any sunroof present
(on versions/markets where fitted) to avoid
any external source of disturbance.
Steering-mounted controls
This button is used to activate the “Telephone” voice recognition mode that
allows you to make calls, view recent/received/
outgoing calls, display the directory, etc.
This button is used to activate the "Radio/ Media" voice recognition mode that allows
you to tune to a specific radio station or a
specific AM/FM radio frequency, play a track or
an album contained on a USB stick/iPod/MP3/
CD.
Quick voice interaction can be used if
these buttons are depressed during a
voice message from the system; it allows you
to directly say a voice command.
For example, if the system is in the middle
of saying a voice help message and if we
know the command to give the system, by
pressing these buttons, the voice message
is interrupted and it is possible to directly
say the desired voice command (so avoiding
having to listen to the complete voice help
message).
When the system is waiting for a voice
command from the user, pressing these
buttons closes the voice session.
Each time a button is pressed, a "beep"
(acoustic signal) is emitted and the
screen displays a screen page of suggestions
asking the user to say a command.
Global voice commands
These commands can be made from any screen page after
pressing the voice recognition or telephone
button located on the steering wheel, as long as
there is no telephone call in progress.
Help
Provide generic help to the user by offering
some available commands.
Cancel
Close the current voice sequence.
Repeat
Repeat the last spoken voice message to the
user.
Voice tutorial
Provide a detailed description to the user on how
to use the voice system.
"Telephone" voice
commands
If a telephone is connected to the system,
the following voice commands can be
made from any main screen page after pressing
the telephone button located on the steering
wheel, as long as there is no telephone call in
progress.
If no telephone is connected, a voice message
announces: "No telephone is connected.
Connect a telephone and try again” and the
voice session will be closed.