2021 PEUGEOT 508 wiper blades
[x] Cancel search: wiper bladesPage 58 of 292

56
Ease of use and comfort
Programming
The heating or ventilation systems can be
programmed to switch on via the secondary
page of the "Climate" menu on the touch screen.
In the Climate > OPTIONS menu:
► Select Temperature conditioning .
► Press the Status tab to activate/deactivate
the system.
► Press the Settings tab to select Heating
mode to heat the engine and passenger
compartment or Ventilation to ventilate the
passenger compartment.
► Then programme/save the activation time for
each selection.
► Press OK to confirm.
Long-range remote control
(Depending on version.)
This enables you to switch the heating in
the passenger compartment on or off from a
distance.
The remote control has a range of about 0.6
miles (1 km) in open country.
Heated windscreen
In cold weather, this system heats the bottom of
the windscreen, as well as the area alongside
the left-hand windscreen pillar.
Without changing the settings for the air
conditioning system, it allows faster release
of the windscreen wiper blades when they
are frozen to the windscreen and helps avoid
the accumulation of snow resulting from the
operation of the windscreen wipers.
Switching on/off
► With the engine running, press this button to
activate/deactivate the function (confirmed by an
indicator lamp).
The function is activated when the outside
temperature drops below 0°C. It is deactivated
automatically when the engine is switched off.
Rear screen demisting/
defrosting
This demisting/de-icing only works with the engine running.
Depending on version, it also demists/de-ices
the door mirrors.
► Press this button to activate/deactivate
the function (confirmed by the indicator
lamp coming on/switching off).
Demisting/defrosting switches off automatically
to prevent an excessive consumption of
electrical current.
Switch off demisting/defrosting when
you no longer need it; reducing
electrical consumption in turn decreases
energy consumption.
Additional heating/ ventilation system
Only available for petrol or Diesel vehicles.
Heating
This is an additional and separate system which
heats the passenger compartment and improves
defrosting performance.
This indicator lamp is lit while the system is programmed or set in operation
remotely via the remote control.
It flashes during the whole duration of the
heating and goes off at the end of the heating
cycle or when stopped using the remote control.
If the engine has not been started for
more than 3 days, the remote control
starting of the system may not work.
Ventilation
This system allows ventilation of the passenger
compartment with exterior air to improve the
temperature experienced on entering the vehicle
in summer.
Page 77 of 292

75
Lighting and visibility
4The image provided by the camera is displayed
in shades of grey in the instrument panel; warm
objects appear brighter than cold objects.
If pedestrians or animals are detected, they
appear in yellow frames.
If the system detects a risk of
collision with pedestrians or
animals, it triggers an alert: one of these symbols
appears on the instrument panel. The
corresponding silhouette is framed in red.
If the "Night Vision" display mode has not been
selected, the alert is triggered in the form of a
temporary window.
In the event of an alert, the driver may act by
making an avoiding manoeuvre or by braking.
Operating limits
The following situations may interfere with
the operation of the system or prevent it from
working:
–
Poor visibility conditions (falling snow
, heavy
rain, thick fog).
–
Camera masked by snow
, mud or dust.
–
Camera scratched after going through roller
car washes repeatedly
.
–
V
ery high outside temperature.
–
At the top or bottom of a steep slope.
–
On a very winding road.
–
In a bend.
–
After an impact which may have impaired the
camera settings or damaged it.
– After repainting of the grille outside of the
PEUGEOT dealer network or a qualified
workshop.
Maintenance
recommendations
The infrared camera has a wash nozzle
connected to the vehicle’s front screenwash
system.
This nozzle operates every 5th use of the
screenwash.
Regularly check that the camera is clean.
In bad weather, or in wintry conditions, ensure
that the camera is not covered with mud, ice or
snow.
Malfunction
If the event of a malfunction, this warning
lamp comes on in orange on the
instrument panel, accompanied by the display of
a message.
Have it checked by a PEUGEOT dealer or a
qualified workshop.
Wiper control stalk
Before operating the wipers in wintry
conditions, clear any snow, ice or frost
from the windscreen and around the wiper
arms and blades.
Do not operate the wipers on a dry
windscreen. In extremely hot or cold
weather, check that the wiper blades are not
stuck to the windscreen before operating the
wipers.
After using an automatic car wash, you may temporarily notice abnormal noises
and poorer wiping performance. You do not
need to replace the wiper blades.
Windscreen wipers
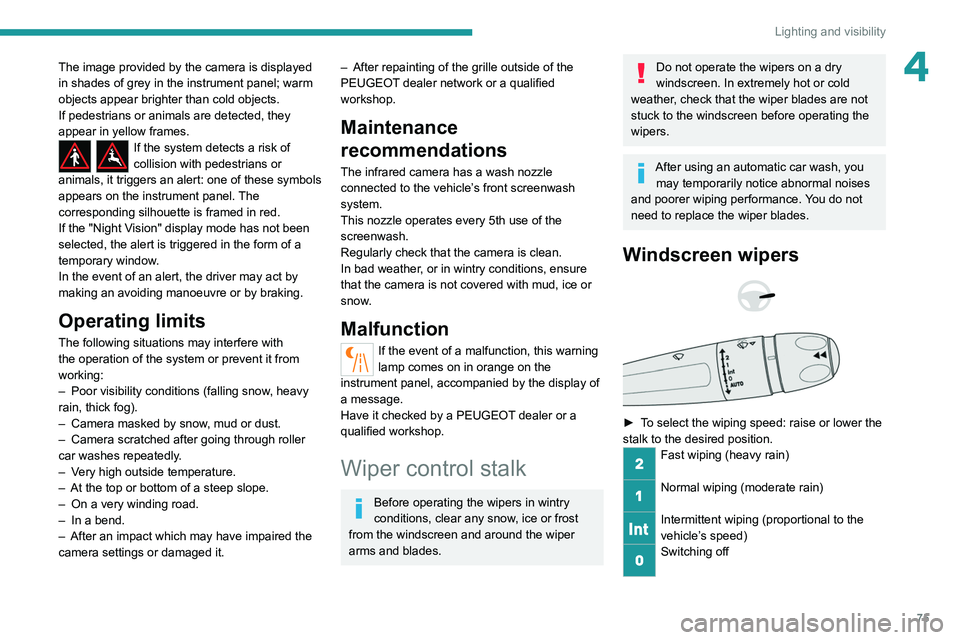
► To select the wiping speed: raise or lower the
stalk to the desired position.
Fast wiping (heavy rain)
Normal wiping (moderate rain)
Intermittent wiping (proportional to the
vehicle’s speed)
Switching off
Page 78 of 292

76
Lighting and visibility
Special position of the
windscreen wipers
This maintenance position is used while cleaning
or replacing the wiper blades. It can also be
useful, in wintry weather (ice, snow), to release
the wiper blades from the windscreen.
To maintain the effectiveness of the flat wiper blades, it is advisable to:
– handle them with care.
– clean them regularly using soapy water.
– avoid using them to hold cardboard on the
windscreen.
– replace them at the first signs of wear.
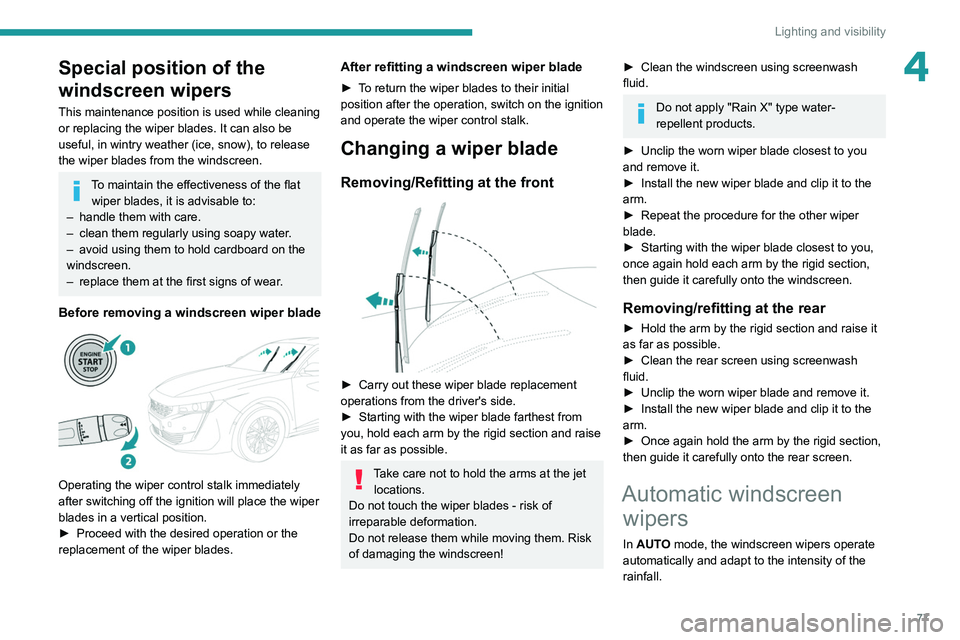
Before removing a windscreen wiper blade
Operating the wiper control stalk immediately
after switching off the ignition will place the wiper
blades in a vertical position.
► Proceed with the desired operation or the
replacement of the wiper blades.
Automatic wiping
Refer to the corresponding section.
In position 1 or 2, the wiping frequency is
automatically reduced when the speed of
the vehicle drops below 3
mph (5 km/h).
When the speed is above 6
mph (10 km/h)
again, the wiping frequency returns to the
original frequency (fast or normal).
After the ignition has been switched off, the wipers may move slightly at the foot
of the windscreen.
If the ignition has been switched off with
the windscreen wipers active, you must
operate the control stalk again to reactivate
wiping when the ignition is switched on again
(unless the ignition was off for less than
a
minute).
Single wipe
► Pull the stalk briefly towards you.
Windscreen wash
► Pull the wiper control stalk towards you and
hold.
A
final wiping cycle is performed when
screenwashing ends.
The windscreen wash jets are incorporated into the tip of each wiper
arm.
Additional jets are installed below the
midpoint of each arm.
Screenwash fluid is sprayed along the length
of the wiper blade. This improves visibility and
reduces screenwash fluid consumption.
With automatic air conditioning, any
action on the screenwash control results
in temporary closure of the air intake to
protect the passenger compartment from any
odour.
To avoid damaging the wiper blades, do not operate the screenwash if the
screenwash reservoir is empty.
Only operate the screenwash if there is no
risk of the fluid freezing on the windscreen
and hindering visibility. During the winter
period, use "very cold climate" rated products.
Never top up with water.
Rear wiper (SW)
► Turn the ring to align the desired symbol with
the marking.
Off
Intermittent wiping
Screenwash-wipe
Reverse gear
When reverse gear is engaged, the rear wiper
will come into operation automatically if the front
windscreen wipers are operating.
The settings are changed via the Driving/
Vehicle touch screen menu.
In the event of accumulation of snow or
hard frost or if a bicycle carrier is fitted to
a towing device, deactivate the automatic rear
wiper via the touch screen’s Driving/Vehicle
menu.
Rear screenwash
► Turn the ring as far as it will go and hold it in
position.
The screenwash and the wiper operate for as
long as the ring remains turned.
A final wiping cycle is performed when screen
washing ends.
Page 79 of 292

77
Lighting and visibility
4Special position of the
windscreen wipers
This maintenance position is used while cleaning
or replacing the wiper blades. It can also be
useful, in wintry weather (ice, snow), to release
the wiper blades from the windscreen.
To maintain the effectiveness of the flat wiper blades, it is advisable to:
–
handle them with care.
–
clean them regularly using soapy water
.
–
avoid using them to hold cardboard on the
windscreen.
–
replace them at the first signs of wear
.
Before removing a windscreen wiper blade
Operating the wiper control stalk immediately
after switching off the ignition will place the wiper
blades in a vertical position.
►
Proceed with the desired operation or the
replacement of the wiper blades.
After refitting a windscreen wiper blade
► To return the wiper blades to their initial
position after the operation, switch on the ignition
and operate the wiper control stalk.
Changing a wiper blade
Removing/Refitting at the front
► Carry out these wiper blade replacement
operations from the driver's side.
►
Starting with the wiper blade farthest from
you, hold each arm by the rigid section and raise
it as far as possible.
Take care not to hold the arms at the jet locations.
Do not touch the wiper blades - risk of
irreparable deformation.
Do not release them while moving them. Risk
of damaging the windscreen!
► Clean the windscreen using screenwash
fluid.
Do not apply "Rain X" type water-
repellent products.
►
Unclip the worn wiper blade closest to you
and remove it.
►
Install the new wiper blade and clip it to the
arm.
►
Repeat the procedure for the other wiper
blade.
►
Starting with the wiper blade closest to you,
once again hold each arm by the rigid section,
then guide it carefully onto the windscreen.
Removing/refitting at the rear
► Hold the arm by the rigid section and raise it
as far as possible.
►
Clean the rear screen using screenwash
fluid.
►
Unclip the worn wiper blade and remove it.
►
Install the new wiper blade and clip it to the
arm.
►
Once again hold the arm by the rigid section,
then guide it carefully onto the rear screen.
Automatic windscreen wipers
In AUTO mode, the windscreen wipers operate
automatically and adapt to the intensity of the
rainfall.
Page 259 of 292

257
Alphabetical index
Tailgate 36
Tank, fuel
157–158
Technical data
204, 206–208
Telephone
219–220, 241–243
Temperature, coolant
19
Ticket holder
59
Time (setting)
221, 245
TMC (Traffic info)
232
Tool box
68
Tools
184–185
Topping-up AdBlue®
179
Top Tether (fixing)
93
Total distance recorder
22
Touch screen
23, 25, 58
Touch-sensitive reading lamps
63–64
Towbar
83, 168
Towed loads
203–204, 206–208
Towing another vehicle
200, 202
Traction battery charge
163
Traction battery (Rechargeable
hybrid)
21, 159–160, 166
Traction control (ASR)
82–83
Traffic information (TMC)
232
Trailer
83, 168
Trailer stability assist (TSA)
83
Trajectory control systems
82
Triangle, warning
183
Trip computer
22–23
Trip distance recorder
22
Tyres
178, 210
Tyre under-inflation detection
115, 188U
Under-inflation (detection) 11 5
Unlocking
27, 29
Unlocking from the inside
33
Unlocking the boot
27, 29
Unlocking the doors
33
Unlocking the tailgate
27, 29
Updating the date
222, 244
Updating the time
221, 245
USB
216, 218, 235, 239
V
Vehicle data recording and privacy 249
Ventilation
51–52, 56–57
Video
240
Visibility
55
Vision, 180° forward
147
Visiopark 1
145
Visiopark 1 - Visiopark 2
144, 146
Voice commands
227–230
W
Wallbox (Rechargeable hybrid) 161–162, 167
Warning and indicator lamps
12
Warning lamp, driver''s seat belt
not fastened
85
Warning lamps
12, 22
Warning lamp, seat belts
85
Warnings and indicators
12
Washing 11 7
Washing (advice)
160, 181
Weights
203–204, 206–207
Welcome lighting
28, 72
Wheel, spare
178, 184–185, 188
Windscreen, heated
56
Windscreen wipers
75, 77
Wiper blades (changing)
77
Wiper, rear
76
Wipers
75, 78
Wipers, automatic rain sensitive
77–78