2021 PEUGEOT 508 refuelling
[x] Cancel search: refuellingPage 5 of 292

3
Contents
Active Safety Brake with Collision Risk
Alert and Intelligent emergency braking
assistance
133
Distraction detection 136
Active lane departure warning system 137
Blind spot monitoring 140
Active Blind Spot Detection 142
Parking sensors 142
Visiopark 1 - Visiopark 2 144
Park Assist 148
Full Park Assist 151
7Practical informationCompatibility of fuels 157
Refuelling 157
Misfuel prevention (Diesel) 158
Rechargeable hybrid system 159
Charging the traction battery (Rechargeable
hybrid engine)
166
Towing device 168
Towing device with retractable ball joint 169
Roof bars 170
Very cold climate screen 172
Snow chains 172
Energy economy mode 173
Bonnet 173
Engine compartment 174
Checking levels 175
Checks 176
AdBlue® (BlueHDi) 178
Free-wheeling 180
Advice on care and maintenance 181
8In the event of a breakdownWarning triangle 183
Running out of fuel (Diesel) 183
Tool kit 184
Temporary puncture repair kit 185
Spare wheel 188
Changing a bulb 191
Fuses 194
12
V battery 194
Accessory battery (Rechargeable hybrid) 197
Towing the vehicle 200
9Technical dataEngine technical data and towed loads 203
Petrol engines 204
Diesel engines 206
Rechargeable hybrid engines 208
Dimensions 209
Identification markings 210
10PEUGEOT Connect RadioFirst steps 2 11
Steering mounted controls 212
Menus 213
Applications 214
Radio 214
DAB (Digital Audio Broadcasting) radio 216
Media 216
Telephone 218
Settings 221
Frequently asked questions 222
11PEUGEOT Connect NavFirst steps 224
Steering mounted controls 225
Menus 225
Voice commands 227
Navigation 230
Connected navigation 233
Applications 235
Radio 238
DAB (Digital Audio Broadcasting) radio 239
Media 239
Telephone 241
Settings 243
Frequently asked questions 245
12Event data recorders
■
Alphabetical index
bit.ly/helpPSA
Access to additional videos
Page 59 of 292

57
Ease of use and comfort
3Programming
The heating or ventilation systems can be
programmed to switch on via the secondary
page of the "Climate" menu on the touch screen.
In the Climate > OPTIONS menu:
► Select Temperature conditioning .
►
Press the
Status tab to activate/deactivate
the system.
►
Press the
Settings tab to select Heating
mode to heat the engine and passenger
compartment or Ventilation to ventilate the
passenger compartment.
►
Then programme/save the activation time for
each selection.
►
Press
OK to confirm.
Long-range remote control
(Depending on version.)
This enables you to switch the heating in
the passenger compartment on or off from a
distance.
The remote control has a range of about 0.6
miles (1 km) in open country.
On
► Pressing and holding this button starts
the heating immediately (confirmed by the
green indicator lamp coming on briefly).
Switching off
► Pressing and holding this button stops
the heating immediately (confirmed by the
temporary illumination of the red indicator lamp).
The indicator lamp in the remote control flashes
for about 2 seconds if the vehicle has not
received the signal.
Then repeat the command after having changed
location.
Changing the battery
The indicator lamp in the remote control will
change to orange if the battery charge is low.
If the indicator lamp is not on, the battery is
discharged.
► Use a coin to unscrew the cap and replace
the battery .
Do not throw remote control batteries
away, as they contain metals that are
harmful to the environment. Take them to an
approved disposal point.
If the system is switched on using the
long-range remote control, the maximum
heating duration is around 45
min. with a
Diesel engine, and around 30
min. with a
petrol engine.
The ventilation is activated provided that the battery is sufficiently charged.
The heating is activated provided that:
–
the battery charge and the fuel level are
sufficient,
–
the engine has been started since the
previous heating cycle,
–
60
minutes have elapsed between two
heating requests.
Programmable heating is supplied by the
vehicle fuel tank. Before use, make sure
that you have sufficient fuel. If the fuel tank is
on reserve, you are strongly recommended
not to programme the heating.
The additional heating must always be
switched off while refuelling to avoid any risk
of fire or explosion.
Page 159 of 292

157
Practical information
7
Compatibility of fuels
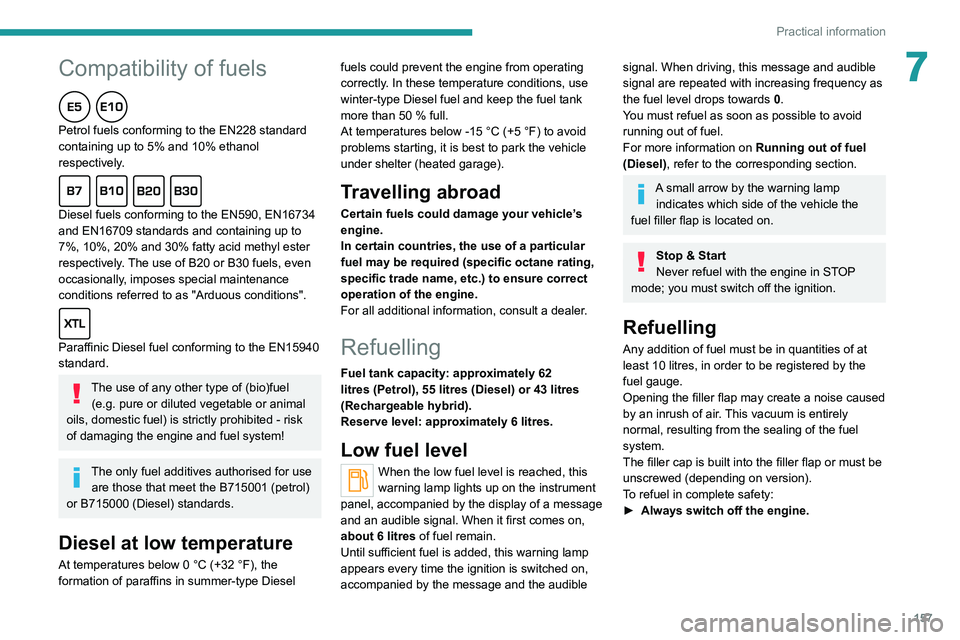
Petrol fuels conforming to the EN228 standard
containing up to 5% and 10% ethanol
respectively.
Diesel fuels conforming to the EN590, EN16734
and EN16709 standards and containing up to
7%, 10%, 20% and 30% fatty acid methyl ester
respectively. The use of B20 or B30 fuels, even
occasionally, imposes special maintenance
conditions referred to as "Arduous conditions".
Paraffinic Diesel fuel conforming to the EN15940
standard.
The use of any other type of (bio)fuel (e.g. pure or diluted vegetable or animal
oils, domestic fuel) is strictly prohibited - risk
of damaging the engine and fuel system!
The only fuel additives authorised for use are those that meet the B715001 (petrol)
or B715000 (Diesel) standards.
Diesel at low temperature
At temperatures below 0 °C (+32 °F), the
formation of paraffins in summer-type Diesel fuels could prevent the engine from operating
correctly
. In these temperature conditions, use
winter-type Diesel fuel and keep the fuel tank
more than 50 % full.
At temperatures below -15 °C (+5 °F) to avoid
problems starting, it is best to park the vehicle
under shelter (heated garage).
Travelling abroad
Certain fuels could damage your vehicle’s
engine.
In certain countries, the use of a particular
fuel may be required (specific octane rating,
specific trade name, etc.) to ensure correct
operation of the engine.
For all additional information, consult a dealer.
Refuelling
Fuel tank capacity: approximately 62
litres (Petrol), 55 litres (Diesel) or 43 litres
(Rechargeable hybrid).
Reserve level: approximately 6 litres.
Low fuel level
When the low fuel level is reached, this
warning lamp lights up on the instrument
panel, accompanied by the display of a message
and an audible signal. When it first comes on,
about 6 litres of fuel remain.
Until sufficient fuel is added, this warning lamp
appears every time the ignition is switched on,
accompanied by the message and the audible
signal. When driving, this message and audible
signal are repeated with increasing frequency as
the fuel level drops towards 0.
You must refuel as soon as possible to avoid
running out of fuel.
For more information on Running out of fuel
(Diesel), refer to the corresponding section.
A small arrow by the warning lamp indicates which side of the vehicle the
fuel filler flap is located on.
Stop & Start
Never refuel with the engine in STOP
mode; you must switch off the ignition.
Refuelling
Any addition of fuel must be in quantities of at
least 10 litres, in order to be registered by the
fuel gauge.
Opening the filler flap may create a noise caused
by an inrush of air. This vacuum is entirely
normal, resulting from the sealing of the fuel
system.
The filler cap is built into the filler flap or must be
unscrewed (depending on version).
To refuel in complete safety:
►
Always switch off the engine.
Page 160 of 292

158
Practical information
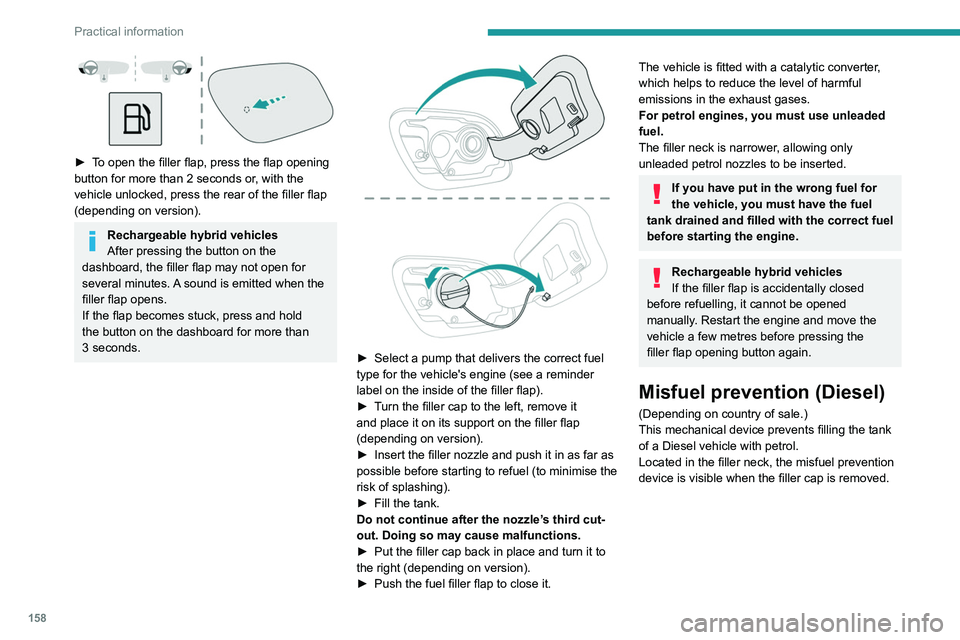
► To open the filler flap, press the flap opening
button for more than 2 seconds or, with the
vehicle unlocked, press the rear of the filler flap
(depending on version).
Rechargeable hybrid vehicles
After pressing the button on the
dashboard, the filler flap may not open for
several minutes. A sound is emitted when the
filler flap opens.
If the flap becomes stuck, press and hold
the button on the dashboard for more than
3
seconds.
► Select a pump that delivers the correct fuel
type for the vehicle's engine (see a reminder
label on the inside of the filler flap).
►
T
urn the filler cap to the left, remove it
and place it on its support on the filler flap
(depending on version).
►
Insert the filler nozzle and push it in as far as
possible before starting to refuel (to minimise the
risk of splashing).
►
Fill the tank.
Do not continue after the nozzle’
s third cut-
out. Doing so may cause malfunctions.
►
Put the filler cap back in place and turn it to
the right (depending on version).
►
Push the fuel filler flap to close it.
The vehicle is fitted with a catalytic converter,
which helps to reduce the level of harmful
emissions in the exhaust gases.
For petrol engines, you must use unleaded
fuel.
The filler neck is narrower, allowing only
unleaded petrol nozzles to be inserted.
If you have put in the wrong fuel for
the vehicle, you must have the fuel
tank drained and filled with the correct fuel
before starting the engine.
Rechargeable hybrid vehicles
If the filler flap is accidentally closed
before refuelling, it cannot be opened
manually. Restart the engine and move the
vehicle a few metres before pressing the
filler
flap opening button again.
Misfuel prevention (Diesel)
(Depending on country of sale.)
This mechanical device prevents filling the tank
of a Diesel vehicle with petrol.
Located in the filler neck, the misfuel prevention
device is visible when the filler cap is removed.
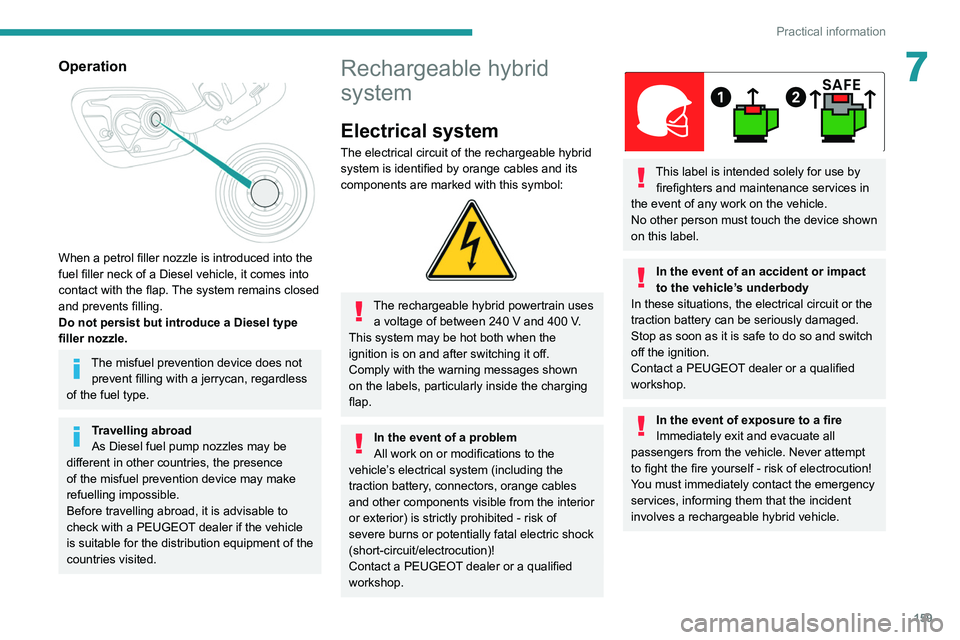
Operation
When a petrol filler nozzle is introduced into the
fuel filler neck of a Diesel vehicle, it comes into
contact with the flap. The system remains closed
and prevents filling.
Do not persist but introduce a Diesel type
filler nozzle.
The misfuel prevention device does not prevent filling with a jerrycan, regardless
of the fuel type.
Travelling abroad
As Diesel fuel pump nozzles may be
different in other countries, the presence
of the misfuel prevention device may make
refuelling impossible.
Before travelling abroad, it is advisable to
check with a PEUGEOT dealer if the vehicle
is suitable for the distribution equipment of the
countries visited.
Page 161 of 292

159
Practical information
7Operation
When a petrol filler nozzle is introduced into the
fuel filler neck of a Diesel vehicle, it comes into
contact with the flap. The system remains closed
and prevents filling.
Do not persist but introduce a Diesel type
filler nozzle.
The misfuel prevention device does not prevent filling with a jerrycan, regardless
of the fuel type.
Travelling abroad
As Diesel fuel pump nozzles may be
different in other countries, the presence
of the misfuel prevention device may make
refuelling impossible.
Before travelling abroad, it is advisable to
check with a PEUGEOT dealer if the vehicle
is suitable for the distribution equipment of the
countries visited.
Rechargeable hybrid
system
Electrical system
The electrical circuit of the rechargeable hybrid
system is identified by orange cables and its
components are marked with this symbol:
The rechargeable hybrid powertrain uses a voltage of between 240 V and 400 V.
This system may be hot both when the
ignition is on and after switching it off.
Comply with the warning messages shown
on the labels, particularly inside the charging
flap.
In the event of a problem
All work on or modifications to the
vehicle’s electrical system (including the
traction battery, connectors, orange cables
and other components visible from the interior
or exterior) is strictly prohibited - risk of
severe burns or potentially fatal electric shock
(short-circuit/electrocution)!
Contact a PEUGEOT dealer or a qualified
workshop.
This label is intended solely for use by firefighters and maintenance services in
the event of any work on the vehicle.
No other person must touch the device shown
on this label.
In the event of an accident or impact
to the vehicle’s underbody
In these situations, the electrical
circuit or the
traction battery can be seriously damaged.
Stop as soon as it is safe to do so and switch
off the ignition.
Contact a PEUGEOT dealer or a qualified
workshop.
In the event of exposure to a fire
Immediately exit and evacuate all
passengers from the vehicle. Never attempt
to fight the fire yourself - risk of electrocution!
You must immediately contact the emergency
services, informing them that the incident
involves a rechargeable hybrid vehicle.
Page 185 of 292

183
In the event of a breakdown
8Warning triangle
This reflective and dismantlable device is to be
installed on the side of the road when a vehicle
is broken down or damaged.
Before getting out of the vehicle
Turn on the hazard warning lamps, then
put on the safety vest to assemble and install
the triangle.
Storage compartment
There is a compartment in the interior trim of the
tailgate to store a warning triangle.
►
After opening the tailgate, release the cover
by turning the screw a quarter turn to the left.
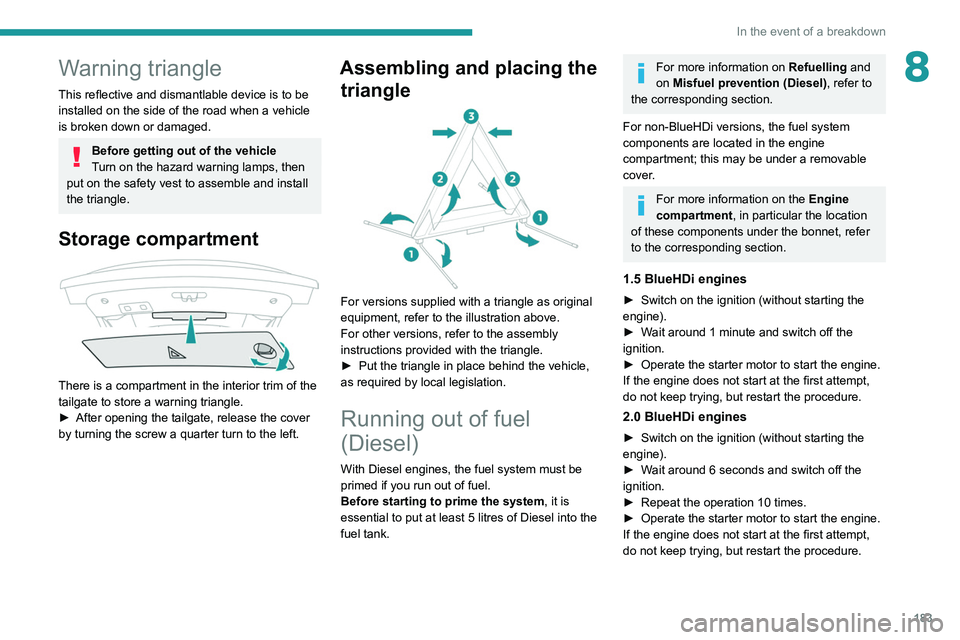
Assembling and placing the triangle
For versions supplied with a triangle as original
equipment, refer to the illustration above.
For other versions, refer to the assembly
instructions provided with the triangle.
►
Put the triangle in place behind the vehicle,
as required by local legislation.
Running out of fuel
(Diesel)
With Diesel engines, the fuel system must be
primed if you run out of fuel.
Before starting to prime the system, it is
essential to put at least 5 litres of Diesel into the
fuel tank.
For more information on Refuelling and
on Misfuel prevention (Diesel), refer to
the corresponding section.
For non-BlueHDi versions, the fuel system
components are located in the engine
compartment; this may be under a removable
cover.
For more information on the Engine
compartment, in particular the location
of these components under the bonnet, refer
to the corresponding section.
1.5 BlueHDi engines
► Switch on the ignition (without starting the
engine).
►
W
ait around 1 minute and switch off the
ignition.
►
Operate the starter motor to start the engine.
If the engine does not start at the first attempt,
do not keep trying, but restart the procedure.
2.0 BlueHDi engines
► Switch on the ignition (without starting the
engine).
►
W
ait around 6 seconds and switch off the
ignition.
►
Repeat the operation 10
times.
►
Operate the starter motor to start the engine.
If the engine does not start at the first attempt,
do not keep trying, but restart the procedure.