2021 PEUGEOT 508 fold seats
[x] Cancel search: fold seatsPage 38 of 292
36
Access
When selective unlocking is activated,
the electronic key must be close to the
rear of the vehicle.
The tailgate is not designed to hold a bicycle carrier.
Closing the tailgate
► Lower the tailgate using the interior grips.
► Release the grips and press down on the
outside of the tailgate to close it.
In the event of a malfunction or if you
experience difficulty opening or closing
the tailgate, have it checked by a PEUGEOT
dealer or a qualified workshop without delay,
to avoid the issue deteriorating and prevent
any risk of the tailgate dropping, potentially
causing serious injury.
Back-up release
To manually unlock the boot in the event of a
battery or central locking failure.
Unlocking
► Fold the rear seats to gain access to the lock
from inside the boot.
control unlocking button permits unlocking of
the driver's door only.
From inside
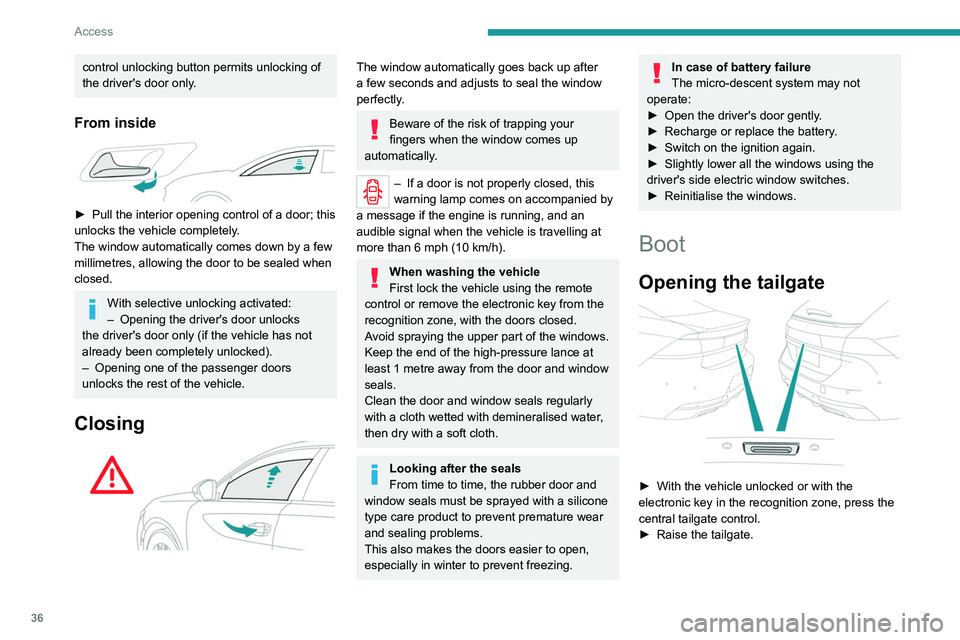
► Pull the interior opening control of a door; this
unlocks the vehicle completely .
The window automatically comes down by a few
millimetres, allowing the door to be sealed when
closed.
With selective unlocking activated:
– Opening the driver's door unlocks
the driver's door only (if the vehicle has not
already been completely unlocked).
–
Opening one of the passenger doors
unlocks the rest of the vehicle.
Closing
The window automatically goes back up after
a few seconds and adjusts to seal the window
perfectly.
Beware of the risk of trapping your
fingers when the window comes up
automatically.
– If a door is not properly closed, this
warning lamp comes on accompanied by
a message if the engine is running, and an
audible signal when the vehicle is travelling at
more than 6
mph (10 km/h).
When washing the vehicle
First lock the vehicle using the remote
control or remove the electronic key from the
recognition zone, with the doors closed.
Avoid spraying the upper part of the windows.
Keep the end of the high-pressure lance at
least 1 metre away from the door and window
seals.
Clean the door and window seals regularly
with a cloth wetted with demineralised water,
then dry with a soft cloth.
Looking after the seals
From time to time, the rubber door and
window seals must be sprayed with a silicone
type care product to prevent premature wear
and sealing problems.
This also makes the doors easier to open,
especially in winter to prevent freezing.
In case of battery failure
The micro-descent system may not
operate:
►
Open the driver's door gently
.
►
Recharge or replace the battery
.
►
Switch on the ignition again.
►
Slightly lower all the windows using the
driver's side electric window switches.
►
Reinitialise the windows.
Boot
Opening the tailgate
► With the vehicle unlocked or with the
electronic key in the recognition zone, press the
central tailgate control.
►
Raise the tailgate.
Page 39 of 292
37
Access
2When selective unlocking is activated,
the electronic key must be close to the
rear of the vehicle.
The tailgate is not designed to hold a bicycle carrier.
Closing the tailgate
► Lower the tailgate using the interior grips.
► Release the grips and press down on the
outside of the tailgate to close it.
In the event of a malfunction or if you
experience difficulty opening or closing
the tailgate, have it checked by a PEUGEOT
dealer or a qualified workshop without delay,
to avoid the issue deteriorating and prevent
any risk of the tailgate dropping, potentially
causing serious injury.
Back-up release
To manually unlock the boot in the event of a
battery or central locking failure.
Unlocking
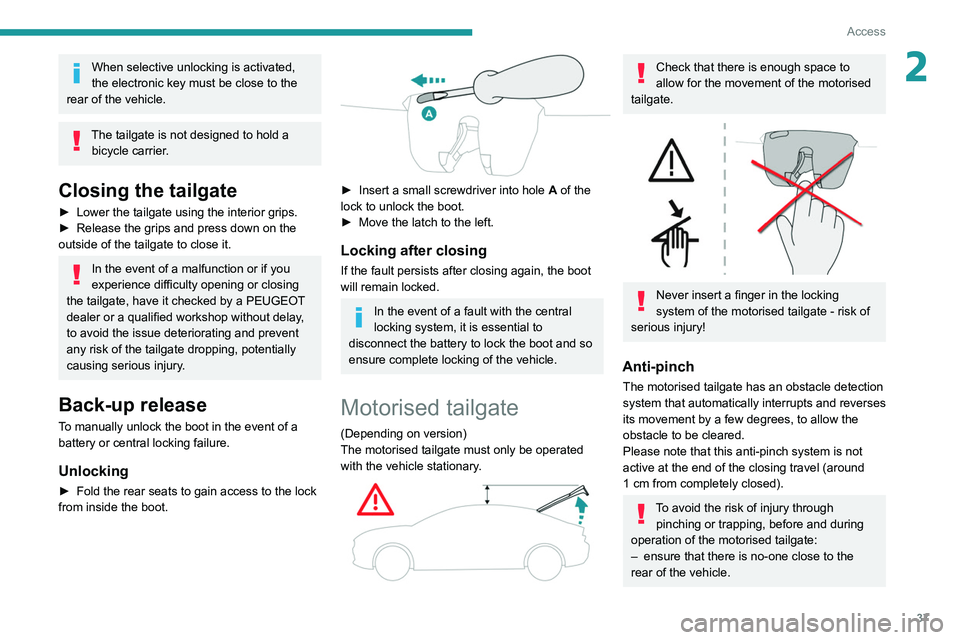
► Fold the rear seats to gain access to the lock
from inside the boot.
► Insert a small screwdriver into hole A of the
lock to unlock the boot.
►
Move the latch to the left.
Locking after closing
If the fault persists after closing again, the boot
will remain locked.
In the event of a fault with the central
locking system, it is essential to
disconnect the battery to lock the boot and so
ensure complete locking of the vehicle.
Motorised tailgate
(Depending on version)
The motorised tailgate must only be operated
with the vehicle stationary.
Check that there is enough space to
allow for the movement of the motorised
tailgate.
Never insert a finger in the locking
system of the motorised tailgate - risk of
serious injury!
Anti-pinch
The motorised tailgate has an obstacle detection
system that automatically interrupts and reverses
its movement by a few degrees, to allow the
obstacle to be cleared.
Please note that this anti-pinch system is not
active at the end of the closing travel (around
1
cm from completely closed).
To avoid the risk of injury through pinching or trapping, before and during
operation of the motorised tailgate:
–
ensure that there is no-one close to the
rear of the vehicle.
Page 50 of 292

48
Ease of use and comfort
Adjustment
► Move control A to the right or to the left to
select the corresponding mirror.
► Move control B in any of the four directions
to adjust.
► Return control A to its central position.
Electric folding
Depending on equipment, the door mirrors can
be folded electrically.
► From the inside, with the
ignition on, place control A in the
central position.
► Pull control A backwards.
► Lock the vehicle from the outside.
From the front seat:► Press this button; its green indicator
lamp comes on.
The settings page is displayed on the touch
screen with the last memorised settings.
If the settings suit you and you make no
changes, the display returns to its previous state,
and the function activates immediately
.
Seats must be adjusted one after another,
starting with the driver's seat.
To modify the settings:
►
Begin with the driver
’s seat.
►
Select a massage intensity from the three
levels offered: " 1
" (Low), "2" (Normal) or "3"
(High).
►
Select another type of massage from those
offered.
►
W
ait for the driver's seat settings page to
disappear.
►
Next, proceed with the passenger's seat in
the same way
.
The changes are applied immediately.
Once activated, the system starts a one hour
massage cycle, made up of sequences of 6
minutes of massage followed by 3 minutes at
rest.
The system automatically stops at the end of the
cycle; the indicator lamp for the button goes off.Steering wheel
adjustment
► When stationary , pull the control to release
the steering wheel.
►
Adjust the height and reach to suit your
driving position.
►
Push the control to lock the steering wheel.
For safety reasons, these adjustments
must only be carried out with the vehicle
stationary.
PEUGEOT i-Cockpit®
The instrument panel information is
visible above the steering wheel, for greater
safety and driving comfort.
Adjust the steering wheel height so that it
does not obstruct the instrument panel.
Mirrors
Door mirrors
Depending on version, the electrochrome system
uses a sensor that detects the level of exterior
brightness and that coming from the rear of the
vehicle, in order to automatically and gradually
switch between day and night usage.
As a safety measure, the mirrors should be adjusted to reduce the "blind spots".
The objects that you see in the mirrors are
in fact closer than they appear. Take this
into account in order to correctly judge the
distance of vehicles approaching from behind.
Demisting/Defrosting
The demisting/defrosting of the door mirrors works with the demisting/
defrosting of the rear screen.
For more information on Rear screen
demisting/defrosting , refer to the
corresponding section.
Page 52 of 292

50
Ease of use and comfort
From the passenger compartment
► Press backrest release handle 1.
► Guide the backrest 3 down to the horizontal
position.
cover or if the load space cover has items
placed on it.
Rechargeable hybrid vehicles
An LED, located below the interior rear
view mirror and visible from outside the
vehicle, lights up blue to indicate that the
vehicle is being driven in Electric mode
(depending on country of sale).
Rear seats
Rear head restraints
High position (use):
► Pull the head restraint fully up.
Low position (stowing; when the seats are not
in use):
►
Press the lug
A to release the head restraint
and push it down.
The rear head restraints can be removed.
Removing a head restraint
► First tilt the corresponding backrest.
► Pull the head restraint fully up.
►
Press the lug
A to release the head restraint
and remove it completely.
►
Store the head restraint.
Refitting a head restraint
► Insert the head restraint rods into the guides
in the corresponding seat backrest.
►
Push the head restraint down as far as it will
go.
►
Press the lug
A to release the head restraint
and push it fully down.
Never drive with passengers seated at
the rear when the head restraints are
removed; the head restraints should be in
place and in the high position.
The head restraint for the centre seat
and those for the outer seats are not
interchangeable.
Folding the backrests
Each section of the backrest has one or two
release controls:
–
A
grip 1 on the outer edge of the backrest.
–
A
lever 2 on the boot side trim (SW).
The backrests should only be manoeuvred when the vehicle is
stationary.
First steps:
►
Lower the head restraints, or remove them
when carrying heavy loads.
►
Lift up the rear armrest.
►
If necessary
, move the front seats forward.
►
Check
that no person or object might interfere
with the folding of the backrests (e.g.
clothing,
luggage).
►
Check that the outer seat belts are lying flat
on the backrests.
When the backrest is released, the red
indicator in the release grip is visible.
Page 67 of 292
65
Ease of use and comfort
3For information on installing the High
load retaining net (SW) , refer to the
corresponding section.
Load space cover
(Hatchback)
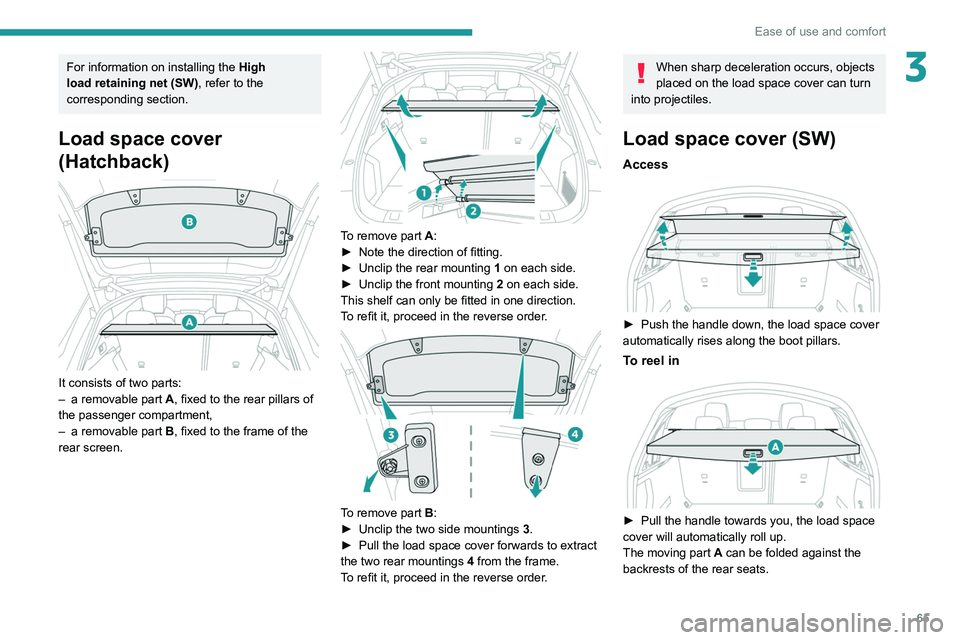
It consists of two parts:
– a removable part A
, fixed to the rear pillars of
the passenger compartment,
–
a removable part B
, fixed to the frame of the
rear screen.
To remove part A:
► Note the direction of fitting.
►
Unclip the rear mounting 1
on each side.
►
Unclip the front mounting 2
on each side.
This shelf can only be fitted in one direction.
To refit it, proceed in the reverse order.
To remove part B:
► Unclip the two side mountings 3
.
►
Pull the load space cover forwards to extract
the two rear mountings 4
from the frame.
To refit it, proceed in the reverse order.
When sharp deceleration occurs, objects
placed on the load space cover can turn
into projectiles.
Load space cover (SW)
Access
► Push the handle down, the load space cover
automatically rises along the boot pillars.
To reel in
► Pull the handle towards you, the load space
cover will automatically roll up.
The moving part
A can be folded against the
backrests of the rear seats.
Page 68 of 292
66
Ease of use and comfort
► Check that the net is hooked and tightened
correctly.
Never reposition the rear seats while the
net's roller is attached to the folded
backrests.
Row 2
► Roll up then remove the load space cover.
► Fold down the rear seats.
► Position the left-hand end of the net roller in
side support 3 by reaching from the left-hand
side of the passenger compartment.
► Position the right-hand end of the net roller in
side support 4 by reaching from the right-hand
side of the passenger compartment.
► Press each side to lock in the roller; the red
indicators must not be visible.
► Unroll the net from the boot.
Removal
► Compress the control B and lift the load
space cover on the right then on the left to
remove it.
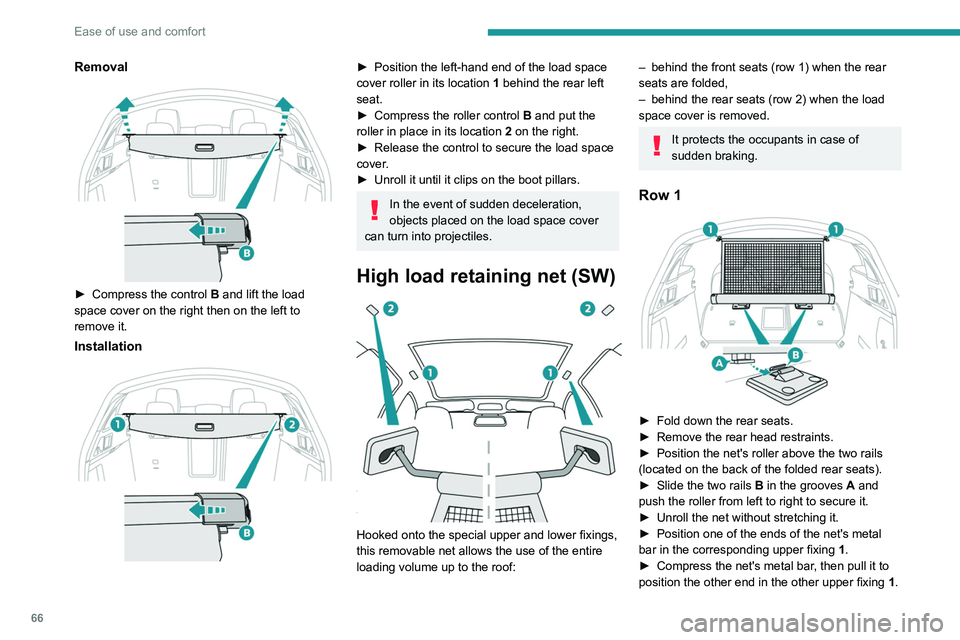
Installation
► Position the left-hand end of the load space
cover roller in its location 1
behind the rear left
seat.
►
Compress the roller control B
and put the
roller in place in its location 2 on the right.
►
Release the control to secure the load space
cover
.
►
Unroll it until it clips on the boot pillars.
In the event of sudden deceleration,
objects placed on the load space cover
can turn into projectiles.
High load retaining net (SW)
Hooked onto the special upper and lower fixings,
this removable net allows the use of the entire
loading volume up to the roof:
– behind the front seats (row 1) when the rear
seats are folded,
–
behind the rear seats (row 2) when the load
space cover is removed.
It protects the occupants in case of
sudden braking.
Row 1
► Fold down the rear seats .
► Remove the rear head restraints.
►
Position the net's roller above the two rails
(located on the back of the folded rear seats).
►
Slide the two rails B
in the grooves A and
push the roller from left to right to secure it.
►
Unroll the net without stretching it.
►
Position one of the ends of the net's metal
bar in the corresponding upper fixing 1
.
►
Compress the net's metal bar
, then pull it to
position the other end in the other upper fixing 1.
Page 69 of 292

67
Ease of use and comfort
3► Check that the net is hooked and tightened
correctly .
Never reposition the rear seats while the
net's roller is attached to the folded
backrests.
Row 2
► Roll up then remove the load space cover .
► Fold down the rear seats.
►
Position the left-hand end of the net roller in
side support 3
by reaching from the left-hand
side of the passenger compartment.
►
Position the right-hand end of the net roller in
side support 4
by reaching from the right-hand
side of the passenger compartment.
►
Press each side to lock in the roller; the red
indicators must not be visible.
►
Unroll the net from the boot.
► Position one of the ends of the net's metal
bar in the corresponding upper fixing 2
.
►
Compress the net's metal bar
, then pull it to
position the other end in the other upper fixing 2.
►
Check that the net is hooked and tightened
correctly
.
►
Lift up and lock the rear seats.
12 V accessory socket
► To connect a 12 V accessory (maximum
power: 120 W), lift the cover and plug in a
suitable adaptor.
►
Switch on the ignition.
The connection of an electrical device not approved by PEUGEOT, such as a
USB charger, may adversely affect the
operation of vehicle electrical systems,
causing faults such as poor radio reception or
interference with displays in the screens.
Stowing rings
Hatchback
SW
The boot has four stowing rings to secure
luggage using different types of retaining nets.
For the SW, two of the rings are fixed and the
other two are movable in tracks.
For more information on the various nets,
contact a PEUGEOT dealer.
Page 87 of 292
85
Safety
5► Check that the seat belt is fastened correctly
by pulling on the strap.
Unfastening
► Press the red button on the buckle.
► Guide the seat belt as it is reeled in.
Seat belt not fastened/
unfastened alerts
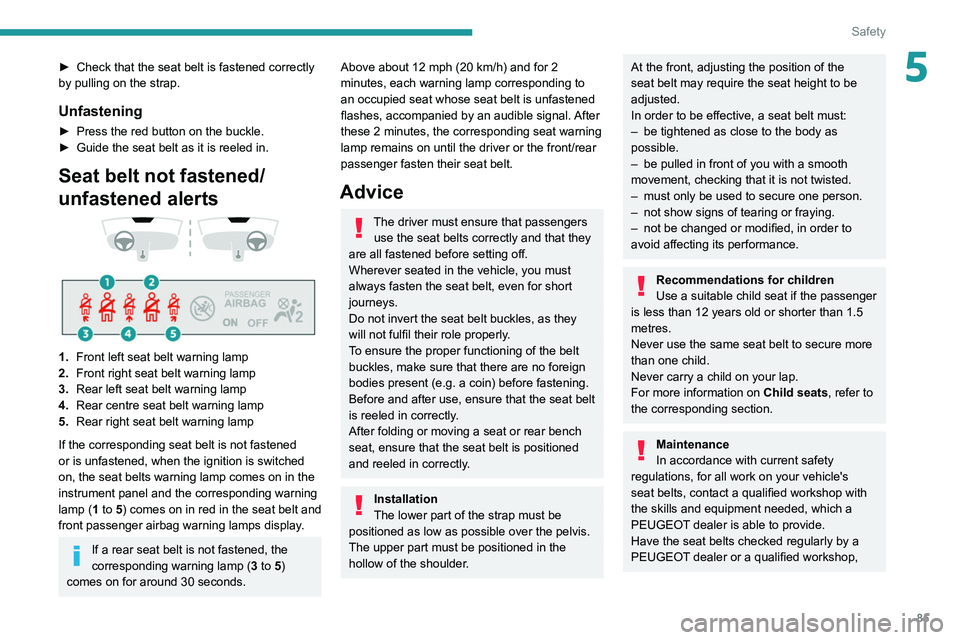
1. Front left seat belt warning lamp
2. Front right seat belt warning lamp
3. Rear left seat belt warning lamp
4. Rear centre seat belt warning lamp
5. Rear right seat belt warning lamp
If the corresponding seat belt is not fastened
or is unfastened, when the ignition is switched
on, the seat belts warning lamp comes on in the
instrument panel and the corresponding warning
lamp (1 to 5) comes on in red in the seat belt and
front passenger airbag warning lamps display.
If a rear seat belt is not fastened, the
corresponding warning lamp ( 3 to 5)
comes on for around 30 seconds.
Above about 12 mph (20 km/h) and for 2
minutes, each warning lamp corresponding to
an occupied seat whose seat belt is unfastened
flashes, accompanied by an audible signal. After
these 2 minutes, the corresponding seat warning
lamp remains on until the driver or the front/rear
passenger fasten their seat belt.
Advice
The driver must ensure that passengers use the seat belts correctly and that they
are all fastened before setting off.
Wherever seated in the vehicle, you must
always fasten the seat belt, even for short
journeys.
Do not invert the seat belt buckles, as they
will not fulfil their role properly.
To ensure the proper functioning of the belt
buckles, make sure that there are no foreign
bodies present (e.g.
a coin) before fastening.
Before and after use, ensure that the seat belt
is reeled in correctly.
After folding or moving a seat or rear bench
seat, ensure that the seat belt is positioned
and reeled in correctly.
Installation
The lower part of the strap must be
positioned as low as possible over the pelvis.
The upper part must be positioned in the
hollow of the shoulder.
At the front, adjusting the position of the
seat belt may require the seat height to be
adjusted.
In order to be effective, a seat belt must:
–
be tightened as close to the body as
possible.
–
be pulled in front of you with a smooth
movement, checking that it is not twisted.
–
must only be used to secure one person.
–
not show signs of tearing or fraying.
–
not be changed or modified, in order to
avoid affecting its performance.
Recommendations for children
Use a suitable child seat if the passenger
is less than 12 years old or shorter than 1.5
metres.
Never use the same seat belt to secure more
than one child.
Never carry a child on your lap.
For more information on Child seats, refer to
the corresponding section.
Maintenance
In accordance with current safety
regulations, for all work on your vehicle's
seat belts, contact a qualified workshop with
the skills and equipment needed, which a
PEUGEOT dealer is able to provide.
Have the seat belts checked regularly by a
PEUGEOT dealer or a qualified workshop,