2021 PEUGEOT 508 gearbox
[x] Cancel search: gearboxPage 128 of 292
126
Driving
This system automatically adjusts the speed
and corrects the trajectory of the vehicle, using
Adaptive cruise control with Stop&Go function in
conjunction with Lane Positioning Assist.
These two functions must be activated and in
operation.
For more information on Adaptive cruise
control and Lane Positioning Assist, refer to
the corresponding sections.
The system assists the driver by acting on the steering, acceleration and braking
within the physical limits
and capacities of the
vehicle. Certain road infrastructure elements
or vehicles in the surroundings may not be
properly seen or may be poorly interpreted by
the camera and radar, resulting in an
unexpected change in direction, a lack of
steering correction and/or inappropriate
management of acceleration or braking.
Primarily designed for driving on main
roads and motorways, this system only
works with moving vehicles driving in the
same direction as your vehicle.
Adaptive cruise control
For more information, refer to the
General recommendations on the use
of driving and manoeuvring aids and the
Cruise control - particular
recommendations.
This system automatically maintains the vehicle
speed at a value set by the driver (speed
setting), while respecting a safety distance from
the vehicle in front (target vehicle) previously set
by the driver. The system automatically manages
the acceleration and deceleration of the vehicle.
With the Stop function , the system manages
braking until the vehicle comes to a complete
stop.
With the Stop
& Go function, the system
manages braking until the vehicle comes to a
complete stop and restarts the vehicle.
The brake lamps come on if the vehicle is slowed down by the system.
It can be dangerous to drive if the brake
lamps are not in perfect working order.
To do this, the system uses a camera fitted at
the top of the windscreen and, depending on
version, a radar fitted in the front bumper.
Primarily designed for driving on main
roads and motorways, this system only
works with moving vehicles driving in the
same direction as your vehicle.
If the driver activates the direction
indicator to overtake a slower vehicle,
cruise control may temporarily reduce the
distance to the target vehicle to facilitate
overtaking, without exceeding the speed
setting.
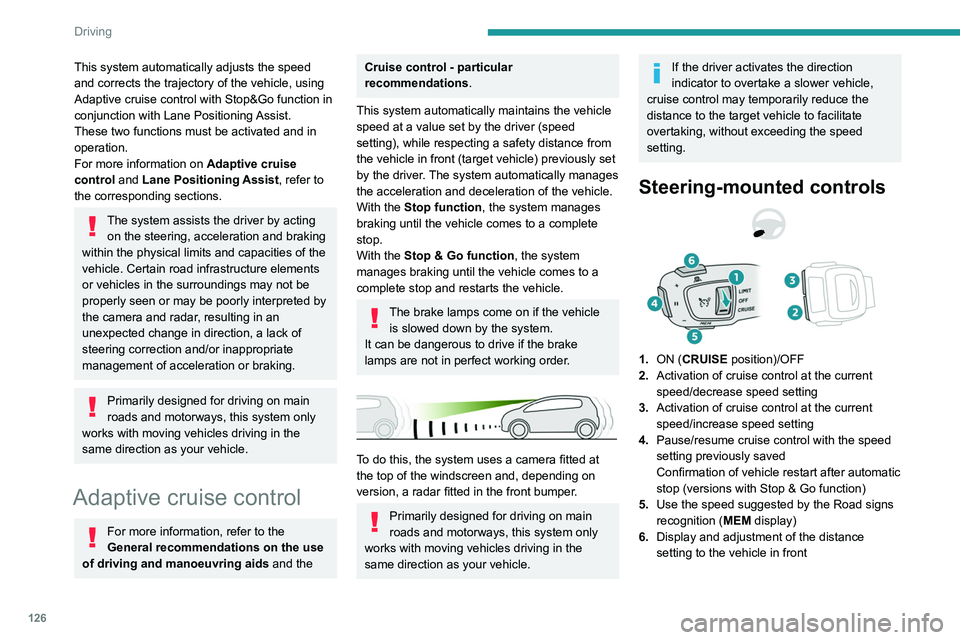
Steering-mounted controls
1. ON (CRUISE position)/OFF
2. Activation of cruise control at the current
speed/decrease speed setting
3. Activation of cruise control at the current
speed/increase speed setting
4. Pause/resume cruise control with the speed
setting previously saved
Confirmation of vehicle restart after automatic
stop (versions with Stop & Go function)
5. Use the speed suggested by the Road signs
recognition ( MEM display)
6. Display and adjustment of the distance
setting to the vehicle in front
Use
Activating the system (pause)
► With the engine running, turn the thumbwheel
1 downwards to the CRUISE position. Cruise
control is ready to operate (grey display).
Switching on cruise control and setting
the speed
With an automatic EAT6 gearbox, your speed
must be between 1 and 112 mph (2 and
180 km/h).
With an automatic EAT8 gearbox, your speed
must be between 0 and 112 mph (0 and
180 km/h).
► Press button 2 or 3: the current speed
becomes the speed setting (minimum 19 mph
(30 km/h)) and cruise control is immediately
activated (green display).
► Press 3 to increase or 2 to decrease the
speed setting (steps of 5 mph (km/h) if held
pressed).
Pressing and holding button 2 or
3 results in a rapid change in the speed
of the vehicle.
Pausing/resumption of cruise control
► Press 4 or depress the brake pedal. To
pause cruise control, it is also possible to: • shift from mode D to N;
• Press the electric parking brake control.
► Press 4 to restart cruise control. Cruise
control may have been paused automatically:
Page 129 of 292
127
Driving
6Use
Activating the system (pause)
► With the engine running, turn the thumbwheel
1 downwards to the CRUISE position. Cruise
control is ready to operate (grey display).
Switching on cruise control and setting
the speed
With an automatic EAT6 gearbox, your speed
must be between 1 and 112 mph (2 and
180
km/h).
With an automatic EAT8 gearbox, your speed
must be between 0 and 112
mph (0 and
180
km/h).
►
Press button
2 or 3: the current speed
becomes the speed setting (minimum 19 mph
(30
km/h)) and cruise control is immediately
activated (green display).
►
Press
3 to increase or 2 to decrease the
speed setting (steps of 5
mph (km/h) if held
pressed).
Pressing and holding button 2 or
3 results in a rapid change in the speed
of the vehicle.
Pausing/resumption of cruise control
► Press 4 or depress the brake pedal. To
pause cruise control, it is also possible to: •
shift from mode
D to N;
•
Press the electric parking brake control.
►
Press
4 to restart cruise control. Cruise
control may have been paused automatically:
• by triggering of the ESC system.
With an EA T6 gearbox, following braking that
has brought the vehicle to a complete stop,
the system holds the vehicle stationary; cruise
control is paused. The driver should depress
the accelerator pedal to move off, then, when
above 1 mph (2
km/h), reactivate the system by
pressing one of the buttons 2, 3 or 4.
With an EAT8 gearbox, following braking that
has brought the vehicle to a complete stop, if the
traffic conditions do not allow the vehicle to begin
moving again within 3
seconds of stopping,
press button 4 or the accelerator pedal to move
off.
If the driver takes no action after the vehicle
has been stopped, the electric parking brake is
applied automatically after about 5 minutes.
Cruise control remains active after
changing gear, regardless of the gearbox
type.
When the driver attempts to reactivate
cruise control, after the function has been
paused, the message "Activation not possible,
unsuitable conditions" is briefly displayed if
reactivation is not possible (safety conditions
not met).
Changing the programmed speed setting
with the Road signs recognition function
► Press 5 to accept the speed suggested by
the function on the instrument panel, then press
again to confirm.
To prevent sudden acceleration or deceleration of the vehicle, select a
speed setting relatively close to the vehicle's
current speed.
Changing the inter-vehicle distance
► Press 6 to display the distance setting
thresholds ("Distant", "Normal" or "Close"), then
press again to select a threshold.
After a few seconds, the option is accepted and
will be memorised when the ignition is switched
off.
Temporarily exceeding the speed setting
► Press the accelerator pedal fully . Distance
monitoring and cruise control are deactivated
while acceleration is maintained. "Cruise control
suspended" is displayed.
Deactivating the system
► Turn the thumbwheel 1 upwards to the OFF
position.
Information displayed on
the instrument panel
The following information can be seen on the
instrument panel in " Driving" display mode.
Page 137 of 292
135
Driving
6levels of alert may be triggered and displayed on
the instrument panel.
The system takes account of the vehicle
dynamics, the speed of your vehicle and the one
in front, the environmental conditions and the
operation of the vehicle (actions on the pedals,
steering wheel, etc.) to trigger the alert at the
most relevant moment.
(orange)
Level 1: visual alert only, warning you that
the vehicle in front is very close.
The message
"Vehicle close" is displayed.
(red)
Level 2: visual and audible alert, warning
you that a collision is imminent.
The message "Brake! " is displayed.
Level 3: in some cases, a vibration alert in the
form of micro-braking can be given, confirming
the risk of collision.
Where the speed of your vehicle is too
high approaching another vehicle, the
first level of alert may not be displayed: the
level 2 alert may be displayed directly.
Important: the level 1 alert is not displayed
when there is a stationary obstacle or
when the "Near " trigger threshold has been
selected.
Intelligent emergency
braking assistance (iEBA)
This function supplements braking in the event
that the driver brakes, but not enough to avoid a
collision.
This assistance will only be provided if the driver
presses the brake pedal.
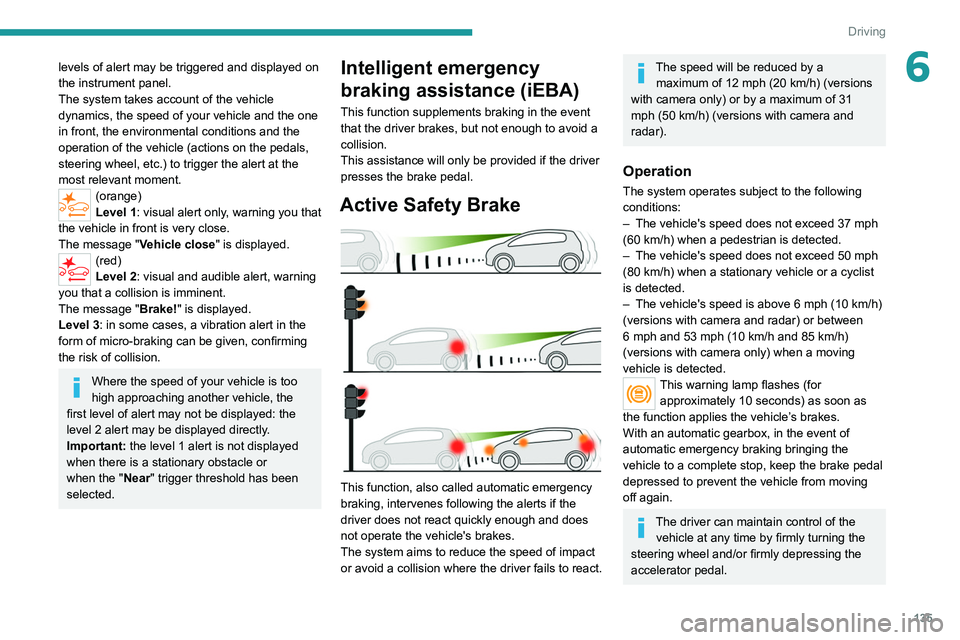
Active Safety Brake
This function, also called automatic emergency
braking, intervenes following the alerts if the
driver does not react quickly enough and does
not operate the vehicle's brakes.
The system aims to reduce the speed of impact
or avoid a collision where the driver fails to react.
The speed will be reduced by a maximum of 12 mph (20 km/h) (versions
with camera only) or by a maximum of 31
mph (50
km/h) (versions with camera and
radar).
Operation
The system operates subject to the following
conditions:
–
The vehicle's speed does not exceed 37 mph
(60 km/h) when a pedestrian is detected.
–
The vehicle's speed does not exceed 50 mph
(80 km/h) when a stationary vehicle or a cyclist
is detected.
–
The vehicle's speed is above 6 mph (10
km/h)
(versions with camera and radar) or between
6 mph and 53 mph (10
km/h and 85 km/h)
(versions with camera only) when a moving
vehicle is detected.
This warning lamp flashes (for approximately 10 seconds) as soon as
the function applies the vehicle’s brakes.
With an automatic gearbox, in the event of
automatic emergency braking bringing the
vehicle to a complete stop, keep the brake pedal
depressed to prevent the vehicle from moving
off again.
The driver can maintain control of the vehicle at any time by firmly turning the
steering wheel and/or firmly depressing the
accelerator pedal.
Page 148 of 292

146
Driving
AUTO mode
This mode is activated by default.
Using sensors in the rear bumper, the automatic
view changes from the rear view (standard) to
the view from above (zoom) as an obstacle is
approached at the level of the red line (less than
30 cm) during a manoeuvre.
180° view
The 180° view facilitates reversing out of a
parking space, making it possible to see the
approach of vehicles, pedestrians and cyclists.
This view is not recommended for carrying out a
complete manoeuvre.
It features 3 areas: left A, centre B and right C.
This view is only available via the view selection
menu.
Visiopark 2
The vehicle has a camera at the front, fitted in the grille, and a camera at the rear, located close
to the number plate lamps.
Using these cameras, the system displays the
vehicle's near surroundings on the touch screen,
offering views from the rear of the vehicle (rear
vision) when reverse gear is engaged and views
from the front of the vehicle (front vision) when
the gearbox is in neutral or a gear is engaged.
Rear vision
The system activates automatically when
reverse gear is engaged.
The system is deactivated:
–
Automatically
, at speeds above approximately
6 mph (10
km/h).
–
When shifting out of reverse (the front vision
image replaces the rear vision image for 7
seconds).
–
By pressing the white arrow in the upper-left
corner of the touch screen.
If a trailer or a bicycle carrier is fitted to
the towball, the area behind the vehicle
on the view from above goes dark.
The surroundings are reconstructed by the
front camera only.
The rear vision views are similar to those for the
Visiopark 1 function.
For more information on the Visiopark
1 function, refer to the corresponding section.
Front and rear vision
With the engine running and the speed
below 12 mph (20 km/h), the system is
activated via the Driving/Vehicle touch screen
menu:
► Select "Visual parking assistance".
AUTO mode is displayed by default, with front
vision, if the gearbox is in neutral or with a
gear engaged, or with rear vision, if reverse is
engaged.
The system is deactivated:
– Automatically above about 19 mph (30 km/h)
(the image disappears temporarily from 12 mph
(20 km/h)).
– By pressing the white arrow in the upper-left
corner of the touch screen.
Page 149 of 292

147
Driving
6The rear vision views are similar to those for the
Visiopark 1 function.
For more information on the Visiopark
1
function, refer to the corresponding section.
Front and rear vision
With the engine running and the speed
below 12 mph (20 km/h), the system is
activated via the Driving/Vehicle touch screen
menu:
►
Select "
Visual parking assistance".
AUTO mode is displayed by default, with front
vision, if the gearbox is in neutral or with a
gear engaged, or with rear vision, if reverse is
engaged.
The system is deactivated:
–
Automatically above about 19 mph (30
km/h)
(the image disappears temporarily from 12 mph
(20
km/h)).
–
By pressing the white arrow in the upper-left
corner of the touch screen.
Standard view
The area in front of your vehicle is displayed on
the screen.
The orange lines 1 represent the width of your
vehicle, with the mirrors unfolded; their direction
changes according to the position of the steering
wheel.
The red line 2 represents a distance of 30 cm
from the front bumper; the two orange lines 3
and 4 represent 1 m and 2 m, respectively.
This view is available with AUTO mode or in the
view selection menu.
Zoom view
The camera records the vehicle's surroundings
during the manoeuvre in order to create a
view from above the front of the vehicle in its
near surroundings, allowing the vehicle to be
manoeuvred around obstacles nearby.
This view is available with AUTO mode or in the
view selection menu.
Obstacles may appear further away than
they actually are.
It is important to check the sides of the
vehicle during the manoeuvre, using the
mirrors.
The parking sensors also supplement the
information on the vehicle's surroundings.
Page 153 of 292

151
Driving
6(pavements, studs, etc.) or too thin (trees, posts,
wire fences, etc.).
–
If the boot is heavily loaded, the tilt of the
vehicle towards the rear may interfere with the
distance measurements.
Do not use the function under the
following exterior conditions:
–
Alongside a soft shoulder (e.g. ditch) or
quay or on the edge of a drop.
–
When the road surface is slippery (e.g. ice).
If any of the following malfunctions
occurs, do not use the system:
–
If a tyre is under-inflated.
–
If one of the bumpers is damaged.
–
If one of the cameras is faulty
.
If the vehicle has undergone any of the
following modifications, do not use the
function:
–
When carrying an object extending beyond
the dimensions of the vehicle (ladder on the
roof bars, bicycle carrier on the tailgate, etc.).
–
With a non-approved towball in place.
–
With snow chains fitted.
–
When driving on a small-diameter or
"space-saver" type spare wheel.
–
When the wheels fitted are a different size
from the original ones.
–
After modifying one or both bumpers
(added protection).
– If the sensors have been repainted other
than by the PEUGEOT dealer network.
–
With sensors not approved for the vehicle.
Malfunctions
When the function is not activated, this
indicator lamp will flash briefly and an
audible signal will be emitted to indicate a
system malfunction.
If the malfunction occurs while the system is in
use, the
indicator lamp goes off.
If the parking sensor malfunction occurs
during use, indicated by this warning lamp
coming on, it causes the function to deactivate.
Consult a PEUGEOT dealer or a qualified
workshop.
In the event of a power steering
malfunction, this warning lamp is
displayed on the instrument panel, accompanied
by a warning message.
You must stop the vehicle.
Stop as soon as it is safe to do so and
switch off the ignition.
Contact a PEUGEOT dealer or a qualified
workshop.
Full Park Assist
For more information, refer to the
General recommendations on the use
of driving and manoeuvring aids .
This system provides active parking assistance
for vehicles fitted with the EAT8 automatic
gearbox: it detects a free "parallel" or "bay"
parking space and then operates the vehicle,
parking it with no need for driver intervention. It
also allows you to automatically exit a
"parallel"
parking space.
The system controls the steering, direction,
acceleration and braking. The system measures
the available parking spaces and calculates
the distances to obstacles using 12 ultrasonic
sensors built into the front and rear bumpers of
the vehicle.
To help the driver monitor the successful
completion of the manoeuvre, the system
automatically displays the Visiopark 1 or
Visiopark 2 and activates the parking sensors.
Page 155 of 292

153
Driving
6When all of the instructions have been validated,
a new page is displayed, indicating that you can
undertake the manoeuvre.
► To undertake the manoeuvre, press
this button.
►
While holding down the button, gradually
release the brake pedal.
The button must be held down
throughout the manoeuvre.
The start of the manoeuvre is indicated by
the display of a window with the message
"Manoeuvre in progress", accompanied by an
audible signal.
The Visiopark 1 or Visiopark 2 and
the parking sensors are automatically
activated to help monitor the vehicle's close
surroundings
throughout the manoeuvre.
Performing the manoeuvre
As soon as the driver releases the brake
pedal, the system automatically takes control
of choosing the travel direction, forwards or
reverse, acceleration, braking and the steering
direction.
The manoeuvring status is indicated by these
symbols:
Manoeuvre in progress.
Manoeuvre interrupted.
Manoeuvre completed or aborted.
The white arrows indicate that the driver must
take back control of the vehicle.
The direction of the manoeuvre is indicated by
these symbols:
Forward gear.
Reverse gear.
The central arrow is green whilst the vehicle
is moving, or white to indicate the next
manoeuvring direction.
Throughout the whole manoeuvre, indicated by the green " AUTO" symbol,
the driver must hold down the function control
button.
During manoeuvring phases, the steering
wheel performs rapid turns: do not hold
the steering wheel or put your hands between
the spokes of the steering wheel. Beware of
any object likely to block the manoeuvre
(e.g.
loose clothing, scarves, ties) - risk of
injury!
If the vehicle slows down significantly,
the brake lamps may come on.
Suspending/resuming the manoeuvre
The manoeuvre can be interrupted temporarily
at any time, either automatically by the system if
an obstacle is detected, or by driver action. If the driver notices a hazard, they may also interrupt
the manoeuvre permanently.
To suspend the manoeuvre, the driver can:
–
Release the function control button.
–
Depress the brake pedal.
–
Resume control of the steering.
–
Change the gearbox status (except changing
to
P).
The vehicle is immediately immobilised if the
manoeuvre is suspended.
This is confirmed by the display of this symbol, accompanied by the message
"Manoeuvre suspended".
Resuming the manoeuvre after resolving the
conditions for suspending it:
►
Release all controls (brake pedal, function
control button, steering wheel, gear selector).
►
Press the function control button again.
Permanent interruption after suspending the
manoeuvre:
►
Depress the brake pedal and engage a gear
.
Aborting the manoeuvre
The manoeuvre is aborted in the following
situations:
–
No action by the driver within 30 seconds of
the manoeuvre being suspended.
–
Intentional application of the parking brake.
–
Gearbox mode P
engaged by the driver.
–
Driver's seat belt unfastened.
–
Opening of a door or the boot.
–
Activation of the direction indicator lamps on
the opposite side to that of the manoeuvre.
Page 156 of 292

154
Driving
– In certain cases, when a wheel of the vehicle
hits a pavement or a low obstacle.
–
T
riggering of anti-slip regulation on a slippery
road.
–
Sudden appearance in the field of the
manoeuvre of an obstacle not detected by the
system before the manoeuvre was started,
with the obstacle remaining for more than 30
seconds.
–
After 10 manoeuvres to enter or exit a
"parallel" parking space and after 7 manoeuvres
to enter a "bay" parking space,
–
System malfunction during the manoeuvre.
Abandoning the manoeuvre immediately
triggers the vehicle’
s brakes and automatically
deactivates the function.
This symbol is displayed accompanied by the message "Manoeuvre aborted".
A message prompts the driver to take back
control of the vehicle.
The function is deactivated after a few seconds; this indicator lamp goes off and
the initial display is resumed.
The system automatically engages gearbox
mode P after 4 seconds.
End of manoeuvre
The vehicle stops as soon as the manoeuvre is
completed.
This symbol is displayed accompanied by the message "Manoeuvre completed".
When the function is deactivated, this
indicator lamp goes off and the original
display is restored.
–
If entering a parking space, the driver may
be required to complete the manoeuvre.
The gearbox changes to
P
4 seconds after
completion of the manoeuvre.
–
When exiting a parking space, the gearbox
changes to
N when the manoeuvre is complete.
A message and symbols prompt the driver to
take back control of the vehicle.
The gearbox automatically changes to mode
P if no action is taken by the driver within 30
seconds.
Operating limits
– The system may suggest an inappropriate
parking space (parking prohibited, work in
progress with damaged road surface, location
alongside a ditch, etc.).
–
The system may indicate that a space has
been found but will not offer it because of a fixed
obstacle on the opposite side of the manoeuvre,
which does not allow the vehicle to follow the
trajectory required for parking.
–
The system may indicate that a space has
been found but the manoeuvre will not be
triggered because the width of the lane is
insufficient.
–
The system is not designed to perform parking
manoeuvres on a steep slope or on a sharp
curve.
– The system does not detect spaces that
are much larger than the vehicle itself or that
are delimited by obstacles that are too low
(pavements, studs, etc.) or too thin (trees, posts,
wire fences, etc.).
–
The system may be impaired by incorrect
inflation of the vehicle’
s tyres.
–
The tilting of the vehicle if the boot is heavily
loaded can affect the distance measurements.
Do not use the function under the
following exterior conditions:
–
Alongside a soft shoulder (ditch) or quay or
on the edge of a drop.
–
When the road surface is slippery (ice).
Do not use the function in the presence
of one of the following malfunctions:
–
If a tyre is under-inflated.
–
If one of the bumpers is damaged.
–
If one of the cameras is faulty
.
–
If the brake lamps are not working.
Do not use the function if the vehicle has
been subject to one of the following
modifications:
–
When carrying an object extending beyond
the dimensions of the vehicle (ladder on the
roof bars, bicycle carrier on the tailgate, etc.).
–
With a non-approved towball in place.
–
With snow chains fitted.
–
When driving on a small-diameter or
"space-saver" type spare wheel.
– When the wheels fitted are a different size
from the original ones.
– After modifying one or both bumpers
(added protection).
– If the sensors have been repainted outside
the PEUGEOT dealer network.
– With sensors not approved for the vehicle.
Malfunctions
When the function is not activated, the
temporary flashing of this indicator lamp
and an audible signal indicate a Full Park Assist
malfunction.
If the malfunction occurs while in use, the
indicator lamp goes off.
If the parking sensor malfunction occurs
during Full Park Assist use, indicated by
this warning lamp coming on, the function is
deactivated.
Consult a PEUGEOT dealer or a qualified
workshop.
In the event of a power steering
malfunction, this warning lamp lights up
on the instrument panel, accompanied by a
message.
You must stop the vehicle.
Stop as soon as it is safe to do so and
switch off the ignition.
Contact a PEUGEOT dealer or a qualified
workshop.