2021 PEUGEOT 5008 child
[x] Cancel search: childPage 116 of 292
11 4
Driving
On certain versions with automatic gearbox
(EAT6/EAT8), the steering column does not lock.
Electric parking brake
In automatic mode, this system applies the
parking brake when the engine is switched off
and releases it when the vehicle moves off.
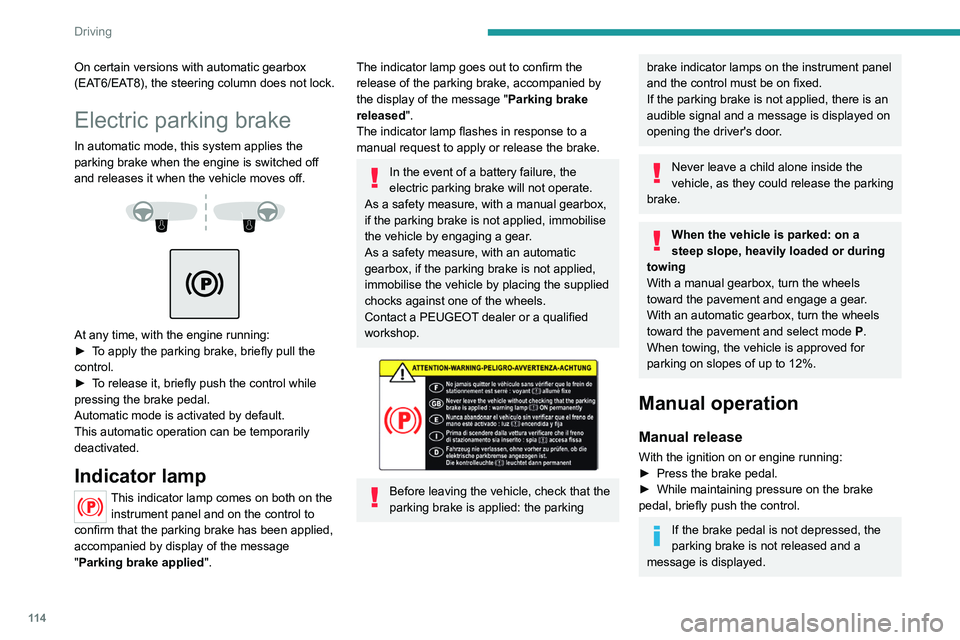
At any time, with the engine running:
► T o apply the parking brake, briefly pull the
control.
►
T
o release it, briefly push the control while
pressing the brake pedal.
Automatic mode is activated by default.
This automatic operation can be temporarily
deactivated.
Indicator lamp
This indicator lamp comes on both on the instrument panel and on the control to
confirm that the parking brake has been applied,
accompanied by display of the message
"Parking brake applied".
The indicator lamp goes out to confirm the
release of the parking brake, accompanied by
the display of the message " Parking brake
released ".
The indicator lamp flashes in response to a
manual request to apply or release the brake.
In the event of a battery failure, the
electric parking brake will not operate.
As a safety measure, with a manual gearbox,
if the parking brake is not applied, immobilise
the vehicle by engaging a gear.
As a safety measure, with an automatic
gearbox, if the parking brake is not applied,
immobilise the vehicle by placing the supplied
chocks against one of the wheels.
Contact a PEUGEOT dealer or a qualified
workshop.
Before leaving the vehicle, check that the
parking brake is applied: the parking
brake indicator lamps on the instrument panel
and the control must be on fixed.
If the parking brake is not applied, there is an
audible signal and a message is displayed on
opening the driver's door.
Never leave a child alone inside the
vehicle, as they could release the parking
brake.
When the vehicle is parked: on a
steep slope, heavily loaded or during
towing
With a manual gearbox, turn the wheels
toward the pavement and engage a gear.
With an automatic gearbox, turn the wheels
toward the pavement and select mode
P
.
When towing, the vehicle is approved for
parking on slopes of up to 12%.
Manual operation
Manual release
With the ignition on or engine running:
► Press the brake pedal.
►
While maintaining pressure on the brake
pedal, briefly push the control.
If the brake pedal is not depressed, the
parking brake is not released and a
message is displayed.
Manual application
With the vehicle stationary:
► Briefly pull the control.
The control indicator lamp flashes to confirm the
application request.
Automatic operation
Automatic release
First ensure that the engine is running and that
the driver's door is closed.
The electric parking brake gradually releases
automatically as the vehicle moves off.
With a manual gearbox
► Fully depress the clutch pedal and engage
first gear or reverse.
► Depress the accelerator pedal and release
the clutch pedal.
With an automatic gearbox
► Depress the brake pedal.
► Select mode D, M or R.
► Release the brake pedal and depress the
accelerator pedal.
If the brake does not release
automatically, check that the front doors
are fully closed.
When stationary with the engine running,
do not depress the accelerator pedal
unnecessarily. Risk of parking brake release.
Page 188 of 292
186
Practical information
Store AdBlue® out of the reach of
children, in its original container.
Procedure
Before starting the top-up procedure, ensure that
the vehicle is parked on a flat and level surface.
In wintry conditions, ensure that the temperature
of the vehicle is above -11°C. Otherwise the
AdBlue
® may be frozen and so cannot be poured
into the tank. Park the vehicle in a warmer area
for a few hours to allow the top-up to be carried
out.
Never pour the AdBlue® into the Diesel
fuel tank.
If any AdBlue® is splashed, or if there are
any spillages on the bodywork, rinse
immediately with cold water or wipe with a
damp cloth.
If the fluid has crystallised, clean it off using a
sponge and hot water.
Important: in the event of a top-up after
an AdBlue breakdown, you must wait
about 5
minutes before switching on the
ignition, without opening the driver's door,
unlocking the vehicle or bringing the
electronic key into the passenger
compartment.
Switch on the ignition, then wait for 10
seconds before starting the engine. ►
Press the "
START/STOP" button to switch off
the engine.
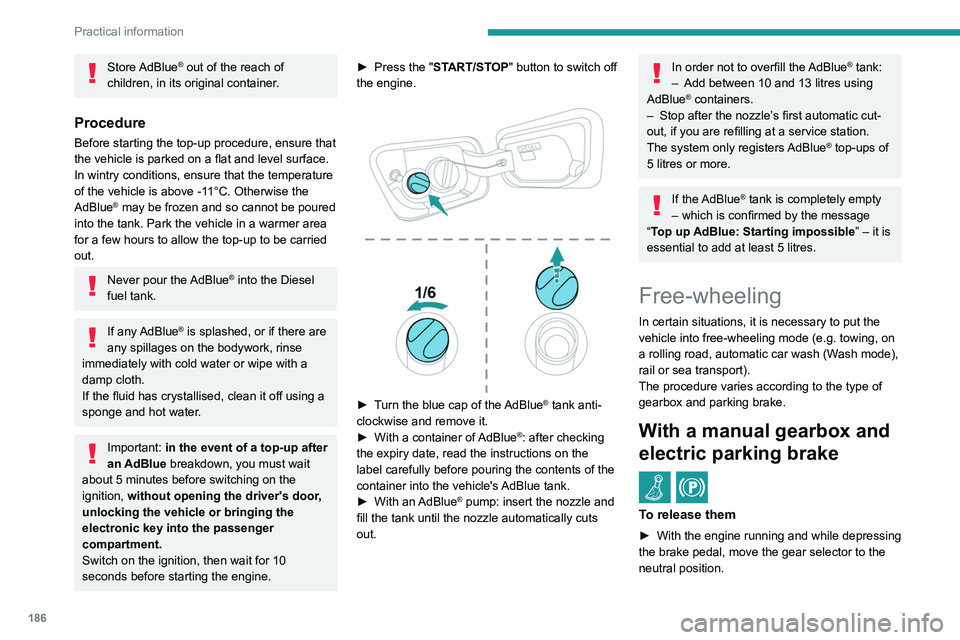
► Turn the blue cap of the AdBlue® tank anti-
clockwise and remove it.
►
With a container of
AdBlue
®: after checking
the expiry date, read the instructions on the
label carefully before pouring the contents of the
container into the vehicle's AdBlue tank.
►
With an
AdBlue® pump: insert the nozzle and
fill the tank until the nozzle automatically cuts
out.
In order not to overfill the AdBlue® tank:
–
Add between 10 and 13 litres using
AdBlue® containers.
–
Stop after the nozzle’ s first automatic cut-
out, if you are refilling at a service station.
The system only registers AdBlue
® top-ups of
5
litres or more.
If the AdBlue® tank is completely empty
– which is confirmed by the message
“Top up
AdBlue: Starting impossible ” – it is
essential to add at least 5 litres.
Free-wheeling
In certain situations, it is necessary to put the
vehicle into free-wheeling mode (e.g. towing, on
a rolling road, automatic car wash (Wash mode),
rail or sea transport).
The procedure varies according to the type of
gearbox and parking brake.
With a manual gearbox and
electric parking brake
/
To release them
► With the engine running and while depressing
the brake pedal, move the gear selector to the
neutral position.
► While depressing the brake pedal, switch off
the ignition.
► Release the brake pedal, then switch on the
ignition again.
► While depressing the brake pedal, press the
control lever to release the parking brake.
► Release the brake pedal, then switch off the
ignition.
Reverting to normal operation
► While depressing the brake pedal, restart the
engine.
With an automatic gearbox
and electric parking brake
/
Release procedure
► With the vehicle stationary and the engine
running, select mode N and switch off the
ignition.
Within 5 seconds:
► Switch on the ignition again.
► While depressing the brake pedal, move the
push selector forwards or backwards to confirm
mode N.
► While depressing the brake pedal, press the
control lever to release the parking brake.
► Release the brake pedal, switch off the
ignition.
Page 196 of 292
194
In the event of a breakdown
With a tyre repaired using this type of kit,
do not exceed a speed of 50 mph
(80 km/h) and do not drive more than
125 miles (200 km).
Contact a PEUGEOT dealer or a qualified
workshop to have the tyre changed.
Checking/adjusting tyre
pressures
The compressor can be used, without injecting
sealant, to check and, if necessary, adjust the
tyre pressures.
► Remove the valve cap from the tyre and keep
it in a clean place.
► Uncoil the pipe stowed under the compressor.
► Screw the pipe onto the valve and tighten
firmly.
► Check that the compressor switch is in
position " O".
► Fully uncoil the electric cable stowed under
the compressor.
► Connect the compressor's electric plug to the
vehicle's 12 V socket.
► Switch the ignition on.
► Start the compressor by placing the switch at
position " I" and adjust the pressure to the value
shown on the vehicle's tyre pressure label. To
deflate: press the black button located on the
compressor pipe, near the valve connection.
If after 7 minutes the pressure of 2 bar is
not reached, the tyre is damaged;
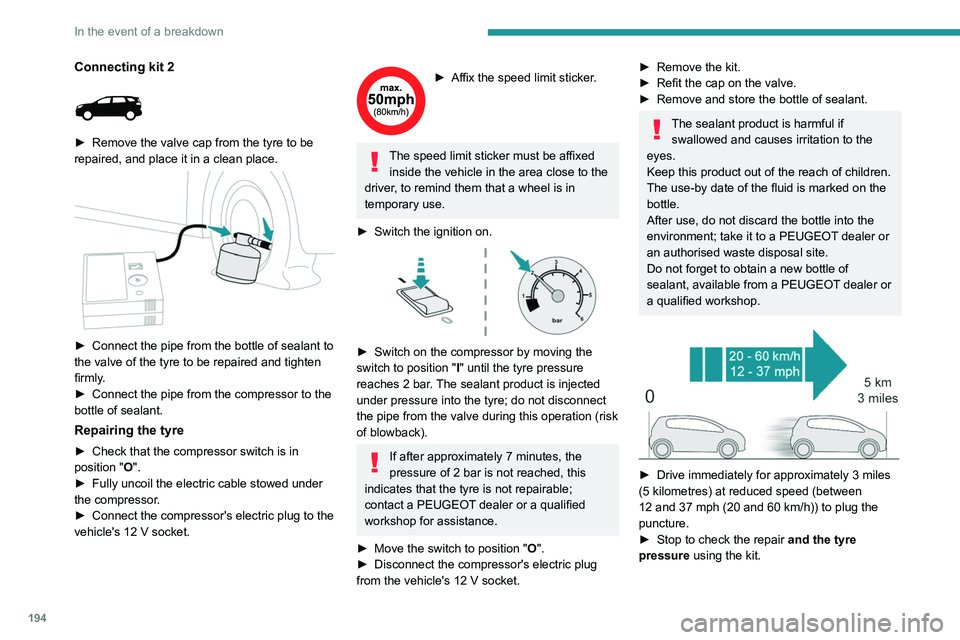
Connecting kit 2
► Remove the valve cap from the tyre to be
repaired, and place it in a clean place.
► Connect the pipe from the bottle of sealant to
the valve of the tyre to be repaired and tighten
firmly
.
►
Connect the pipe from the compressor to the
bottle of sealant.
Repairing the tyre
► Check that the compressor switch is in
position "O".
►
Fully uncoil the electric cable stowed under
the compressor
.
►
Connect the compressor's electric plug to the
vehicle's 12
V socket.
► Affix the speed limit sticker .
The speed limit sticker must be affixed
inside the vehicle in the area close to the
driver, to remind them that a wheel is in
temporary use.
►
Switch the ignition on.
► Switch on the compressor by moving the
switch to position " I
" until the tyre pressure
reaches 2 bar. The sealant product is injected
under pressure into the tyre; do not disconnect
the pipe from the valve during this operation (risk
of blowback).
If after approximately 7 minutes, the
pressure of 2 bar is not reached, this
indicates that the tyre is not repairable;
contact a PEUGEOT dealer or a qualified
workshop for assistance.
►
Move the switch to position " O
".
►
Disconnect the compressor's electric plug
from the vehicle's 12
V socket.
► Remove the kit.
► Refit the cap on the valve.
►
Remove and store the bottle of sealant.
The sealant product is harmful if swallowed and causes irritation to the
eyes.
Keep this product out of the reach of children.
The use-by date of the fluid is marked on the
bottle.
After use, do not discard the bottle into the
environment; take it to a PEUGEOT dealer or
an authorised waste disposal site.
Do not forget to obtain a new bottle of
sealant, available from a PEUGEOT dealer or
a qualified workshop.
► Drive immediately for approximately 3 miles
(5 kilometres) at reduced speed (between
12 and 37 mph (20 and 60
km/h)) to plug the
puncture.
►
Stop to check the repair
and the tyre
pressure using the kit.
Page 264 of 292
262
Alphabetical index
Charger, induction 64
Charger, wireless
64
Charging cable
168
Charging cable (Rechargeable
hybrid)
166, 172
Charging connector (Rechargeable
hybrid)
166, 171–172
Charging flap (Rechargeable
hybrid)
166, 171–172
Charging the traction battery
(Rechargeable hybrid)
20, 165, 171–172
CHECK
21
Checking the engine oil level
17
Checking the levels
181–182
Checking tyre pressures (using the kit)
192, 195
Checks
181, 183–184
Checks, routine
183–184
Child lock
108–109
Children
94, 101–102, 105–106, 107
Children (safety)
108
Child seats
94, 97–98, 100–101, 107
Child seats, conventional
100–101
Child seats, i-Size
107
Child seats, ISOFIX
102, 104–105
Cleaning (advice)
165, 187–188
Closing the boot
29, 32
Closing the doors
29, 32
Collision Risk Alert
147–148
Configurations, seats
55
Configuration, vehicle
23, 25
Connected applications
248Connection, Bluetooth 231–232, 248–249,
253–254
Connection, Wi-Fi network
249
Connectivity
247
Consumption figures
24
Container, AdBlue®
185
Control, emergency boot release
33
Control, emergency door
30–31
Control, heated seats
46
Controls, steering mounted
116–118
Control stalk, lighting
74–75
Control stalk, wipers
80–82
Control unit
166, 168, 172
Courtesy lamps
66–67
Cover, load space
69
Cruise control
128, 130–131, 133–135
Cruise control, adaptive
135–136
Cruise control by speed limit
recognition
130–131
Cruise control, dynamic with Stop
function
130–131
Cup holder
62
D
DAB (Digital Audio Broadcasting) -
Digital radio
228, 251
Date (setting)
234, 256
Daytime running lamps
75, 200–201
Deactivating the passenger airbag
96, 99
Deadlocking
27, 29
Deferred charging 24–25, 173
Deferred charging (Rechargeable
hybrid)
24–25, 166, 171
Defrosting
47, 60
Defrosting, front
60
Demisting
47, 60
Demisting, front
60
Demisting, rear
61
Demisting, rear screen
61
Dials and gauges
9
Digital instrument panel
9–10
Dimensions
221
Dipstick
17, 181
Direction indicators
75, 200–201
Domestic charging
168
Domestic charging (Rechargeable hybrid)
172
Door pockets
62
Doors
32
Drive Assist Plus
135
Driver’s attention warning
150
Driving
42–43, 110
Driving aids camera (warnings)
127
Driving aids (recommendations)
126
Driving economically
7
Driving modes
89–90, 121–122
Driving positions (storing)
45–46
Dynamic stability control (DSC)
88, 90
E
EBFD 87
Page 267 of 292
265
Alphabetical index
Menus (audio) 225–226, 237–238
Menu short cuts
23
Messages
255
Messages, quick
255
Mirror, rear view
48
Mirrors, door
47–48, 61, 151
Mirror, vanity
62
Misfuel prevention
164
Mobile application
24, 61, 171, 173
Modularity, seats
55
Motor, electric
122, 165, 220
Motorised tailgate
33–34, 36
Mountings, ISOFIX
102
N
Navigation 242–244
Navigation, connected
245–247
Net
69–70
Net, high load retaining
70–71
Night vision
79
Night Vision
79
O
Obstacle detection 153
Oil change
181
Oil consumption
181
OIl, engine
181
On-board tools
72, 190–192
Opening the bonnet 179
Opening the boot
28, 32
Opening the doors
28, 32
Opening the windows
26
P
Pads, brake 184
Paint
188, 222
Paint colour code
222
Paint, matt
188
Parcel shelf, rear
67, 69
Park Assist
158–160
Parking brake, electric
114–116, 183
Parking sensors, audible and visual
153
Parking sensors, front
153
Parking sensors, rear
153
Passenger compartment temperature pre-
conditioning (Rechargeable hybrid)
25, 61
Pedestrian horn (Rechargeable hybrid)
85
Personalisation
10
Plates, identification
222
Player, Apple®
229, 252
Player, USB
228, 251
Port, USB
63, 67, 228, 230, 247, 251
Power
20
Power indicator (Rechargeable hybrid)
8, 20
Pressures, tyres
184, 193, 222
Pre-tensioning seat belts
94
Priming pump
190
Priming the fuel system
189
Profiles 233, 256
Protecting children
95–99, 101–102,
105–106, 107
Puncture
192–193, 195
R
Radar (warnings) 127
Radio
226–227, 250
Radio, digital (Digital Audio
Broadcasting - DAB)
228, 251
Range, AdBlue®
18, 182
RDS
227, 250
Reading lamps
66–67
READY lamp
179
Rear air blower
59
Rear screen, demisting
61
Rechargeable hybrid engine
8, 24,
178–179, 212, 220
Rechargeable hybrid system
5, 8, 24,
112, 122, 165
Recharging the battery
207, 210
Recharging the traction battery
168
Recharging the traction battery
(Rechargeable hybrid)
165, 171–172
Recirculation, air
58, 60
Recorder, total distance
21
Recovery
211–214
Recovery of the vehicle
211–214
Reduction of electrical load
179
Regeneration of the particle filter
183
Page 268 of 292
266
Alphabetical index
Regenerative braking (deceleration
by engine braking)
120
Reinitialisation of the under-inflation
detection system
126
Reinitialising the remote control
32
Reminder, lighting on
74
Remote control
26–30
Remote functions
25, 173
Remotely operable functions (Rechargeable
hybrid)
25, 61
Removing a wheel
198–199
Removing the mat
65
Replacing bulbs
200–201
Replacing fuses
201–202
Replacing the air filter
183
Replacing the oil filter
183
Replacing the passenger compartment
filter
183
Reservoir, screenwash
182
Resetting the trip recorder
21
Reset trip
22
Rev counter
9
Reversing camera
127, 154–156
Reversing lamps
201
Roof bars
176–177
Running out of fuel (Diesel)
189
S
Safety, children 95–99, 101–102,
105–106, 107
Saturation of the particle filter (Diesel)
183
Screen menu map 230
Screens, very cold conditions
178
Screenwash
81
Screenwash, front
81
Screenwash, rear
81
SCR (Selective Catalytic Reduction)
19, 184
Seat belts
91–92, 94, 100
Seat belts, rear
92–93
Seat, rear bench
48–49
Seats, additional
53–55
Seats, electric
45–46
Seats, front
43, 45–46
Seats, heated
46
Seats, rear
48–55, 98
Selector, gear
116–120
Sensors (warnings)
127
Serial number, vehicle
222
Service indicator
17, 21
Servicing
17, 183–184
Settings, equipment
23, 25
Settings, system
233, 256
Sidelamps
75, 200–201
Silent vehicle warning sound (Rechargeable
hybrid)
85
Ski flap
67
Smartphone
25, 64
Snow chains
125, 177–178
Snow screen
178
Socket, 12 V accessory
62, 66, 72
Socket, auxiliary
229, 251
Socket, Jack
251
Speakers
63
Speed limiter
128, 130–133Speed limit recognition 128, 130
Speedometer
9, 127
Sport mode
122–123
Spotlamps, side
77
Stability control (ESC)
87–88, 90
Starting a Diesel engine
163
Starting the engine
11 2
Starting the vehicle
111, 116–119
Starting using another battery
113, 206
State of charge, battery
24
Station, radio
226–227, 250
Stay, bonnet
179–180
Steering mounted controls, audio
224, 237
Steering wheel, adjustment
47
Stickers, customising ~ Stickers,
expressive
188
Stopping the vehicle
112, 116–119
Stop & Start
23, 57, 60, 123–124, 163, 179, 183, 209
Storage
62, 64–65, 67–68
Storage box
72
Storage boxes
68
Storage compartments
62
Storage wells
72
Storing driving positions
45–46
Sunroof, panoramic
39–41
Sunshine sensor
56
Sun visor
62
Suspension
184
Synchronising the remote control
32