2021 PEUGEOT 5008 child
[x] Cancel search: childPage 40 of 292
38
Access
– Changing a wheel.
– T owing the vehicle.
–
T
ransport on a ship or ferry.
Deactivating the interior volumetric
and anti-tilt monitoring
► Switch off the ignition and within 10 seconds
press the alarm button until its red indicator lamp
is on fixed.
►
Get out of the vehicle.
►
Immediately lock the vehicle using the remote
control or the Keyless Entry and Starting system.
Only the exterior perimeter monitoring is
activated; the button's red indicator lamp flashes
once every second.
To take effect, this deactivation must be carried out after each time the ignition is
switched off.
Reactivating the interior volumetric
and anti-tilt monitoring
► Deactivate the exterior perimeter monitoring
by unlocking the vehicle using the remote control
or the Keyless Entry and Starting system.
The indicator lamp in the button goes off.
►
Reactivate all monitoring by locking the
vehicle using the remote control or the Keyless
Entry and Starting system.
The red indicator lamp in the button once again
flashes every second.
Triggering of the alarm
This is indicated by sounding of the siren
and flashing of the direction indicators for 30
seconds.
Depending on the country of sale, certain
monitoring functions remain active until the alarm
has been triggered eleven times consecutively.
When the vehicle is unlocked using the remote
control or the Keyless Entry and Starting system,
rapid flashing of the red indicator lamp in the
button informs you that the alarm was triggered
during your absence. When the ignition is
switched on, this flashing stops.
Failure of the remote control
To deactivate the monitoring functions:
► Unlock the vehicle using the key in the
driver's door lock.
►
Open the door; the alarm is triggered.
►
Switch on the ignition; this stops the alarm.
The indicator lamp in the button goes off.
Locking the vehicle without
activating the alarm
► Lock or deadlock the vehicle using the key
(built-in the remote control) in the driver's door
lock.
Malfunction
When the ignition is switched on, the fixed
lighting of the red indicator lamp in the button
indicates a system malfunction. Have it checked by a PEUGEOT dealer or a
qualified workshop.
Electric windows
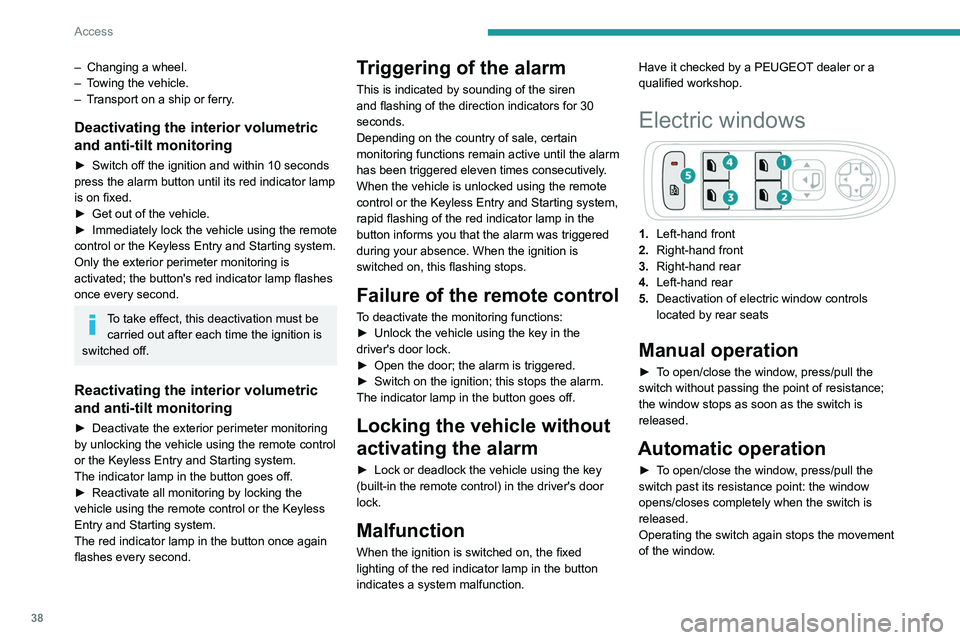
1.
Left-hand front
2. Right-hand front
3. Right-hand rear
4. Left-hand rear
5. Deactivation of electric window controls
located by rear seats
Manual operation
► To open/close the window, press/pull the
switch without passing the point of resistance;
the window stops as soon as the switch is
released.
Automatic operation
► To open/close the window, press/pull the
switch past its resistance point: the window
opens/closes completely when the switch is
released.
Operating the switch again stops the movement
of the window.
Window controls remain operational for
approximately 45 seconds after switching
off the ignition or after locking the vehicle.
After that time, the controls are disabled.
To reactivate them, switch on the ignition or
unlock the vehicle.
Anti-pinch
If the window meets an obstacle while rising, it
stops and immediately partially lowers again.
Deactivating the rear
controls for the rear electric
windows
For your children's safety, press control 5 to
deactivate the controls for the rear electric
windows, irrespective of their positions.
The red indicator lamp in the button comes
on and a confirmation message is displayed.
The lamp will remain lit until the controls are
reactivated.
The rear electric windows can still be controlled
using the driver's controls.
Page 41 of 292
39
Access
2Window controls remain operational for
approximately 45 seconds after switching
off the ignition or after locking the vehicle.
After that time, the controls are disabled.
To reactivate them, switch on the ignition or
unlock the vehicle.
Anti-pinch
If the window meets an obstacle while rising, it
stops and immediately partially lowers again.
Deactivating the rear
controls for the rear electric
windows
For your children's safety, press control 5 to
deactivate the controls for the rear electric
windows, irrespective of their positions.
The red indicator lamp in the button comes
on and a confirmation message is displayed.
The lamp will remain lit until the controls are
reactivated.
The rear electric windows can still be controlled
using the driver's controls.
Reinitialising the electric
windows
After reconnecting the battery, or in the event
of abnormal window movement, the anti-pinch
function must be reinitialised.
The anti-pinch function is disabled during the
following sequence of operations.
For each window:
►
Lower the window fully
, then raise it; it will
rise in steps of a few centimetres each time the
control is pressed. Repeat the operation until the
window is fully closed.
►
Continue to pull the control for at least one
second after the window reaches the closed
position.
If an electric window meets an obstacle
during operation, the movement of the
window must be reversed. To do this, press
the relevant control.
When the driver operates the passengers’
electric window controls, it is important to
ensure that nothing can prevent the window
from closing properly.
It is important to ensure that passengers use
the electric windows correctly.
Pay particular attention to children when
operating the windows.
Be aware of passengers and/or other persons
present when closing windows using the key
or the "Keyless Entry and Starting" system.
Do not put your head or arms through the
open windows when the vehicle is moving -
risk of serious injury!
Panoramic sunroof
The panoramic sunroof consists of a movable
glass panel that slides over the roof and a blind
that can be opened independently. Opening the
sunroof automatically opens the blind.
►
T
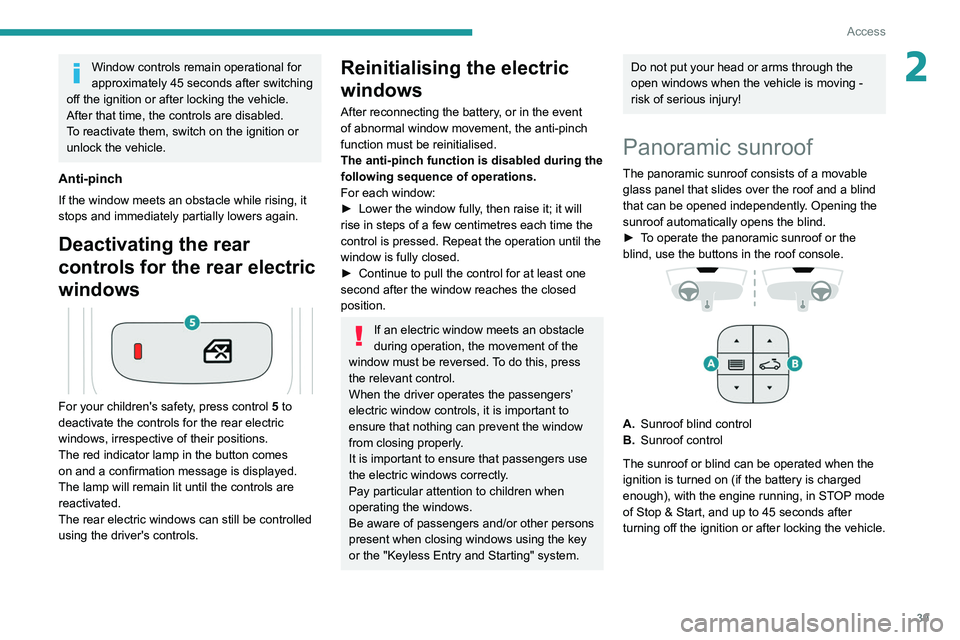
o operate the panoramic sunroof or the
blind, use the buttons in the roof console.
A. Sunroof blind control
B. Sunroof control
The sunroof or blind can be operated when the
ignition is turned on (if the battery is charged
enough), with the engine running, in STOP mode
of Stop & Start, and up to 45
seconds after
turning off the ignition or after locking the vehicle.
Page 42 of 292
40
Access
Precautions
Do not put your head or arms through the
sunroof while the vehicle is moving - risk
of serious injury!
Ensure that any luggage or accessories
carried on the roof bars do not interfere
with the movement of the sunroof.
Do not place heavy loads on the movable
glass panel of the sunroof.
If the sunroof is wet, following a shower
or washing the vehicle, wait until it is
completely dry before opening.
Do not operate the sunroof if it is covered by
snow or ice - risk of damage!
Use only plastic scrapers to remove snow or
ice from the sunroof.
Regularly check the condition of the
sunroof seals (e.g. presence of dust,
dead leaves).
If using a car wash, check first that the roof is
correctly closed and keep the high-pressure
jet at least 30 centimetres from the seals.
Never leave the vehicle with the sunroof
open.
Operation
When opening the sunroof fully, the movable
glass moves to a partially open position, then
slides over the roof. Any intermediate position is
possible.
Depending on the speed of the vehicle,
the partially open position may vary to
improve the acoustics.
Before operating the sunroof or blind
control buttons, ensure that no object or
person might prevent the movement.
Be particularly aware of children when
operating the sunroof or blind.
If something is trapped when operating the
sunroof or blind, you should reverse the
movement of the sunroof or blind by pressing
the control in question.
The driver must ensure that passengers use
the sunroof and blind correctly.
Anti-pinch system
If the sunroof or blind encounters an obstacle
when closing, the movement is automatically
reversed.
The roof anti-pinch system is designed to be
effective at speeds of up to 75 mph (120
km/h).
Opening/Closing
► To open the sunroof or the blind, use the
part of the button located towards the rear of the
vehicle.
► To close the sunroof or the blind, use the part
of the button located towards the front of the
vehicle.
Operation of buttons
► Pressing a button beyond its point of
resistance directly opens or closes the sunroof
or blind fully
.
►
Pressing the button again stops the current
movement.
►
When holding a button (without going
beyond the point of resistance), the movement
of the sunroof or blind stops when this button is
released.
►
When the sunroof is closed: pressing once
without passing the point of resistance moves it
to a partially open position.
►
When the sunroof is partially open: pressing
once without passing the point of resistance
opens or closes it fully
.
The sunroof and windows, then the blind, can be closed by holding down the door
locking control. The manoeuvre stops as soon
as the locking control is released.
Closing of the blind is limited by the
position of the sunroof: the blind cannot
go further than the front of the movable glass.
During simultaneous movements of the
sunroof and blind, the blind automatically
stops or resumes movement depending on
the position of the sunroof.
Reinitialisation
Following reconnection of the battery or in the
event of a fault or jerky movement of the sunroof
or blind, reinitialisation is required.
► Check that nothing is interfering with the
sunroof or blind and that the seals are clean.
► With the ignition on, fully close the sunroof
and blind.
► Press and hold the front part of button B, until
the sunroof and blind move slightly, then hold for
a further 1 second before releasing.
► Wait 2 seconds and then press and hold the
front part of button B. The blind and the sunroof
will open and close, one after the other. When
both are completely closed again, hold for a
further 2 seconds and release.
If there is an operating fault, restart the
whole procedure.
Page 46 of 292
44
Ease of use and comfort
3.Lumbar support electric adjustment
The control allows independent adjustment of
the depth and vertical position of the lumbar
support.
►
Press and hold the front or rear of the
control to increase or reduce the lumbar
support.
►
Press and hold the top or bottom of the
control to raise or lower the lumbar support
area.
Placing the passenger seat
in the table position
The backrest of the passenger seat can be fully
folded forwards and secured in this position.
This function, when associated with folding
of the backrest of the rear seats, helps with
transporting long and bulky objects.
First steps:
►
Lower the head restraint.
►
Fold up the “aircraft” type table (depending
on version).
►
Move the seat backwards to allow space for
the head restraint.
►
Adjust the seat to the lowest position.
►
Check that there is nothing that might
interfere with folding of the backrest (seat belt,
child seat, items of clothing, bags, etc.).
Deactivation of the front passenger
airbag is recommended.
Folding the backrest
► Pull the control fully upwards to release the
backrest.
►
T
ip the backrest fully forwards.
In this position, the backrest can support
a maximum load of 30
kg.
When sharp deceleration occurs, objects
placed on the folded backrest can turn into
projectiles.
Returning the backrest into position
► Pull the control fully upwards to release the
backrest.
►
Raise the backrest and guide it backwards
until it latches into place.
►
Check that the backrest is correctly latched
into place.
Front head restraints
Adjusting the height
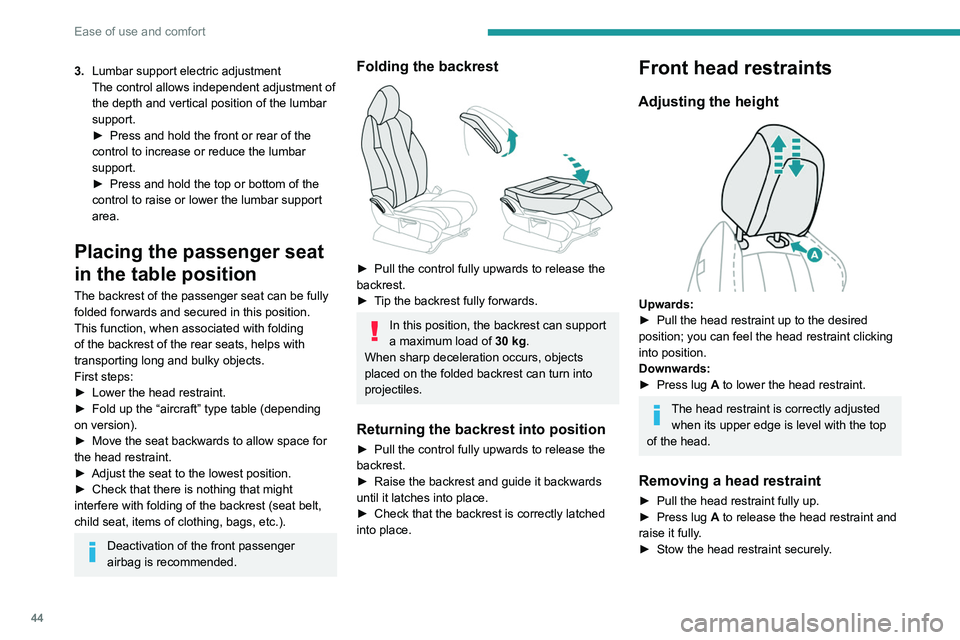
Upwards:
► Pull the head restraint up to the desired
position; you can feel the head restraint clicking
into position.
Downwards:
►
Press lug
A to lower the head restraint.
The head restraint is correctly adjusted when its upper edge is level with the top
of the head.
Removing a head restraint
► Pull the head restraint fully up.
► Press lug A to release the head restraint and
raise it fully.
►
Stow the head restraint securely
.
Refitting a head restraint
► Insert the head restraint rods into the guides
in the corresponding seat backrest.
► Push the head restraint fully down.
► Press the lug A to release the head restraint
and push it down.
► Adjust the height of the head restraint.
Never drive with the head restraints
removed; they should be in place and
adjusted for the occupant of the seat.
Electrically-adjusted driver's
seat
To carry out these electric adjustments, switch on the ignition or start the engine
if the vehicle has gone into energy economy
mode.
These electric adjustments are accessible
about 1 minute after opening the driver's door.
They are deactivated about 1 minute after
switching the ignition off.
Page 53 of 292
51
Ease of use and comfort
3Longitudinal adjustment
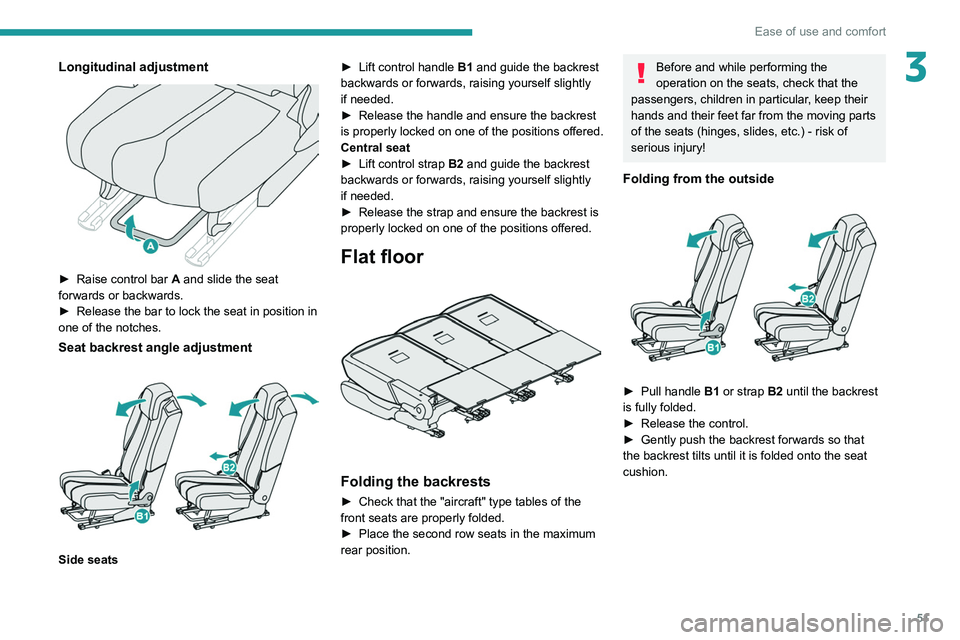
► Raise control bar A and slide the seat
forwards or backwards.
►
Release the bar to lock the seat in position in
one of the notches.
Seat backrest angle adjustment
Side seats ►
Lift control handle
B1
and guide the backrest
backwards or forwards, raising yourself slightly
if needed.
►
Release the handle and ensure the backrest
is
properly locked on one of the positions offered.
Central seat
►
Lift control strap
B2 and guide the backrest
backwards or forwards, raising yourself slightly
if needed.
►
Release the strap and ensure the backrest is
properly locked on one of the positions offered.
Flat floor
Folding the backrests
► Check that the "aircraft" type tables of the
front seats are properly folded.
►
Place the second row seats in the maximum
rear position.
Before and while performing the
operation on the seats, check that the
passengers, children in particular, keep their
hands and their feet far from the moving parts
of the seats (hinges, slides, etc.) - risk of
serious injury!
Folding from the outside
► Pull handle B1 or strap B2 until the backrest
is fully folded.
►
Release the control.
►
Gently push the backrest forwards so that
the backrest tilts until it is folded onto the seat
cushion.
Page 54 of 292
52
Ease of use and comfort
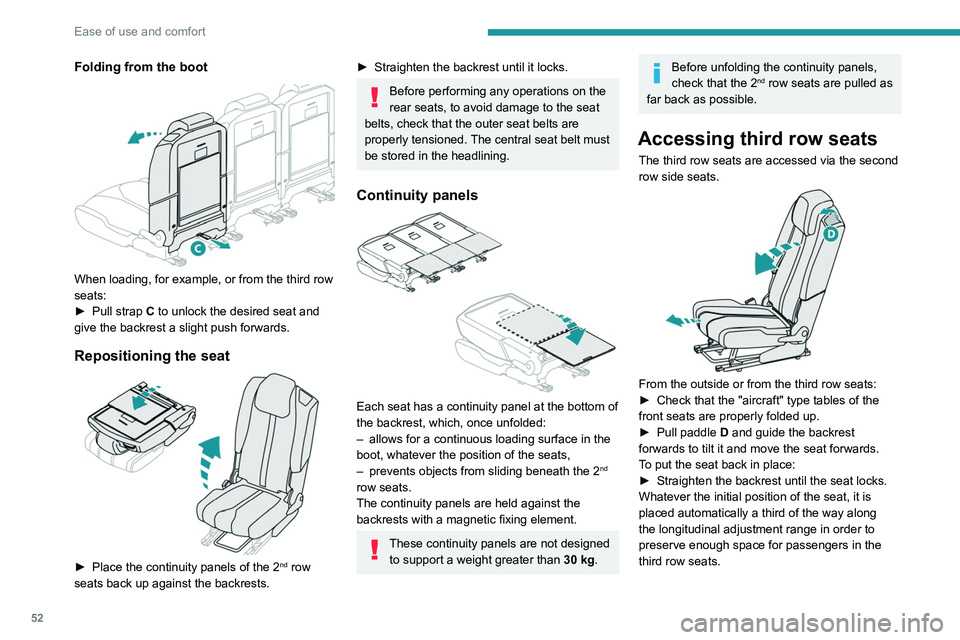
Folding from the boot
When loading, for example, or from the third row
seats:
►
Pull strap
C to unlock the desired seat and
give the backrest a slight push forwards.
Repositioning the seat
► Place the continuity panels of the 2nd row
seats back up against the backrests.
► Straighten the backrest until it locks.
Before performing any operations on the
rear seats, to avoid damage to the seat
belts, check that the outer seat belts are
properly tensioned. The central seat belt must
be stored in the headlining.
Continuity panels
Each seat has a continuity panel at the bottom of
the backrest, which, once unfolded:
–
allows for a continuous loading surface in the
boot, whatever the position of the seats,
–
prevents objects from sliding beneath the 2nd
row seats.
The continuity panels are held against the
backrests with a magnetic fixing element.
These continuity panels are not designed to support a weight greater than 30
kg.
Before unfolding the continuity panels,
check that the 2nd row seats are pulled as
far back as possible.
Accessing third row seats
The third row seats are accessed via the second
row side seats.
From the outside or from the third row seats:
► Check that the "aircraft" type tables of the
front seats are properly folded up.
►
Pull paddle D
and guide the backrest
forwards to tilt it and move the seat forwards.
To put the seat back in place:
►
Straighten the backrest until the seat locks.
Whatever the initial position of the seat, it is
placed automatically a third of the way along
the longitudinal adjustment range in order to
preserve enough space for passengers in the
third row seats.
If this system fails (paddle D), the third
row passengers can also get out after
having folded the backrest of the second row
seats using strap C.
Do not let children operate the seats
unsupervised.
Third row seats
The two third row seats are stored in a retracted
position in the bottom of the boot. Each one is
covered with rigid concertina panels, secured to
the vehicle.
Do not let children operate the seats
unsupervised.
Each concertina panel can support a
maximum load of 100 kg with the third
row seats folded away.
With the third row seats removed and the
removable concertina panels supports
installed, the maximum load is limited to
50 kg.
Page 55 of 292
53
Ease of use and comfort
3If this system fails (paddle D), the third
row passengers can also get out after
having folded the backrest of the second row
seats using strap C.
Do not let children operate the seats
unsupervised.
Third row seats
The two third row seats are stored in a retracted
position in the bottom of the boot. Each one is
covered with rigid concertina panels, secured to
the vehicle.
Do not let children operate the seats
unsupervised.
Each concertina panel can support a
maximum load of 100
kg with the third
row seats folded away.
With the third row seats removed and the
removable concertina panels supports
installed, the maximum load is limited to
50
kg.
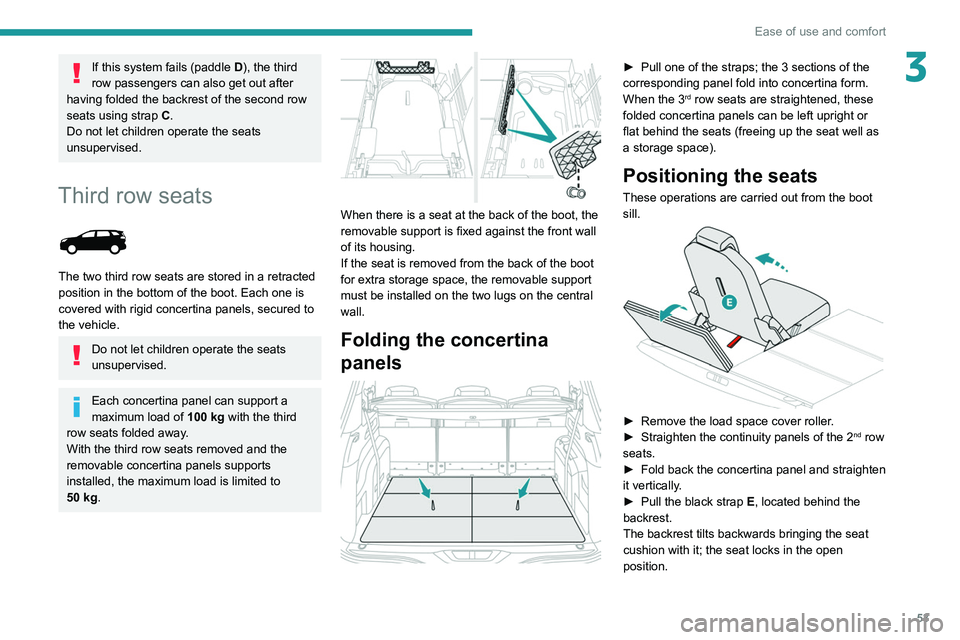
When there is a seat at the back of the boot, the
removable support is fixed against the front wall
of its housing.
If the seat is removed from the back of the boot
for extra storage space, the removable support
must be installed on the two lugs on the central
wall.
Folding the concertina
panels
► Pull one of the straps; the 3 sections of the
corresponding panel fold into concertina form.
When the 3
rd row seats are straightened, these
folded concertina panels can be left upright or
flat behind the seats (freeing up the seat well as
a storage space).
Positioning the seats
These operations are carried out from the boot
sill.
► Remove the load space cover roller .
► Straighten the continuity panels of the 2nd row
seats.
►
Fold back the concertina panel and straighten
it vertically
.
►
Pull the black strap E
, located behind the
backrest.
The backrest tilts backwards bringing the seat
cushion with it; the seat locks in the open
position.
Page 96 of 292
94
Safety
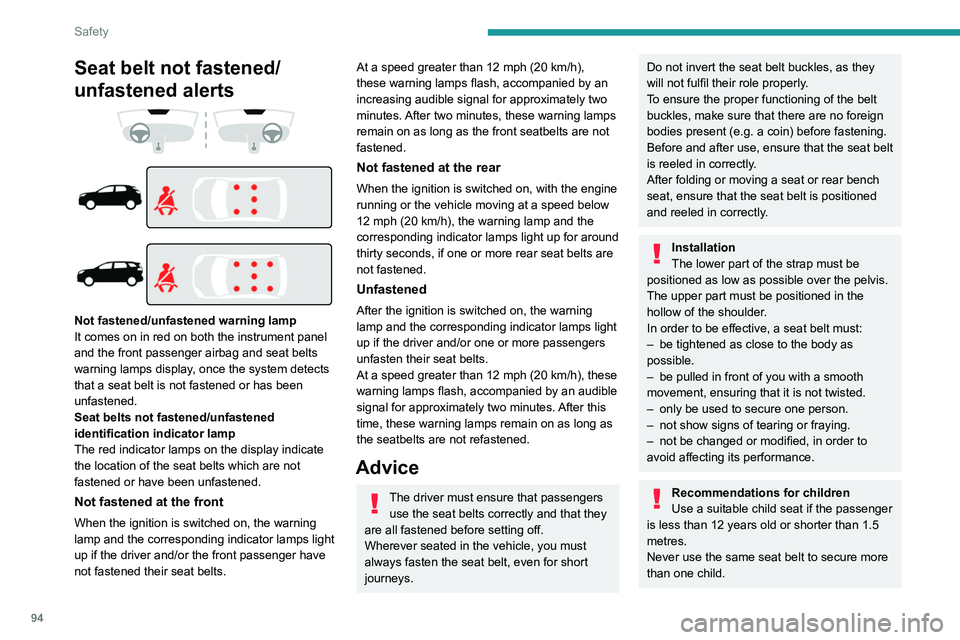
Seat belt not fastened/
unfastened alerts
Not fastened/unfastened warning lamp
It comes on in red on both the instrument panel
and the front passenger airbag and seat belts
warning lamps display, once the system detects
that a seat belt is not fastened or has been
unfastened.
Seat belts not fastened/unfastened
identification indicator lamp
The red indicator lamps on the display indicate
the location of the seat belts which are not
fastened or have been unfastened.
Not fastened at the front
When the ignition is switched on, the warning
lamp and the corresponding indicator lamps light
up if the driver and/or the front passenger have
not fastened their seat belts.
At a speed greater than 12 mph (20 km/h),
these warning lamps flash, accompanied by an
increasing audible signal for approximately two
minutes. After two minutes, these warning lamps
remain on as long as the front seatbelts are not
fastened.
Not fastened at the rear
When the ignition is switched on, with the engine
running or the vehicle moving at a speed below
12 mph (20
km/h), the warning lamp and the
corresponding indicator lamps light up for around
thirty seconds, if one or more rear seat belts are
not fastened.
Unfastened
After the ignition is switched on, the warning
lamp and the corresponding indicator lamps light
up if the driver and/or one or more passengers
unfasten their seat belts.
At a speed greater than 12 mph (20 km/h), these
warning lamps flash, accompanied by an audible
signal for approximately two minutes. After this
time, these warning lamps remain on as long as
the seatbelts are not refastened.
Advice
The driver must ensure that passengers use the seat belts correctly and that they
are all fastened before setting off.
Wherever seated in the vehicle, you must
always fasten the seat belt, even for short
journeys.
Do not invert the seat belt buckles, as they
will not fulfil their role properly.
To ensure the proper functioning of the belt
buckles, make sure that there are no foreign
bodies present (e.g.
a coin) before fastening.
Before and after use, ensure that the seat belt
is reeled in correctly.
After folding or moving a seat or rear bench
seat, ensure that the seat belt is positioned
and reeled in correctly.
Installation
The lower part of the strap must be
positioned as low as possible over the pelvis.
The upper part must be positioned in the
hollow of the shoulder.
In order to be effective, a seat belt must:
–
be tightened as close to the body as
possible.
–
be pulled in front of you with a smooth
movement, ensuring that it is not twisted.
–
only be used to secure one person.
–
not show signs of tearing or fraying.
–
not be changed or modified, in order to
avoid affecting its performance.
Recommendations for children
Use a suitable child seat if the passenger
is less than 12 years old or shorter than 1.5
metres.
Never use the same seat belt to secure more
than one child.
Never carry a child on your lap.
For more information on Child seats, refer to
the corresponding section.
Maintenance
In accordance with current safety
regulations, for all work on your vehicle's
seat belts, contact a qualified workshop with
the skills and equipment needed, which a
PEUGEOT dealer is able to provide.
Have the seat belts checked regularly by a
PEUGEOT dealer or a qualified workshop,
particularly if the straps show signs of
damage.
Clean the seat belt straps with soapy water or
a textile cleaning product, sold by PEUGEOT
dealers.
Airbags
General information
System designed to help improve the safety
of the occupants sitting in the front seats and
the rear outer seats, in the event of a violent
collision. The airbags supplement the action
of the seat belts equipped with a force limiting
system.
Electronic detectors record and analyse the
front and side impacts sustained in the impact
detection zones: