2021 Peugeot 308 light
[x] Cancel search: lightPage 136 of 244

134
Practical information
Towing device
Load distribution
► Distribute the load in the trailer so that the
heaviest items are as close as possible to the
axle, and the nose weight approaches the
maximum permitted without exceeding it.
Air density decreases with altitude, thus reducing
engine performance.
The maximum towable load
must be reduced by 10% per 1,000
metres of
altitude.
Use genuine towing devices and their
wiring harnesses approved by
PEUGEOT. We recommend having them
fitted by a PEUGEOT dealer or a qualified
workshop.
If not fitted by a PEUGEOT dealer, they must
still be fitted in accordance with the vehicle
manufacturer's instructions.
Certain driving or manoeuvring aid functions
are automatically deactivated while an
approved towing system is in use.
Comply with the maximum authorised
towable weight, as indicated on your
vehicle's registration certificate, on the
manufacturer's label and in the Technical
data section of this guide.
Complying with the maximum authorised
nose weight (towball weight) also includes
the use of accessories (bicycle carriers,
tow boxes, etc.).
Observe the legislation in force in the
country where you are driving.
GTi towing
Your vehicle cannot be fitted with a
tow-bar.
Towing device with towball
Before each use
To ensure the towball is correctly fitted,
check the follow points:
Saloon:
–
The green mark on the wheel is in line with
the green mark on the towball.
–
The wheel is in contact with the towball
(position A
).
–
The safety lock is on and the key removed;
the wheel can no longer be operated.
–
The towball must not be able to move in
its carrier; test by attempting to move it with
your hand.
SW :
–
The towball is correctly engaged (position
A
).
–
The safety lock is on and the key removed;
the trigger can no longer be operated.
–
The towball must not be able to move in
its carrier; test by attempting to move it with
your hand.
If the towball is not engaged, the trailer can
become detached -
Accident risk!
During use
Never release the locking system when
a trailer or load carrier is connected to the
towball.
Never exceed the maximum authorised
weight for the vehicle - Gross Train Weight
or GTW.
Always comply with the maximum authorised
load on the towing device: if it is exceeded,
this device may become detached from the
vehicle - risk of an accident!
Check that the trailer lamps work correctly.
Before setting off, check and/or adjust
headlamp beam height.
For more information on Headlamp height
adjustment, refer to the corresponding
section.
Following use
When travelling without a trailer or load
on a towbar-mounted carrier, the towball
must be removed and the protective plug
inserted in the carrier. This measure applies
particularly where the towball might obscure
visibility of the number plate or its lighting.
Blanking plug
In the event of recovery, it is essential to remove
the blanking plug if your vehicle has one.
To do this, contact a PEUGEOT dealer or a
qualified workshop.
The blanking plug behind the lower air intake grille.
Towbar with quickly detachable towball
(hatchback)
Presentation
This genuine towing device can be fitted and
removed with no need for tools.
Page 148 of 244
146
Practical information
For your safety and driving comfort, it is
important to have them regularly checked by a
PEUGEOT dealer or a qualified workshop.
Only use products recommended by
PEUGEOT or products of equivalent
quality and specification.
In order to optimise the operation of
components as important as those in the
braking system, PEUGEOT selects and offers
very specific products.
After washing the vehicle, dampness, or in
wintry conditions, ice can form on the brake
discs and pads: braking efficiency may be
reduced. Make light brake applications to dry
and defrost the brakes.
AdBlue® (BlueHDi)
To respect the environment and ensure compliance with the Euro 6 standard, without
adversely affecting the performance or fuel
consumption of its Diesel engines, PEUGEOT
has taken the decision to equip its vehicles
with a system that associates SCR (Selective
Catalytic Reduction) with a Diesel Particle Filter
(DPF) for the treatment of exhaust gases.
SCR system
Using a liquid called AdBlue® that contains
urea, a catalytic converter turns up to 85% of
the nitrogen oxides (NOx) into nitrogen and
water, which are harmless to health and the
environment.
The AdBlue® is contained in a special
tank holding about 17 litres.
Its capacity allows a driving range of
approximately 4,000
miles (6,500 km),
which
may vary considerably depending on your
driving style.
An alert system is triggered once the reserve
level is reached: it is then possible to drive for a
further 1,500 miles (2,400
km) before the tank is
empty and the vehicle is immobilised.
For more information on the Warning
and indicator lamps and the associated
alerts, or the Indicators, please refer to the
corresponding sections.
Once the AdBlue® tank is empty, a device
required by law prevents the engine from
being restarted.
If the SCR system is faulty, the level of
emissions from the vehicle will no longer meet
the Euro 6 standard and the vehicle starts
polluting the environment.
In the event of a confirmed SCR system
malfunction, it is essential to visit a
PEUGEOT dealer or a qualified workshop.
After 685 miles (1,100 km), a device is
automatically activated to prevent the engine
from starting.
In both cases, a range indicator indicates
the distance that can be travelled before the
vehicle is stopped.
Freezing of the AdBlue®
AdBlue® freezes at temperatures below
around -11°C.
The SCR system includes a heater for the
AdBlue
® tank, allowing you to continue driving
in very cold conditions.
Supply of AdBlue®
It is recommended that the AdBlue® be topped
up as soon as the first alert is issued indicating
that the reserve level has been reached.
For the correct operation of the SCR
system:
–
Use
only AdBlue
® fluid that meets the ISO
22241 standard.
–
Never
transfer AdBlue
® to another container
as it would lose its purity.
–
Never
dilute AdBlue
® with water.
You can obtain AdBlue
® from a PEUGEOT
dealer or a qualified workshop.
You can also visit a service station equipped with AdBlue® pumps specially
designed for passenger vehicles (for versions
with access to the AdBlue
® tank via the fuel
filler flap).
Never top up from an AdBlue® dispenser
reserved for heavy goods vehicles.
Storage recommendations
AdBlue® freezes at about -11°C and deteriorates
above +25°C. Containers should be stored in a
cool area and protected from direct sunlight.
Under these conditions, the fluid can be kept for
at least a year.
If the fluid has frozen, it can be used once it has
completely thawed out in the ambient air.
Never store AdBlue® containers in your
vehicle.
Precautions for use
AdBlue® is a urea-based solution. This fluid is
non-flammable, colourless and odourless (when
kept in a cool place).
In the event of contact with the skin, wash the
affected area with soap and running water. In the
event of contact with the eyes, immediately rinse
the eyes with large amounts of water or with an
eye wash solution for at least 15 minutes. Seek
medical attention if you feel a persistent burning
sensation or irritation.
If swallowed, immediately wash out the mouth
with clean water and then drink plenty of water.
In certain conditions (high temperature, for
example), the risk of release of ammonia cannot
be excluded: do not inhale the fluid. Ammonia
Page 149 of 244
147
Practical information
7Never top up from an AdBlue® dispenser
reserved for heavy goods vehicles.
Storage recommendations
AdBlue® freezes at about -11°C and deteriorates
above +25°C. Containers should be stored in a
cool area and protected from direct sunlight.
Under these conditions, the fluid can be kept for
at least a year.
If the fluid has frozen, it can be used once it has
completely thawed out in the ambient air.
Never store AdBlue® containers in your
vehicle.
Precautions for use
AdBlue® is a urea-based solution. This fluid is
non-flammable, colourless and odourless (when
kept in a cool place).
In the event of contact with the skin, wash the
affected area with soap and running water. In the
event of contact with the eyes, immediately rinse
the eyes with large amounts of water or with an
eye wash solution for at least 15 minutes. Seek
medical attention if you feel a persistent burning
sensation or irritation.
If swallowed, immediately wash out the mouth
with clean water and then drink plenty of water.
In certain conditions (high temperature, for
example), the risk of release of ammonia cannot
be excluded: do not inhale the fluid. Ammonia
vapours have an irritant effect on mucous
membranes (eyes, nose and throat).
Store AdBlue® out of the reach of
children, in its original container.
Procedure
Before starting the top-up procedure, ensure that
the vehicle is parked on a flat and level surface.
In wintry conditions, ensure that the temperature
of the vehicle is above -11°C. Otherwise the
AdBlue
® may be frozen and so cannot be poured
into the tank. Park the vehicle in a warmer area
for a few hours to allow the top-up to be carried
out.
Never pour the AdBlue® into the Diesel
fuel tank.
For specific information about how to
access the AdBlue tank, refer to the
detailed descriptions below.
If any AdBlue® is splashed, or if there are
any spillages on the bodywork, rinse
immediately with cold water or wipe with a
damp cloth.
If the fluid has crystallised, clean it off using a
sponge and hot water.
Important: in the event of a top-up after
a breakdown because of a lack of
AdBlue, it is essential to wait around 5
minutes before switching on the ignition,
without opening the driver’s door,
unlocking the vehicle, introducing the key
into the ignition switch, or introducing the
key of the “
Keyless Entry and Starting
”
system into the passenger compartment
.
Switch on the ignition, then wait for 10
seconds before starting the engine.
Access to the AdBlue®
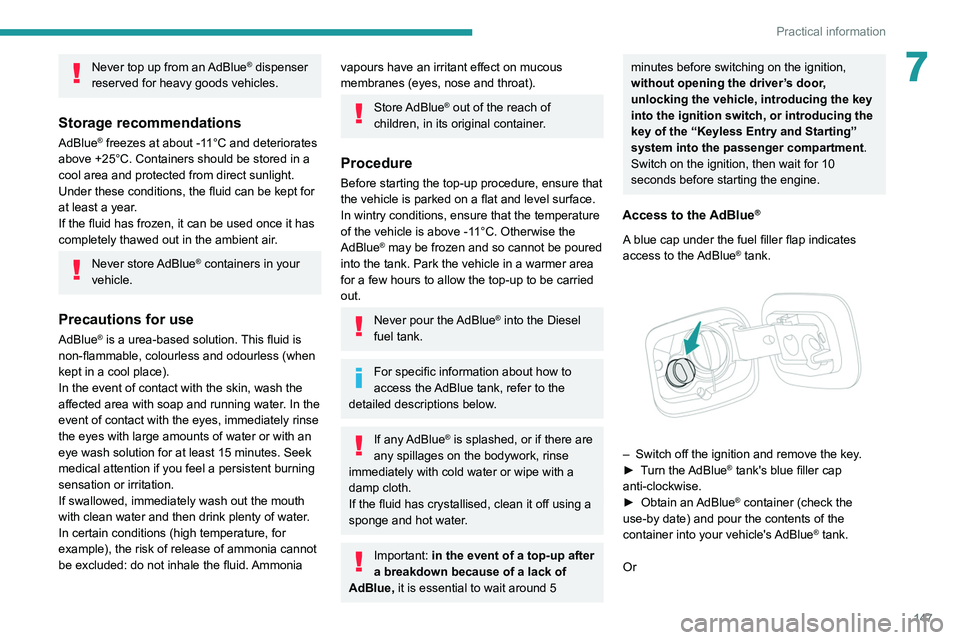
A blue cap under the fuel filler flap indicates
access to the AdBlue® tank.
– Switch off the ignition and remove the key .
► T urn the AdBlue® tank's blue filler cap
anti-clockwise.
►
Obtain an
AdBlue
® container (check the
use-by date) and pour the contents of the
container into your vehicle's AdBlue
® tank.
Or
Page 158 of 244

156
In the event of a breakdown
► Remove the kit and stow it.
Drive at reduced speed (50 mph
(80 km/h) max.), limiting the distance
travelled to approximately 125 miles
(200
km).
Removing the pipe and
cartridge
► Turn the pipe assembly 2 to the left until it
comes into contact with the unit.
►
Disconnect the connector 1
from the cartridge
by turning it a quarter turn anti-clockwise.
►
Pull the pipe assembly 2
out slightly, then
disconnect the connector 3 from the air intake
pipe by turning it a quarter turn anti-clockwise.
– Remove the pipe assembly 2 .
– Keep the compressor vertical.
–
Unscrew the cartridge 4
from the bottom.
To fit the new cartridge and new pipe, carry out
these operations in reverse order.
Be careful of fluid discharge.
The expiry date of the fluid is indicated
on the cartridge.
The sealant cartridge is designed for single
use; it must be replaced even if only partly
used.
After use, do not discard the cartridge into the
environment, take it to an authorised waste
disposal site or a PEUGEOT dealer.
Do not forget to obtain a new sealant
cartridge, available from PEUGEOT dealers
or from a qualified workshop.
Checking/adjusting tyre
pressures
Use the compressor, without injecting
any sealant, to check and, if necessary,
adjust the tyre pressures.
► Turn selector A to the "Inflation"
position.
►
Uncoil the white pipe G
fully.
►
Connect the pipe to the tyre valve.
►
Connect the compressor's electric plug to the
vehicle's 12V socket.
Only the 12V socket located at the front
of the vehicle can be used.
►
Restart the vehicle and leave the engine
running.
Tyre inflation pressures are indicated on this label.
► Adjust the pressure using the compressor
(to inflate: set switch B to position "I"; to deflate:
set switch B to position "O" and press button C),
following the vehicle's tyre pressure label.
If, after approximately seven minutes,
this pressure is not reached, this
indicates that the tyre is irreparable; contact a
PEUGEOT dealer or a qualified workshop for
assistance.
► Remove the kit and stow it.
Do not drive more than 125 miles
(200 km) with a repaired tyre; see a
PEUGEOT dealer or a qualified workshop to
have the tyre changed.
Should the pressure of one or more tyres
be adjusted, it is necessary to reinitialise
the under-inflation detection system.
For more information on Tyre under-inflation
detection, refer to the corresponding section.
Page 162 of 244
160
In the event of a breakdown
If your vehicle is fitted with alloy wheels, when
tightening the bolts on fitting, it is normal to
notice that the washers do not come into
contact with the "space-saver" spare wheel.
The wheel is secured by the conical contact
of each bolt.
► Put the wheel in place on the hub.
► Screw in the bolts by hand as far as possible.
►
Pre-tighten the anti-theft bolt using the
wheelbrace 5
fitted with the anti-theft socket 2
(according to equipment).
►
Pre-tighten the other bolts using wheelbrace
5
only.
► Lower the vehicle again fully .
► Unwind jack 6
to lower and detach it.
► Tighten the anti-theft bolt using the
wheelbrace 5 fitted with the anti-theft socket 2
(according to equipment).
►
T
ighten the other bolts using wheelbrace 5
only.
►
Refit
the bolt cover(s) (depending on version).
►
Store the tools in the support box.
After changing a wheel
To store the punctured wheel in the boot
correctly, first remove the central cover.
When using the "space-saver" type spare
wheel, do not exceed 50 mph (80 km/h).
Have the tightening of the bolts and the
pressure of the spare wheel checked by a
PEUGEOT dealer or a qualified workshop
without delay.
Have the punctured wheel repaired and
replace it on the vehicle as soon as possible.
If your vehicle has tyre under-inflation
detection, check the tyre pressures and
reinitialise the system.
For more information on Tyre under-inflation
detection, refer to the corresponding section.
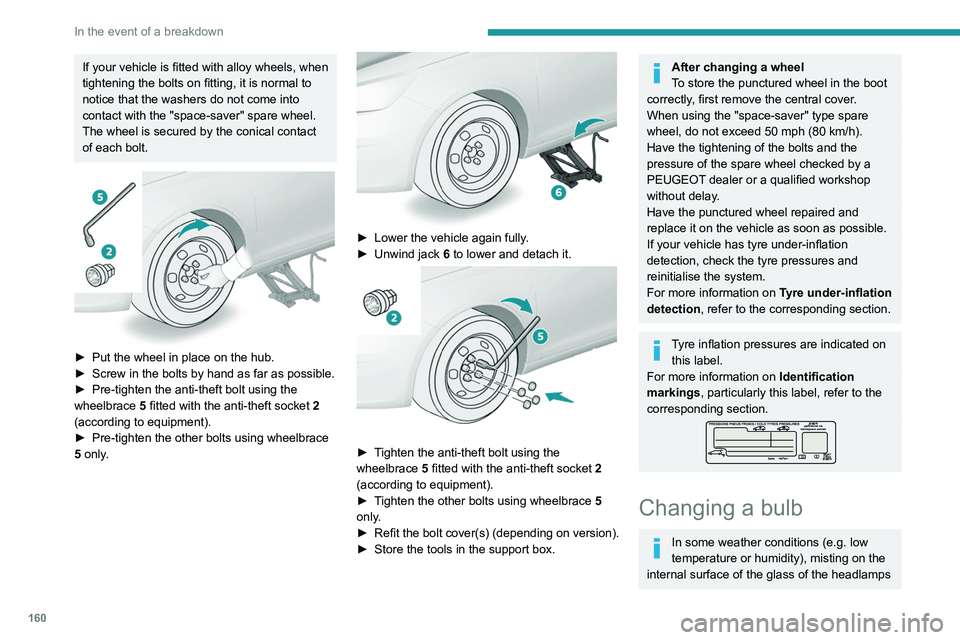
Tyre inflation pressures are indicated on this label.
For more information on Identification
markings, particularly this label, refer to the
corresponding section.
Changing a bulb
In some weather conditions (e.g. low
temperature or humidity), misting on the
internal surface of the glass of the headlamps
and rear lamps is normal, and will disappear
after the lamps have been on for a few
minutes.
The headlamps have polycarbonate lenses with a protective coating:
– Do not clean them with a dry or abrasive
cloth, nor with detergent or solvent
products.
– Use a sponge and soapy water or a pH
neutral product.
– When using a high-pressure washer on
persistent marks, do not keep the lance
directed towards the headlamps, lamps or
their edges for too long, so as not to damage
their protective coating and seals.
Changing a bulb must only be done with
the ignition off and after the headlamp /
lamp has been switched off for several
minutes - risk of serious burns!
Do not touch the bulb directly with your
fingers; use a lint-free cloth.
It is essential only to use anti-ultraviolet
(UV) type bulbs, so as not to damage the
headlamp.
Always replace a failed bulb with a new bulb
of the same type and specification. To avoid
lighting imbalance, replace the bulbs in pairs.
Page 163 of 244
161
In the event of a breakdown
8and rear lamps is normal, and will disappear
after the lamps have been on for a few
minutes.
The headlamps have polycarbonate lenses with a protective coating:
–
Do not clean them with a dry or abrasive
cloth, nor with detergent or solvent
products.
–
Use a sponge and soapy water or a pH
neutral product.
–
When using a high-pressure washer on
persistent marks, do not keep the lance
directed towards the headlamps, lamps or
their edges for too long, so as not to damage
their protective coating and seals.
Changing a bulb must only be done with
the ignition off and after the headlamp /
lamp has been switched off for several
minutes - risk of serious burns!
Do not touch the bulb directly with your
fingers; use a lint-free cloth.
It is essential only to use anti-ultraviolet
(UV) type bulbs, so as not to damage the
headlamp.
Always replace a failed bulb with a new bulb
of the same type and specification. To avoid
lighting imbalance, replace the bulbs in pairs.
Refitting the lamp units
Perform the operations in the reverse
order to dismantling.
Light-emitting diode (LED)
headlamps and lamps
Depending on version, the affected types of
headlamps/lamps are:
–
Full LED technology headlamps.
–
Daytime running lamps/sidelamps.
–
Direction indicator side repeaters.
–
Side spotlamps.
–
Third brake lamp.
–
Rear sidelamps.
If you need to replace this type of bulb,
you must contact a PEUGEOT dealer or
a qualified workshop.
Do not touch LED or Full LED
technology
headlamps - risk of electrocution!
Front lamps
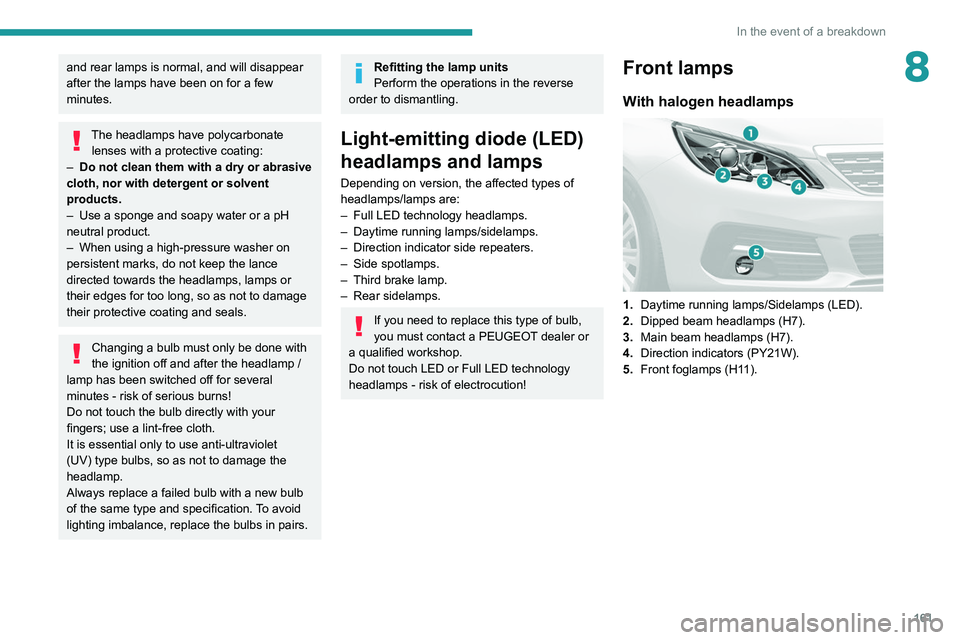
With halogen headlamps
1. Daytime running lamps/Sidelamps (LED).
2. Dipped beam headlamps (H7).
3. Main beam headlamps (H7).
4. Direction indicators (PY21W).
5. Front foglamps (H11).
Page 166 of 244

164
In the event of a breakdown
The direction indicator bulb is located below the
front lamp.
►
Unclip the trim by pulling at the top (notch).
►
Unscrew the bulb holder ¼ of a turn.
►
Replace the bulb.
Rear lamps (hatchback)
1. Sidelamps (light-emitting diodes - LEDs).
2. Reversing lamps (W16W).
3. Direction indicators (PY-21W amber).
4. Brake lamps (light-emitting diodes - LEDs).
5. Foglamps (P21W).
Reversing lamps, direction indicators
(on the wings)
► Open the tailgate and then remove the
access cover .
► Disconnect the lamp unit connector .
► Remove the lamp fixing nut.
►
Extract the lamp unit carefully from the
outside.
►
Unscrew the bulb holder ¼ of a turn and
replace the bulb.
Foglamps (tailgate)
► Open the tailgate then remove the large
plastic cover .
► Unclip the 2 access covers, left and right.
► Unscrew the screws located in each opening.
►
Unclip the boot trim to access the lamp unit
connector
.
►
Disconnect the lamp unit connector
.
►
Remove the lamp unit fixing nut.
► Extract the lamp unit carefully from the
outside.
► Unscrew the bulb holder ¼ of a turn and
replace the bulb.
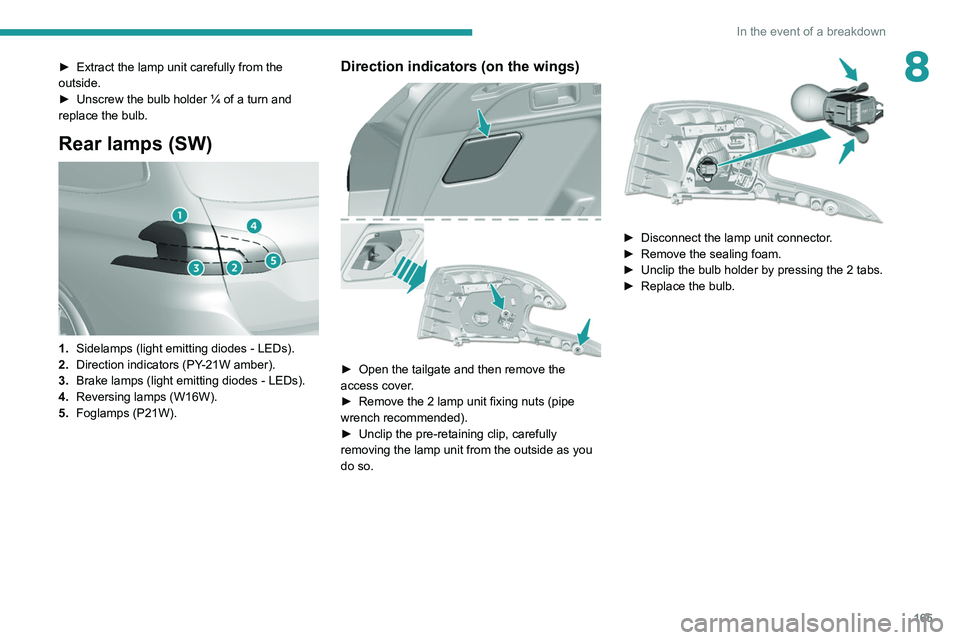
Rear lamps (SW)
1. Sidelamps (light emitting diodes - LEDs).
2. Direction indicators (PY-21W amber).
3. Brake lamps (light emitting diodes - LEDs).
4. Reversing lamps (W16W).
5. Foglamps (P21W).
Page 167 of 244
165
In the event of a breakdown
8► Extract the lamp unit carefully from the
outside.
►
Unscrew the bulb holder ¼ of a turn and
replace the bulb.
Rear lamps (SW)
1. Sidelamps (light emitting diodes - LEDs).
2. Direction indicators (PY-21W amber).
3. Brake lamps (light emitting diodes - LEDs).
4. Reversing lamps (W16W).
5. Foglamps (P21W).
Direction indicators (on the wings)
► Open the tailgate and then remove the
access cover .
►
Remove the 2 lamp unit fixing nuts (pipe
wrench recommended).
►
Unclip the pre-retaining clip, carefully
removing the lamp unit from the outside as you
do so.
► Disconnect the lamp unit connector .
► Remove the sealing foam.
►
Unclip the bulb holder by pressing the 2 tabs.
►
Replace the bulb.