2021 Peugeot 308 steering wheel
[x] Cancel search: steering wheelPage 120 of 244
11 8
Driving
Deactivation/Activation
► Press this button to deactivate/reactivate the
system at any time.
Deactivation is signalled by the lighting of the
indicator lamp in the button.
Malfunction
In the event of a system
malfunction, these warning lamps
come on on the instrument panel, accompanied
by an onscreen message and an audible signal.
Have the system checked by a PEUGEOT
dealer or a qualified workshop.
Blind Spot Monitoring
Refer to the General recommendations on the
use of driving and manoeuvring aids .
Function statusIndicator lamp Display and/or associated
messageComments
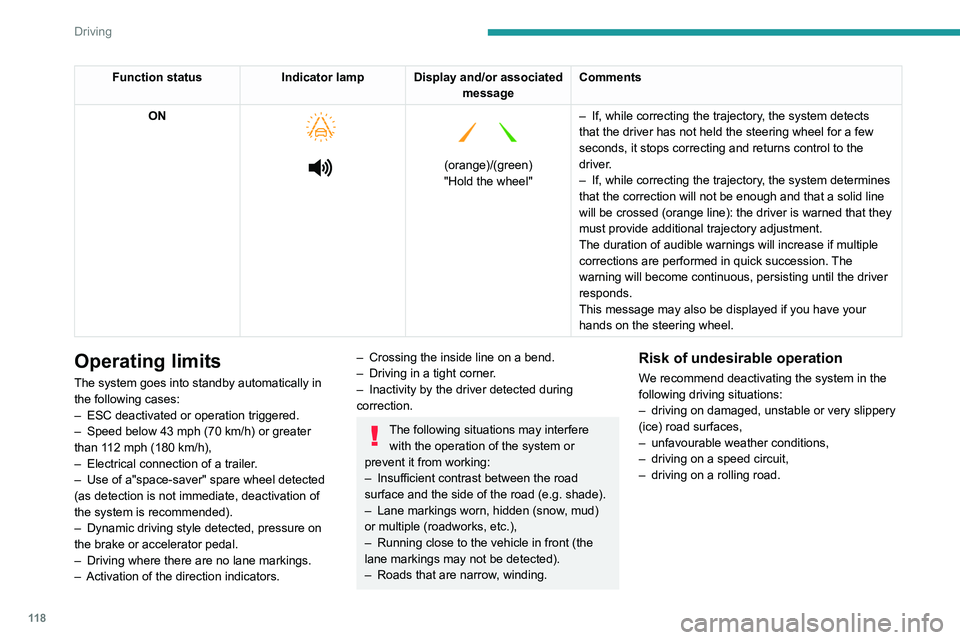
ON
(orange)/(green)
"Hold the wheel" –
If, while correcting the trajectory
, the system detects
that the driver has not held the steering wheel for a few
seconds, it stops correcting and returns control to the
driver.
– If, while correcting the trajectory , the system determines
that the correction will not be enough and that a solid line
will be crossed (orange line): the driver is warned that they
must provide additional trajectory adjustment.
The duration of audible warnings will increase if multiple
corrections are performed in quick succession. The
warning will become continuous, persisting until the driver
responds.
This message may also be displayed if you have your
hands on the steering wheel.
Operating limits
The system goes into standby automatically in
the following cases:
–
ESC deactivated or operation triggered.
–
Speed below 43 mph (70
km/h) or greater
than 112 mph (180
km/h),
–
Electrical connection of a trailer
.
–
Use of a"space-saver" spare wheel detected
(as detection is not immediate, deactivation of
the system is recommended).
–
Dynamic driving style detected, pressure on
the brake or accelerator pedal.
–
Driving where there are no lane markings.
–
Activation of the direction indicators.
– Crossing the inside line on a bend.
– Driving in a tight corner .
–
Inactivity by the driver detected during
correction.
The following situations may interfere with the operation of the system or
prevent it from working:
–
Insufficient contrast between the road
surface and the side of the road (e.g. shade).
–
Lane markings worn, hidden (snow
, mud)
or multiple (roadworks, etc.),
–
Running close to the vehicle in front (the
lane markings may not be detected).
–
Roads that are narrow
, winding.
Risk of undesirable operation
We recommend deactivating the system in the
following driving situations:
–
driving on damaged, unstable or very slippery
(ice) road surfaces,
–
unfavourable weather conditions,
–
driving on a speed circuit,
–
driving on a rolling road.
Page 125 of 244

123
Driving
6Rear view
To activate the camera located on the tailgate,
engage reverse gear and do not exceed a speed
of 6 mph (10 km/h).
The system is deactivated:
–
If a trailer is attached or a bicycle carrier
is fitted on a towing device (vehicle fitted
with a towing device installed in line with the
manufacturer's recommendations).
–
Automatically
, at speeds above approximately
6 mph (10
km/h),
–
Automatically
, if the tailgate is opened.
–
Upon changing out of reverse gear (the image
remains displayed for 7
seconds).
–
By pressing the white arrow in the upper-left
corner of the touch screen.
AUTO mode
This mode is activated by default.
Using sensors in the rear bumper, the automatic
view changes from the rear view (standard) to
the view from above (zoom) as an obstacle is
approached at the level of the red line (less than
30
cm) during a manoeuvre.
Standard view
The area behind the vehicle is displayed on the
screen. The blue lines
1 represent the width of your
vehicle, with the mirrors unfolded; their direction
changes according to the position of the steering
wheel.
The red line 2 represents a distance of 30 cm
from the rear bumper; the two blue lines 3 and 4
represent 1 m and 2 m, respectively.
This view is available with AUTO mode or in the
view selection menu.
Zoom view
The camera records the vehicle's surroundings
during the manoeuvre in order to create a
view from above the rear of the vehicle in its
near surroundings, allowing the vehicle to be
manoeuvred around nearby obstacles.
This view is available with AUTO mode or in the
view selection menu.
Page 126 of 244

124
Driving
Obstacles may appear further away than
they actually are.
It is important to monitor the sides of the
vehicle during the manoeuvre, using the
mirrors.
Parking sensors also provide additional
information about the area around the vehicle.
180° view
The 180° view facilitates reversing out of a
parking space, making it possible to see the
approach of vehicles, pedestrians and cyclists.
This view is not recommended for carrying out a
complete manoeuvre.
It features 3 areas: left A, centre B and right C.
This view is only available via the view selection
menu.
Park Assist
Refer to the General recommendations on the
use of driving and manoeuvring aids .
This system provides active parking
assistance:
it detects a parking space then operates the
steering system to park in this space.
With a manual gearbox, the driver manages the
accelerator, brakes, gears and clutch.
With an automatic gearbox (EAT6/EAT8), the
driver manages the accelerator, brakes and
gears.
During phases of entry into and exit from a
parking space, the system provides visual and
audible information to the driver in order to make
the manoeuvres safe. Several forward and
reverse manoeuvres may be required.
At any time, the driver can take back control by
holding the steering wheel.
In some circumstances, the sensors may
not detect small obstacles located in their
blind spots.
The Park Assist system cannot work with the engine off.
The Park Assist system provides assistance for
the following manoeuvres:
A. Entry into a "parallel" parking space.
B. Exit from a "parallel" parking space.
C. Entry into a "bay" parking space.
During manoeuvring phases, the steering
wheel performs rapid turns: do not hold
the steering wheel, do not put your hands
between the spokes of the steering wheel.
Watch out for any object that could interfere
with the manoeuvre (loose clothing, scarves,
ties, etc.)- risk of injury!
When Park Assist is activated, it prevents
Stop & Start from going into STOP mode.
In STOP mode, activation of Park Assist
restarts the engine.
The Park Assist system takes control of the steering for a maximum of 4
manoeuvring cycles. The function is
deactivated after these 4 cycles. If you think
that your vehicle is not positioned correctly,
Page 127 of 244
125
Driving
6you should then take over the steering to
finish the manoeuvre.
The sequence of manoeuvres and the driving instructions are displayed on the
touch screen.
Assistance is activated: the display of this symbol and a speed limit indicate
that the steering manoeuvres are controlled
by the system: do not touch the steering
wheel.
Assistance is deactivated: the display of this symbol indicates that the
steering manoeuvres are no longer controlled
by the system: you must take over the
steering.
You should always check the surroundings of your vehicle before
starting a manoeuvre.
The parking sensors function is not available during parking space
measurement. It intervenes later when
manoeuvring to warn you that your vehicle is
approaching an obstacle: the audible signal
becomes continuous when the obstacle is
less than thirty centimetres away.
If you have deactivated the parking sensors,
they are automatically reactivated during
assisted parking manoeuvres.
Activation of Park Assist deactivates the Blind Spot Monitoring.
Operation
Assistance with "parallel" parking manoeuvres
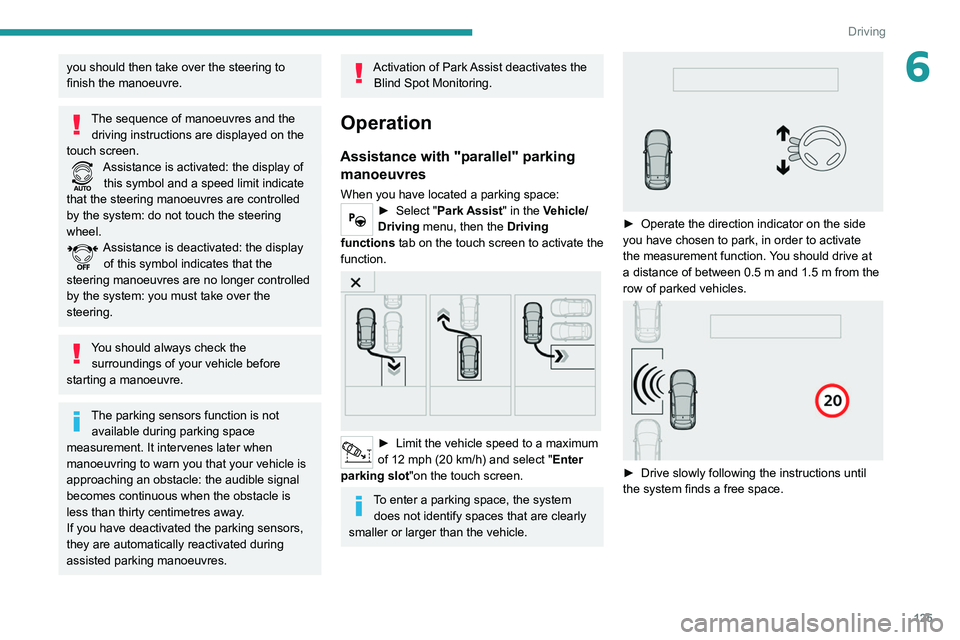
When you have located a parking space:► Select "Park Assist" in the Vehicle/
Driving menu, then the Driving
functions tab on the touch screen to activate the
function.
► Limit the vehicle speed to a maximum
of 12 mph (20 km/h) and select " Enter
parking slot "on the touch screen.
To enter a parking space, the system
does not identify spaces that are clearly
smaller or larger than the vehicle.
► Operate the direction indicator on the side
you have chosen to park, in order to activate
the measurement function.
You should drive at
a distance of between 0.5
m and 1.5 m from the
row of parked vehicles.
► Drive slowly following the instructions until
the system finds a free space.
Page 128 of 244
126
Driving
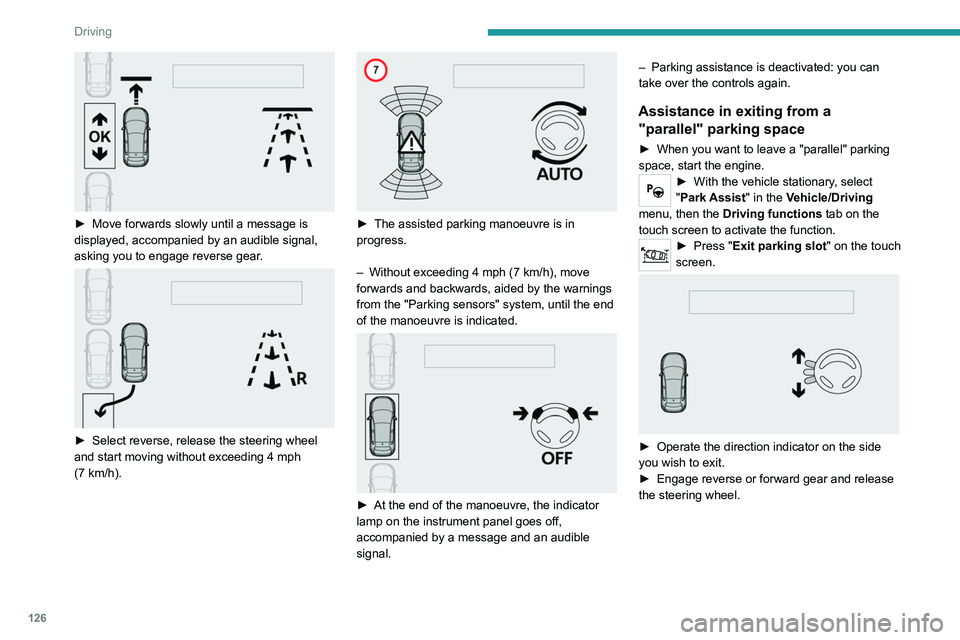
► Move forwards slowly until a message is
displayed, accompanied by an audible signal,
asking you to engage reverse gear
.
► Select reverse, release the steering wheel
and start moving without exceeding 4 mph
(7
km/h).
► The assisted parking manoeuvre is in
progress.
–
Without exceeding 4 mph (7
km/h), move
forwards and backwards, aided by the warnings
from the "Parking sensors" system, until the end
of the manoeuvre is indicated.
► At the end of the manoeuvre, the indicator
lamp on the instrument panel goes off,
accompanied by a message and an audible
signal. –
Parking assistance is deactivated: you can
take over the controls again.
Assistance in exiting from a
"parallel" parking space
► When you want to leave a "parallel" parking
space, start the engine.
► With the vehicle stationary , select
"Park Assist" in the Vehicle/Driving
menu, then the Driving functions tab on the
touch screen to activate the function.
► Press " Exit parking slot " on the touch
screen.
► Operate the direction indicator on the side
you wish to exit.
►
Engage reverse or forward gear and release
the steering wheel.
Page 130 of 244
128
Driving
To switch the system off for a prolonged period,
contact a PEUGEOT dealer or a qualified
workshop.
Malfunctions
This warning lamp lights up on the instrument panel and a message appears,
accompanied by an audible signal.
If the lateral distance between your
vehicle and the space is too great, the
system may not be able to measure the
space.
Any object exceeding the dimensions of the
vehicle is not taken into account by the Park
Assist system during a manoeuvre.
In bad weather or in winter, ensure that
the sensors are not covered by dirt, ice
or snow.
In the event of a fault, have the system
checked by a PEUGEOT dealer or a qualified
workshop.
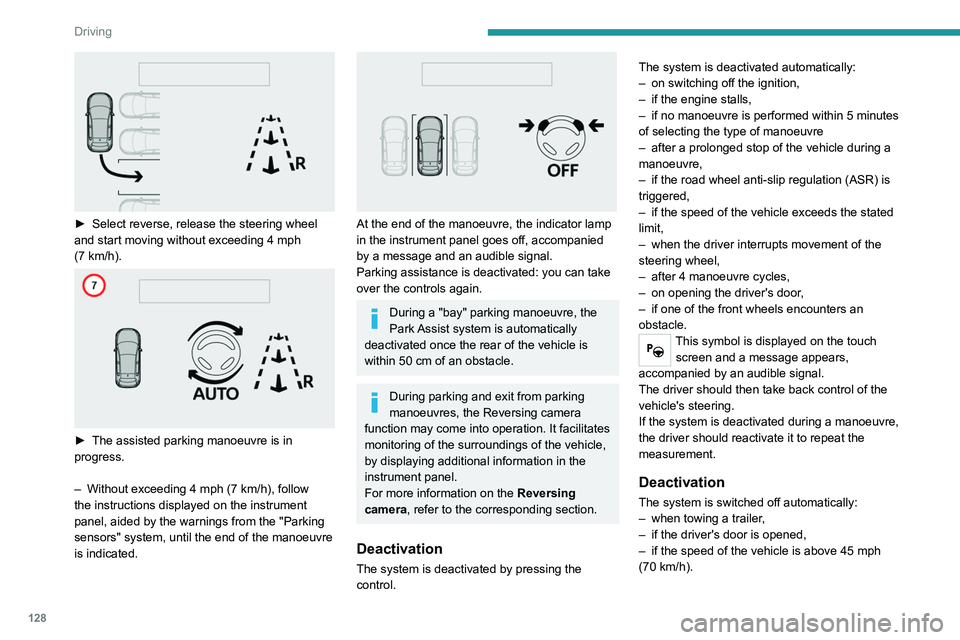
► Select reverse, release the steering wheel
and start moving without exceeding 4 mph
(7
km/h).
► The assisted parking manoeuvre is in
progress.
–
Without exceeding 4 mph (7
km/h), follow
the instructions displayed on the instrument
panel, aided by the warnings from the "Parking
sensors" system, until the end of the manoeuvre
is indicated.
At the end of the manoeuvre, the indicator lamp
in the instrument panel goes off, accompanied
by a message and an audible signal.
Parking assistance is deactivated: you can take
over the controls again.
During a "bay" parking manoeuvre, the
Park Assist system is automatically
deactivated once the rear of the vehicle is
within 50
cm of an obstacle.
During parking and exit from parking
manoeuvres, the Reversing camera
function may come into operation. It facilitates
monitoring of the surroundings of the vehicle,
by displaying additional information in the
instrument panel.
For more information on the Reversing
camera , refer to the corresponding section.
Deactivation
The system is deactivated by pressing the
control. The system is deactivated automatically:
–
on switching off the ignition,
–
if the engine stalls,
–
if no manoeuvre is performed within 5 minutes
of selecting the type of manoeuvre
–
after a prolonged stop of the vehicle during a
manoeuvre,
–
if the road wheel anti-slip regulation (ASR) is
triggered,
–
if the speed of the vehicle exceeds the stated
limit,
–
when the driver interrupts movement of the
steering wheel,
–
after 4 manoeuvre cycles,
–
on opening the driver's door
,
–
if one of the front wheels encounters an
obstacle.
This symbol is displayed on the touch screen and a message appears,
accompanied by an audible signal.
The driver should then take back control of the
vehicle's steering.
If the system is deactivated during a manoeuvre,
the driver should reactivate it to repeat the
measurement.
Deactivation
The system is switched off automatically:
– when towing a trailer ,
–
if the driver's door is opened,
–
if the speed of the vehicle is above 45 mph
(70 km/h).
Page 174 of 244
172
In the event of a breakdown
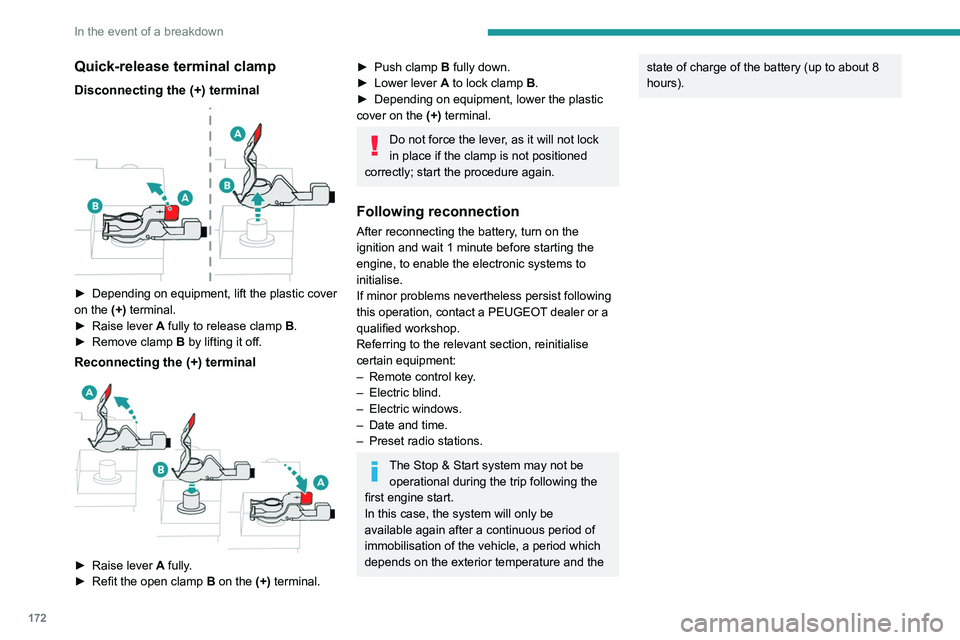
Quick-release terminal clamp
Disconnecting the (+) terminal
► Depending on equipment, lift the plastic cover
on the (+) terminal.
►
Raise lever
A
fully to release clamp
B
.
►
Remove clamp
B
by lifting it off.
Reconnecting the (+) terminal
► Raise lever A fully.
► Refit the open clamp B on the (+) terminal.
► Push clamp B fully down.
► Lower lever A to lock clamp B.
►
Depending on equipment, lower the plastic
cover on the
(+) terminal.
Do not force the lever, as it will not lock
in place if the clamp is not positioned
correctly; start the procedure again.
Following reconnection
After reconnecting the battery, turn on the
ignition and wait 1 minute before starting the
engine, to enable the electronic systems to
initialise.
If minor problems nevertheless persist following
this operation, contact a PEUGEOT dealer or a
qualified workshop.
Referring to the relevant section, reinitialise
certain equipment:
–
Remote control key
.
–
Electric blind.
–
Electric windows.
–
Date and time.
–
Preset radio stations.
The Stop & Start system may not be operational during the trip following the
first engine start.
In this case, the system will only be
available again after a continuous period of
immobilisation of the vehicle, a period which
depends on the exterior temperature and the
state of charge of the battery (up to about 8
hours).Towing the vehicle
General recommendations
Observe the legislation in force in the country where you are driving.
Ensure that the weight of the towing vehicle is higher than that of the \
towed vehicle.
The driver must remain at the wheel of the towed vehicle and must have a\
valid driving licence.
When towing a vehicle with all four wheels on the ground, always use an \
approved towbar; ropes and straps are prohibited.
The towing vehicle must move off gently.
When the vehicle is towed with its engine off, there is no longer braking and steering assistance.
A professional recovery service must be called if:
– broken down on a motorway or main road;
– not possible to put the gearbox into neutral, unlock the steering, or re\
lease the parking brake;
– not possible to tow a vehicle with an automatic gearbox, with the engine\
running;
– towing with only two wheels on the ground;
– four-wheel drive vehicle;
– no approved towbar available.
Towing constraints
Type of vehicle
(engine / gearbox) Front wheels on the
ground Rear wheels on the
ground Flatbed
4 wheels on the ground
with towbar
Internal combustion / Manual
Internal combustion / Automatic
In case of battery or electric parking brake failure, it is essential to call a p
rofessional using flatbed recovery vehicles (excluding manual gearbox).
Page 175 of 244
173
In the event of a breakdown
8Towing the vehicle
General recommendations
Observe the legislation in force in the country where you are driving.
Ensure that the weight of the towing vehicle is higher than that of the \
towed vehicle.
The driver must remain at the wheel of the towed vehicle and must have a\
valid driving licence.
When towing a vehicle with all four wheels on the ground, always use an \
approved towbar; ropes and straps are prohibited.
The towing vehicle must move off gently.
When the vehicle is towed with its engine off, there is no longer braking and steering assistance.
A professional recovery service must be called if:
– broken down on a motorway or main road;
–
not possible to put the gearbox into neutral, unlock the steering, or re\
lease the parking brake;
–
not possible to tow a vehicle with an automatic gearbox, with the engine\
running;
–
towing with only two wheels on the ground;
–
four-wheel drive vehicle;
–
no approved towbar available.
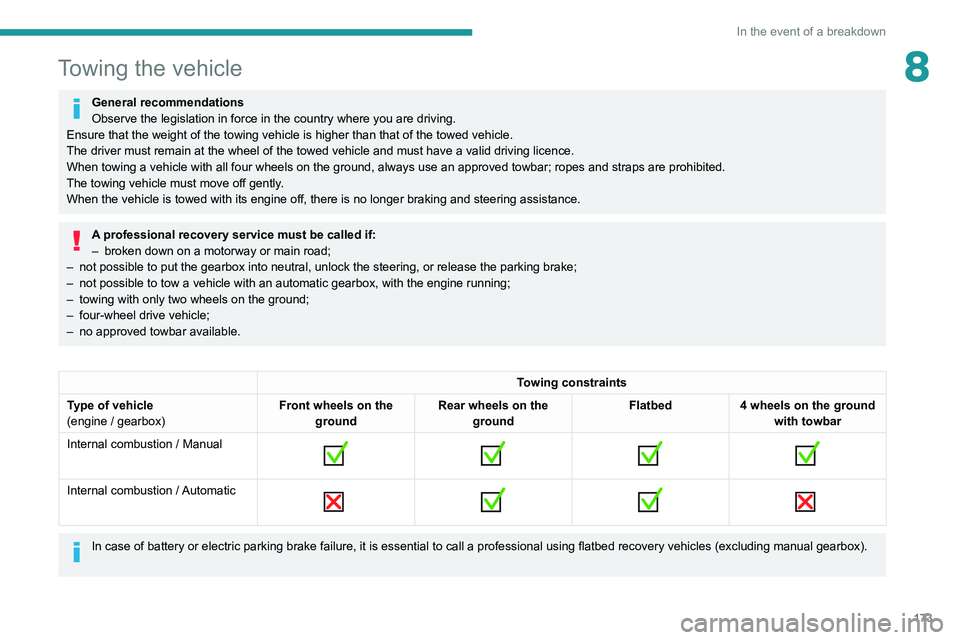
Towing constraints
Type of vehicle
(engine / gearbox) Front wheels on the
ground Rear wheels on the
ground Flatbed
4 wheels on the ground
with towbar
Internal combustion / Manual
Internal combustion / Automatic
In case of battery or electric parking brake failure, it is essential to call a p
rofessional using flatbed recovery vehicles (excluding manual gearbox).