2021 Peugeot 308 towing
[x] Cancel search: towingPage 123 of 244

121
Driving
6Parking sensors
Refer to the General recommendations on the
use of driving and manoeuvring aids.
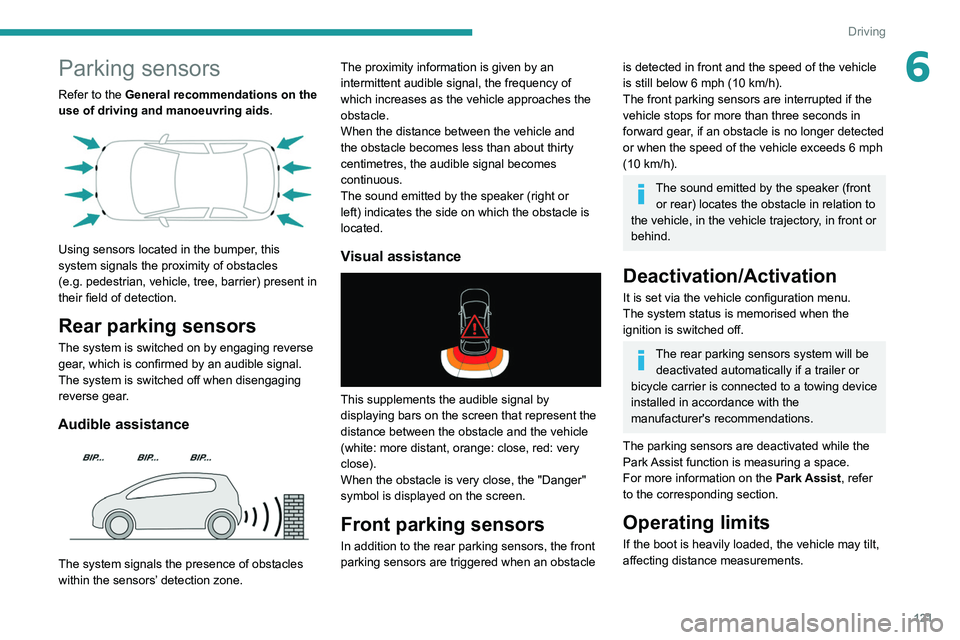
Using sensors located in the bumper, this
system signals the proximity of obstacles
(e.g.
pedestrian, vehicle, tree, barrier) present in
their field of detection.
Rear parking sensors
The system is switched on by engaging reverse
gear, which is confirmed by an audible signal.
The system is switched off when disengaging
reverse gear.
Audible assistance
The system signals the presence of obstacles
within the sensors’ detection zone. The proximity information is given by an
intermittent audible signal, the frequency of
which increases as the vehicle approaches the
obstacle.
When the distance between the vehicle and
the obstacle becomes less than about thirty
centimetres, the audible signal becomes
continuous.
The sound emitted by the speaker (right or
left) indicates the side on which the obstacle is
located.
Visual assistance
This supplements the audible signal by
displaying bars on the screen that represent the
distance between the obstacle and the vehicle
(white: more distant, orange: close, red: very
close).
When the obstacle is very close, the "Danger"
symbol is displayed on the screen.
Front parking sensors
In addition to the rear parking sensors, the front
parking sensors are triggered when an obstacle
is detected in front and the speed of the vehicle
is still below 6 mph (10
km/h).
The front parking sensors are interrupted if the
vehicle stops for more than three seconds in
forward gear, if an obstacle is no longer detected
or when the speed of the vehicle exceeds 6
mph
(10
km/h).
The sound emitted by the speaker (front or rear) locates the obstacle in relation to
the vehicle, in the vehicle trajectory, in front or
behind.
Deactivation/Activation
It is set via the vehicle configuration menu.
The system status is memorised when the
ignition is switched off.
The rear parking sensors system will be deactivated automatically if a trailer or
bicycle carrier is connected to a towing device
installed in accordance with the
manufacturer's recommendations.
The parking sensors are deactivated while the
Park Assist function is measuring a space.
For more information on the Park Assist, refer
to the corresponding section.
Operating limits
If the boot is heavily loaded, the vehicle may tilt,
affecting distance measurements.
Page 124 of 244

122
Driving
Rear view
To activate the camera located on the tailgate,
engage reverse gear and do not exceed a speed
of 6 mph (10 km/h).
The system is deactivated:
– If a trailer is attached or a bicycle carrier
is fitted on a towing device (vehicle fitted
with a towing device installed in line with the
manufacturer's recommendations).
– Automatically, at speeds above approximately
6 mph (10 km/h),
– Automatically, if the tailgate is opened.
– Upon changing out of reverse gear (the image
remains displayed for 7 seconds).
– By pressing the white arrow in the upper-left
corner of the touch screen.
Malfunction
In the event of a malfunction when
changing into reverse, this warning lamp
comes on on the instrument panel, accompanied
by an onscreen message and an audible signal
(short beep).
Contact a PEUGEOT dealer or a qualified
workshop to have the system checked.
Visiopark 1
Refer to the General recommendations on the
use of driving and manoeuvring aids .
As soon as reverse gear is engaged with the
engine running, this system displays views of
your vehicle’s close surroundings on the touch
screen using a camera located at the rear of the
vehicle.
The screen is divided into two parts with a
contextual view and a view from above the
vehicle in its close surroundings.
The parking sensors supplement the information
on the view from above the vehicle.
Various contextual views may be displayed:
–
Standard view
.
–
180° view
.
–
Zoom view
.
AUTO mode is activated by default.
In this mode, the system chooses the best view
to display
(standard or zoom).
You can change the type of view at any time
during a manoeuvre.
The system status is not saved when the ignition
is switched off.
Principle of operation
Using the rear camera, the vehicle's close
surroundings are recorded during manoeuvres
at low speed.
An image from above your vehicle in its close
surroundings is reconstructed (represented
between the brackets) in real time and as the
manoeuvre progresses.
It facilitates the alignment of your vehicle when
parking and allows obstacles close to the vehicle
to be seen. It is automatically deleted if the
vehicle remains stationary for too long.
Page 125 of 244

123
Driving
6Rear view
To activate the camera located on the tailgate,
engage reverse gear and do not exceed a speed
of 6 mph (10 km/h).
The system is deactivated:
–
If a trailer is attached or a bicycle carrier
is fitted on a towing device (vehicle fitted
with a towing device installed in line with the
manufacturer's recommendations).
–
Automatically
, at speeds above approximately
6 mph (10
km/h),
–
Automatically
, if the tailgate is opened.
–
Upon changing out of reverse gear (the image
remains displayed for 7
seconds).
–
By pressing the white arrow in the upper-left
corner of the touch screen.
AUTO mode
This mode is activated by default.
Using sensors in the rear bumper, the automatic
view changes from the rear view (standard) to
the view from above (zoom) as an obstacle is
approached at the level of the red line (less than
30
cm) during a manoeuvre.
Standard view
The area behind the vehicle is displayed on the
screen. The blue lines
1 represent the width of your
vehicle, with the mirrors unfolded; their direction
changes according to the position of the steering
wheel.
The red line 2 represents a distance of 30 cm
from the rear bumper; the two blue lines 3 and 4
represent 1 m and 2 m, respectively.
This view is available with AUTO mode or in the
view selection menu.
Zoom view
The camera records the vehicle's surroundings
during the manoeuvre in order to create a
view from above the rear of the vehicle in its
near surroundings, allowing the vehicle to be
manoeuvred around nearby obstacles.
This view is available with AUTO mode or in the
view selection menu.
Page 130 of 244

128
Driving
To switch the system off for a prolonged period,
contact a PEUGEOT dealer or a qualified
workshop.
Malfunctions
This warning lamp lights up on the instrument panel and a message appears,
accompanied by an audible signal.
If the lateral distance between your
vehicle and the space is too great, the
system may not be able to measure the
space.
Any object exceeding the dimensions of the
vehicle is not taken into account by the Park
Assist system during a manoeuvre.
In bad weather or in winter, ensure that
the sensors are not covered by dirt, ice
or snow.
In the event of a fault, have the system
checked by a PEUGEOT dealer or a qualified
workshop.
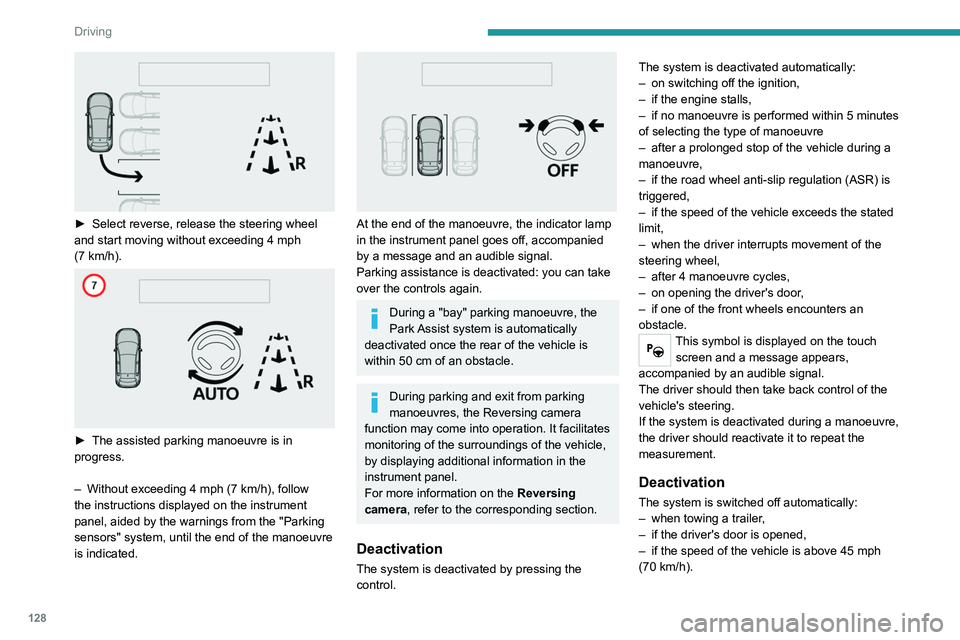
► Select reverse, release the steering wheel
and start moving without exceeding 4 mph
(7
km/h).
► The assisted parking manoeuvre is in
progress.
–
Without exceeding 4 mph (7
km/h), follow
the instructions displayed on the instrument
panel, aided by the warnings from the "Parking
sensors" system, until the end of the manoeuvre
is indicated.
At the end of the manoeuvre, the indicator lamp
in the instrument panel goes off, accompanied
by a message and an audible signal.
Parking assistance is deactivated: you can take
over the controls again.
During a "bay" parking manoeuvre, the
Park Assist system is automatically
deactivated once the rear of the vehicle is
within 50
cm of an obstacle.
During parking and exit from parking
manoeuvres, the Reversing camera
function may come into operation. It facilitates
monitoring of the surroundings of the vehicle,
by displaying additional information in the
instrument panel.
For more information on the Reversing
camera , refer to the corresponding section.
Deactivation
The system is deactivated by pressing the
control. The system is deactivated automatically:
–
on switching off the ignition,
–
if the engine stalls,
–
if no manoeuvre is performed within 5 minutes
of selecting the type of manoeuvre
–
after a prolonged stop of the vehicle during a
manoeuvre,
–
if the road wheel anti-slip regulation (ASR) is
triggered,
–
if the speed of the vehicle exceeds the stated
limit,
–
when the driver interrupts movement of the
steering wheel,
–
after 4 manoeuvre cycles,
–
on opening the driver's door
,
–
if one of the front wheels encounters an
obstacle.
This symbol is displayed on the touch screen and a message appears,
accompanied by an audible signal.
The driver should then take back control of the
vehicle's steering.
If the system is deactivated during a manoeuvre,
the driver should reactivate it to repeat the
measurement.
Deactivation
The system is switched off automatically:
– when towing a trailer ,
–
if the driver's door is opened,
–
if the speed of the vehicle is above 45 mph
(70 km/h).
Page 136 of 244

134
Practical information
Towing device
Load distribution
► Distribute the load in the trailer so that the
heaviest items are as close as possible to the
axle, and the nose weight approaches the
maximum permitted without exceeding it.
Air density decreases with altitude, thus reducing
engine performance.
The maximum towable load
must be reduced by 10% per 1,000
metres of
altitude.
Use genuine towing devices and their
wiring harnesses approved by
PEUGEOT. We recommend having them
fitted by a PEUGEOT dealer or a qualified
workshop.
If not fitted by a PEUGEOT dealer, they must
still be fitted in accordance with the vehicle
manufacturer's instructions.
Certain driving or manoeuvring aid functions
are automatically deactivated while an
approved towing system is in use.
Comply with the maximum authorised
towable weight, as indicated on your
vehicle's registration certificate, on the
manufacturer's label and in the Technical
data section of this guide.
Complying with the maximum authorised
nose weight (towball weight) also includes
the use of accessories (bicycle carriers,
tow boxes, etc.).
Observe the legislation in force in the
country where you are driving.
GTi towing
Your vehicle cannot be fitted with a
tow-bar.
Towing device with towball
Before each use
To ensure the towball is correctly fitted,
check the follow points:
Saloon:
–
The green mark on the wheel is in line with
the green mark on the towball.
–
The wheel is in contact with the towball
(position A
).
–
The safety lock is on and the key removed;
the wheel can no longer be operated.
–
The towball must not be able to move in
its carrier; test by attempting to move it with
your hand.
SW :
–
The towball is correctly engaged (position
A
).
–
The safety lock is on and the key removed;
the trigger can no longer be operated.
–
The towball must not be able to move in
its carrier; test by attempting to move it with
your hand.
If the towball is not engaged, the trailer can
become detached -
Accident risk!
During use
Never release the locking system when
a trailer or load carrier is connected to the
towball.
Never exceed the maximum authorised
weight for the vehicle - Gross Train Weight
or GTW.
Always comply with the maximum authorised
load on the towing device: if it is exceeded,
this device may become detached from the
vehicle - risk of an accident!
Check that the trailer lamps work correctly.
Before setting off, check and/or adjust
headlamp beam height.
For more information on Headlamp height
adjustment, refer to the corresponding
section.
Following use
When travelling without a trailer or load
on a towbar-mounted carrier, the towball
must be removed and the protective plug
inserted in the carrier. This measure applies
particularly where the towball might obscure
visibility of the number plate or its lighting.
Blanking plug
In the event of recovery, it is essential to remove
the blanking plug if your vehicle has one.
To do this, contact a PEUGEOT dealer or a
qualified workshop.
The blanking plug behind the lower air intake grille.
Towbar with quickly detachable towball
(hatchback)
Presentation
This genuine towing device can be fitted and
removed with no need for tools.
Page 137 of 244

135
Practical information
7Blanking plug
In the event of recovery, it is essential to remove
the blanking plug if your vehicle has one.
To do this, contact a PEUGEOT dealer or a
qualified workshop.
The blanking plug behind the lower air intake grille.
Towbar with quickly detachable towball
(hatchback)
Presentation
This genuine towing device can be fitted and
removed with no need for tools.
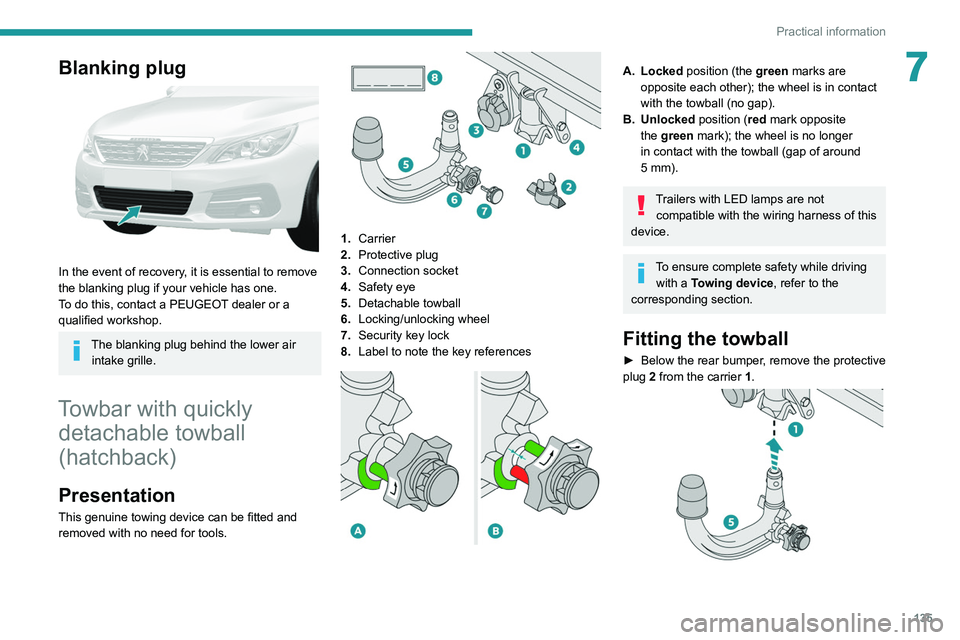
1. Carrier
2. Protective plug
3. Connection socket
4. Safety eye
5. Detachable towball
6. Locking/unlocking wheel
7. Security key lock
8. Label to note the key references
A. Locked position (the green marks are
opposite each other); the wheel is in contact
with the towball (no gap).
B. Unlocked position (red mark opposite the green mark); the wheel is no longer
in contact with the towball (gap of around
5
mm).
Trailers with LED lamps are not compatible with the wiring harness of this
device.
To ensure complete safety while driving with a Towing device , refer to the
corresponding section.
Fitting the towball
► Below the rear bumper , remove the protective
plug 2 from the carrier 1.
Page 139 of 244

137
Practical information
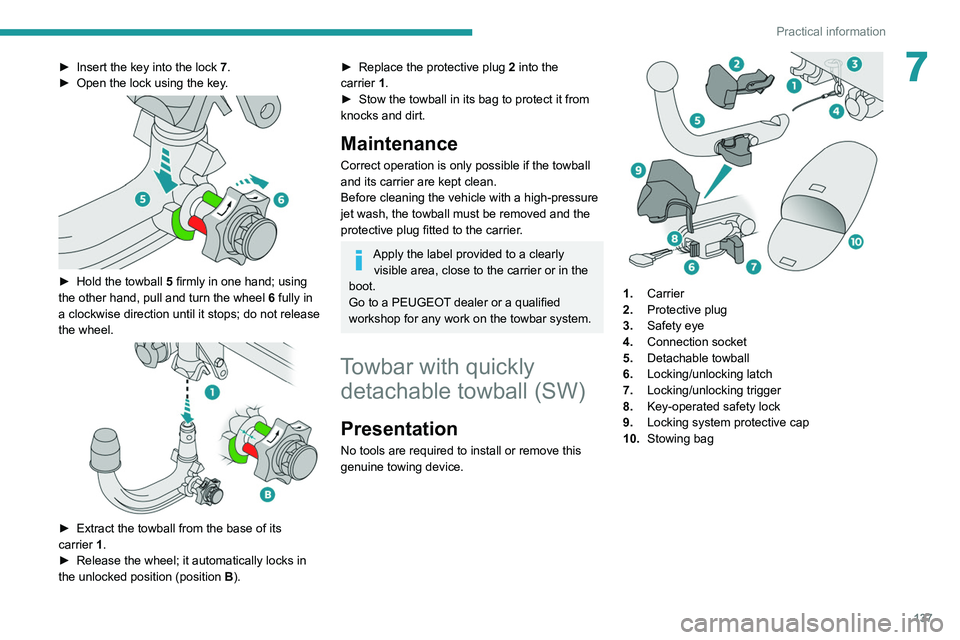
7► Insert the key into the lock 7.
► Open the lock using the key .
► Hold the towball 5 firmly in one hand; using
the other hand, pull and turn the wheel 6 fully in
a clockwise direction until it stops; do not release
the wheel.
► Extract the towball from the base of its
carrier 1.
►
Release the wheel; it automatically locks in
the unlocked position (position B
).
► Replace the protective plug 2 into the
carrier 1.
►
Stow the towball in its bag to protect it from
knocks and dirt.
Maintenance
Correct operation is only possible if the towball
and its carrier are kept clean.
Before cleaning the vehicle with a high-pressure
jet wash, the towball must be removed and the
protective plug fitted to the carrier.
Apply the label provided to a clearly visible area, close to the carrier or in the
boot.
Go to a PEUGEOT dealer or a qualified
workshop for any work on the towbar system.
Towbar with quickly detachable towball (SW)
Presentation
No tools are required to install or remove this
genuine towing device.
1. Carrier
2. Protective plug
3. Safety eye
4. Connection socket
5. Detachable towball
6. Locking/unlocking latch
7. Locking/unlocking trigger
8. Key-operated safety lock
9. Locking system protective cap
10. Stowing bag
Page 140 of 244

138
Practical information
A. Locked position
The latch is positioned to the right.
The trigger is facing toward the rear.
B. Unlocked position
The latch is positioned to the left.
The trigger is facing toward the front.
Observe the legislation in force in the
country in which you are driving.
To find out how much weight your vehicle can tow, consult the "Technical data"
section.
To ensure complete safety while driving with
a Towing device , refer to the corresponding
section.
Maintenance
Correct operation is only possible if the towball
and its carrier are kept clean.
Before cleaning the vehicle with a high-pressure
jet wash, the towball must be removed and the
protective plug fitted to the carrier. Go to a PEUGEOT dealer or a qualified
workshop for any work on the towbar system.
Fitting the towball
► Below the rear bumper
, unclip and remove
the protective plug from the carrier.
► On the towball, push the latch to the left and
hold it in this position.
►
At the same time, push the trigger forwards to
unlock the mechanism (position B
).
►
Insert the end of the towball into the
carrier
and push it as far as it will go.
► Ensure that the two pins are in full contact
with the notches in the carrier , that the trigger
has popped back and the latch has moved to the
right to lock the mechanism (position A).
►
Insert the key into the lock and turn it to the
right.
►
Remove the key from the lock.
►
Install the protective cap and clip it into place
by turning it to the left.
► Attach the trailer to the towball.
► Attach the trailer safety cable to the safety
eye fitted on the towball's carrier
.
► Lift the protective cover on the connection
socket and connect the trailer's electric plug.
Removing the towball
► Disconnect the trailer's electric plug from the
connection socket on the carrier.
► Detach the trailer safety cable from the safety
eye on the carrier.
► Unhitch the trailer from the towball.
► Unclip the protective cap and remove it by
turning it to the right.
► Insert the key into the lock and turn it to the
left.
► Remove the key from the lock.