2021 Peugeot 308 door lock
[x] Cancel search: door lockPage 71 of 244
69
Safety
5It is recommended that children travel
on the rear seats of the vehicle:
–
‘rear facing’ up to the age of 3,
–
‘forward facing’ over the age of 3.
Make sure that the seat belt is correctly
positioned and tightened.
For child seats with a support leg, ensure that
the support leg is in firm and steady contact
with the floor.
Advice
An incorrectly installed child seat compromises the child's safety in the
event of an accident.
Ensure that there is no seat belt or seat belt
buckle under the child seat, as this could
destabilise it.
Remember to fasten the seat belts or the
harness of child seats, keeping the slack
relative to the child's body to a minimum,
even for short journeys.
When installing a child seat using the seat
belt, ensure that the seat belt is tightened
correctly on the child seat and that it secures
the child seat firmly on the seat of the vehicle.
If the passenger seat is adjustable, move it
forwards if necessary.
Remove the head restraint before
installing a child seat with a backrest on a
passenger seat.
Ensure that the head restraint is stored or
attached securely to prevent it from being
thrown around the vehicle in the event of
sharp braking. Refit the head restraint once
the child seat has been removed.
Installing a booster seat
The chest part of the seat belt must be
positioned on the child's shoulder without
touching the neck.
Ensure that the lap part of the seat belt
passes correctly over the child's thighs.
Use a booster seat with backrest, equipped
with a belt guide at shoulder level.
Additional protections
To prevent accidental opening of the
doors and rear windows, use the "Child lock".
Take care not to open the rear windows by
more than one third.
To protect young children from the rays of the
sun, fit side blinds on the rear windows.
As a safety precaution, do not leave:
–
a child alone and unattended in a vehicle,
–
a child or an animal in a vehicle which is
exposed to the sun, with the windows closed,
–
the keys within reach of children inside the
vehicle.
Child seat at the rear
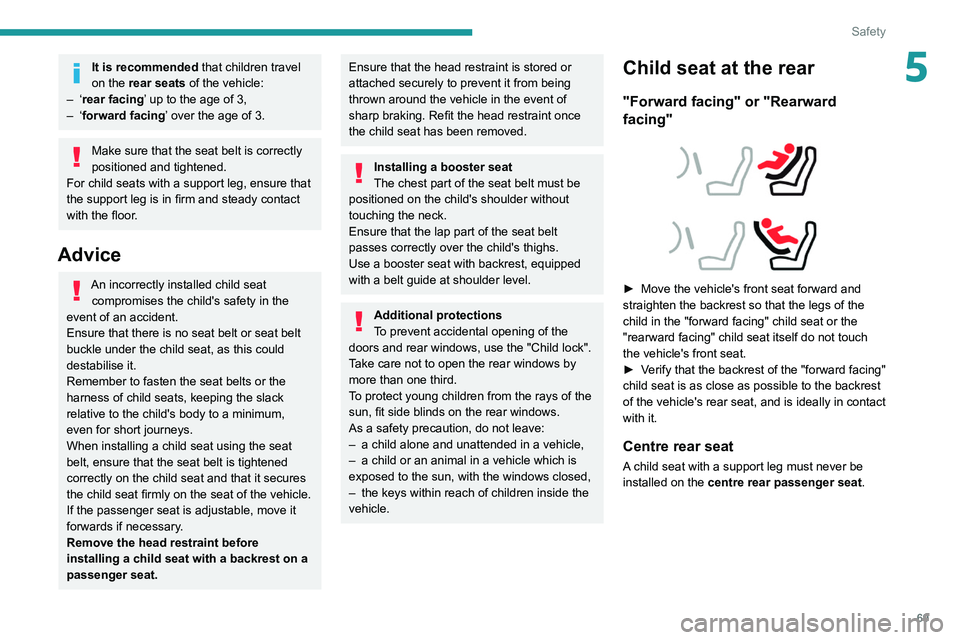
"Forward facing" or "Rearward
facing"
► Move the vehicle's front seat forward and
straighten the backrest so that the legs of the
child in the "forward facing" child seat or the
"rearward facing" child seat itself do not touch
the vehicle's front seat.
►
V
erify that the backrest of the "forward facing"
child seat is as close as possible to the backrest
of the vehicle's rear seat, and is ideally in contact
with it.
Centre rear seat
A child seat with a support leg must never be
installed on the centre rear passenger seat .
Page 80 of 244
78
Safety
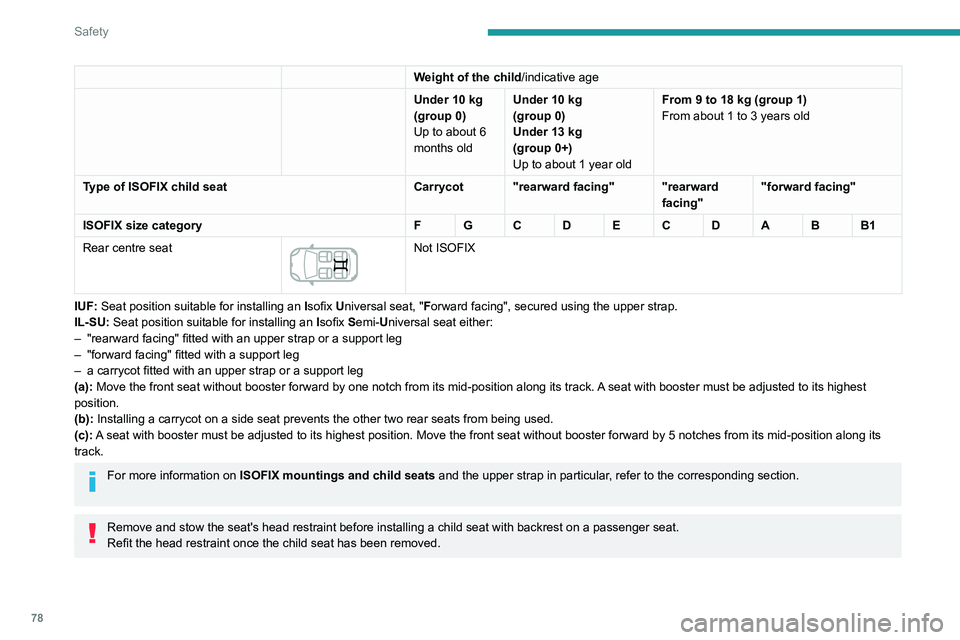
Weight of the child/indicative age
Under 10 kg
(group
0)
Up to about 6
months old Under 10
kg
(group
0)
Under 13
kg
(group
0+)
Up to about 1 year old From 9 to 18
kg (group 1)
From about 1 to 3 years old
Type of ISOFIX child seat Carrycot "rearward facing" "rearward
facing""forward facing"
ISOFIX size category F G C D E C D A B B1
Rear centre seat
Not ISOFIX
IUF: Seat position suitable for installing an Isofix Universal seat, "Forward facing", secured using the upper strap.
IL-SU: Seat position suitable for installing an Isofix Semi-Universal seat either:
–
"rearward facing" fitted with an upper strap or a support leg
–
"forward facing" fitted with a support leg
–
a carrycot fitted with an upper strap or a support leg
(a):
Move the front seat without booster forward by one notch from its mid-p\
osition along its track. A seat with booster must be adjusted to its highest
position.
(b): Installing a carrycot on a side seat prevents the other two rear seats \
from being used.
(c): A seat with booster must be adjusted to its highest position. Move the fr\
ont seat without booster forward by 5 notches from its mid-position alon\
g its
track.
For more information on ISOFIX mountings and child seats and the upper strap in particular, refer to the corresponding section.
Remove and stow the seat's head restraint before installing a child seat\
with backrest on a passenger seat.
Refit the head restraint once the child seat has been removed.
Child lock
This mechanical system prevents opening of a
rear door using its interior control.
The control is located on the edge of each rear
door and locking is independent for each door.
Locking
► Using the built-in key, turn the control as far
as it will go: • to the left on the left-hand rear door,
• to the right on the right-hand rear door.
Unlocking
► Using the built-in key, turn the control as far
as it will go: • to the right on the left-hand rear door,
• to the left on the right-hand rear door.
Page 81 of 244
79
Safety
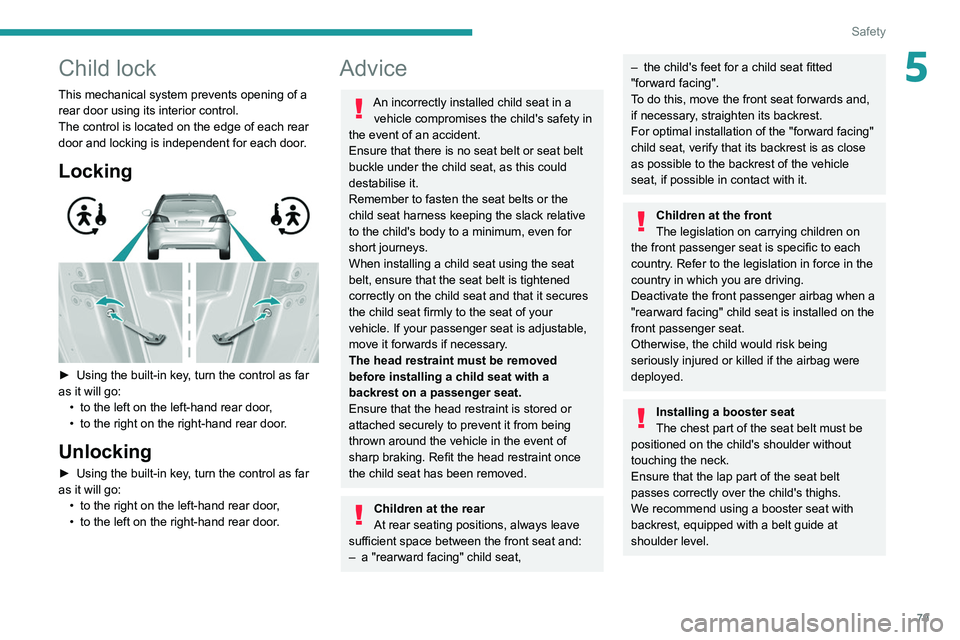
5Child lock
This mechanical system prevents opening of a
rear door using its interior control.
The control is located on the edge of each rear
door and locking is independent for each door.
Locking
► Using the built-in key, turn the control as far
as it will go: •
to the left on the left-hand rear door
,
•
to the right on the right-hand rear door
.
Unlocking
► Using the built-in key, turn the control as far
as it will go: •
to the right on the left-hand rear door
,
•
to the left on the right-hand rear door
.
Advice
An incorrectly installed child seat in a vehicle compromises the child's safety in
the event of an accident.
Ensure that there is no seat belt or seat belt
buckle under the child seat, as this could
destabilise it.
Remember to fasten the seat belts or the
child seat harness keeping the slack relative
to the child's body to a minimum, even for
short journeys.
When installing a child seat using the seat
belt, ensure that the seat belt is tightened
correctly on the child seat and that it secures
the child seat firmly to the seat of your
vehicle. If your passenger seat is adjustable,
move it forwards if necessary.
The head restraint must be removed
before installing a child seat with a
backrest on a passenger seat.
Ensure that the head restraint is stored or
attached securely to prevent it from being
thrown around the vehicle in the event of
sharp braking. Refit the head restraint once
the child seat has been removed.
Children at the rear
At rear seating positions, always leave
sufficient space between the front seat and:
–
a "rearward facing" child seat,
– the child's feet for a child seat fitted
"forward facing".
T
o do this, move the front seat forwards and,
if necessary, straighten its backrest.
For optimal installation of the "forward facing"
child seat, verify that its backrest is as close
as possible to the backrest of the vehicle
seat, if possible in contact with it.
Children at the front
The legislation on carrying children on
the front passenger seat is specific to each
country. Refer to the legislation in force in the
country in which you are driving.
Deactivate the front passenger airbag when a
"rearward facing" child seat is installed on the
front passenger seat.
Otherwise, the child would risk being
seriously injured or killed if the airbag were
deployed.
Installing a booster seat
The chest part of the seat belt must be
positioned on the child's shoulder without
touching the neck.
Ensure that the lap part of the seat belt
passes correctly over the child's thighs.
We recommend using a booster seat with
backrest, equipped with a belt guide at
shoulder level.
Page 82 of 244
80
Safety
Additional protections
To prevent accidental opening of the
doors and rear windows, use the "Child lock".
Take care not to open the rear windows by
more than one third.
To protect young children from direct sunlight,
fit side blinds to the rear windows.
As a safety precaution, do not leave:
–
a child or children alone and unattended in
a vehicle,
–
a child or an animal in a vehicle which is
exposed to the sun, with the windows closed,
–
the keys within reach of children inside the
vehicle.
Page 85 of 244
83
Driving
6Starting with the key
The parking brake must be applied.
►
With a manual gearbox in neutral, fully
depress the clutch pedal.
►
With an automatic gearbox in mode P
or N,
fully depress the brake pedal.
►
Insert the key into the ignition switch.
–
The system recognises the starting code.
►
Unlock
the steering column by simultaneously
turning the steering wheel and the key.
In some cases, you may have to apply
some force to turn the wheels (if the
wheels are turned against a kerb, for
example).
►
With a petrol engine, operate the starter
motor by turning the key to position 3
without
pressing the accelerator pedal, until the engine
starts. As soon as the engine starts, release the
key.
►
With a Diesel engine, turn the key to position
2
, ignition on, to operate the engine preheating
system.
► Wait until this warning lamp goes off in
the instrument panel, then turn the key to
position 3 without pressing the accelerator pedal,
to operate the starter motor until the engine
starts. As soon as the engine starts, release the
key.
In wintry conditions, the warning lamp
may stay on for a longer period.
When the engine is hot, the warning lamp
does not come on.
If the engine does not start straight away,
switch off the ignition.
Wait a few seconds before operating the
starter motor again. If the engine does not
start after several attempts, do not keep
trying: you risk damaging the starter motor
and the engine.
Contact a PEUGEOT dealer or a qualified
workshop.
In mild conditions, do not leave the
engine to warm up while stationary, but
move off straight away and drive at moderate
speed.
Never leave the engine running in an
enclosed area without adequate
ventilation: internal combustion engines emit
toxic exhaust gases, such as carbon
monoxide. Danger of poisoning and death!
In very severe wintry conditions (temperature
below -23°C), the engine should be left to
idle for 4 minutes before moving off to ensure
the correct operation and service life of the
mechanical parts of your vehicle, engine and
gearbox.
Switching off using the key
► Immobilise the vehicle.
► T urn the key fully towards you to position 1
(Stop).
►
Remove the key from the ignition switch.
►
T
o lock the steering column, turn the steering
wheel until it locks.
To facilitate unlocking of the steering column, it is recommended that the
wheels be returned to the straight ahead
position before switching off the engine.
► Check that the parking brake is
correctly applied, particularly on sloping
ground.
–
With a manual parking brake, the lever must
be pulled up.
– With an electric parking brake, the
indicator lamp in the control lever must be
on.
Never switch off the ignition before the
complete immobilisation of the vehicle.
When leaving the vehicle, remove the
key and lock the doors.
Switching off the engine leads to a loss
of braking assistance.
Avoid attaching heavy objects to the key or the remote control, which would weigh
Page 87 of 244
85
Driving
6► Press the "START/STOP" button; the
instrument panel comes on but the engine does
not start.
►
Press the button again to switch off the
ignition and allow the vehicle to be locked.
With the ignition on, the system
automatically goes into energy economy
mode to maintain an adequate state of charge
in the battery.
Key not detected
Back-up starting
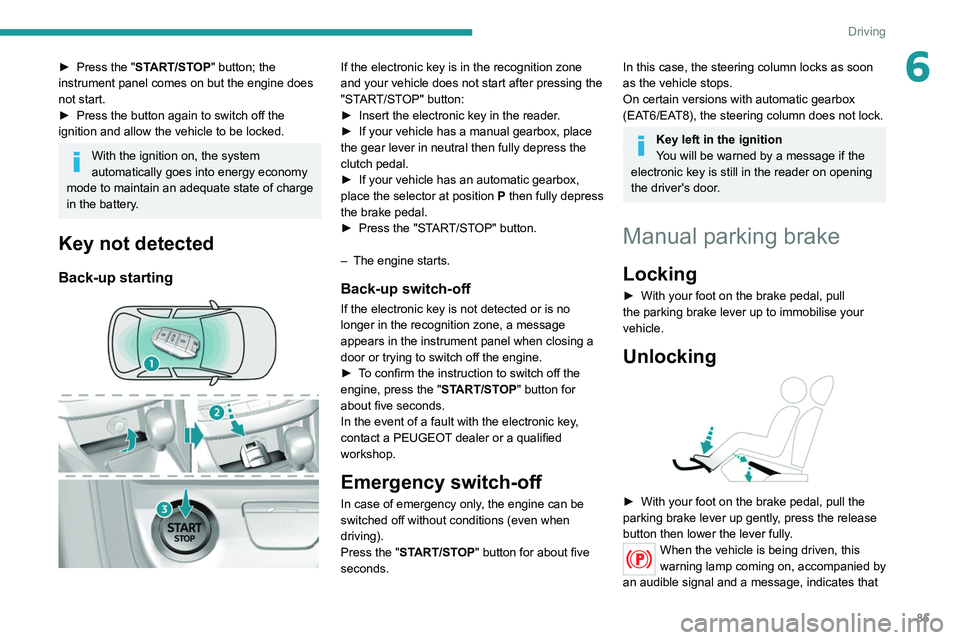
If the electronic key is in the recognition zone
and your vehicle does not start after pressing the
"START/STOP" button:
►
Insert the electronic key in the reader
.
►
If your vehicle has a manual gearbox, place
the gear lever in neutral then fully depress the
clutch pedal.
►
If your vehicle has an automatic gearbox,
place the selector at position
P then fully depress
the brake pedal.
►
Press the "ST
ART/STOP" button.
–
The engine starts.
Back-up switch-off
If the electronic key is not detected or is no
longer in the recognition zone, a message
appears in the instrument panel when closing a
door or trying to switch off the engine.
►
T
o confirm the instruction to switch off the
engine, press the " START/STOP" button for
about five seconds.
In the event of a fault with the electronic key,
contact a PEUGEOT dealer or a qualified
workshop.
Emergency switch-off
In case of emergency only, the engine can be
switched off without conditions (even when
driving).
Press the "START/STOP" button for about five
seconds.
In this case, the steering column locks as soon
as the vehicle stops.
On certain versions with automatic gearbox
(EAT6/EAT8), the steering column does not lock.
Key left in the ignition
You will be warned by a message if the
electronic key is still in the reader on opening
the driver's door.
Manual parking brake
Locking
► With your foot on the brake pedal, pull
the parking brake lever up to immobilise your
vehicle.
Unlocking
► With your foot on the brake pedal, pull the
parking brake lever up gently , press the release
button then lower the lever fully.
When the vehicle is being driven, this
warning lamp coming on, accompanied by
an audible signal and a message, indicates that
Page 90 of 244
88
Driving
Hill start assist
System which keeps your vehicle immobilised
temporarily (approximately 2 seconds) when
starting on a gradient, the time it takes to move
your foot from the brake pedal to the accelerator
pedal.
It is only active when:
– the vehicle is completely stationary, with your
foot on the brake pedal,
– certain slope conditions are met,
– the driver’s door is closed.
The hill start assist system cannot be
deactivated.
Do not leave the vehicle while it is being
held in the hill start assist phase.
If you need to leave the vehicle with the
engine running, apply the parking brake
manually. Then check that the parking brake
warning lamp is on continuously (not flashing)
on the instrument panel.
Parking the vehicle with the
brake released
In very cold conditions (risk of ice), when
being towed, and in a car wash tunnel, it
is recommended that the parking brake not be
applied.
To immobilise your vehicle, engage a gear or
P mode (Park) or fit a chock against one of
the wheels.
►
Switch off the engine.
Application of the parking brake is confirmed
by illumination of the indicator lamps on the
instrument panel and the control lever
.
►
Switch on the ignition again, without starting
the engine.
►
Release the parking brake manually by
pushing the control lever while keeping your foot
on the brake pedal.
The complete release of the parking brake is confirmed by the brake indicator
lamp and the P indicator lamp in the control lever
going off, accompanied by the display of a
message.
►
Switch off the ignition.
With the EAT8 automatic gearbox, P
mode is automatically engaged when the
ignition is switched off.
The wheels are blocked.
For more information on the EAT8 automatic
gearbox, particularly in relation to leaving the
vehicle in free-wheeling mode, refer to the
corresponding section.
Deactivating automatic
operation
In some situations, for example when it is
extremely cold or when towing (e.g. caravan,
breakdown), it may be necessary to deactivate
automatic operation of the system.
►
Start the engine.
►
Apply the parking brake with the control lever
,
if it is released.
►
T
ake your foot fully off the brake pedal.
►
Push and hold the control lever in the release
direction for at least 10 seconds and no more
than 15 seconds.
►
Release the control lever
.
►
Press and hold the brake pedal.
►
Pull the control lever in the application
direction for 2 seconds.
Deactivation of the automatic functions is
confirmed by illumination of this indicator
lamp on the instrument panel.
►
Release the control lever and the brake
pedal.
From now on, the parking brake can only be
applied and released manually using the control
lever
.
Repeat this procedure to reactivate automatic
operation.
Reactivation of automatic operation is confirmed
by the indicator lamp on the instrument panel
going off.
Emergency braking
Emergency braking should only be used
in exceptional circumstances.
In the event of a fault with the brake pedal or
in exceptional circumstances (e.g. driver taken
ill, driver under instruction, etc.), a continuous
pull on the control lever will brake the vehicle.
Braking takes place as long as the control lever
is being pulled. Braking stops when the control
lever is released.
The ABS and DSC systems stabilise the vehicle
during emergency braking.
If the emergency braking malfunctions, the
"Parking brake faulty” message will be displayed.
If the ABS and DSC systems malfunction,
signalled by the illumination of one or both
warning lamps in the instrument panel, then
stability of the vehicle is no longer guaranteed.
In this event, stability must be assured by the
driver by repeating alternate "pull-release"
actions on the control lever until the vehicle is
immobilised.
Page 94 of 244

92
Driving
Malfunction
In the event of a malfunction, this warning
lamp comes on and a message is
displayed, when the ignition is switched on.
In this case, the gearbox goes into back-up
mode and is locked in 3
rd gear. It is possible to
feel a significant jolt (without risk for the gearbox)
while changing from P to R and from N to R.
Do not exceed 62 mph (100 km/h), local speed
restrictions permitting.
Have it checked by a PEUGEOT dealer or a
qualified workshop.
There is a risk of damaging the gearbox: – If the accelerator and brake pedals are
pressed simultaneously.
– In the event of a battery failure, forcing the
selector from position P to another position.
With an automatic gearbox, never try to
start the engine by pushing the vehicle.
EAT8 automatic gearbox
Automatic 8 speed gearbox with a push selector.
It also offers a manual mode with gear changes
via control paddles situated behind the steering
wheel.
or holds the gear selected until the maximum
engine speed is reached.
When braking, the gearbox changes down
automatically to provide effective engine braking.
If you release the accelerator sharply, the
gearbox will not shift to a higher gear for safety
reasons.
Never select position N while the vehicle
is moving.
Never select positions P or R unless the
vehicle is completely stationary.
"Sport" and "Snow" programmes
These two special programmes supplement the
automatic operation in specific conditions of use.
"Sport"
► Press this button, once the engine has
started.
"
S" appears on the instrument panel.
The gearbox automatically favours a dynamic
style of driving.
On versions fitted with the
Driver Sport Pack, the
"S" button is replaced by the " SPORT" button.
"Snow"
► Press this button, once the engine has
started.
"T" appears on the instrument panel.
The gearbox adapts to driving on slippery roads.
This programme improves starting and traction
when grip is poor.
Driver Sport Pack
This function favours a dynamic style of driving.► Press the " SPORT" button, after
starting the engine.
"S" appears in the instrument panel.
For more information on Driver Sport Pack,
refer to the corresponding section.
Return to automatic operation
► At any time, press the selected button ( "S or
"T") again to quit the activated programme and
return to auto-adaptive mode.
Manual operation
To limit fuel consumption during an extended standstill with the engine
running (for example, in a traffic jam), set the
gear selector to N and apply the parking
brake.
►
Selecting position
M
enables sequential
shifting between the six gears.
►
Push backwards to shift up a gear
.
►
Push forwards to shift down a gear
.
The gearbox only changes gear if the road
speed and engine speed permit; apart from
this condition, the rules for automatic operation
temporarily apply.
D disappears, and the gears engaged
appear in succession on the instrument
panel.
If the engine speed is too low or too high, the
selected gear flashes for a few seconds, then the
gearactually activated is displayed.
It is possible to change from position D to
position M
at any time.
When the vehicle is stationary or moving
very slowly, the gearbox selects gear M1
automatically.
The Sport and Snow programmes are inactive
in manual operation.
This symbol is displayed if a gear is not engaged correctly (gear selector between
two positions).
Switching the vehicle off
Before switching off the engine, it is possible to
engage position P or N to place the gearbox in
neutral.
In both cases, apply the parking brake to
immobilise the vehicle, unless it is programmed
to automatic mode.
If the selector is not in position P, when
the driver's door is opened or
approximately 45 seconds after the ignition is
switched off, an audible signal sounds and a
message appears.
►
Return the gear selector to P
; the audible
signal stops and the message disappears.