2021 Peugeot 308 ECU
[x] Cancel search: ECUPage 81 of 244
79
Safety
5Child lock
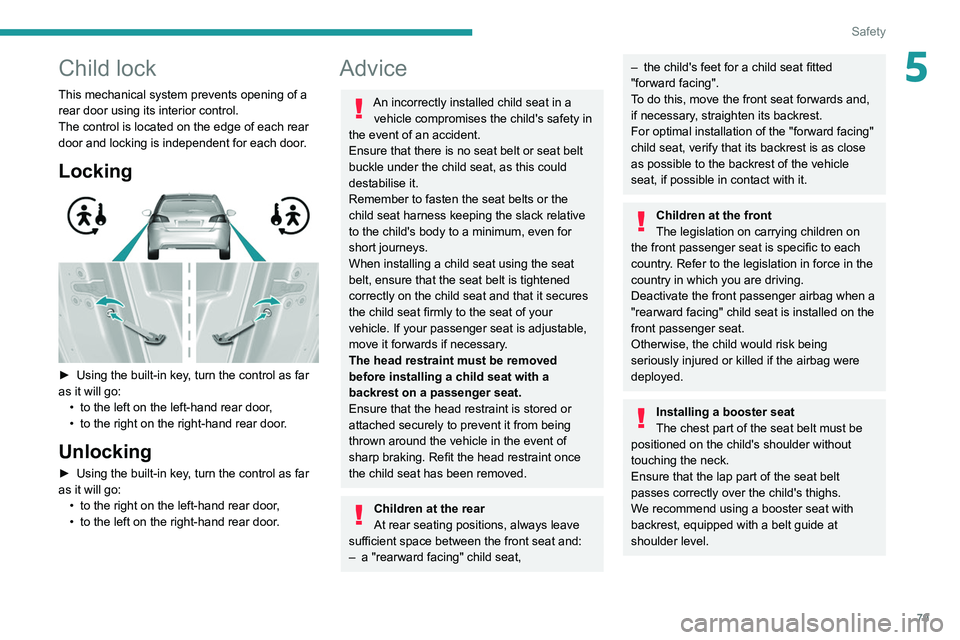
This mechanical system prevents opening of a
rear door using its interior control.
The control is located on the edge of each rear
door and locking is independent for each door.
Locking
► Using the built-in key, turn the control as far
as it will go: •
to the left on the left-hand rear door
,
•
to the right on the right-hand rear door
.
Unlocking
► Using the built-in key, turn the control as far
as it will go: •
to the right on the left-hand rear door
,
•
to the left on the right-hand rear door
.
Advice
An incorrectly installed child seat in a vehicle compromises the child's safety in
the event of an accident.
Ensure that there is no seat belt or seat belt
buckle under the child seat, as this could
destabilise it.
Remember to fasten the seat belts or the
child seat harness keeping the slack relative
to the child's body to a minimum, even for
short journeys.
When installing a child seat using the seat
belt, ensure that the seat belt is tightened
correctly on the child seat and that it secures
the child seat firmly to the seat of your
vehicle. If your passenger seat is adjustable,
move it forwards if necessary.
The head restraint must be removed
before installing a child seat with a
backrest on a passenger seat.
Ensure that the head restraint is stored or
attached securely to prevent it from being
thrown around the vehicle in the event of
sharp braking. Refit the head restraint once
the child seat has been removed.
Children at the rear
At rear seating positions, always leave
sufficient space between the front seat and:
–
a "rearward facing" child seat,
– the child's feet for a child seat fitted
"forward facing".
T
o do this, move the front seat forwards and,
if necessary, straighten its backrest.
For optimal installation of the "forward facing"
child seat, verify that its backrest is as close
as possible to the backrest of the vehicle
seat, if possible in contact with it.
Children at the front
The legislation on carrying children on
the front passenger seat is specific to each
country. Refer to the legislation in force in the
country in which you are driving.
Deactivate the front passenger airbag when a
"rearward facing" child seat is installed on the
front passenger seat.
Otherwise, the child would risk being
seriously injured or killed if the airbag were
deployed.
Installing a booster seat
The chest part of the seat belt must be
positioned on the child's shoulder without
touching the neck.
Ensure that the lap part of the seat belt
passes correctly over the child's thighs.
We recommend using a booster seat with
backrest, equipped with a belt guide at
shoulder level.
Page 104 of 244

102
Driving
On detecting speed limit information, the system
displays the value.
For a suggested maximum speed, the first time
that the vehicle exceeds it by more than 3 mph
(5 km/h) (e.g. 59 mph (95 km/h)), the speed is
displayed and flashes for 10 seconds (depending
on version).
Operating limits
The system does not take account of reduced
speed limits, especially those imposed in the
following cases:
– Poor weather (rain, snow).
– Atmospheric pollution.
– Towing.
– Driving with a space-saver type spare wheel
or snow chains fitted.
– Tyre repaired using the temporary puncture
repair kit.
– Young drivers.
The system may not display the speed limit if it
does not detect a speed limit sign within a preset
period and in the following situations:
– Road signs that are obstructed, non-standard,
damaged or bent.
– Obsolete or incorrect maps.
► ensure that the mat is secured correctly ,
► never fit one mat on top of another .
Units of speed
Ensure that the units of speed displayed
on the instrument panel (mph or km/h) are
those for the country you are driving in.
If this is not the case, when the vehicle is
stationary, set the display to the required
units of speed so that it complies with what is
authorised locally.
In case of doubt, contact a PEUGEOT dealer
or a qualified workshop.
Speed Limit Recognition
and Recommendation
Refer to the General recommendations on the
use of driving and manoeuvring aids .
This system displays the maximum authorised
speed in the instrument panel, according to
the speed limits in the country in which you are
driving, using:
– Speed limit signs detected by the camera.
– Speed limit details from the navigation system
mapping.
You should update your navigation mapping regularly in order to receive
accurate speed limit information from the
system.
The units for the speed limit (mph or km/h) depend on the country you are
driving in.
This should be taken into account so that you
observe the speed limit.
For the system to operate correctly when
you change country, the units for speed in
the instrument panel must be those for the
country you are driving in.
The automatic reading of road signs is a driving aid system and does not always
display speed limits correctly.
The speed limit signs present on the road
always take priority over the display by the
system.
The system is designed to detect signs that
conform to the Vienna Convention on road
signs.
Specific speed limits, such as those for
heavy goods vehicles, are not displayed.
The display of the speed limit in the
instrument panel is updated as you pass
a speed limit sign intended for cars (light
vehicles).
Activation / Deactivation
By default, the system is automatically activated
at every engine start.
It is set via the Driving / Vehicle touch
screen menu.
Information displayed on
the instrument panel
1. Detected speed limit indication
or
2. End of speed limit indication
The system is active but is not detecting speed
limit information.
Page 113 of 244

111
Driving
6Certain situations cannot be managed by the
system and require the driver to take back
control of the vehicle.
Cases of non-detection by the radar:
–
Pedestrians, some cyclists, animals.
–
Stationary vehicles (traffic jam, breakdown,
etc.).
– Vehicles crossing your lane.
– V ehicles driving in the opposite direction.
Situations in which the driver must pause the
cruise control system:
– Vehicles in a tight bend.
– When approaching a roundabout.
– When following a narrow vehicle.
Reactivate cruise control when conditions permit.
Situations in which the driver is prompted to
immediately resume control:
–
Excessively sharp deceleration by the vehicle
in front of you.
– When a vehicle cuts in sharply between your
vehicle and the one in front.
The system must not be activated in the
following situations:
–
Use of the "space-saver" type spare wheel
(depending on version).
–
Towing.
–
Following an impact on the front bumper
.
Be particularly careful:
– When motorcycles are present and
when there are vehicles staggered across the
traffic lane.
–
When you enter a tunnel or cross a bridge.
Cruise control operates by day and night,
in fog or moderate rainfall.
However, it is strongly recommended that
you always keep a safe distance from the
vehicles in front of you according to the traffic
conditions, weather conditions and the state
of the road surface.
Use the cruise control only where the driving
conditions allow running at a constant speed
and keeping an adequate safety distance.
Do not activate the cruise control in urban
areas where pedestrians are likely to cross
the road, in heavy traffic (except for versions
with EAT8 gearbox), on winding or steep
roads, on slippery or flooded roads, when
there is snowfall, if the front bumper is
damaged or when the brake lamps have
failed.
In certain circumstances, it may not
be possible for the speed setting to be
maintained or even reached: loaded vehicle,
ascending a steep hill, etc.
The system is not intended for the following situations:
–
if the front end of the vehicle has been
modified (addition of long-range headlamps,
painting of the front bumper),
–
driving on a racing circuit,
–
running on a rolling road,
–
use of snow chains, non-slip covers or
studded tyres.
The use of mats not approved by PEUGEOT
may interfere with the operation of the cruise
control.
To avoid any risk of jamming the pedals:
–
ensure that the mat is secured correctly
,
–
never put one mat on top of another
.
Page 137 of 244
135
Practical information
7Blanking plug
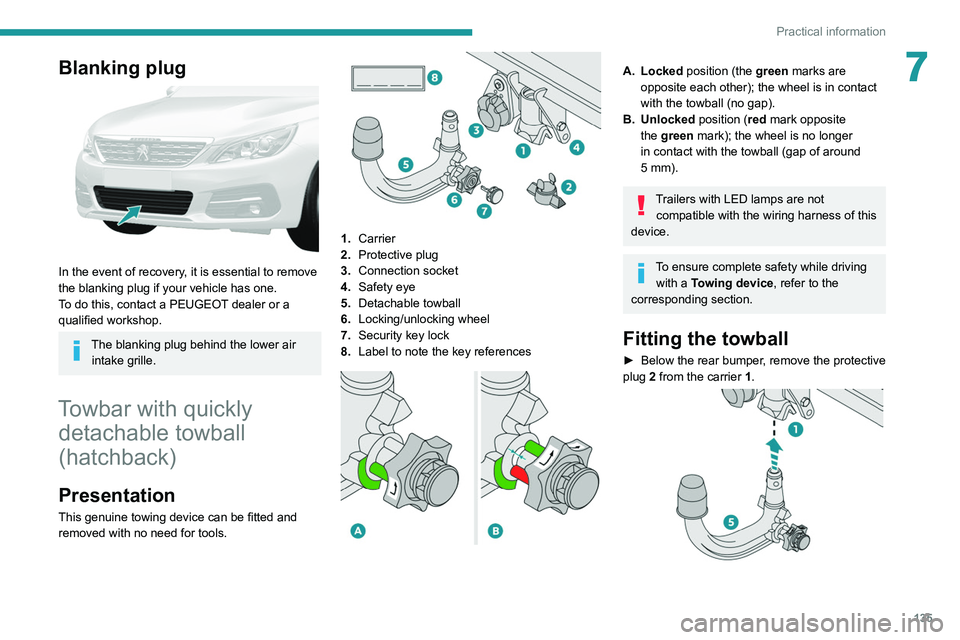
In the event of recovery, it is essential to remove
the blanking plug if your vehicle has one.
To do this, contact a PEUGEOT dealer or a
qualified workshop.
The blanking plug behind the lower air intake grille.
Towbar with quickly detachable towball
(hatchback)
Presentation
This genuine towing device can be fitted and
removed with no need for tools.
1. Carrier
2. Protective plug
3. Connection socket
4. Safety eye
5. Detachable towball
6. Locking/unlocking wheel
7. Security key lock
8. Label to note the key references
A. Locked position (the green marks are
opposite each other); the wheel is in contact
with the towball (no gap).
B. Unlocked position (red mark opposite the green mark); the wheel is no longer
in contact with the towball (gap of around
5
mm).
Trailers with LED lamps are not compatible with the wiring harness of this
device.
To ensure complete safety while driving with a Towing device , refer to the
corresponding section.
Fitting the towball
► Below the rear bumper , remove the protective
plug 2 from the carrier 1.
Page 142 of 244
140
Practical information
Load reduction mode
This system manages the use of certain
functions according to the level of charge
remaining in the battery.
When the vehicle is being driven, the load
reduction function temporarily deactivates certain
functions, such as the air conditioning and the
heated rear screen.
The deactivated functions are reactivated
automatically as soon as conditions permit.
Fitting roof bars
Fitting directly to the roof
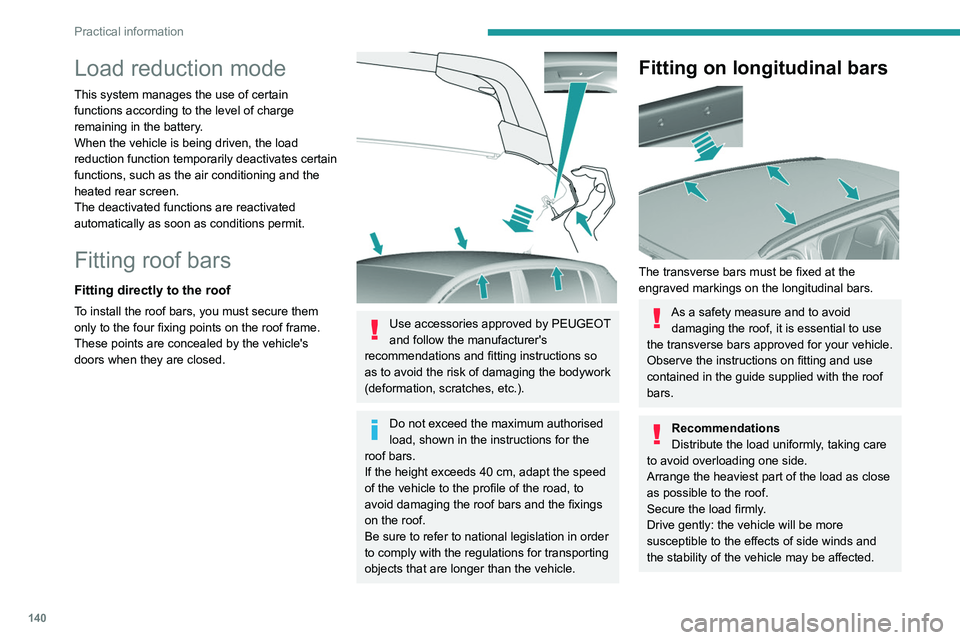
To install the roof bars, you must secure them
only to the four fixing points on the roof frame.
These points are concealed by the vehicle's
doors when they are closed.
Use accessories approved by PEUGEOT
and follow the manufacturer's
recommendations and fitting instructions so
as to avoid the risk of damaging the bodywork
(deformation, scratches, etc.).
Do not exceed the maximum authorised
load, shown in the instructions for the
roof bars.
If the height exceeds 40
cm, adapt the speed
of the vehicle to the profile of the road, to
avoid damaging the roof bars and the fixings
on the roof.
Be sure to refer to national legislation in order
to comply with the regulations for transporting
objects that are longer than the vehicle.
Fitting on longitudinal bars
The transverse bars must be fixed at the
engraved markings on the longitudinal bars.
As a safety measure and to avoid damaging the roof, it is essential to use
the transverse bars approved for your vehicle.
Observe the instructions on fitting and use
contained in the guide supplied with the roof
bars.
Recommendations
Distribute the load uniformly, taking care
to avoid overloading one side.
Arrange the heaviest part of the load as close
as possible to the roof.
Secure the load firmly.
Drive gently: the vehicle will be more
susceptible to the effects of side winds and
the stability of the vehicle may be affected.
On a long journey, check the security of the
load at every stop.
Remove the roof bars once they are no longer
needed.
Bonnet
Opening
► Open the left-hand front door.
► Pull the release lever, located at the bottom
of the door frame, towards you.
Page 143 of 244
141
Practical information
7On a long journey, check the security of the
load at every stop.
Remove the roof bars once they are no longer
needed.
Bonnet
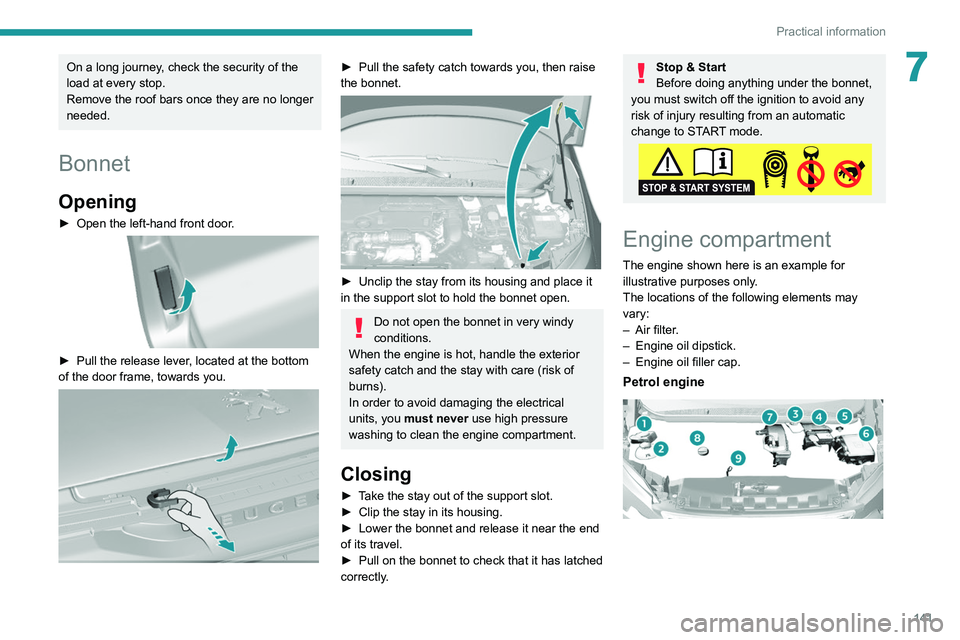
Opening
► Open the left-hand front door.
► Pull the release lever , located at the bottom
of the door frame, towards you.
► Pull the safety catch towards you, then raise
the bonnet.
► Unclip the stay from its housing and place it
in the support slot to hold the bonnet open.
Do not open the bonnet in very windy
conditions.
When the engine is hot, handle the exterior
safety catch and the stay with care (risk of
burns).
In order to avoid damaging the electrical
units, you must never use high pressure
washing to clean the engine compartment.
Closing
► Take the stay out of the support slot.
► Clip the stay in its housing.
►
Lower the bonnet and release it near the end
of its travel.
►
Pull on the bonnet to check that it has latched
correctly
.
Stop & Start
Before doing anything under the bonnet,
you must switch off the ignition to avoid any
risk of injury resulting from an automatic
change to START mode.
Engine compartment
The engine shown here is an example for
illustrative purposes only.
The locations of the following elements may
vary:
–
Air filter
.
–
Engine oil dipstick.
–
Engine oil filler cap.
Petrol engine
Page 152 of 244
150
In the event of a breakdown
Tool kit
This is a set of tools provided with the vehicle.
Its content depends on your vehicle's equipment:
–
temporary puncture repair kit,
–
spare wheel.
Accessing the tools
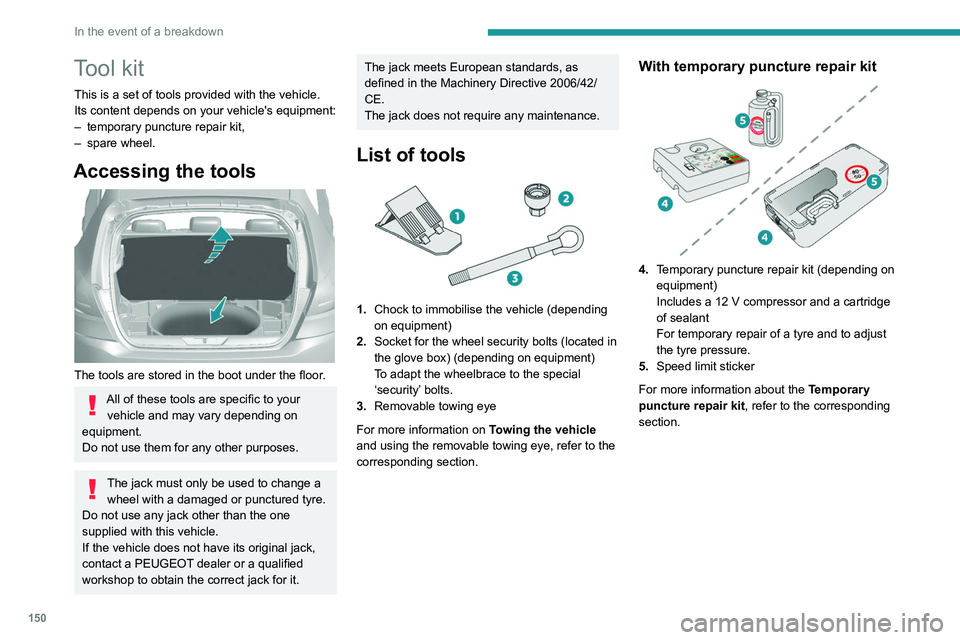
The tools are stored in the boot under the floor.
All of these tools are specific to your vehicle and may vary depending on
equipment.
Do not use them for any other purposes.
The jack must only be used to change a wheel with a damaged or punctured tyre.
Do not use any jack other than the one
supplied with this vehicle.
If the vehicle does not have its original jack,
contact a PEUGEOT dealer or a qualified
workshop to obtain the correct jack for it.
The jack meets European standards, as
defined in the Machinery Directive 2006/42/
CE.
The jack does not require any maintenance.
List of tools
1. Chock to immobilise the vehicle (depending
on equipment)
2. Socket for the wheel security bolts (located in
the glove box) (depending on equipment)
To adapt the wheelbrace to the special
‘security’ bolts.
3. Removable towing eye
For more information on Towing the vehicle
and using the removable towing eye, refer to the
corresponding section.
With temporary puncture repair kit
4. Temporary puncture repair kit (depending on
equipment)
Includes a 12 V compressor and a cartridge
of sealant
For temporary repair of a tyre and to adjust
the tyre pressure.
5. Speed limit sticker
For more information about the Temporary
puncture repair kit, refer to the corresponding
section.
With spare wheel
5. Wheelbrace
For removing the wheel trim and the wheel
bolts.
6. Jack with integrated handle
To raise the vehicle.
7. Wheel bolt cap removal tool (depending on
equipment)
For removing the wheel bolt head finishers on
alloy wheels.
For more information on the Spare wheel, refer
to the corresponding section.
Page 154 of 244
152
In the event of a breakdown
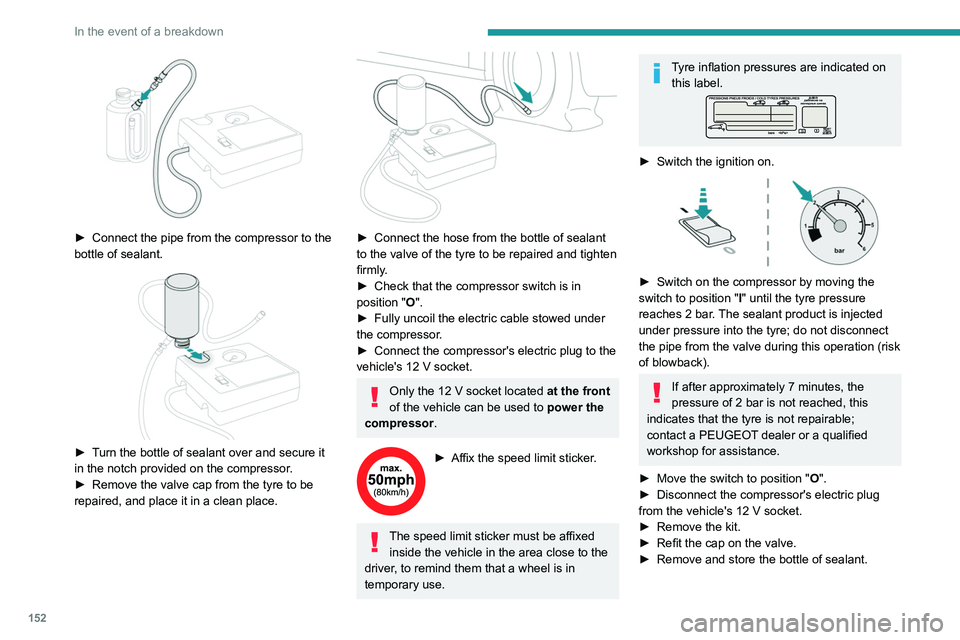
► Connect the pipe from the compressor to the
bottle of sealant.
► Turn the bottle of sealant over and secure it
in the notch provided on the compressor.
►
Remove the valve cap from the tyre to be
repaired, and place it in a clean place.
► Connect the hose from the bottle of sealant
to the valve of the tyre to be repaired and tighten
firmly
.
►
Check that the compressor switch is in
position
"O".
►
Fully uncoil the electric cable stowed under
the compressor
.
►
Connect the compressor's electric plug to the
vehicle's 12
V socket.
Only the 12 V socket located at the front
of the vehicle can be used to power the
compressor .
► Affix the speed limit sticker .
The speed limit sticker must be affixed
inside the vehicle in the area close to the
driver, to remind them that a wheel is in
temporary use.
Tyre inflation pressures are indicated on this label.
► Switch the ignition on.
► Switch on the compressor by moving the
switch to position " I
" until the tyre pressure
reaches 2 bar. The sealant product is injected
under pressure into the tyre; do not disconnect
the pipe from the valve during this operation (risk
of blowback).
If after approximately 7 minutes, the
pressure of 2 bar is not reached, this
indicates that the tyre is not repairable;
contact a PEUGEOT dealer or a qualified
workshop for assistance.
►
Move the switch to position " O
".
►
Disconnect the compressor's electric plug
from the vehicle's 12
V socket.
►
Remove the kit.
►
Refit the cap on the valve.
►
Remove and store the bottle of sealant.