2021 Peugeot 308 bonnet
[x] Cancel search: bonnetPage 100 of 244

98
Driving
vehicle has reached a speed of 5 mph
(8 km/h).
During parking manoeuvres, STOP mode
is not available for a few seconds after
coming out of reverse gear or turning the
steering wheel.
Engine restarting (START mode)
The engine automatically restarts as soon as the
driver indicates the intention of moving off again.
► With a manual gearbox: with the clutch
pedal fully depressed.
► With an automatic gearbox:
• With the selector in position D or M: with the
brake pedal released.
• With the selector in position N and the brake
pedal released: with the selector at D or M.
• With the selector in position P and the brake
pedal depressed: with the selector at R, N,
D or M.
• Reverse gear engaged.
Special cases
The engine will restart automatically if all
conditions for operation are met again and in the
following cases.
– The electric parking brake is being applied.
– Vehicle speed exceeds 2 mph (3 km/h).
– Some specific conditions (braking assistance,
air conditioning setting, etc.).
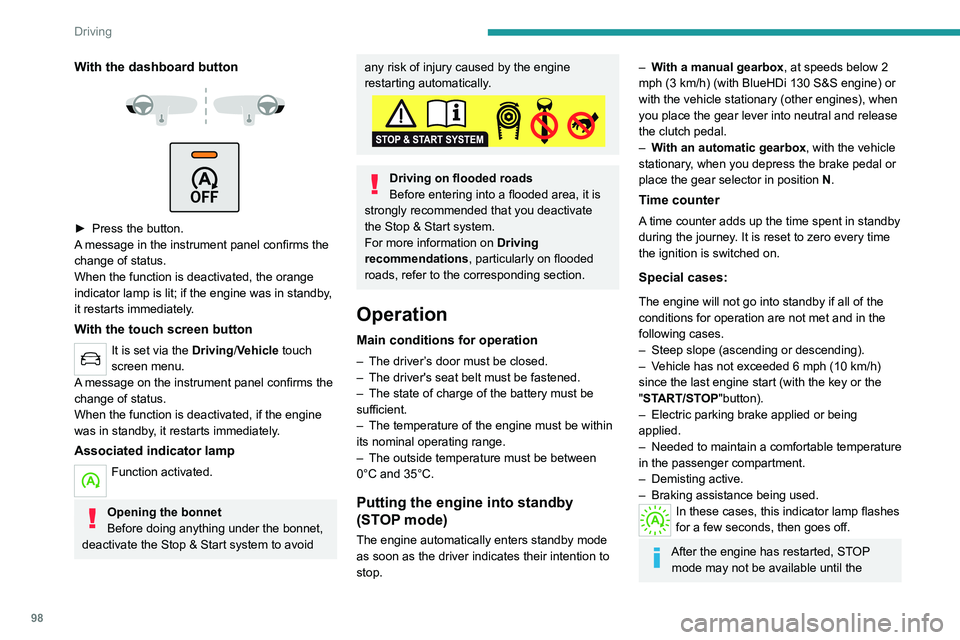
With the dashboard button
► Press the button.
A message in the instrument panel confirms the
change of status.
When the function is deactivated, the orange
indicator lamp is lit; if the engine was in standby,
it restarts immediately.
With the touch screen button
It is set via the Driving/Vehicle touch
screen menu.
A message on the instrument panel confirms the
change of status.
When the function is deactivated, if the engine
was in standby, it restarts immediately.
Associated indicator lamp
Function activated.
Opening the bonnet
Before doing anything under the bonnet,
deactivate the Stop & Start system to avoid
any risk of injury caused by the engine
restarting automatically.
Driving on flooded roads
Before entering into a flooded area, it is
strongly recommended that you deactivate
the Stop & Start system.
For more information on Driving
recommendations, particularly on flooded
roads, refer to the corresponding section.
Operation
Main conditions for operation
– The driver ’s door must be closed.
– The driver's seat belt must be fastened.
–
The state of charge of the battery must be
sufficient.
–
The temperature of the engine must be within
its nominal operating range.
–
The outside temperature must be between
0°C and 35°C.
Putting the engine into standby
(STOP mode)
The engine automatically enters standby mode
as soon as the driver indicates their intention to
stop.
– With a manual gearbox, at speeds below 2
mph (3 km/h) (with BlueHDi 130 S&S engine) or
with the vehicle stationary (other engines), when
you place the gear lever into neutral and release
the clutch pedal.
–
W
ith an automatic gearbox, with the vehicle
stationary, when you depress the brake pedal or
place the gear selector in position N.
Time counter
A time counter adds up the time spent in standby
during the journey. It is reset to zero every time
the ignition is switched on.
Special cases:
The engine will not go into standby if all of the
conditions for operation are not met and in the
following cases.
–
Steep slope (ascending or descending).
–
V
ehicle has not exceeded 6 mph (10 km/h)
since the last engine start (with the key or the
"START/STOP"button).
–
Electric parking brake applied or being
applied.
–
Needed
to maintain a comfortable temperature
in the passenger compartment.
–
Demisting active.
–
Braking assistance being used.
In these cases, this indicator lamp flashes
for a few seconds, then goes off.
After the engine has restarted, STOP mode may not be available until the
Page 142 of 244

140
Practical information
Load reduction mode
This system manages the use of certain
functions according to the level of charge
remaining in the battery.
When the vehicle is being driven, the load
reduction function temporarily deactivates certain
functions, such as the air conditioning and the
heated rear screen.
The deactivated functions are reactivated
automatically as soon as conditions permit.
Fitting roof bars
Fitting directly to the roof
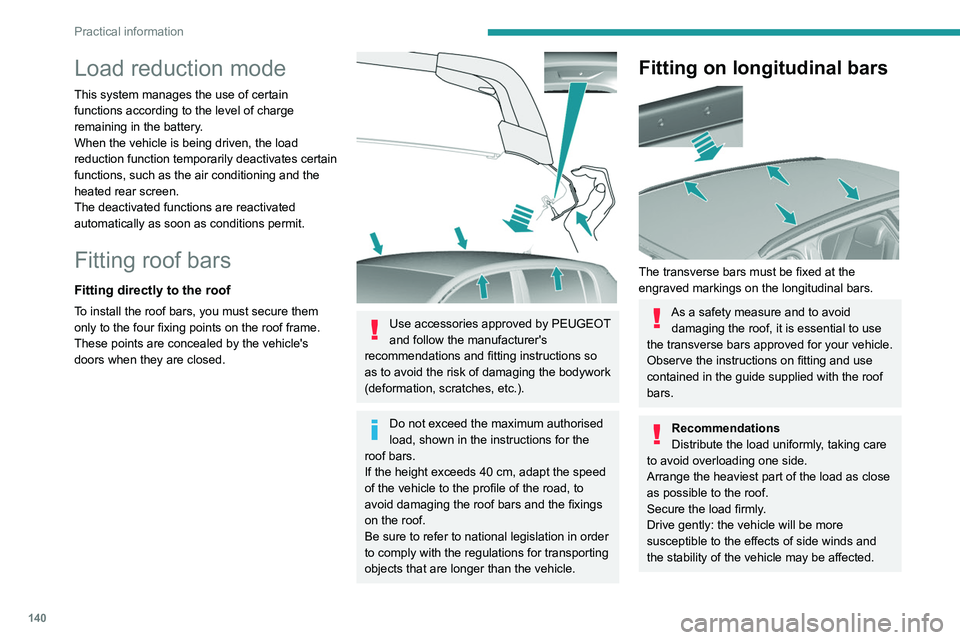
To install the roof bars, you must secure them
only to the four fixing points on the roof frame.
These points are concealed by the vehicle's
doors when they are closed.
Use accessories approved by PEUGEOT
and follow the manufacturer's
recommendations and fitting instructions so
as to avoid the risk of damaging the bodywork
(deformation, scratches, etc.).
Do not exceed the maximum authorised
load, shown in the instructions for the
roof bars.
If the height exceeds 40
cm, adapt the speed
of the vehicle to the profile of the road, to
avoid damaging the roof bars and the fixings
on the roof.
Be sure to refer to national legislation in order
to comply with the regulations for transporting
objects that are longer than the vehicle.
Fitting on longitudinal bars
The transverse bars must be fixed at the
engraved markings on the longitudinal bars.
As a safety measure and to avoid damaging the roof, it is essential to use
the transverse bars approved for your vehicle.
Observe the instructions on fitting and use
contained in the guide supplied with the roof
bars.
Recommendations
Distribute the load uniformly, taking care
to avoid overloading one side.
Arrange the heaviest part of the load as close
as possible to the roof.
Secure the load firmly.
Drive gently: the vehicle will be more
susceptible to the effects of side winds and
the stability of the vehicle may be affected.
On a long journey, check the security of the
load at every stop.
Remove the roof bars once they are no longer
needed.
Bonnet
Opening
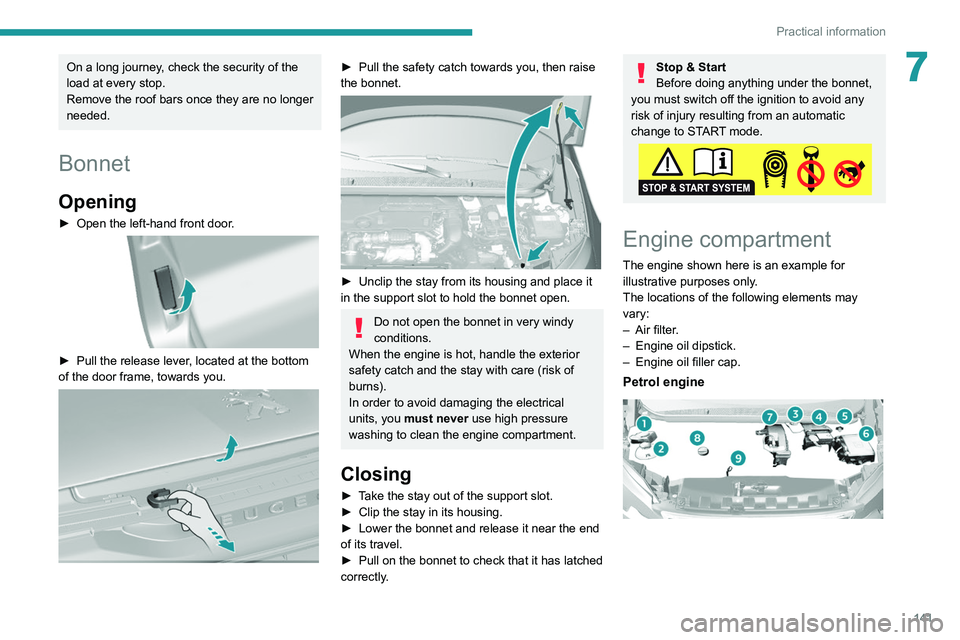
► Open the left-hand front door.
► Pull the release lever, located at the bottom
of the door frame, towards you.
Page 143 of 244

141
Practical information
7On a long journey, check the security of the
load at every stop.
Remove the roof bars once they are no longer
needed.
Bonnet
Opening
► Open the left-hand front door.
► Pull the release lever , located at the bottom
of the door frame, towards you.
► Pull the safety catch towards you, then raise
the bonnet.
► Unclip the stay from its housing and place it
in the support slot to hold the bonnet open.
Do not open the bonnet in very windy
conditions.
When the engine is hot, handle the exterior
safety catch and the stay with care (risk of
burns).
In order to avoid damaging the electrical
units, you must never use high pressure
washing to clean the engine compartment.
Closing
► Take the stay out of the support slot.
► Clip the stay in its housing.
►
Lower the bonnet and release it near the end
of its travel.
►
Pull on the bonnet to check that it has latched
correctly
.
Stop & Start
Before doing anything under the bonnet,
you must switch off the ignition to avoid any
risk of injury resulting from an automatic
change to START mode.
Engine compartment
The engine shown here is an example for
illustrative purposes only.
The locations of the following elements may
vary:
–
Air filter
.
–
Engine oil dipstick.
–
Engine oil filler cap.
Petrol engine
Page 144 of 244

142
Practical information
Diesel engine
1.Screenwash fluid reservoir
2. Engine coolant reservoir
3. Brake fluid reservoir
4. Battery/Fuses
5. Remote earth point (-)
6. Fusebox
7. Air filter
8. Engine oil filler cap
9. Engine oil dipstick
10. Priming pump*
The Diesel fuel system operates under
very high pressure.
All work on this circuit must be carried out
only by a PEUGEOT dealer or a qualified
workshop.
Checking levels
Check all of the following levels regularly in
accordance with the manufacturer's service
* Depending on engine.
schedule. Top them up if required, unless
otherwise indicated.
If a level drops significantly, have the
corresponding system checked by a PEUGEOT
dealer or a qualified workshop.
The fluids must comply with the manufacturer's requirements and with
the vehicle's engine.
Take care when working under the bonnet, as certain areas of the engine
may be extremely hot (risk of burns) and the
cooling fan could start at any time (even with
the ignition off).
Used products
Avoid prolonged contact of used oil or fluids with the skin.
Most of these fluids are harmful to health and
very corrosive.
Do not discard used oil or fluids into
sewers or onto the ground.
Empty used oil into the containers reserved
for this purpose at a PEUGEOT dealer or a
qualified workshop.
Engine oil
The level is checked, with the engine having been switched off for at least 30
minutes and on level ground, either using the oil
level indicator in the instrument panel when the
ignition is switched on (for vehicles equipped
with an electric gauge), or using the dipstick.
It is normal to top up the oil level between two
services (or oil changes). It is recommended
that you check the level, and top up if necessary,
every 3,000 miles (5,000 km).
In order to maintain the reliability of the
engine and emissions control system,
never use additives in the engine oil.
Checking using the dipstick
For the location of the dipstick, please refer
to the illustration of the corresponding engine
compartment.
►
Grasp the dipstick by its coloured grip and
pull it out completely
.
►
Wipe the end of the dipstick using a clean,
lint-free cloth.
► Reinsert the dipstick and push fully down,
then pull it out again to visually check the oil
level: the correct level is between marks A (max)
and B (min).
Do not start the engine if the level is:
– above mark A: contact a PEUGEOT dealer or
a qualified workshop.
– below mark B: top up the engine oil
immediately.
Oil grade
Before topping up or changing the
engine oil, check that the oil is suitable
for your engine and complies with the
recommendations in the service schedule
supplied with the vehicle (or available
from your PEUGEOT dealer or qualified
workshop).
Use of non-recommended oil may invalidate
your warranty in the event of engine failure.
Topping up the engine oil level
For the location of the engine oil filler cap, please
refer to the corresponding under-bonnet engine
compartment illustration.
► Add oil in small quantities, avoiding any spills
on engine components (risk of fire).
► Wait a few minutes before checking the level
again using the dipstick.
► Top up the level if necessary.
► After checking the level, carefully screw the
oil filler cap back on and replace the dipstick in
its tube.
Page 145 of 244

143
Practical information
7► Reinsert the dipstick and push fully down,
then pull it out again to visually check the oil
level: the correct level is between marks A
(max)
and B (min).
Do not start the engine if the level is:
–
above mark
A: contact a PEUGEOT dealer or
a qualified workshop.
–
below mark B
: top up the engine oil
immediately.
Oil grade
Before topping up or changing the
engine oil, check that the oil is suitable
for your engine and complies with the
recommendations in the service schedule
supplied with the vehicle (or available
from your PEUGEOT dealer or qualified
workshop).
Use of non-recommended oil may invalidate
your warranty in the event of engine failure.
Topping up the engine oil level
For the location of the engine oil filler cap, please
refer to the corresponding under-bonnet engine
compartment illustration.
►
Add oil in small quantities, avoiding any spills
on engine components (risk of fire).
►
W
ait a few minutes before checking the level
again using the dipstick.
►
T
op up the level if necessary.
►
After checking the level, carefully screw the
oil filler cap back on
and replace the dipstick in
its tube.
Within 30 minutes of adding oil, the oil
level indication in the instrument panel
when the ignition is switched on is not valid.
Brake fluid
The brake fluid level must be between mark "A" (MAX located on the remote
reservoir) and mark " B" (MIN located on the
main reservoir). If not, check the brake pads for
wear.
To know how often the brake fluid should be
replaced, refer to the manufacturer's servicing
schedule.
Clean the cap before removing it to refill.
Use only DOT4 brake fluid from a sealed
container.
Engine coolant
It is normal to top up this fluid between
two services.
The check and top-up must only be done with
the engine cold.
A level of coolant that is too low risks causing
major damage to the engine; the coolant level
must be close to the "MAX" mark without ever
going above it.
If the level is close to or below the " MIN” mark, it
is essential to top up.
When the engine is hot, the temperature of the
coolant is regulated by the fan.
As the cooling system is pressurised, wait at
least one hour after switching off the engine
before carrying out any work.
In order to avoid the risk of scalding if you need
to top up in an emergency, wrap a cloth around
the cap and unscrew the cap by two turns to
allow the pressure to drop.
Once the pressure has dropped, remove the cap
and top up to the required level.
Screenwash fluid
Top up to the required level when necessary.
Fluid specification
The fluid must be topped up with a pre-mixed
product.
In winter (temperatures below zero), a fluid
containing an anti-freeze agent which is
Page 164 of 244

162
In the event of a breakdown
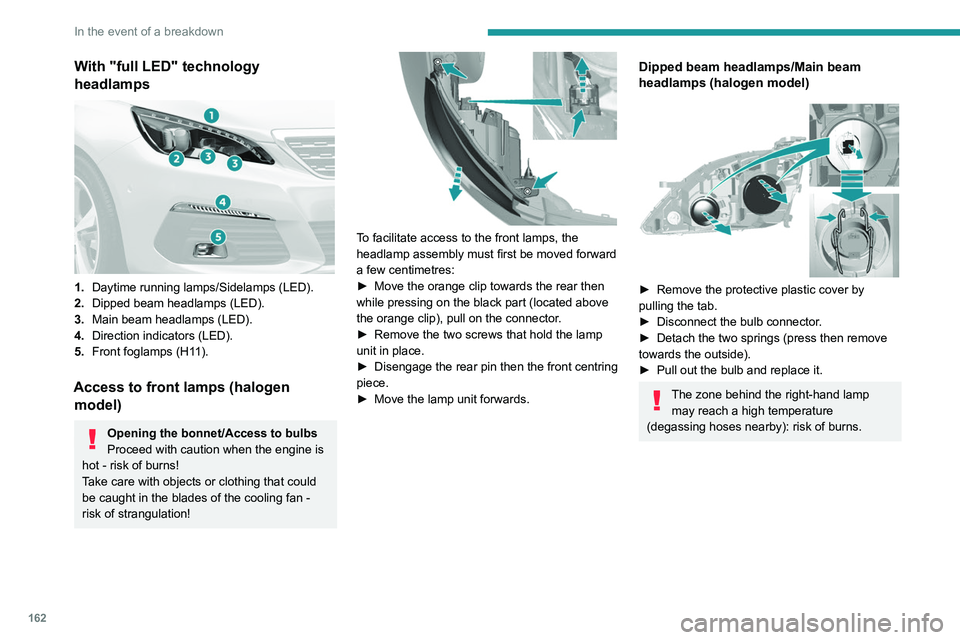
With "full LED" technology
headlamps
1.Daytime running lamps/Sidelamps (LED).
2. Dipped beam headlamps (LED).
3. Main beam headlamps (LED).
4. Direction indicators (LED).
5. Front foglamps (H11).
Access to front lamps (halogen
model)
Opening the bonnet/Access to bulbs
Proceed with caution when the engine is
hot - risk of burns!
Take care with objects or clothing that could
be caught in the blades of the cooling fan -
risk of strangulation!
To facilitate access to the front lamps, the
headlamp assembly must first be moved forward
a few centimetres:
►
Move the orange clip towards the rear then
while pressing on the black part (located above
the orange clip), pull on the connector
.
►
Remove the two screws that hold the lamp
unit in place.
►
Disengage the rear pin then the front centring
piece.
►
Move the lamp unit forwards.
Dipped beam headlamps/Main beam
headlamps (halogen model)
► Remove the protective plastic cover by
pulling the tab.
►
Disconnect the bulb connector
.
►
Detach the two springs (press then remove
towards the outside).
►
Pull out the bulb and replace it.
The zone behind the right-hand lamp may reach a high temperature
(degassing hoses nearby): risk of burns.
Front foglamps
► Unclip the trim by pulling at the top (notch).
► Unscrew the 2 screws to remove the unit
from its housing.
Page 171 of 244

169
In the event of a breakdown
8FuseN° Rating
(A) Functions
F25 40Headlamp
washer relay
(retrofitting).
F27 25Built-in systems
interface.
F28 30Diesel
emissions
control system
(AdBlue
®).
F29 30Windscreen
wiper motor.
F30 80Pre-heat glow
plugs (Diesel),
additional
programmable
heating
(retrofitting),
headlamp wash
pump.
12 V battery
Procedure for starting the engine using another
battery or charging a discharged battery.
Lead-acid starter batteries
These batteries contain harmful
substances (sulphuric acid and lead).
They must be disposed of in accordance
with regulations and must never under any
circumstances be discarded with household
waste.
Take used remote control batteries and
vehicle batteries to a special collection point.
Protect your eyes and face before
handling the battery.
All operations on the battery must be carried
out in a well ventilated area and away from
naked flames and sources of sparks, to avoid
any risk of explosion or fire.
Wash your hands afterwards.
Versions equipped with Stop & Start are
fitted with a 12 V lead-acid battery with
special technology and specifications.
It should only be replaced by a PEUGEOT
dealer or a qualified workshop.
Before doing any work
Immobilise the vehicle: apply the parking
brake, put the gearbox in neutral, then switch
off the ignition.
Check that all electrical equipment is switched
off.
Access to the battery
The battery is located under the bonnet.
To access them:
►
Open the bonnet using the interior release
lever
, then the exterior safety catch.
Page 172 of 244

170
In the event of a breakdown
► Secure the bonnet stay.
► Remove the plastic cover on the (+) terminal.
The battery (-) terminal is not accessible.
A
remote earth point is located on the engine.
Starting using another
battery
If your vehicle's battery is flat, the engine can be
started using a backup battery (either external or
from another vehicle) and jump leads or using a
battery booster.
Never start the engine by connecting a
battery charger.
Never use a 24
V or higher battery booster.
Check beforehand that the backup battery
has a nominal voltage of 12
V and a capacity
at least equal to that of the discharged
battery.
The two vehicles must not be in contact with
each other.
Switch off all electricity-consuming equipment
on both vehicles (audio system, wipers,
lighting, etc.).
Make sure that the jump leads are well away
from the engine’s moving parts (fan, belt,
etc.).
Do not disconnect the (+) terminal while the
engine is running.
► Lift the plastic cover on the (+) terminal, if the
vehicle has one.
►
Connect the red cable to the (+) terminal of
flat battery
A (at the metal elbow), then to the
(+) terminal of the backup battery
B or of the
booster.
►
Connect one end of the green or black cable
to the (-) terminal of the backup battery
B or of
the booster (or to an earth point on the assisting
vehicle).
►
Connect the other end of the green or black
cable to the earth point
C
.
►
Start the engine on the assisting vehicle and
leave it running for a few minutes.
►
Operate the starter on the broken down
vehicle and let the engine run.
If the engine does not start immediately, switch
off the ignition and wait a few moments before
trying again.
►
W
ait for it to return to idle.
►
Disconnect the jump leads in reverse order.
►
Refit the plastic cover to the (+) terminal, if
the vehicle has one.
►
Allow the engine to run for at least
30
minutes, with the vehicle stationary, so that
the battery reaches an adequate state of charge.
Drive cautiously during the first 30
minutes after starting the engine.
With an automatic gearbox, never try to
start the engine by pushing the vehicle.
Charging the battery using a
battery charger
For optimum service life of the battery, it is
essential to maintain an adequate state of
charge.
In some circumstances, it may be necessary to
charge the battery:
–
When using the vehicle mainly for short
journeys.
–
If the vehicle is to be taken off the road for
several weeks.
Contact a PEUGEOT
dealer or a qualified
workshop.