2021 NISSAN NV200 ignition
[x] Cancel search: ignitionPage 114 of 300

• All doors unlock automatically when thetransmission is placed in the P (Park) po-
sition, when the ignition is turned to the
OFF position, or when the key is removed
from the ignition.
CAUTION
Listed below are conditions or occur-
rences which will damage the key fob:
• Do not allow the key fob, which con-
tains electrical components, to come
into contact with water or salt water.
This could affect the system
function.
• Do not drop the key fob.
• Do not strike the key fob sharply
against another object.
• Do not change or modif y the key fob.
• Wetting may damage the key fob. If
the key fob gets wet, immediately
wipe until it is completely dry.
REMOTE KEYLESS ENTRY SYSTEM (if
so equipped)
3-10Pre-driving checks and adjustments
Page 115 of 300
•Do not place the key fob for an ex-
tended period in an area where tem-
peratures exceed 140°F (60°C).
• Do not attach the key fob with a key
holder that contains a magnet.
• Do not place the key fob near equip-
ment that produces a magnetic field,
such as a TV, audio equipment and
personal computers.
If a key fob is lost or stolen, NISSAN rec-
ommends erasing the ID code of that
key fob. This will prevent the key fob
from unauthorized use to unlock the
vehicle. For information regarding the
erasing procedure, it is recommended
that you visit a NISSAN dealer.
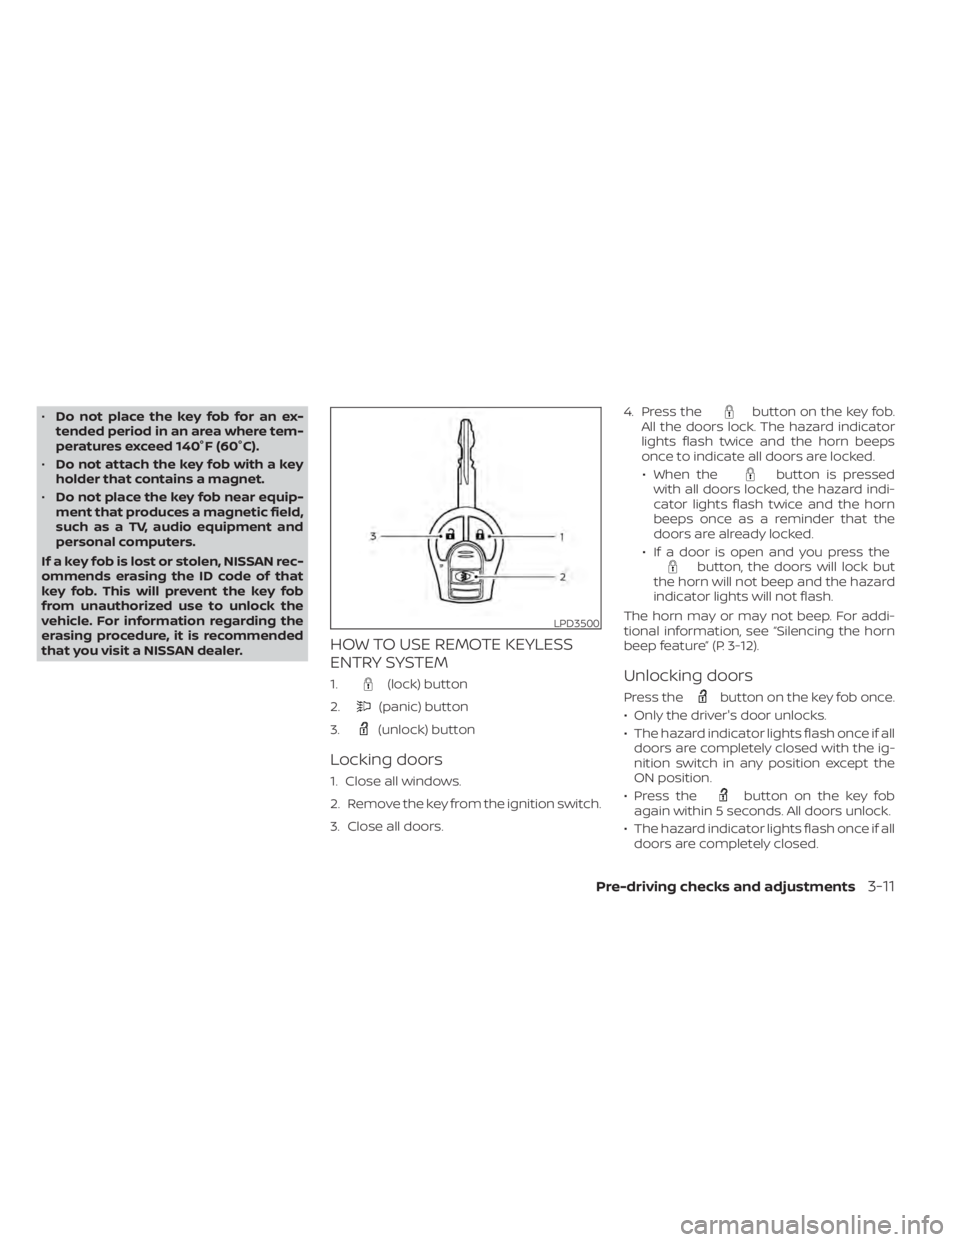
HOW TO USE REMOTE KEYLESS
ENTRY SYSTEM
1.(lock) button
2.
(panic) button
3.
(unlock) button
Locking doors
1. Close all windows.
2. Remove the key from the ignition switch.
3. Close all doors. 4. Press the
button on the key fob.
All the doors lock. The hazard indicator
lights flash twice and the horn beeps
once to indicate all doors are locked.
• When the
button is pressed
with all doors locked, the hazard indi-
cator lights flash twice and the horn
beeps once as a reminder that the
doors are already locked.
• If a door is open and you press the
button, the doors will lock but
the horn will not beep and the hazard
indicator lights will not flash.
The horn may or may not beep. For addi-
tional information, see “Silencing the horn
beep feature” (P. 3-12).
Unlocking doors
Press thebutton on the key fob once.
• Only the driver's door unlocks.
• The hazard indicator lights flash once if all doors are completely closed with the ig-
nition switch in any position except the
ON position.
• Press the
button on the key fob
again within 5 seconds. All doors unlock.
• The hazard indicator lights flash once if all doors are completely closed.
LPD3500
Page 116 of 300
button on the key fob once
to turn on the interior lights.
The interior lights can be turned off without
waiting a period of time by inserting the key
into the ignition switch and placing the ig-
nition switch in the ON or START position,
locking the doors with the key fob, power
door lock switch or pushing the interior
light switch to the OFF position.
For additional information, see
lightsŽ (P. 2-32).
Auto relock
When thebutton on the key fob is
pressed, all doors will lock automatically
within one minute unless one of the follow-
ing operations is performed:
€ Any door is opened.
€ A key is inserted into the ignition switch and the switch is cycled from OFF to ON.
€ Press key fob
button.
Using the panic alarm
If you are near your vehicle and feel threat-
ened, you may activate the panic alarm to call attention by pressing and holding the
button on the key fob for
longer than
0.5 seconds.
The panic alarm and headlights will stay on
for a period of time.
The panic alarm stops when:
• It has run for a period of time.
• Any button is pressed on the key fob.
Silencing the horn beep feature
If desired, the horn beep feature can be
deactivated using the key fob.
To deactivate: Press and hold the
andbuttonsfor at least 2 seconds.
The hazard indicator lights will flash three
times to confirm that the horn beep fea-
ture has been deactivated.
To activate: Press and hold the
andbuttonsfor at least 2 seconds once
more.
The hazard indicator lights will flash once
and the horn will sound once to confirm
that the horn beep feature has been
reactivated.
Deactivating the horn beep feature does
not silence the horn if the alarm is
triggered.
3-12Pre-driving checks and adjustments
Page 126 of 300
•The distance guide line and the ve-
hicle width line should be used as a
reference only when the vehicle is on
a level paved surface. The distance
viewed on the monitor is for refer-
ence only and may be different than
the actual distance between the ve-
hicle and displayed objects.
CAUTION
Do not scratch the camera lens when
cleaning dirt or snow from the front of
the camera.
The RearView Monitor system automati-
cally shows a rear view of the vehicle when
the shif t lever is shif ted into the R (Reverse)
position. The radio can still be heard while
the RearView Monitor is active. To display the rear view, the RearView Moni-
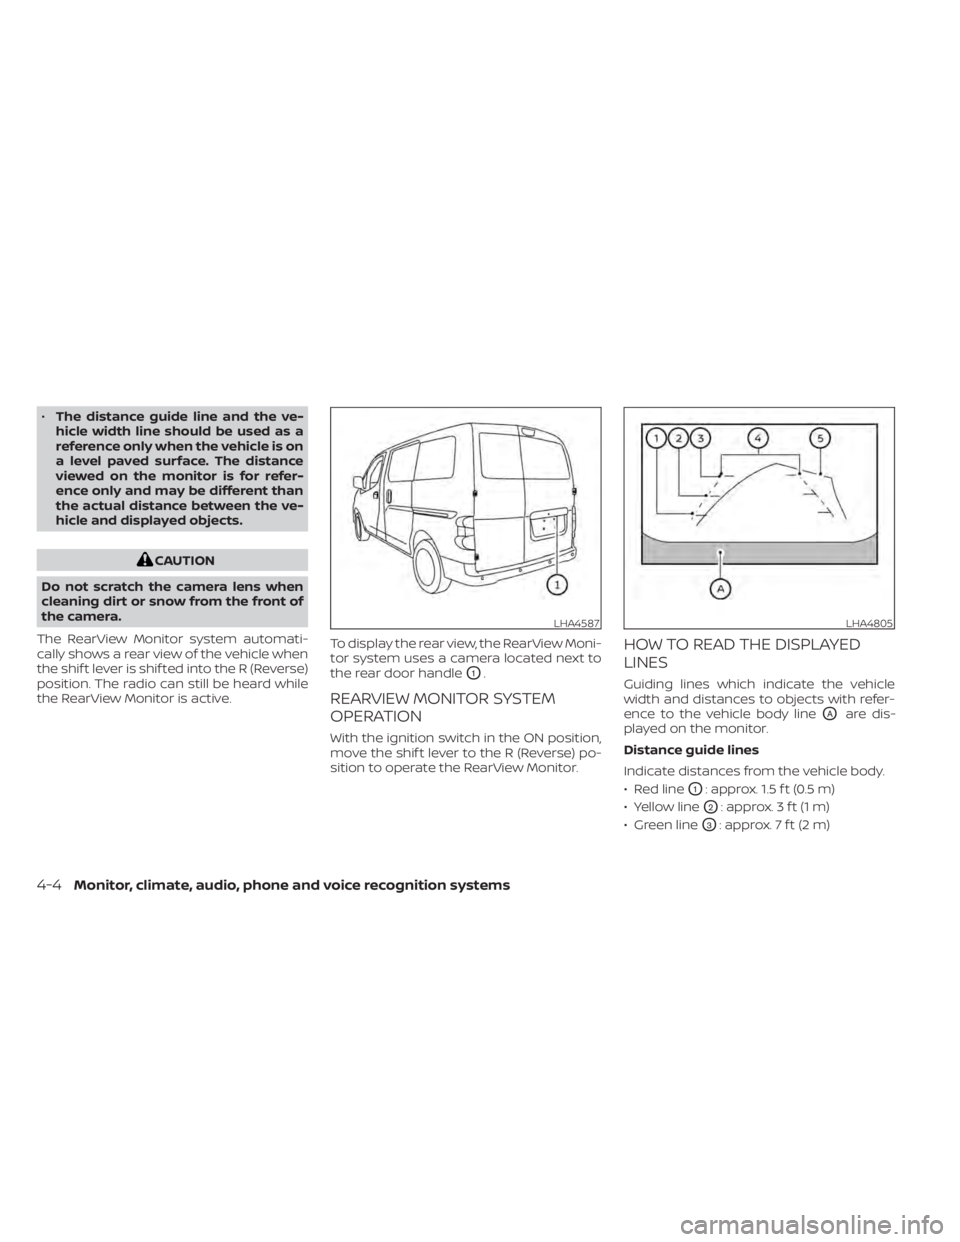
tor system uses a camera located next to
the rear door handle
O1.
REARVIEW MONITOR SYSTEM
OPERATION
With the ignition switch in the ON position,
move the shif t lever to the R (Reverse) po-
sition to operate the RearView Monitor.
HOW TO READ THE DISPLAYED
LINES
Guiding lines which indicate the vehicle
width and distances to objects with refer-
ence to the vehicle body line
OAare dis-
played on the monitor.
Distance guide lines
Indicate distances from the vehicle body.
• Red line
O1: approx. 1.5 f t (0.5 m)
• Yellow line
O2: approx. 3 f t (1 m)
• Green line
O3: approx. 7 f t (2 m)
LHA4587LHA4805
4-4Monitor, climate, audio, phone and voice recognition systems
Page 145 of 300
CAUTION
• Do not use leaded gasoline. Deposits
from leaded gasoline will seriously
reduce the three-way catalyst's abil-
ity to help reduce exhaust pollutants.
• Keep your engine tuned up. Malfunc-
tions in the ignition, fuel injection, or
electrical systems can cause over
rich fuel flow into the three-way
catalyst, causing it to overheat. Do
not keep driving if the engine mis-
fires, or if noticeable loss of perfor-
mance or other unusual operating
conditions are detected. Have the ve-
hicle inspected promptly. It is recom-
mended that you visit a NISSAN
dealer for this service.
• Avoid driving with an extremely low
fuel level. Running out of fuel could
cause the engine to misfire, damag-
ing the three-way catalyst.
• Do not race the engine while warm-
ing it up.
• Do not push or tow your vehicle to
start the engine.TIRE PRESSURE MONITORING
SYSTEM (TPMS)
Each tire, including the spare (if provided),
should be checked monthly when cold and
inflated to the inflation pressure recom-
mended by the vehicle manufacturer on
the vehicle placard or tire inflation pressure
label.
(If your vehicle has tires of a different size
than the size indicated on the vehicle plac-
ard or tire inflation pressure label, you
should determine the proper tire inflation
pressure for those tires.)
As an added safety feature, your vehicle
has been equipped with a Tire Pressure
Monitoring System (TPMS) that illuminates
a low tire pressure telltale when one or
more of your tires is significantly under-
inflated. Accordingly, when the low tire
pressure telltale illuminates, you should
stop and check your tires as soon as pos-
sible, and inflate them to the proper pres-
sure. Driving on a significantly under-
inflated tire causes the tire to overheat and
can lead to tire failure. Under-inflation also
reduces fuel efficiency and tire tread life,
and may affect the vehicle’s handling and
stopping ability. Please note that the TPMS is not a substi-
tute for proper tire maintenance, and it is
the driver’s responsibility to maintain cor-
rect tire pressure, even if under-inflation
has not reached the level to trigger illumi-
nation of the TPMS low tire pressure telltale.
Your vehicle has also been equipped with a
TPMS malfunction indicator to indicate
when the system is not operating properly.
The TPMS malfunction indicator is com-
bined with the low tire pressure telltale.
When the system detects a malfunction,
the telltale will flash for approximately one
minute and then remain continuously illu-
minated. This sequence will continue upon
subsequent vehicle start-ups as long as
the malfunction exists. When the malfunc-
tion indicator is illuminated, the system
may not be able to detect or signal low tire
pressure as intended. TPMS malfunctions
may occur for a variety of reasons, includ-
ing the installation of replacement or alter-
nate tires or wheels on the vehicle that
prevent the TPMS from functioning prop-
erly. Always check the TPMS malfunction
telltale af ter replacing one or more tires or
wheels on your vehicle to ensure that the
replacement or alternate tires and wheels
allow the TPMS to continue to function
properly.
Starting and driving5-3
Page 150 of 300
WARNING
• Never remove the ignition key or
place the ignition switch in the LOCK
position while driving. The steering
wheel will lock (for models with a
steering lock mechanism). This may
cause the driver to lose control of the
vehicle and could result in serious ve-
hicle damage or personal injury.
CONTINUOUSLY VARIABLE
TRANSMISSION
The ignition lock is designed so that the
ignition switch cannot be turned to the
LOCK position until the shif t lever is moved
to the P (Park) position.
• When placing the ignition switch in the LOCK position, make sure that the shif t
lever is in the P (Park) position
• When removing the key from the ignition switch (if it is inserted), make sure that the
shif t lever is in the P (Park) position. When the ignition switch cannot be placed
in the LOCK position:
1. Move the shif t lever to the P (Park)
position.
2. Move the ignition switch slightly in the ON direction.
3. Turn the ignition switch to the LOCK position.
4. Remove the key if it is inserted in the ignition switch.
If the ignition switch is placed in the LOCK
position, the shif t lever cannot be moved
from the P (Park) position.
The shif t lever can be moved if the igni-
tion switch is in the ON position and the
foot brake pedal is depressed.
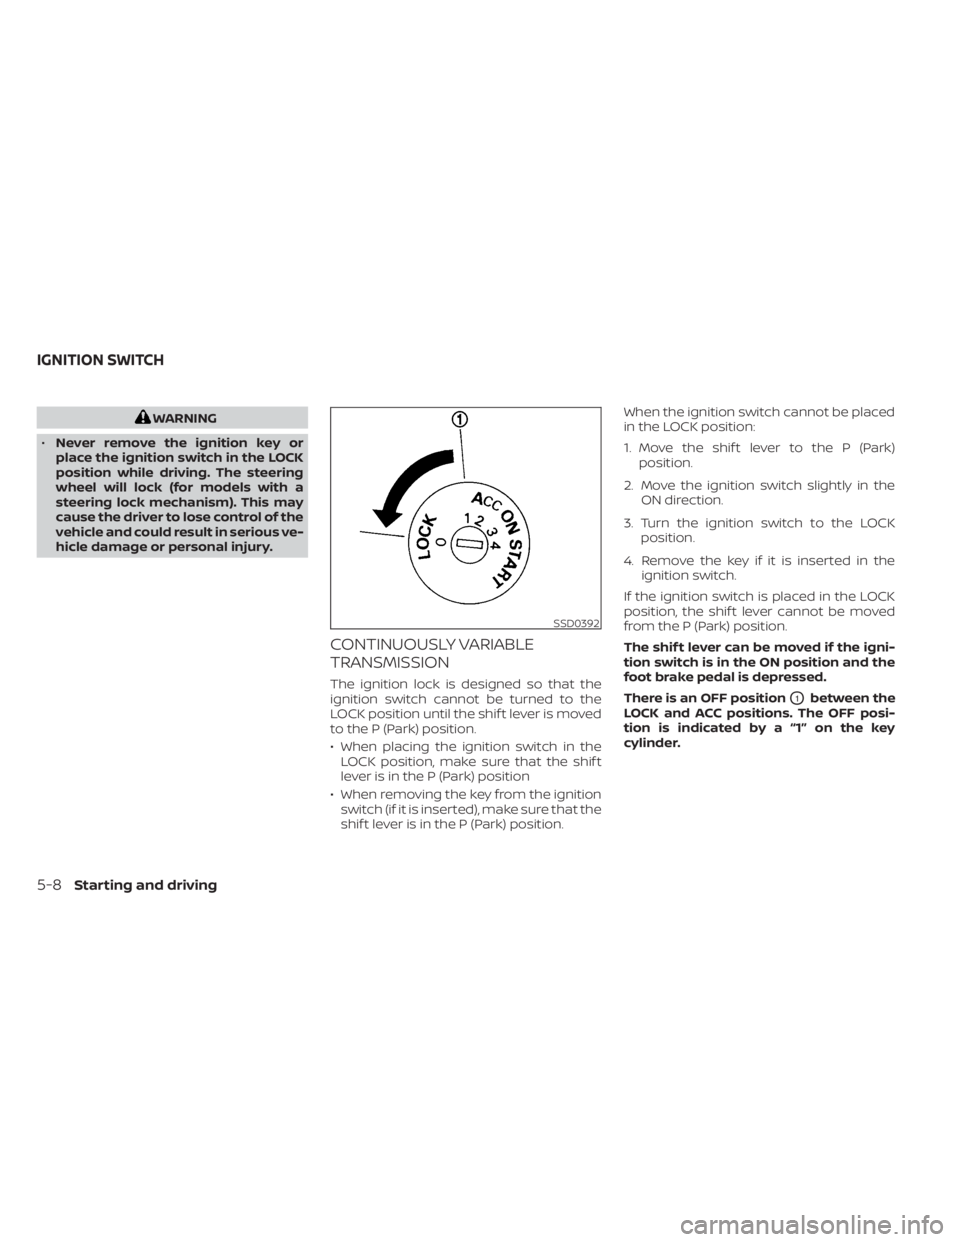
There is an OFF position
O1between the
LOCK and ACC positions. The OFF posi-
tion is indicated by a “1” on the key
cylinder.
Page 152 of 300
1. Apply the parking brake.
2. Move the shif t lever to P (Park) or N (Neu-tral). P (Park) is recommended.
The shif t lever cannot be moved out of
P (Park) and into any of the other gear
positions if the ignition switch is
turned to the OFF position or if the key
is removed from the ignition switch.
The starter is designed not to operate
if the shif t lever is in any of the driving
positions.
3. Crank the engine with your foot off the
accelerator pedal by placing the igni-
tion switch in the START position. Re-
lease the key when the engine starts. If
the engine starts, but fails to run, repeat
the above procedure.
• If the engine is very hard to start in extremely cold weather or when re-
starting, depress the accelerator
pedal a little (approximately 1/3 to the
floor) and hold it and then crank the
engine. Release the key and the accel-
erator pedal when the engine starts. • If the engine is very hard to start be-
cause it is flooded, depress the accel-
erator pedal all the way to the floor
and hold it. Crank the engine for 5–6
seconds. Af ter cranking the engine, re-
lease the accelerator pedal. Crank the
engine with your foot off the accel-
erator pedal by turning the ignition
key to the START position. Release the
key when the engine starts. If the en-
gine starts, but fails to run, repeat the
above procedure.
Page 155 of 300
CAUTION
To avoid possible damage to your ve-
hicle, when stopping the vehicle on an
uphill grade, do not hold the vehicle by
depressing the accelerator pedal. The
foot brake should be used for this
purpose.
1. Af ter starting the engine, fully depress the foot brake pedal before moving the
shif t lever out of the P (Park) position.
2. Keep the foot brake pedal depressed and move the shif t lever into a driving
gear.
3. Release the foot brake, then gradually start the vehicle in motion.
4. Stop the vehicle completely before mov- ing the shif t lever into the P (Park)
position.
The Continuously Variable Transmission
is designed so the foot brake pedal MUST
be depressed before shif ting from P
(Park) to any drive position while the ig-
nition switch is in the ON position. The shif t lever cannot be moved out of P
(Park) and into any of the other gear po-
sitions if the ignition switch is placed in
the LOCK, OFF or ACC position or if the
keyisremoved.
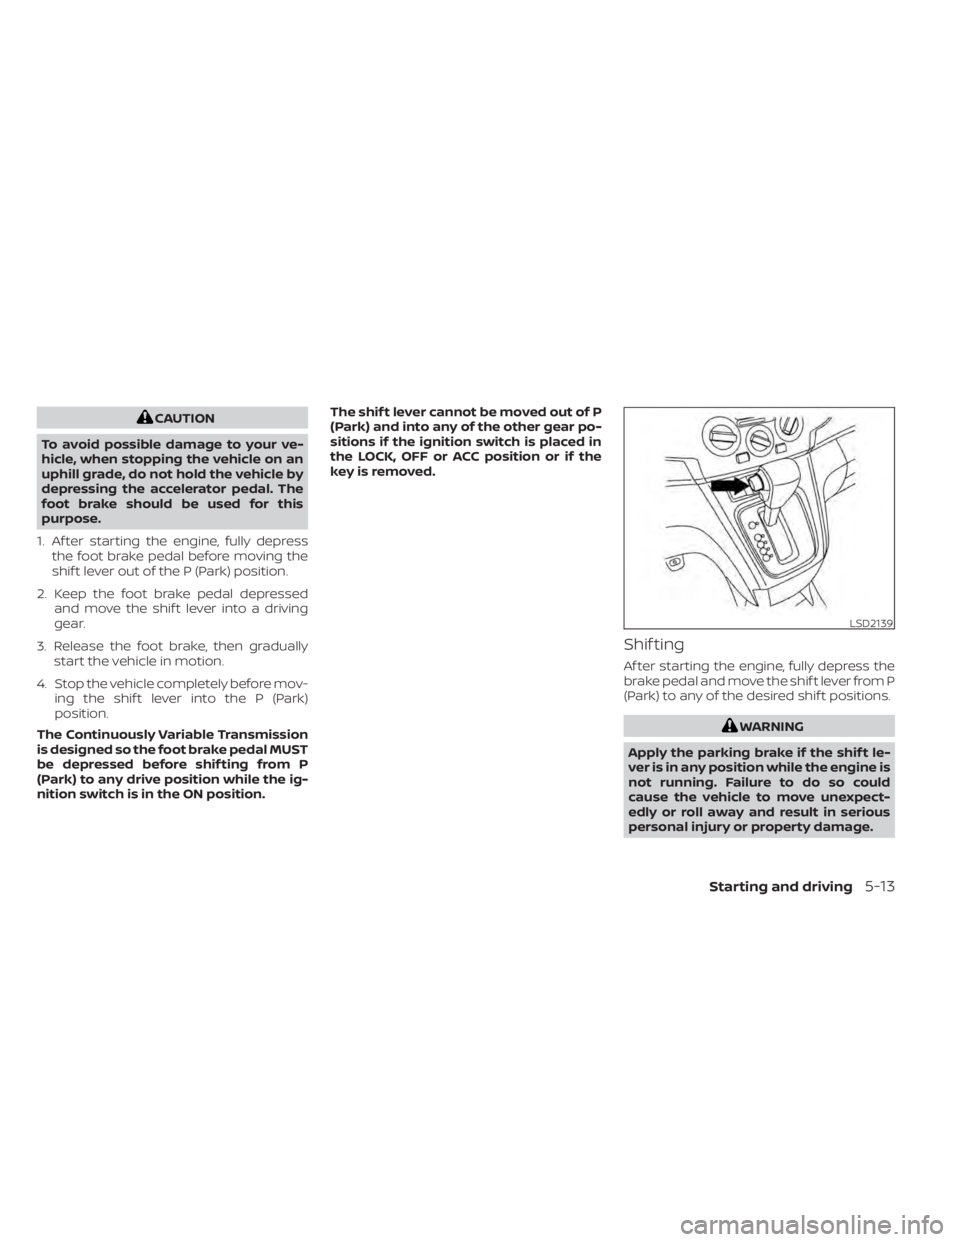
Shif ting
Af ter starting the engine, fully depress the
brake pedal and move the shif t lever from P
(Park) to any of the desired shif t positions.