2021 NISSAN MURANO lock
[x] Cancel search: lockPage 185 of 508
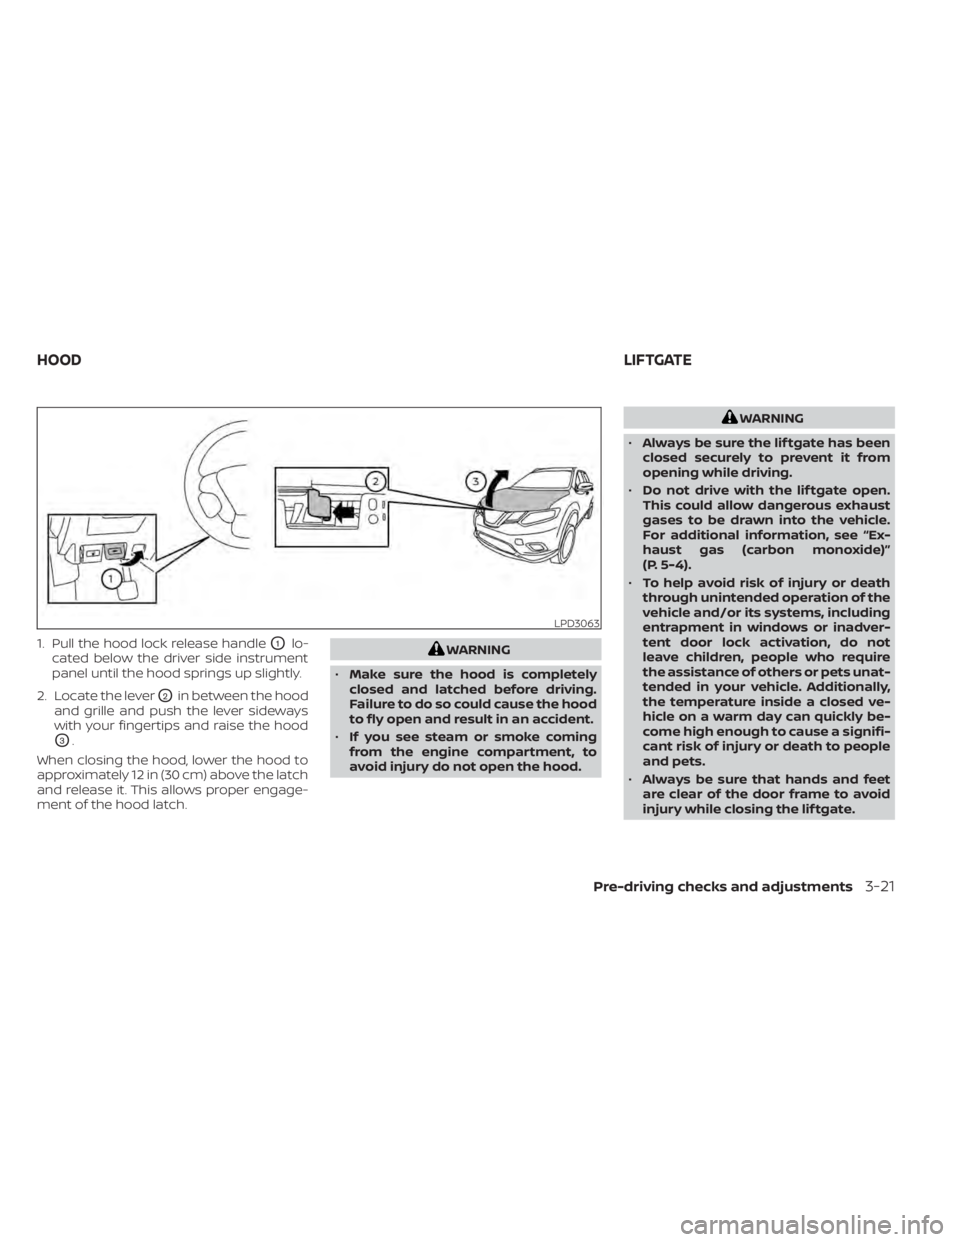
1. Pull the hood lock release handleO1lo-
cated below the driver side instrument
panel until the hood springs up slightly.
2. Locate the lever
O2in between the hood
and grille and push the lever sideways
with your fingertips and raise the hood
O3.
When closing the hood, lower the hood to
approximately 12 in (30 cm) above the latch
and release it. This allows proper engage-
ment of the hood latch.
WARNING
• Make sure the hood is completely
closed and latched before driving.
Failure to do so could cause the hood
to fly open and result in an accident.
• If you see steam or smoke coming
from the engine compartment, to
avoid injury do not open the hood.
WARNING
• Always be sure the lif tgate has been
closed securely to prevent it from
opening while driving.
• Do not drive with the lif tgate open.
This could allow dangerous exhaust
gases to be drawn into the vehicle.
For additional information, see “Ex-
haust gas (carbon monoxide)”
(P. 5-4).
• To help avoid risk of injury or death
through unintended operation of the
vehicle and/or its systems, including
entrapment in windows or inadver-
tent door lock activation, do not
leave children, people who require
the assistance of others or pets unat-
tended in your vehicle. Additionally,
the temperature inside a closed ve-
hicle on a warm day can quickly be-
come high enough to cause a signifi-
cant risk of injury or death to people
and pets.
• Always be sure that hands and feet
are clear of the door frame to avoid
injury while closing the lif tgate.
LPD3063
HOOD LIFTGATE
Pre-driving checks and adjustments3-21
Page 186 of 508
CAUTION
Do not use accessory carriers that at-
tach to the lif tgate. Doing so will cause
damage to the vehicle.
OPERATING THE MANUAL
LIFTGATE (if so equipped)
The power door lock system allows you to
lock or unlock all doors including the lif t-
gate simultaneously.
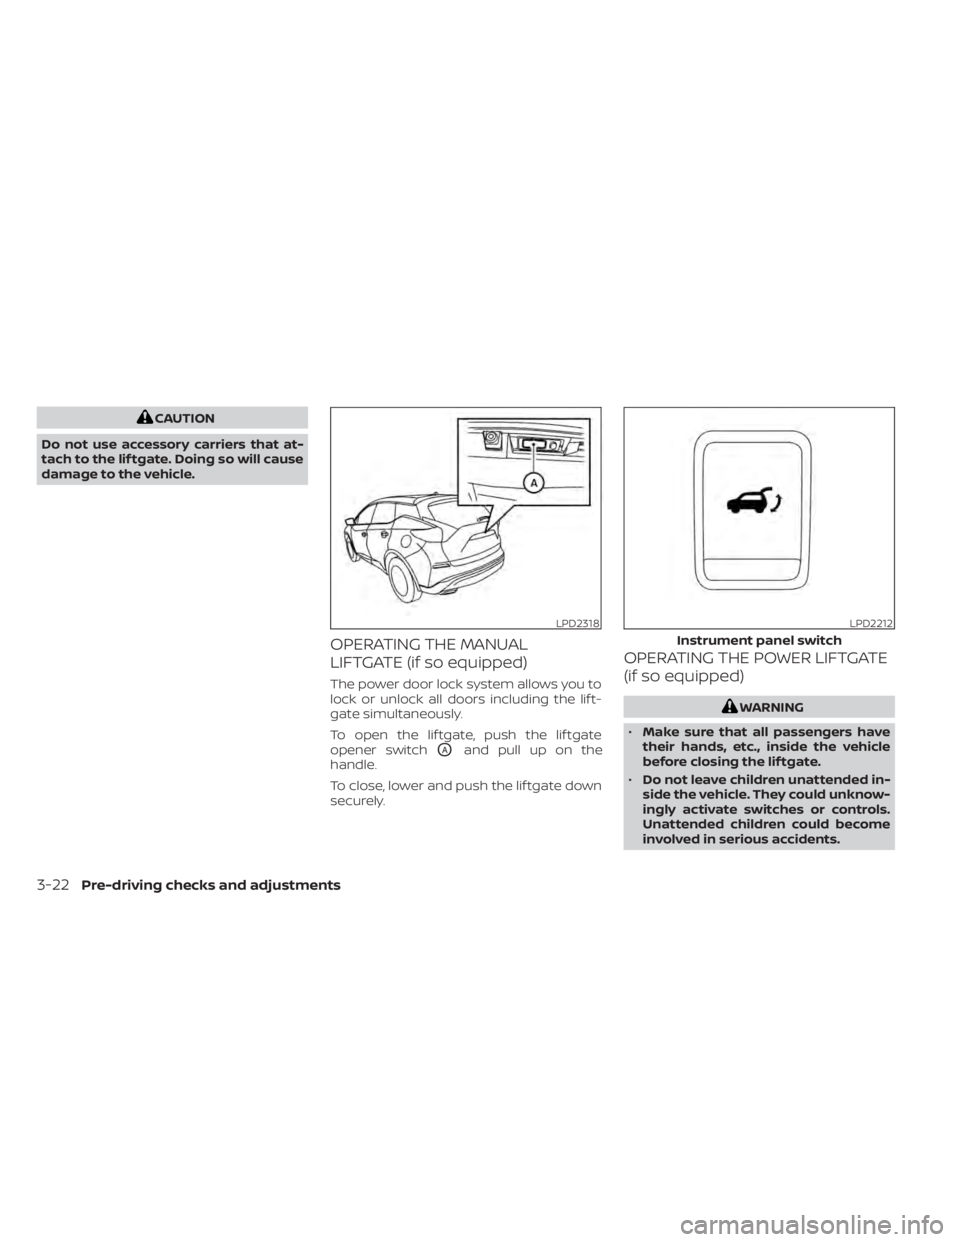
To open the lif tgate, push the lif tgate
opener switch
OAand pull up on the
handle.
To close, lower and push the lif tgate down
securely.
OPERATING THE POWER LIFTGATE
(if so equipped)
WARNING
• Make sure that all passengers have
their hands, etc., inside the vehicle
before closing the lif tgate.
• Do not leave children unattended in-
side the vehicle. They could unknow-
ingly activate switches or controls.
Unattended children could become
involved in serious accidents.
LPD2318LPD2212
Instrument panel switch
3-22Pre-driving checks and adjustments
Page 187 of 508
NOTE:
To open, close or reverse the power lif t-
gate, the shif t lever must be in P (Park).
Also, the power lif tgate will not operate if
battery voltage is low.
Power Open:
The power lif tgate automatically moves
from the fully closed position to the fully
open position in approximately5–8sec-
onds. The power open feature can be acti-
vated by the switch on the Intelligent Key,
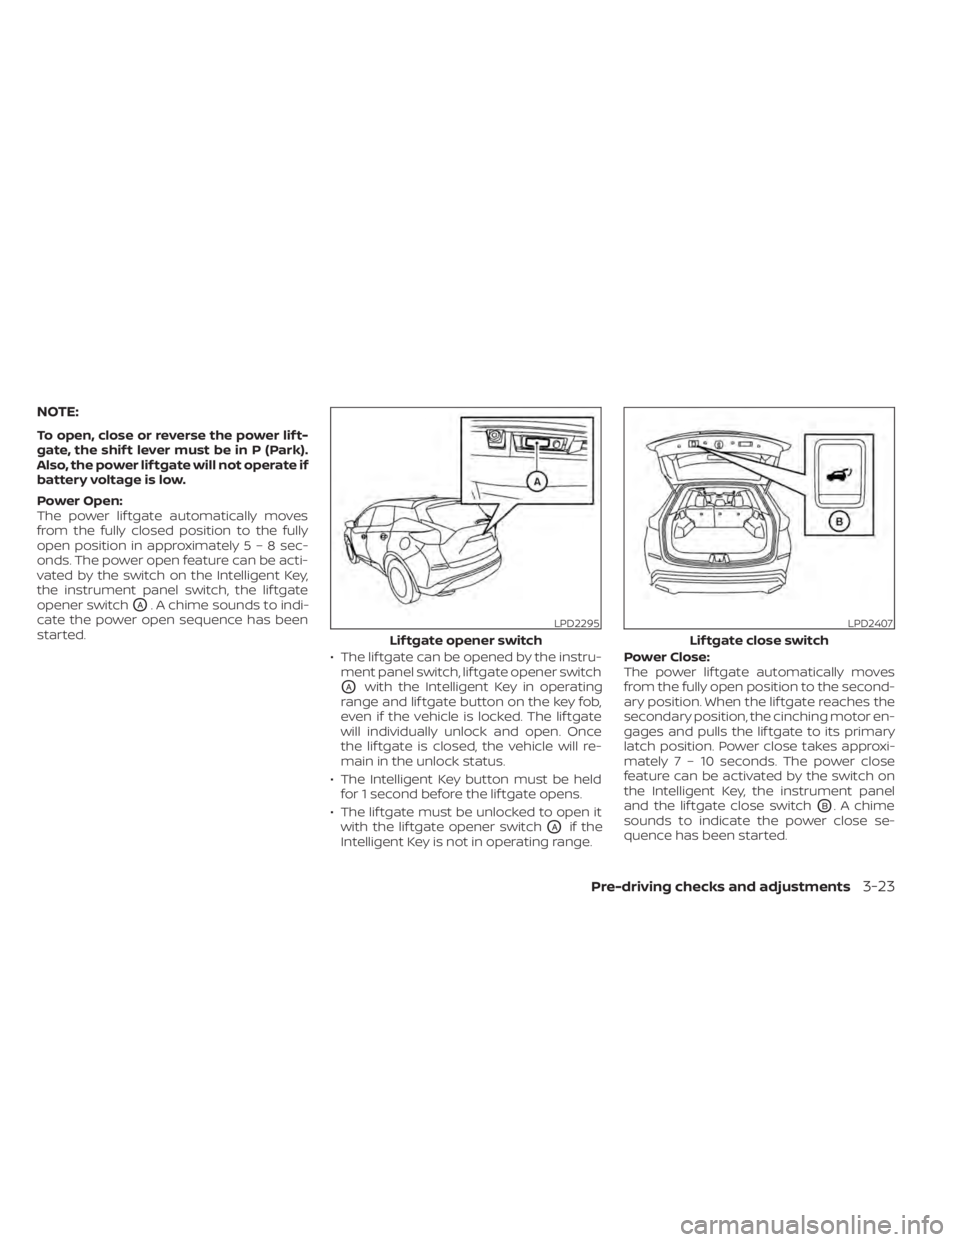
the instrument panel switch, the lif tgate
opener switch
OA. A chime sounds to indi-
cate the power open sequence has been
started.
• The lif tgate can be opened by the instru-ment panel switch, lif tgate opener switch
OAwith the Intelligent Key in operating
range and lif tgate button on the key fob,
even if the vehicle is locked. The lif tgate
will individually unlock and open. Once
the lif tgate is closed, the vehicle will re-
main in the unlock status.
• The Intelligent Key button must be held for 1 second before the lif tgate opens.
• The lif tgate must be unlocked to open it with the lif tgate opener switch
OAif the
Intelligent Key is not in operating range. Power Close:
The power lif tgate automatically moves
from the fully open position to the second-
ary position. When the lif tgate reaches the
secondary position, the cinching motor en-
gages and pulls the lif tgate to its primary
latch position. Power close takes approxi-
matel
y7–10sec onds. The power close
feature can be activated by the switch on
the Intelligent Key, the instrument panel
and the lif tgate close switch
OB. A chime
sounds to indicate the power close se-
quence has been started.
LPD2295
Lif tgate opener switch
LPD2407
Lif tgate close switch
Pre-driving checks and adjustments3-23
Page 191 of 508
CAUTION
• Interference or malfunction can be
caused by parking in close proximity
to radio or satellite towers.
• Intelligent Key interference could be
caused if you have your key fob
stored next to your cell phone or any
RF-enabled smart card. For addi-
tional information, see “NISSAN Intel-
ligent Key® system” (P. 3-7).
LIFTGATE RELEASE
WARNING
• Always be sure the lif tgate has been
closed securely to prevent it from
opening while driving.
• Do not drive with the lif tgate open.
This could allow dangerous exhaust
gases to be drawn into the vehicle.
For additional information, see “Ex-
haust gas (carbon monoxide)”
(P. 5-4).
• To avoid personal injury, do not at-
tempt to activate the power lif tgate
if one or both of the lif tgate struts are
removed.
CAUTION
• If the power lif tgate does not stay
open or if the lif tgate unexpectedly
closes at any time while a continuous
warning chime sounds, do not oper-
ate the lif tgate. There may be a pres-
sure loss in one or both of the lif tgate
struts. It is recommended that you
have the lif tgate inspected. It is rec-
ommended that you visit a NISSAN
dealer for this service.
• Do not activate the power lif tgate if
one or both of the lif tgate struts are
removed. Damage to the lif tgate or
power lif tgate mechanisms may
occur.
Lif tgate release (manual and
power)
The lif tgate release mechanism allows the
lif tgate to be opened in the event of a dis-
charged battery.
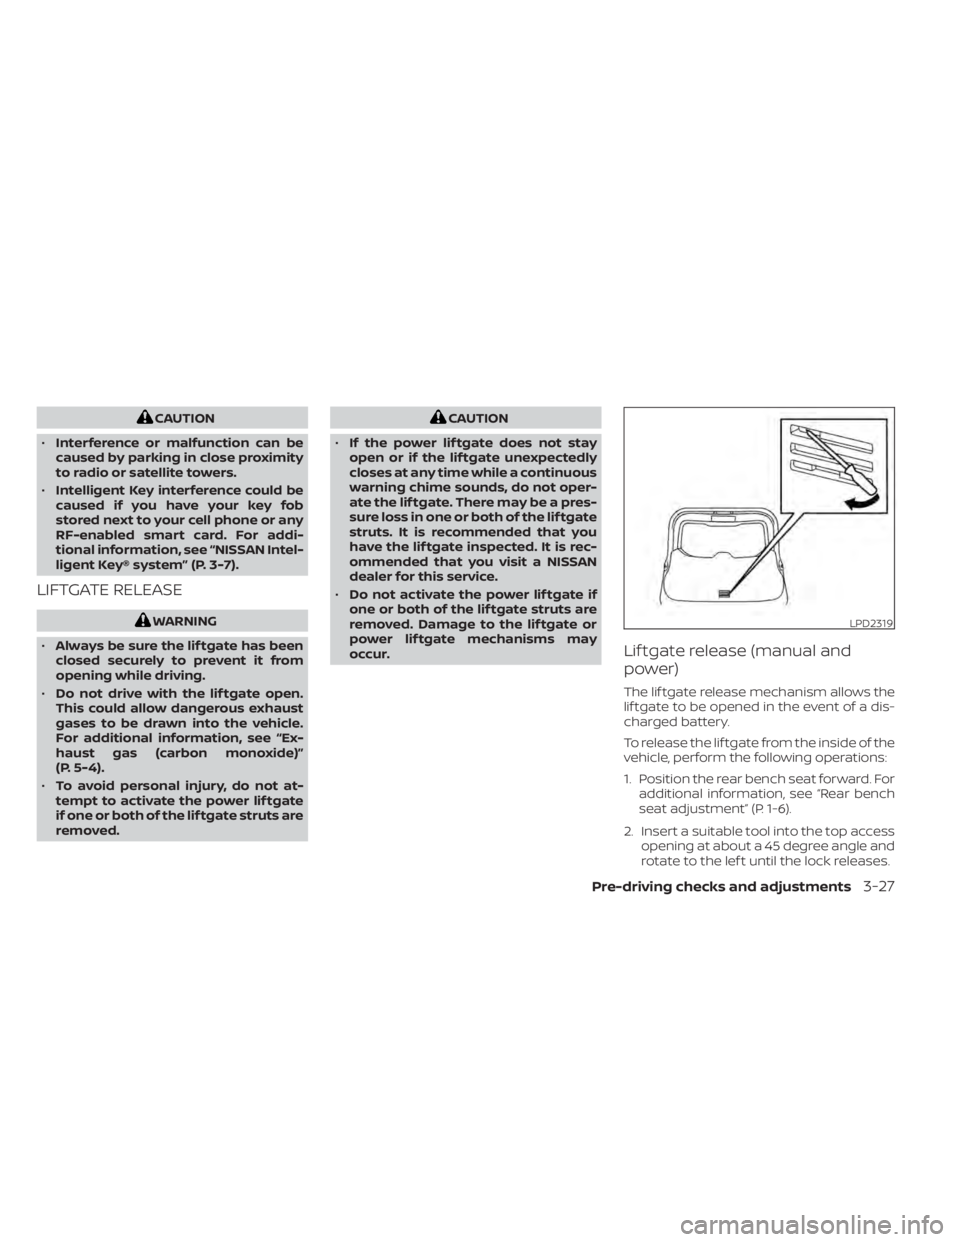
To release the lif tgate from the inside of the
vehicle, perform the following operations:
1. Position the rear bench seat forward. For additional information, see “Rear bench
seat adjustment” (P. 1-6).
2. Insert a suitable tool into the top access opening at about a 45 degree angle and
rotate to the lef t until the lock releases.
LPD2319
Pre-driving checks and adjustments3-27
Page 193 of 508
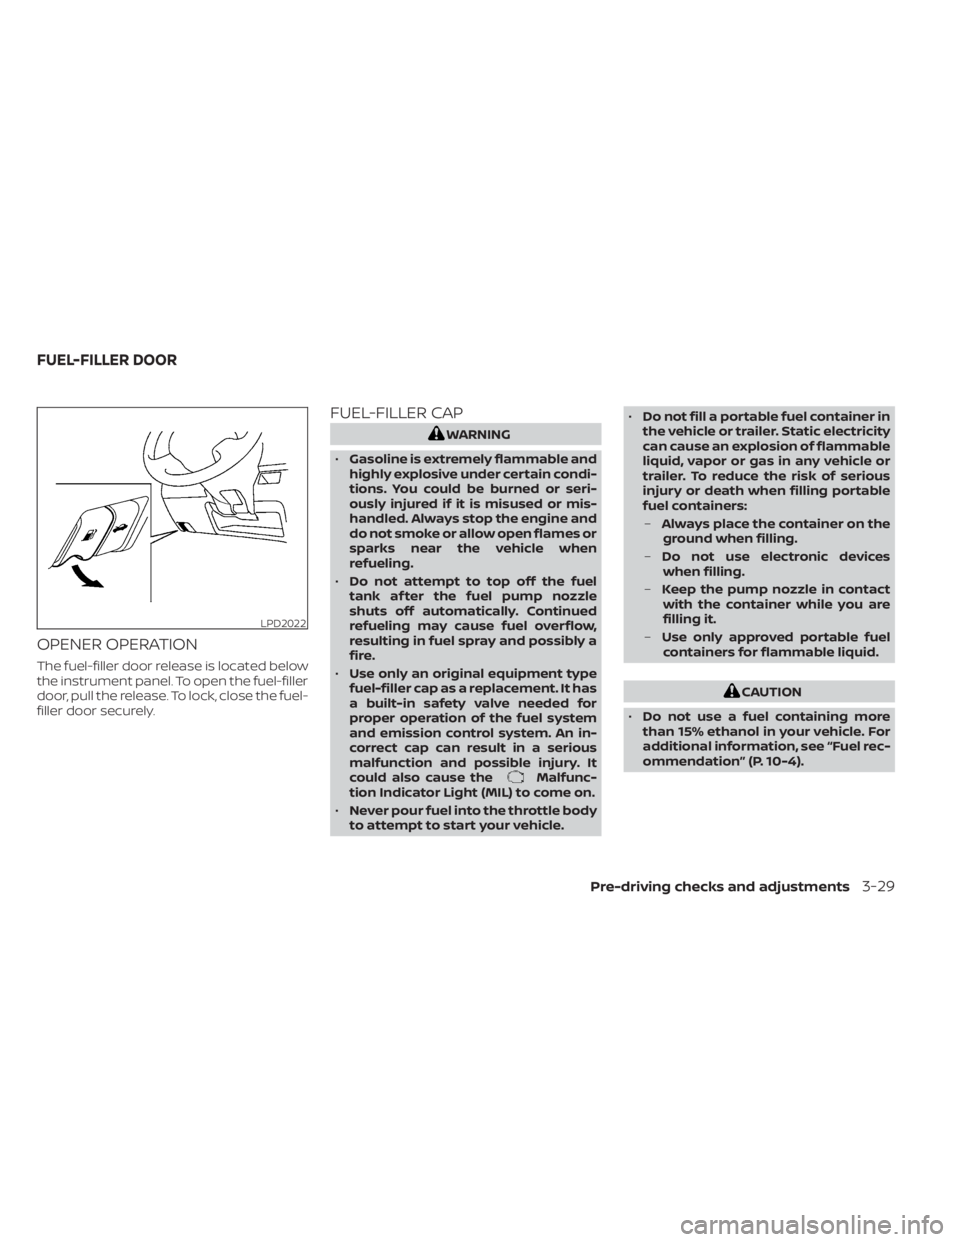
OPENER OPERATION
The fuel-filler door release is located below
the instrument panel. To open the fuel-filler
door, pull the release. To lock, close the fuel-
filler door securely.
FUEL-FILLER CAP
WARNING
• Gasoline is extremely flammable and
highly explosive under certain condi-
tions. You could be burned or seri-
ously injured if it is misused or mis-
handled. Always stop the engine and
do not smoke or allow open flames or
sparks near the vehicle when
refueling.
• Do not attempt to top off the fuel
tank af ter the fuel pump nozzle
shuts off automatically. Continued
refueling may cause fuel overflow,
resulting in fuel spray and possibly a
fire.
• Use only an original equipment type
fuel-filler cap as a replacement. It has
a built-in safety valve needed for
proper operation of the fuel system
and emission control system. An in-
correct cap can result in a serious
malfunction and possible injury. It
could also cause the
Malfunc-
tion Indicator Light (MIL) to come on.
• Never pour fuel into the throttle body
to attempt to start your vehicle. •
Do not fill a portable fuel container in
the vehicle or trailer. Static electricity
can cause an explosion of flammable
liquid, vapor or gas in any vehicle or
trailer. To reduce the risk of serious
injury or death when filling portable
fuel containers:
– Always place the container on the
ground when filling.
– Do not use electronic devices
when filling.
– Keep the pump nozzle in contact
with the container while you are
filling it.
– Use only approved portable fuel
containers for flammable liquid.
CAUTION
• Do not use a fuel containing more
than 15% ethanol in your vehicle. For
additional information, see “Fuel rec-
ommendation” (P. 10-4).
LPD2022
FUEL-FILLER DOOR
Pre-driving checks and adjustments3-29
Page 194 of 508
•The Loose Fuel Cap warning mes-
sage will appear if the fuel-filler cap
is not properly tightened. It may take
a few driving trips for the message to
be displayed. Failure to tighten the
fuel-filler cap properly af ter the
Loose Fuel Cap warning message ap-
pears may cause the
Malfunc-
tion Indicator Light (MIL) to
illuminate.
• Failure to tighten the fuel-filler cap
properly may cause the
Mal-
function Indicator Light (MIL) to illu-
minate. If the
light illuminates
because the fuel-filler cap is loose or
missing, tighten or install the cap and
continue to drive the vehicle. The
light should turn off af ter a few
driving trips. If thelight does not
turn off af ter a few driving trips, have
the vehicle inspected. It is recom-
mended that you visit a NISSAN
dealer for this service.
• For additional information, see “Mal-
function Indicator Light (MIL)”
(P. 2-13).
• If fuel is spilled on the vehicle body,
flush it away with water to avoid
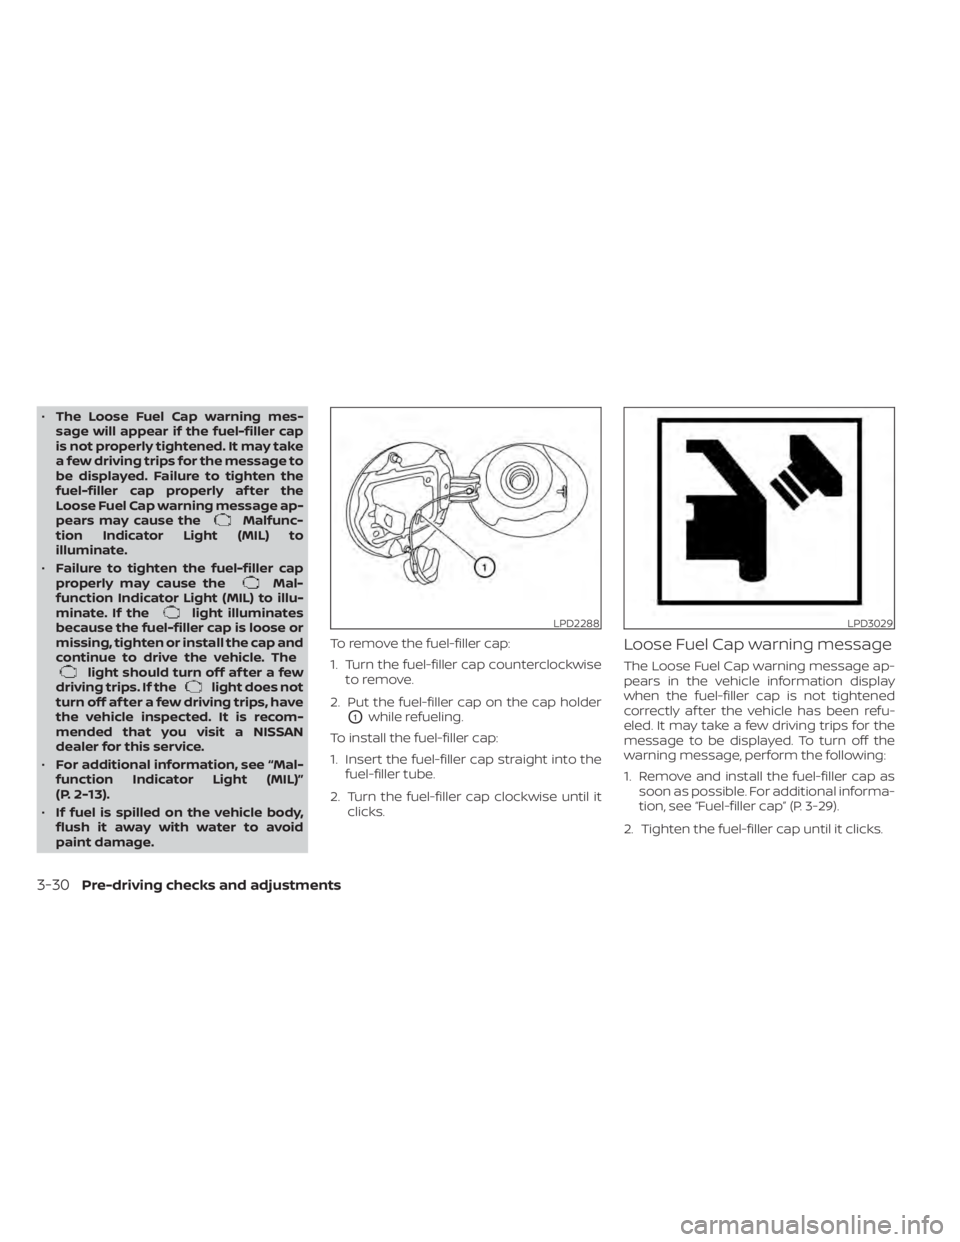
paint damage. To remove the fuel-filler cap:
1. Turn the fuel-filler cap counterclockwise
to remove.
2. Put the fuel-filler cap on the cap holder
O1while refueling.
To install the fuel-filler cap:
1. Insert the fuel-filler cap straight into the fuel-filler tube.
2. Turn the fuel-filler cap clockwise until it clicks.
Loose Fuel Cap warning message
The Loose Fuel Cap warning message ap-
pears in the vehicle information display
when the fuel-filler cap is not tightened
correctly af ter the vehicle has been refu-
eled. It may take a few driving trips for the
message to be displayed. To turn off the
warning message, perform the following:
1. Remove and install the fuel-filler cap assoon as possible. For additional informa-
tion, see “Fuel-filler cap” (P. 3-29).
2. Tighten the fuel-filler cap until it clicks.
LPD2288LPD3029
3-30Pre-driving checks and adjustments
Page 195 of 508
3. Press the OK button on the steeringwheel for about one second to turn off
the Loose Fuel Cap warning message
af ter tightening the fuel-filler cap.WARNING
• Do not adjust the steering wheel
while driving. You could lose control
of your vehicle and cause an
accident.
• Do not adjust the steering wheel any
closer to you than is necessary for
proper steering operation and com-
fort. The driver's air bag inflates with
great force. If you are unrestrained,
leaning forward, sitting sideways or
out of position in any way, you are at
greater risk of injury or death in a
crash. You may also receive serious
or fatal injuries from the air bag if you
are up against it when it inflates. Al-
ways sit back against the seatback
and as far away as practical from the
steering wheel. Always use the seat
belts.
MANUAL OPERATION (if so
equipped)
Tilt and telescopic operation
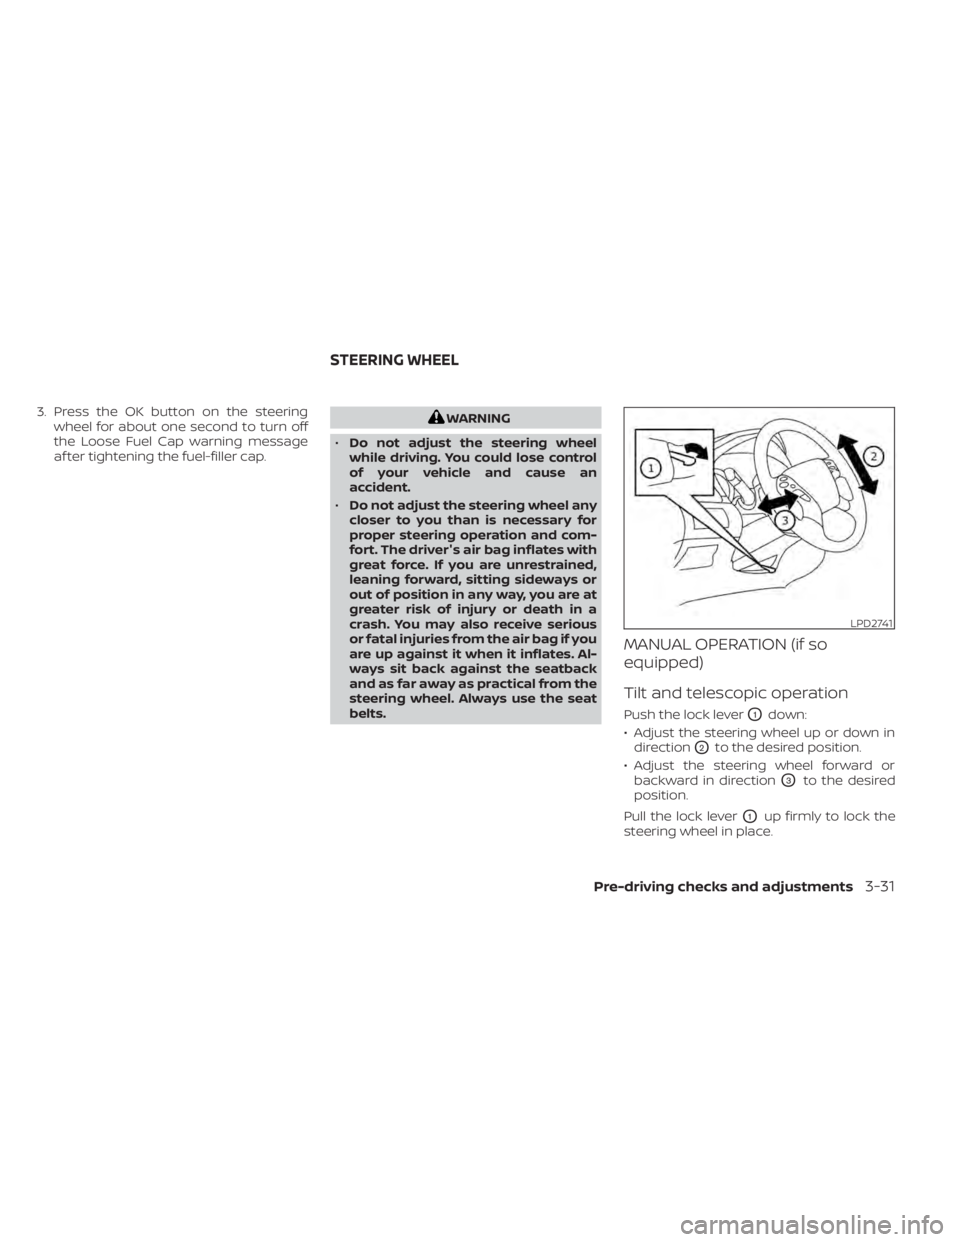
Push the lock leverO1down:
• Adjust the steering wheel up or down in direction
O2to the desired position.
• Adjust the steering wheel forward or backward in direction
O3to the desired
position.
Pull the lock lever
O1up firmly to lock the
steering wheel in place.
LPD2741
STEERING WHEEL
Pre-driving checks and adjustments3-31
Page 196 of 508
AUTOMATIC OPERATION (if so
equipped)
Tilt and telescopic operation
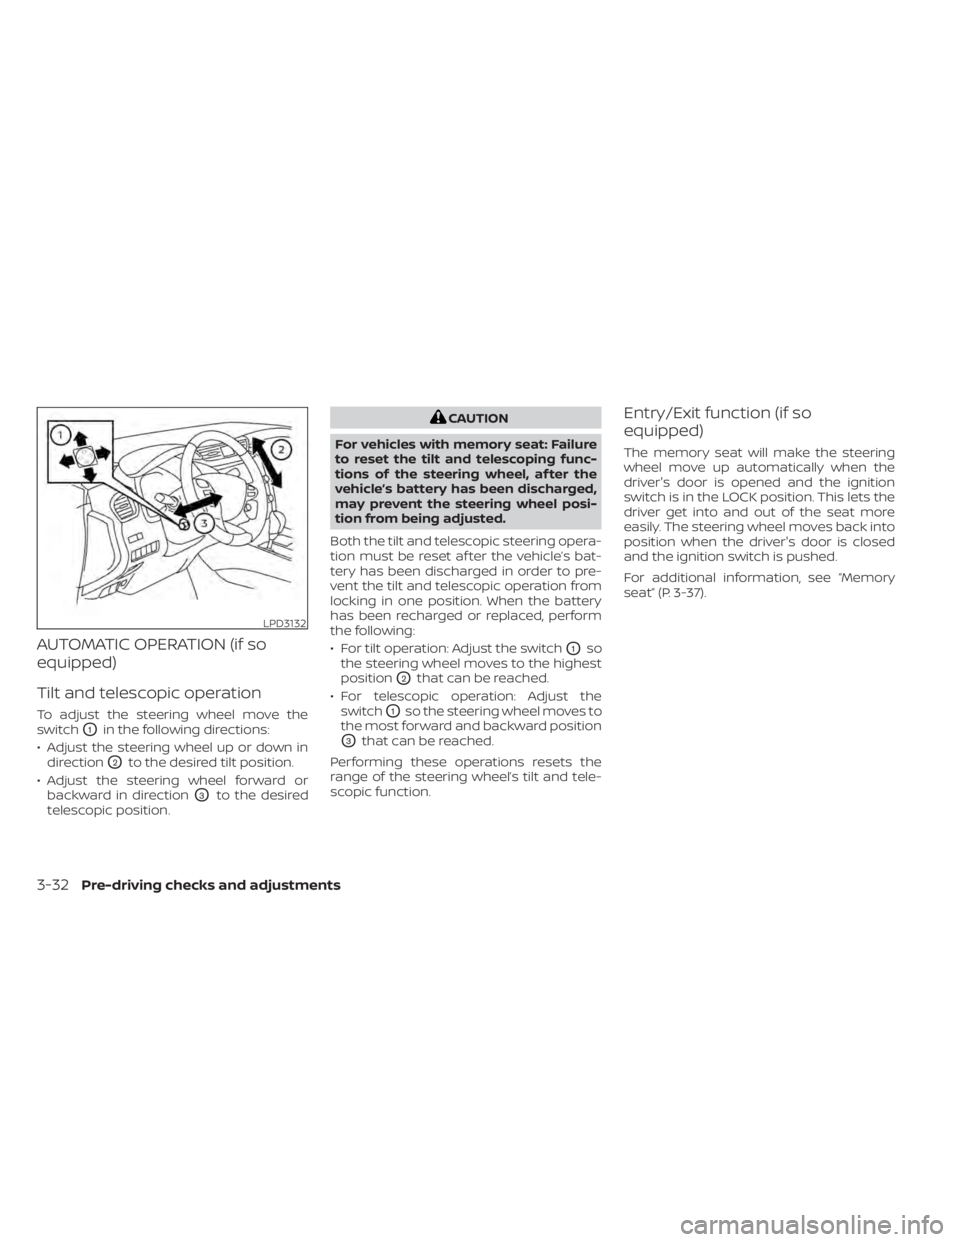
To adjust the steering wheel move the
switch
O1in the following directions:
• Adjust the steering wheel up or down in direction
O2to the desired tilt position.
• Adjust the steering wheel forward or backward in direction
O3to the desired
telescopic position.
CAUTION
For vehicles with memory seat: Failure
to reset the tilt and telescoping func-
tions of the steering wheel, af ter the
vehicle’s battery has been discharged,
may prevent the steering wheel posi-
tion from being adjusted.
Both the tilt and telescopic steering opera-
tion must be reset af ter the vehicle’s bat-
tery has been discharged in order to pre-
vent the tilt and telescopic operation from
locking in one position. When the battery
has been recharged or replaced, perform
the following:
• For tilt operation: Adjust the switch
O1so
the steering wheel moves to the highest
position
O2that can be reached.
• For telescopic operation: Adjust the switch
O1so the steering wheel moves to
the most forward and backward position
O3that can be reached.
Performing these operations resets the
range of the steering wheel’s tilt and tele-
scopic function.
Entry/Exit function (if so
equipped)
The memory seat will make the steering
wheel move up automatically when the
driver's door is opened and the ignition
switch is in the LOCK position. This lets the
driver get into and out of the seat more
easily. The steering wheel moves back into
position when the driver's door is closed
and the ignition switch is pushed.
For additional information, see “Memory
seat” (P. 3-37).
LPD3132
3-32Pre-driving checks and adjustments