Page 19 of 346

WARNING
∙ Do not ride in a moving vehicle whenthe seatback is reclined. This can be
dangerous. The shoulder belt will not
be against your body. In an accident,
you could be thrown into it and re-
ceive neck or other serious injuries.
You could also slide under the lap belt
and receive serious internal injuries. ∙ For the most effective protection
when the vehicle is in motion, the seat
should be upright. Always sit well
back and upright in the seat with both
feet on the floor and adjust the seat
properly. For additional information,
refer to “Precautions on seat belt us-
age” in this section.
∙ Af ter adjustment, gently rock in the seat to make sure it is securely locked. ∙ Do not leave children unattended in-
side the vehicle. They could unknow-
ingly activate switches or controls or
make the vehicle move. Unattended
children could become involved in se-
rious accidents.
∙ To help avoid risk of injury or death through unintended operation of the
vehicle and/or its systems, do not
leave children, people who require the
assistance of others or pets unat-
tended in your vehicle. Additionally,
the temperature inside a closed ve-
hicle on a warm day can quickly be-
come high enough to cause a signifi-
cant risk of injury or death to people
and pets.
∙ Do not adjust the driver’s seat while driving so full attention may be given
to vehicle operation. The seat may
move suddenly and could cause loss
of control of the vehicle.
∙ The seatback should not be reclined any more than needed for comfort.
Seat belts are most effective when the
passenger sits well back and straight
up in the seat. If the seatback is re-
clined, the risk of sliding under the lap
belt and being injured is increased.
Page 20 of 346

CAUTION
When adjusting the seat positions, be
sure not to contact any moving parts to
avoid possible injuries and/or damage.
FRONT MANUAL SEAT
ADJUSTMENT
Your vehicle seats can be adjusted manu-
ally. For additional information about ad-
justing the seats, refer to the steps outlined
in this section.
Forward and backward
Pull the center of the bar up and hold it
while you slide the seat forward or back-
ward to the desired position. Release the
bar to lock the seat in position.
Reclining
To recline the seatback, pull the lever up
and lean back. To bring the seatback for-
ward, pull the lever up and lean your body
forward. Release the lever to lock the seat-
back in position.
The reclining feature allows adjustment of
the seatback for occupants of different
sizes for added comfort and to help obtain
proper seat belt fit. For additional informa-
tion, refer to “Precautions on seat belt us-
age” in this section. Also, the seatback can
be reclined to allow occupants to rest
when the vehicle is stopped and the shif t
Page 23 of 346
WARNING
∙ Never allow anyone to ride in thecargo area or on the rear seat when it
is in the fold-down position. Use of
these areas by passengers without
proper restraints could result in seri-
ous injury or death in an accident or
sudden stop.
∙ Properly secure all cargo with ropes or straps to help prevent it from sliding
or shif ting. Do not place cargo higher
than the seatbacks. In a sudden stop
or collision, unsecured cargo could
cause personal injury.
∙ When returning the seatbacks to the upright position, be certain they are
completely secured in the latched po-
sition. If they are not completely se-
cured, passengers may be injured in
an accident or sudden stop.
∙ Closely supervise children when they are around cars to prevent them from
playing and becoming locked in the
hatch where they could be seriously
injured. Keep the car locked, with the
rear seatback and hatch securely
latched when not in use, and prevent
children’s access to car keys.
Page 31 of 346
 mode seat belts. If the
seat belt becomes wrapped around a
child’s")
∙ Do not allow children to play with theseat belts. Most seating positions are
equipped with Automatic Locking Re-
tractor (ALR) mode seat belts. If the
seat belt becomes wrapped around a
child’s neck with the ALR mode acti-
vated, the child can be seriously in-
jured or killed if the seat belt retracts
and becomes tight. This can occur
even if the vehicle is parked. Unbuckle
the seat belt to release the child. If the
seat belt cannot be unbuckled or is
already unbuckled, release the child
by cutting the seat belt with a suitable
tool (such as a knife or scissors) to
release the seat belt.
Fastening the seat belts
1. Adjust the seat. For additional informa- tion, refer to “Seats” in this section. 2. Slowly pull the seat belt out of the re-
tractor and insert the tongue into the
buckle�Auntil you hear and feel the
latch engage.
∙ The retractor is designed to lock
during a sudden stop or on impact.
A slow pulling motion permits the
seat belt to move, and allows you
some freedom of movement in the
seat.
∙ If the seat belt cannot be pulled
from its fully retracted position,
firmly pull the belt and release it.
Then smoothly pull the belt out of
the retractor.
Page 32 of 346

3. Position the lap belt portionlow and
snug on the hips
�Bas shown.
4. Pull the shoulder belt portion toward the retractor to take up extra slack
�C.
Be sure the shoulder belt is routed over
your shoulder and across your chest.
The front passenger seat and the rear
seating positions’ three-point seat belts
have two modes of operation: ∙ Emergency Locking Retractor (ELR)
∙ Automatic Locking Retractor (ALR) The ELR mode allows the seat belt to ex-
tend and retract to allow the driver and
passengers some freedom of movement
in the seat. The ELR locks the seat belt
when the vehicle slows down rapidly or
during certain impacts.
The ALR mode (child restraint mode) locks
the seat belt for child restraint installation.
When the ALR mode is activated, the seat
belt cannot be extended again until the
seat belt tongue is detached from the
buckle and fully retracted. The seat belt re-
turns to the ELR mode af ter the seat belt
fully retracts. For additional information, re-
fer to “Child restraints” in this section.
The ALR mode should be used only for
child restraint installation. During nor-
mal seat belt use by an occupant, the ALR
mode should not be activated. If it is ac-
tivated, it may cause uncomfortable seat
belt tension. It can also change the op-
eration of the front passenger air bag.
For additional information, refer to
“Front passenger air bag and status
light” in this section.
Page 36 of 346
Shoulder belt height adjustment
(front seats)
The shoulder belt anchor height should be
adjusted to the position best for you. For
additional information, refer to “Precau-
tions on seat belt usage” in this section. To
adjust, pull out the adjustment button
�1
and move the shoulder belt anchor to the
desired position
�2, so the belt passes over
the center of the shoulder. The belt should
be away from your face and neck, but not
falling off your shoulder. Release the ad-
justment button to lock the shoulder belt
anchor into position.
Page 81 of 346
Repair and replacement
procedure
The front air bags, side air bags, curtain air
bags and pretensioner(s) are designed to
inflate on a one-time-only basis. As a re-
minder, unless it is damaged, the supple-
mental air bag warning light remains illu-
minated af ter inflation has occurred. These
systems should be repaired and/or re-
placed as soon as possible. It is recom-
mended that you visit a NISSAN dealer for
this service.
When maintenance work is required on the
vehicle, the front air bags, side air bags,
curtain air bags, pretensioner(s) and re-
lated parts should be pointed out to the
person performing the maintenance. The
ignition switch should always be placed in
the LOCK position when working under the
hood or inside the vehicle.
Page 98 of 346
The windshield wiper and washer operates
when the ignition switch is in the ON posi-
tion.
Push the lever down to operate the wiper
at the following speed:
�1Intermittent (INT) — intermittent op-
eration can be adjusted by turning the
knob toward
�A(Slower) or�B(Faster).
�2Low (LO) — continuous low speed op-
eration
�3High (HI) — continuous high speed op-
eration
Push the lever up
�4to have one sweep
operation (MIST) of the wiper.
Pull the lever toward you
�5to operate the
washer. The wiper will also operate several
times.
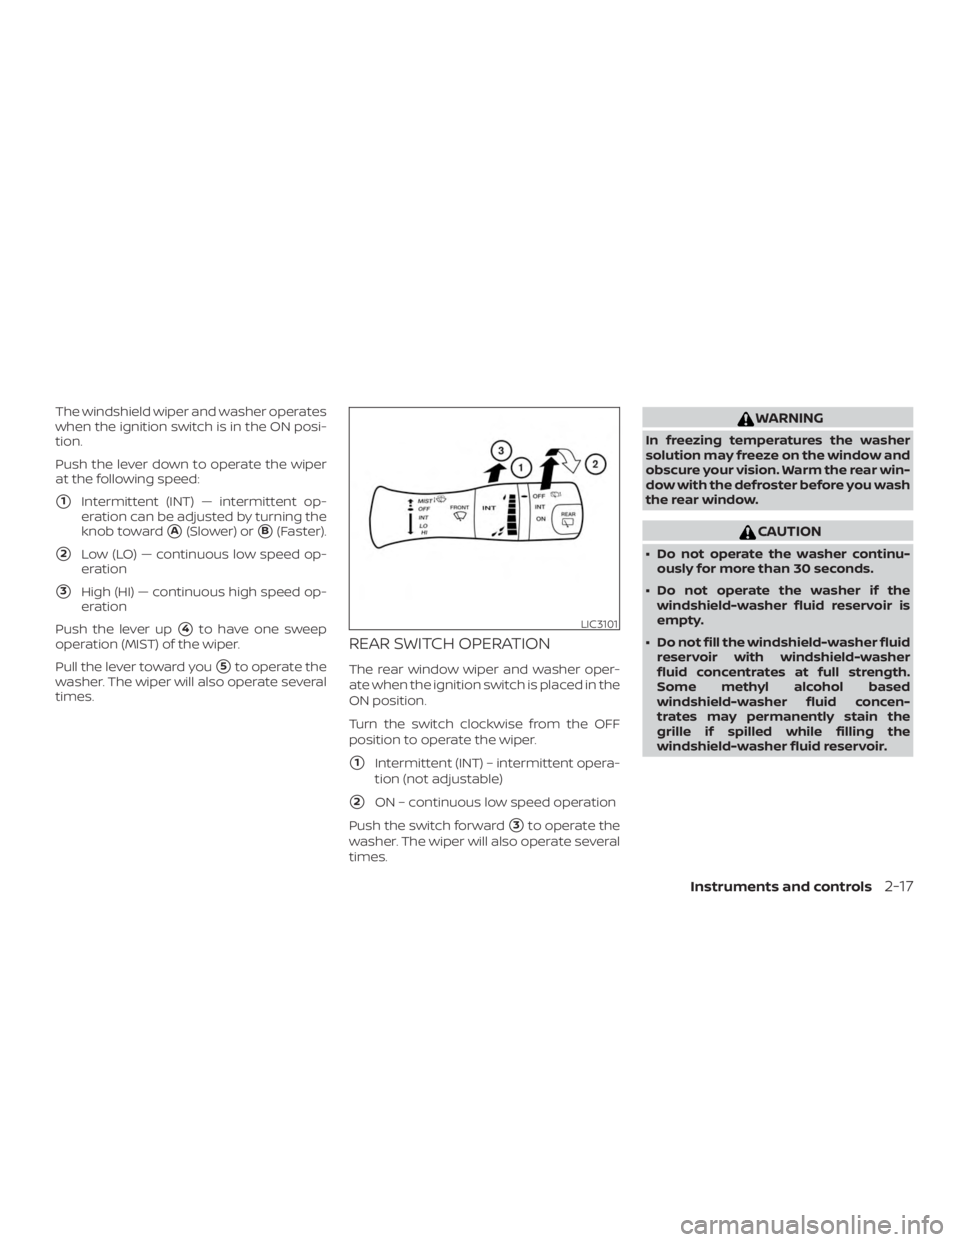
REAR SWITCH OPERATION
The rear window wiper and washer oper-
ate when the ignition switch is placed in the
ON position.
Turn the switch clockwise from the OFF
position to operate the wiper.
�1Intermittent (INT) – intermittent opera-
tion (not adjustable)
�2ON – continuous low speed operation
Push the switch forward
�3to operate the
washer. The wiper will also operate several
times.


The shoulder belt anchor height should be
adjusted to the position best for you. For
additional information, refer to “Precau-
tions on seat belt usage�")
 are designed to
inflate on a one-time-only basis. As a re-
minder, unless it is damaged, the su")